
Manuals
Page 1
User Guide Getting Started Printing Troubleshooting Replenishing and Replacing Consumables For information not in "Read This First" before you use , be sure to read the Safety Information in this machine and keep it handy for future reference. Read this manual carefully before using the machine. For safe and correct use this manual, refer to the HTML/PDF files on the supplied CD-ROM.
User Guide Getting Started Printing Troubleshooting Replenishing and Replacing Consumables For information not in "Read This First" before you use , be sure to read the Safety Information in this machine and keep it handy for future reference. Read this manual carefully before using the machine. For safe and correct use this manual, refer to the HTML/PDF files on the supplied CD-ROM.
Manuals
Page 3
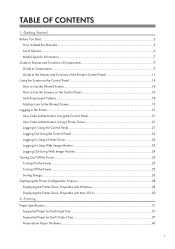
Getting Started Before You Start...5 How to Read the Manuals...5 List of Options...6 Model-Specific Information...7 Guide to Names and Functions of Components 9 Guide to Components...9 Guide to the Names and Functions of the Printer's ...
Getting Started Before You Start...5 How to Read the Manuals...5 List of Options...6 Model-Specific Information...7 Guide to Names and Functions of Components 9 Guide to Components...9 Guide to the Names and Functions of the Printer's ...
Manuals
Page 7
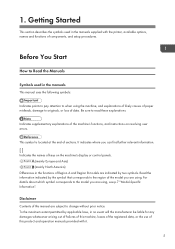
...the names of keys on resolving user errors. Be sure to change without prior notice. Read the information indicated by applicable laws, in the manuals supplied with it. 5 This symbol is located at the end of components, and setup procedures. Disclaimer Contents of data. 1. Getting Started ...functions, and instructions on the machine's display or control panels. (mainly Europe and Asia) (mainly North America) Differences in the manuals This manual uses the following symbols: Indicates points to pay attention to the model you are using. To the maximum extent permitted by the ...
...the names of keys on resolving user errors. Be sure to change without prior notice. Read the information indicated by applicable laws, in the manuals supplied with it. 5 This symbol is located at the end of components, and setup procedures. Disclaimer Contents of data. 1. Getting Started ...functions, and instructions on the machine's display or control panels. (mainly Europe and Asia) (mainly North America) Differences in the manuals This manual uses the following symbols: Indicates points to pay attention to the model you are using. To the maximum extent permitted by the ...
Manuals
Page 8
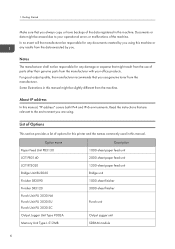
... your office products. Some illustrations in this machine or any documents created by you always copy or have backups of the data registered in this manual might be responsible for any damage or expense that might be responsible for this printer and the names commonly used in this... manual, "IP address" covers both IPv4 and IPv6 environments. Read the instructions that you use of parts other than genuine parts from the manufacturer with your ...
... your office products. Some illustrations in this machine or any documents created by you always copy or have backups of the data registered in this manual might be responsible for any damage or expense that might be responsible for this printer and the names commonly used in this... manual, "IP address" covers both IPv4 and IPv6 environments. Read the instructions that you use of parts other than genuine parts from the manufacturer with your ...
Manuals
Page 10
Getting Started If the label contains the following, your printer is a region A model: • CODE XXXX -22, -27 • 220-240 V (mainly North America) If the label contains the following, your printer is a Region B model, refer to the metric units. If your printer is a Region A model, refer to the inch units. 8 If your printer is a region B model: • CODE XXXX -17 • 120-127 V • Dimensions in this manual are given in two units of measure: metric and inch. 1.
Getting Started If the label contains the following, your printer is a region A model: • CODE XXXX -22, -27 • 220-240 V (mainly North America) If the label contains the following, your printer is a Region B model, refer to the metric units. If your printer is a Region A model, refer to the inch units. 8 If your printer is a region B model: • CODE XXXX -17 • 120-127 V • Dimensions in this manual are given in two units of measure: metric and inch. 1.
Manuals
Page 31
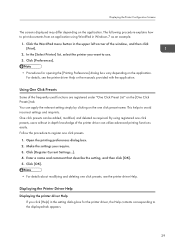
The following procedure explains how to print documents from an application using registered one click presets, see the printer driver Help or the manuals provided with the application. Click [Register Current Settings...]. 4. Enter a name and comment that describe the setting, and then click [OK]. 5. This helps to use. 3. Open ...
The following procedure explains how to print documents from an application using registered one click presets, see the printer driver Help or the manuals provided with the application. Click [Register Current Settings...]. 4. Enter a name and comment that describe the setting, and then click [OK]. 5. This helps to use. 3. Open ...

Manuals
Page 34
Printing Paper sizes requiring manual setting Paper weight Paper capacity Note Standard size: 11 × 17 , 81/2 × 14 , 81/2 × 13 , 81/2 × 11 , 81/4 × 14 , 81/4 × ...
Printing Paper sizes requiring manual setting Paper weight Paper capacity Note Standard size: 11 × 17 , 81/2 × 14 , 81/2 × 13 , 81/2 × 11 , 81/4 × 14 , 81/4 × ...

Manuals
Page 35
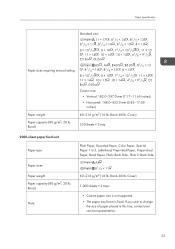
Cover) 80 g/m2 (20 lb. Paper Specification Paper sizes requiring manual setting Paper weight Paper capacity Note Standard size: 11 × 17 , 81/2 × 14 , 81/2 × 13 , 81/2 × 11 , 81/4 × 14 , 81/4 × ...
Cover) 80 g/m2 (20 lb. Paper Specification Paper sizes requiring manual setting Paper weight Paper capacity Note Standard size: 11 × 17 , 81/2 × 14 , 81/2 × 13 , 81/2 × 11 , 81/4 × 14 , 81/4 × ...

Manuals
Page 36
Printing Paper sizes requiring manual setting Paper weight Paper capacity Standard size: B4 JIS , B5 JIS , B6 JIS , 11 × 17 , 81/2 × 14 , 81/2 × 13 , 81/2 × 11 , ...
Printing Paper sizes requiring manual setting Paper weight Paper capacity Standard size: B4 JIS , B5 JIS , B6 JIS , 11 × 17 , 81/2 × 14 , 81/2 × 13 , 81/2 × 11 , ...
Manuals
Page 37
... lb. Cover) 1,000 sheets × 2 trays • Custom paper size is not supported. • The paper tray fence is fixed. Paper Specification Paper sizes requiring manual setting Paper weight Paper capacity (80 g/m2, 20 lb. If you wish to 3, Letterhead, Preprinted Paper, Prepunched Paper, Bond Paper, Thick: Back Side, Thick 2: Back...
... lb. Cover) 1,000 sheets × 2 trays • Custom paper size is not supported. • The paper tray fence is fixed. Paper Specification Paper sizes requiring manual setting Paper weight Paper capacity (80 g/m2, 20 lb. If you wish to 3, Letterhead, Preprinted Paper, Prepunched Paper, Bond Paper, Thick: Back Side, Thick 2: Back...
Manuals
Page 81
... down ... image again. • Using curled paper often causes misfeeds, soiled paper edges, or slipped positions while performing stack printing. multiple stored documents. See the manual for the shortcut image, see p.25 "Turning On/Off the Power". "The format of paper type, paper size, or paper capacity problems, use by another...
... down ... image again. • Using curled paper often causes misfeeds, soiled paper edges, or slipped positions while performing stack printing. multiple stored documents. See the manual for the shortcut image, see p.25 "Turning On/Off the Power". "The format of paper type, paper size, or paper capacity problems, use by another...
Manuals
Page 87
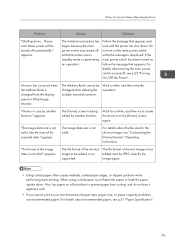
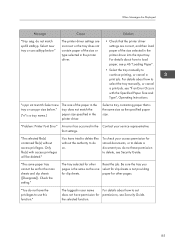
... an Error Occurs with access privileges will be set does not have permission to delete, see p.46 "Loading Paper". • Select the tray manually to select the tray manually, or cancel a print job, see Security Guide. For details about how to continue printing, or cancel a print job. When Messages Are Displayed Message...
... an Error Occurs with access privileges will be set does not have permission to delete, see p.46 "Loading Paper". • Select the tray manually to select the tray manually, or cancel a print job, see Security Guide. For details about how to continue printing, or cancel a print job. When Messages Are Displayed Message...
Manuals
Page 114
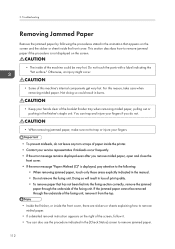
... to remove jammed paper. 112 You can also use the procedure indicated in the [Check Status] screen to the following the procedures stated in the manual. • Do not remove the fusing unit. Troubleshooting Removing Jammed Paper Remove the jammed paper by following : • When removing jammed paper, touch only those...
... to remove jammed paper. 112 You can also use the procedure indicated in the [Check Status] screen to the following the procedures stated in the manual. • Do not remove the fusing unit. Troubleshooting Removing Jammed Paper Remove the jammed paper by following : • When removing jammed paper, touch only those...


