Quick Start Guide
Page 1
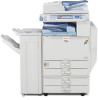
www.ricoh-usa.com Ricoh Product Line Segment 2 thru 6 MP/5000/5001, MP C5000/C6000/C6501, MP7000/8000, MP6001/7001, MP8001/9001, MP907EX This guide is not intended to replace your users manual, features and options will vary by machine type, model and finisher type installed.
www.ricoh-usa.com Ricoh Product Line Segment 2 thru 6 MP/5000/5001, MP C5000/C6000/C6501, MP7000/8000, MP6001/7001, MP8001/9001, MP907EX This guide is not intended to replace your users manual, features and options will vary by machine type, model and finisher type installed.
Troubleshooting Guide
Page 16
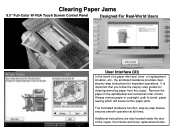
It is important that you follow the step by step guides for important operations. Always remove paper in the alphabetical and numerical order shown. Additional instructions are also located inside the door of a paper mis-feed, ... clear, step-by -step feature ensures smooth operation at all times. Clearing Paper Jams 8.5" Full-Color W-VGA Touch Screen Control Panel Designed For Real-World Users User Interface (UI) In the event of the copier, the finisher and toner replacement bottle. Remove the paper in a straight path to avoid paper tearing which...
It is important that you follow the step by step guides for important operations. Always remove paper in the alphabetical and numerical order shown. Additional instructions are also located inside the door of a paper mis-feed, ... clear, step-by -step feature ensures smooth operation at all times. Clearing Paper Jams 8.5" Full-Color W-VGA Touch Screen Control Panel Designed For Real-World Users User Interface (UI) In the event of the copier, the finisher and toner replacement bottle. Remove the paper in a straight path to avoid paper tearing which...
User Guide
Page 10
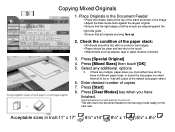
... trays, or select the size paper you must be output on the same size. Press [Start] 8. Place Originals in the image Adjust the Side Guide flush against the largest original. Ensure that the right edges of all the sheets are aligned against the right side... guide . Ensure that all originals are multiple paper sizes you want them all to normal copy mode ready for the next user. This will output al the default auto paper select. 6. If there are lying face...
... trays, or select the size paper you must be output on the same size. Press [Start] 8. Place Originals in the image Adjust the Side Guide flush against the largest original. Ensure that the right edges of all the sheets are aligned against the right side... guide . Ensure that all originals are multiple paper sizes you want them all to normal copy mode ready for the next user. This will output al the default auto paper select. 6. If there are lying face...


