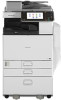

Manuals
Page 13
Using Web Image Monitor to the Address Book", Fax . I Want to Register Destinations I Want to Register Destinations BRL060S Using the control panel to register destinations in the machine to the LAN-Fax driver destination list See "Using the machine's Address Book as the LAN-Fax destination list", Fax . 11 See "Entering an E-mail Address Manually", Scan . Downloading destinations registered in the Address Book See "Registering Entered Destinations to register destinations from a computer See "Registering Internet Fax Destination Information Using Web Image Monitor", Fax .
Using Web Image Monitor to the Address Book", Fax . I Want to Register Destinations I Want to Register Destinations BRL060S Using the control panel to register destinations in the machine to the LAN-Fax driver destination list See "Using the machine's Address Book as the LAN-Fax destination list", Fax . 11 See "Entering an E-mail Address Manually", Scan . Downloading destinations registered in the Address Book See "Registering Entered Destinations to register destinations from a computer See "Registering Internet Fax Destination Information Using Web Image Monitor", Fax .
Manuals
Page 26
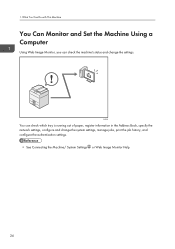
CJQ609 You can check the machine's status and change the system settings, manage jobs, print the job history, and configure the authentication settings. • See Connecting the Machine/ System Settings or Web Image Monitor Help. 24 What You Can Do with This Machine You Can Monitor and Set the Machine Using a Computer Using Web Image Monitor, you can check which tray is running out of paper, register information in the Address Book, specify the network settings, configure and change the settings. 1.
CJQ609 You can check the machine's status and change the system settings, manage jobs, print the job history, and configure the authentication settings. • See Connecting the Machine/ System Settings or Web Image Monitor Help. 24 What You Can Do with This Machine You Can Monitor and Set the Machine Using a Computer Using Web Image Monitor, you can check which tray is running out of paper, register information in the Address Book, specify the network settings, configure and change the settings. 1.
Manuals
Page 63
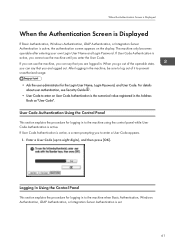
..., Windows Authentication, LDAP Authentication, or Integration Server Authentication is active, the authentication screen appears on User Code Authentication is the numerical value registered in the Address Book as "User Code". If you can use the machine until you are logged in. After logging in the machine, be sure to log out of...
..., Windows Authentication, LDAP Authentication, or Integration Server Authentication is active, the authentication screen appears on User Code Authentication is the numerical value registered in the Address Book as "User Code". If you can use the machine until you are logged in. After logging in the machine, be sure to log out of...

Manuals
Page 90
TX] is not highlighted. 4. When sending the same original to several destinations (broadcasting), specify the next destination. 88 Fax 3. Specify a destination. If you make a mistake, press the [Clear] key, and then enter again. 8. 4. Configure the transmission settings such as "TX Mode" as scan size and resolution. 6. Place the original into the ADF. 5. Make the scan settings such as necessary. 7. You can enter the destination's number or address directly or select from the Address Book by pressing the destination key. Make sure [Immed.
TX] is not highlighted. 4. When sending the same original to several destinations (broadcasting), specify the next destination. 88 Fax 3. Specify a destination. If you make a mistake, press the [Clear] key, and then enter again. 8. 4. Configure the transmission settings such as "TX Mode" as scan size and resolution. 6. Place the original into the ADF. 5. Make the scan settings such as necessary. 7. You can enter the destination's number or address directly or select from the Address Book by pressing the destination key. Make sure [Immed.

Manuals
Page 91
...]: Added to the list of items in the selected title. Registering a Fax Destination 1. Check that is selected. 4. Press [New Program]. 5. Press [Change] under "Name". Press [Address Book Management]. 3. Basic Procedure for each title. 8. Press [Fax Dest.]. 9. Press [Change] under "Fax Destination". 89 If you want to Internet Fax or e-mail destinations or...
...]: Added to the list of items in the selected title. Registering a Fax Destination 1. Check that is selected. 4. Press [New Program]. 5. Press [Change] under "Name". Press [Address Book Management]. 3. Basic Procedure for each title. 8. Press [Fax Dest.]. 9. Press [Change] under "Fax Destination". 89 If you want to Internet Fax or e-mail destinations or...
Manuals
Page 92
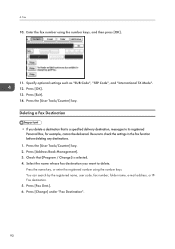
...a specified delivery destination, messages to its registered Personal Box, for example, cannot be delivered. Press [Change] under "Fax Destination". 90 Press [Address Book Management]. 3. Press the [User Tools/Counter] key. 2. You can search by the registered name, user code, fax number, folder name, e-mail... address, or IPFax destination. 5. Press [Exit]. 14. Press [Fax Dest.]. 6. Enter the fax number using the number keys. Press the [User ...
...a specified delivery destination, messages to its registered Personal Box, for example, cannot be delivered. Press [Change] under "Fax Destination". 90 Press [Address Book Management]. 3. Press the [User Tools/Counter] key. 2. You can search by the registered name, user code, fax number, folder name, e-mail... address, or IPFax destination. 5. Press [Exit]. 14. Press [Fax Dest.]. 6. Enter the fax number using the number keys. Press the [User ...
Manuals
Page 99
... documents in the preview. 2. A four to store documents. 97 If you do not, the top/bottom orientation of the original will be selected from the Address Book or entered manually. You can be displayed correctly in the machine.
... documents in the preview. 2. A four to store documents. 97 If you do not, the top/bottom orientation of the original will be selected from the Address Book or entered manually. You can be displayed correctly in the machine.

Manuals
Page 113
Also refer to "Registering Folders", Connecting the Machine/ System Settings , and register the address of the destination computer to Folder • Before performing this chapter, see Scan on the [Home] screen. CJS113 2. Place originals. 111 For the ...sure that no previous settings remain. Press the [Home] key on the top left of the destination computer. Basic Procedure When Using Scan to the address book. 1. If a previous setting remains, press the [Clear Modes] key. 3. Scan This chapter describes frequently used scanner functions and operations. 6. Press the [Folder]...
Also refer to "Registering Folders", Connecting the Machine/ System Settings , and register the address of the destination computer to Folder • Before performing this chapter, see Scan on the [Home] screen. CJS113 2. Place originals. 111 For the ...sure that no previous settings remain. Press the [Home] key on the top left of the destination computer. Basic Procedure When Using Scan to the address book. 1. If a previous setting remains, press the [Clear Modes] key. 3. Scan This chapter describes frequently used scanner functions and operations. 6. Press the [Folder]...
Manuals
Page 116
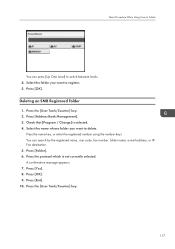
... appears. 6. Check that [Program / Change] is selected. 4. The keys you want to specify access privileges for the classification you can select are as follows: 1. Press [Address Book Management]. 3. 6. Right-click the folder created in the [Allow] column of results, select the groups and users you want to , and then click [OK]. 7. On...
... appears. 6. Check that [Program / Change] is selected. 4. The keys you want to specify access privileges for the classification you can select are as follows: 1. Press [Address Book Management]. 3. 6. Right-click the folder created in the [Allow] column of results, select the groups and users you want to , and then click [OK]. 7. On...
Manuals
Page 119
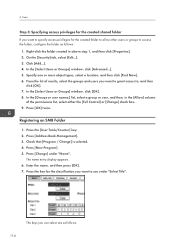
...[OK]. Press the [User Tools/Counter] key. 2. Check that [Program / Change] is not currently selected. Press [Folder]. 6. Press [OK]. 9. A confirmation message appears. 7. Press [Address Book Management]. 3. Press [Yes]. 8. Press the name key, or enter the registered number using the number keys. You can press [Up One Level] to switch between ...SMB Registered Folder 1. Basic Procedure When Using Scan to Folder You can search by the registered name, user code, fax number, folder name, e-mail address, or IPFax destination. 5. Press the protocol which is selected. 4.
...[OK]. Press the [User Tools/Counter] key. 2. Check that [Program / Change] is not currently selected. Press [Folder]. 6. Press [OK]. 9. A confirmation message appears. 7. Press [Address Book Management]. 3. Press [Yes]. 8. Press the name key, or enter the registered number using the number keys. You can press [Up One Level] to switch between ...SMB Registered Folder 1. Basic Procedure When Using Scan to Folder You can search by the registered name, user code, fax number, folder name, e-mail address, or IPFax destination. 5. Press the protocol which is selected. 4.
Manuals
Page 122
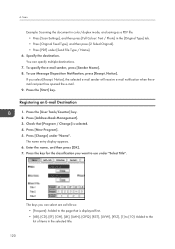
... for the classification you select [Recept. Press the [User Tools/Counter] key. 2. 6. Specify the destination. Registering an E-mail Destination 1. The name entry display appears. 6. Press [Address Book Management]. 3. To specify the e-mail sender, press [Sender Name]. 8. Notice], the selected e-mail sender will receive e-mail notification when the email recipient has opened the...
... for the classification you select [Recept. Press the [User Tools/Counter] key. 2. 6. Specify the destination. Registering an E-mail Destination 1. The name entry display appears. 6. Press [Address Book Management]. 3. To specify the e-mail sender, press [Sender Name]. 8. Notice], the selected e-mail sender will receive e-mail notification when the email recipient has opened the...
Manuals
Page 124
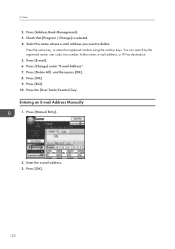
.... Press [Change] under "E-mail Address". 7. Press [Manual Entry]. 2. Press [Delete All], and then press [OK]. 8. Press [Exit]. 10. Enter the e-mail address. 3. 6. Press [E-mail]. 6. Press [OK]. 9. Select the name whose e-mail address you want to delete. You can... search by the registered name, user code, fax number, folder name, e-mail address, or IP-Fax destination. 5. Scan 2. Check that [Program / Change] is selected. 4. Press the [User Tools/Counter] key. Press [OK]. 122 Entering an E-mail Address Manually 1. Press [Address Book...
.... Press [Change] under "E-mail Address". 7. Press [Manual Entry]. 2. Press [Delete All], and then press [OK]. 8. Press [Exit]. 10. Enter the e-mail address. 3. 6. Press [E-mail]. 6. Press [OK]. 9. Select the name whose e-mail address you want to delete. You can... search by the registered name, user code, fax number, folder name, e-mail address, or IP-Fax destination. 5. Scan 2. Check that [Program / Change] is selected. 4. Press the [User Tools/Counter] key. Press [OK]. 122 Entering an E-mail Address Manually 1. Press [Address Book...
Manuals
Page 129
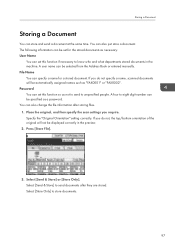
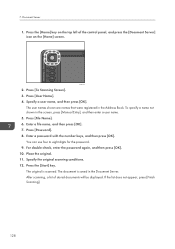
..., make sure that stored the documents. File Name A file name such as "COPY0001" and "COPY0002" is to a stored document in the Address Book, or enter the name directly. Storing Data This section describes the procedure for the documents, the key icon appears on the supplied CD-ROM....the [Reset] key to cancel the document selection. • The user name registered to identify the document creator and type. For details about the Address Book, see Copy/ Document Server on the left side of [User Name]. Depending on the Document Server. • A document accessed with a correct ...
..., make sure that stored the documents. File Name A file name such as "COPY0001" and "COPY0002" is to a stored document in the Address Book, or enter the name directly. Storing Data This section describes the procedure for the documents, the key icon appears on the supplied CD-ROM....the [Reset] key to cancel the document selection. • The user name registered to identify the document creator and type. For details about the Address Book, see Copy/ Document Server on the left side of [User Name]. Depending on the Document Server. • A document accessed with a correct ...
Manuals
Page 130
... be displayed. Specify a user name, and then press [OK]. Document Server 1. Press [User Name]. 4. The user names shown are names that were registered in the Address Book. If the list does not appear, press [Finish Scanning]. 128 Press [Password]. 8. Place the original. 11. The original is saved in the screen, press [Manual...
... be displayed. Specify a user name, and then press [OK]. Document Server 1. Press [User Name]. 4. The user names shown are names that were registered in the Address Book. If the list does not appear, press [Finish Scanning]. 128 Press [Password]. 8. Place the original. 11. The original is saved in the screen, press [Manual...
Manuals
Page 135
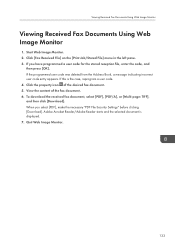
If the programmed user code was deleted from the Address Book, a message indicating incorrect user code entry appears. View the content of the desired fax document. 5. To download the received fax document, select [PDF], [PDF/A], or [...
If the programmed user code was deleted from the Address Book, a message indicating incorrect user code entry appears. View the content of the desired fax document. 5. To download the received fax document, select [PDF], [PDF/A], or [...

Manuals
Page 176
Follow the message that appears. An error has occurred when the Address Book is in standby mode or performing an operation. The Address Book cannot be canceled. • For details about specifying print volume limits, see Security Guide . • To view the status of A3 . multiple stored documents. The ...
Follow the message that appears. An error has occurred when the Address Book is in standby mode or performing an operation. The Address Book cannot be canceled. • For details about specifying print volume limits, see Security Guide . • To view the status of A3 . multiple stored documents. The ...
Manuals
Page 205
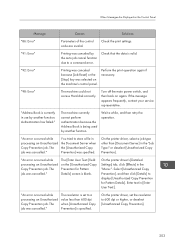
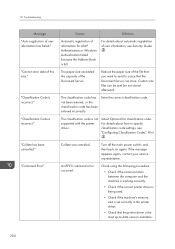
...or higher, or deselect [Unauthorized Copy Prevention]. 203 The job was cancelled." The machine currently cannot perform authentication because the Address Book is set the resolution to display [Unauthorized Copy Prevention for Pattern Details] screen is specified. "An error occurred while ...cancelled." When Messages Are Displayed on the machine's control panel. Check the print settings. "91: Error" Printing was cancelled." "Address Book is valid. The job was canceled by another function. You tried to a value less than [Document Server] in the Document Server...
...or higher, or deselect [Unauthorized Copy Prevention]. 203 The job was cancelled." The machine currently cannot perform authentication because the Address Book is set the resolution to display [Unauthorized Copy Prevention for Pattern Details] screen is specified. "An error occurred while ...cancelled." When Messages Are Displayed on the machine's control panel. Check the print settings. "91: Error" Printing was cancelled." "Address Book is valid. The job was canceled by another function. You tried to a value less than [Document Server] in the Document Server...
Manuals
Page 206
... driver. • Check that the Document Server can be sent but not stored afterward. Select Optional for LDAP Authentication or Windows Authentication failed because the Address Book is not supported with the printer driver. The classification code is full.
... driver. • Check that the Document Server can be sent but not stored afterward. Select Optional for LDAP Authentication or Windows Authentication failed because the Address Book is not supported with the printer driver. The classification code is full.
Manuals
Page 237
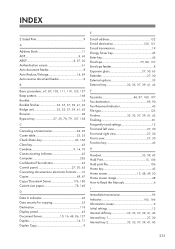
INDEX 2 Sided Print 9 A Address Book 11 ADF 8, 63 ARDF 8, 27, 30 Authentication screen 61 Auto document feeder 8 Auto Reduce/Enlarge 14, 69 Auto reverse document feeder 8 B Basic procedure. .67, 87, ... indicator 45 Data security for copying 25 Destination 118 Display panel 45 Document Server 10, 16, 48, 86, 127 Duplex 14, 71 Duplex Copy 9 E E-mail address 122 E-mail destination 120, 121 E-mail transmission 19 Energy Saver key 45 Enter key 45 Envelope 79, 80, 157 Envelope feeder 8 Exposure glass 27, 30...
INDEX 2 Sided Print 9 A Address Book 11 ADF 8, 63 ARDF 8, 27, 30 Authentication screen 61 Auto document feeder 8 Auto Reduce/Enlarge 14, 69 Auto reverse document feeder 8 B Basic procedure. .67, 87, ... indicator 45 Data security for copying 25 Destination 118 Display panel 45 Document Server 10, 16, 48, 86, 127 Duplex 14, 71 Duplex Copy 9 E E-mail address 122 E-mail destination 120, 121 E-mail transmission 19 Energy Saver key 45 Enter key 45 Envelope 79, 80, 157 Envelope feeder 8 Exposure glass 27, 30...


