
Network Guide
Page 5
...authentication is set 38 About Menu and Mode 39 Access in the Administrator Mode 41 Displaying Web Image Monitor Help 41 Using SmartDeviceMonitor for Admin 42 Installing SmartDeviceMonitor for Client 24 Using NetWare ...25 Setting Up as a Print Server (NetWare 3.x 26 Setting Up as a Print ... Printer (NetWare 4.x, 5 / 5.1, 6 / 6.5 32 2. Using a Printer Server Preparing Printer Server 23 Printing notification via SmartDeviceMonitor for Admin 43 Changing the Network Interface Board Configuration 43 Locking the Menus on a Network 2 Initial Settings Overview 2 Initial Settings...5 1.
...authentication is set 38 About Menu and Mode 39 Access in the Administrator Mode 41 Displaying Web Image Monitor Help 41 Using SmartDeviceMonitor for Admin 42 Installing SmartDeviceMonitor for Client 24 Using NetWare ...25 Setting Up as a Print Server (NetWare 3.x 26 Setting Up as a Print ... Printer (NetWare 4.x, 5 / 5.1, 6 / 6.5 32 2. Using a Printer Server Preparing Printer Server 23 Printing notification via SmartDeviceMonitor for Admin 43 Changing the Network Interface Board Configuration 43 Locking the Menus on a Network 2 Initial Settings Overview 2 Initial Settings...5 1.

Network Guide
Page 33
...IPv6 cannnot be used on . • When using the machine as a "print server" or "re- print server ronments: A Installing SmartDeviceMonitor for Admin • NDS mode in Windows 95/ 98/Me B Setting the network interface board. • NDS or Bindery mode in Windows 2000/XP, Windows...name. ❒ The procedure is required to the network. To use the machine in the NetWare environment. Reference p.43 "Installing SmartDeviceMonitor for Admin" ❖ Printers listed by Novell is explained with the following envi- D Starting the print server. B Setting the network interface board....
...IPv6 cannnot be used on . • When using the machine as a "print server" or "re- print server ronments: A Installing SmartDeviceMonitor for Admin • NDS mode in Windows 95/ 98/Me B Setting the network interface board. • NDS or Bindery mode in Windows 2000/XP, Windows...name. ❒ The procedure is required to the network. To use the machine in the NetWare environment. Reference p.43 "Installing SmartDeviceMonitor for Admin" ❖ Printers listed by Novell is explained with the following envi- D Starting the print server. B Setting the network interface board....
Network Guide
Page 50
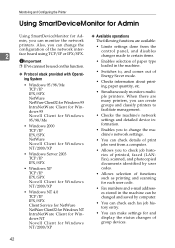
... and detailed device information. • Enables you can change the machine's network settings. NT/2000/XP 42 Monitoring and Configuring the Printer Using SmartDeviceMonitor for Admin Using SmartDeviceMonitor for Ad- ❖ Available operations min, you to check job histories of printed, faxed (LANFax), scanned, and photocopied documents identified by computer. •...
... and detailed device information. • Enables you can change the machine's network settings. NT/2000/XP 42 Monitoring and Configuring the Printer Using SmartDeviceMonitor for Admin Using SmartDeviceMonitor for Ad- ❖ Available operations min, you to check job histories of printed, faxed (LANFax), scanned, and photocopied documents identified by computer. •...
Network Guide
Page 51
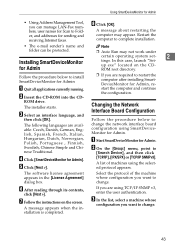
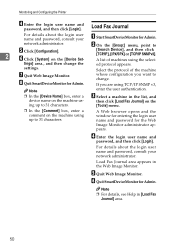
...Simple and Chinese Traditional. The installer starts. B On the [Group:] menu, point to change the network interface board configuration using SmartDeviceMonitor for Admin Note ❒ Auto Run may appear. A message about restarting the computer may not work under certain operating system set- 2 tings. ...In this case, launch "Set- F After reading through its contents, click [Next >]. Installing SmartDeviceMonitor for Admin. Follow the procedure below to [Search Device], and then click [TCP/IP], [IPX/SPX] or [TCP/IP SNMPv3]. G Follow the ...
...Simple and Chinese Traditional. The installer starts. B On the [Group:] menu, point to change the network interface board configuration using SmartDeviceMonitor for Admin Note ❒ Auto Run may appear. A message about restarting the computer may not work under certain operating system set- 2 tings. ...In this case, launch "Set- F After reading through its contents, click [Next >]. Installing SmartDeviceMonitor for Admin. Follow the procedure below to [Search Device], and then click [TCP/IP], [IPX/SPX] or [TCP/IP SNMPv3]. G Follow the ...
Network Guide
Page 52
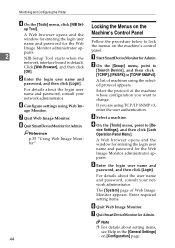
... and then click [Login]. For details about the login user name and password, consult your network administrator. H Quit SmartDeviceMonitor for Admin. A Start SmartDeviceMonitor for Admin. A list of machines using Web Im- If you want to lock the menus on the machine's control panel. G Quit ... On the [Group:] menu, point to [De- A Web browser opens and the window for entering the login user name and password for Admin. pears. 2 NIB Setup Tool starts when the network interface board is default. age Monitor. Reference p.35 "Using Web Image Monitor" 44 Locking...
... and then click [Login]. For details about the login user name and password, consult your network administrator. H Quit SmartDeviceMonitor for Admin. A Start SmartDeviceMonitor for Admin. A list of machines using Web Im- If you want to lock the menus on the machine's control panel. G Quit ... On the [Group:] menu, point to [De- A Web browser opens and the window for entering the login user name and password for Admin. pears. 2 NIB Setup Tool starts when the network interface board is default. age Monitor. Reference p.35 "Using Web Image Monitor" 44 Locking...
Network Guide
Page 53
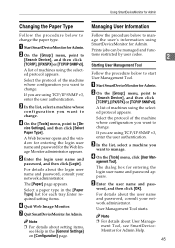
...Follow the procedure below to change . The dialog box for Admin. Select the protocol of machines using SmartDeviceMonitor for Admin. A Web browser opens and the window for entering the login user name and password for Admin Help. 45 E Enter the login user name and password,... [Group:] menu, point to change the paper type. vice Settings], and then click [Select Paper Type]. A Start SmartDeviceMonitor for Admin Changing the Paper Type Follow the procedure below to manage the user's information using the selected protocol appears. For details about User Manage...
...Follow the procedure below to change . The dialog box for Admin. Select the protocol of machines using SmartDeviceMonitor for Admin. A Web browser opens and the window for entering the login user name and password for Admin Help. 45 E Enter the login user name and password,... [Group:] menu, point to change the paper type. vice Settings], and then click [Select Paper Type]. A Start SmartDeviceMonitor for Admin Changing the Paper Type Follow the procedure below to manage the user's information using the selected protocol appears. For details about User Manage...
Network Guide
Page 55
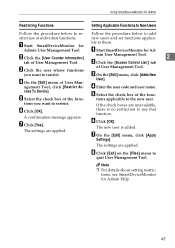
... If the check boxes are applied. G Click [Yes]. G On the [Edit] menu, click [Apply Settings]. Using SmartDeviceMonitor for Admin Restricting Functions Setting Applicable Functions to New Users Follow the procedure below to restrict. new users and set functions applica- A Start SmartDeviceMonitor for... Admin User Management Tool. User]. D Enter the user code and user name. F Click [OK]. The new user is no restriction...
... If the check boxes are applied. G Click [Yes]. G On the [Edit] menu, click [Apply Settings]. Using SmartDeviceMonitor for Admin Restricting Functions Setting Applicable Functions to New Users Follow the procedure below to restrict. new users and set functions applica- A Start SmartDeviceMonitor for... Admin User Management Tool. User]. D Enter the user code and user name. F Click [OK]. The new user is no restriction...
Network Guide
Page 56
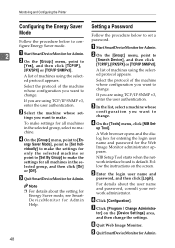
.... Follow the instructions on the [Device Settings] area, and then change . For details about the setting for Energy Saver mode, see SmartDeviceMonitor for Admin Help. 48 Setting a Password Follow the procedure below to [Yes], and then click [TCP/IP], [IPX/SPX] or [TCP/IP SNMPv3]....selected group, and then click [On] or [Off]. B On the [Group:] menu, point to configure Energy Saver mode. 2 A Start SmartDeviceMonitor for Admin. C Select the machine whose configuration you want to [Search Device], and then click [TCP/IP], [IPX/SPX] or [TCP/IP SNMPv3]. tings ...
.... Follow the instructions on the [Device Settings] area, and then change . For details about the setting for Energy Saver mode, see SmartDeviceMonitor for Admin Help. 48 Setting a Password Follow the procedure below to [Yes], and then click [TCP/IP], [IPX/SPX] or [TCP/IP SNMPv3]....selected group, and then click [On] or [Off]. B On the [Group:] menu, point to configure Energy Saver mode. 2 A Start SmartDeviceMonitor for Admin. C Select the machine whose configuration you want to [Search Device], and then click [TCP/IP], [IPX/SPX] or [TCP/IP SNMPv3]. tings ...
Network Guide
Page 57
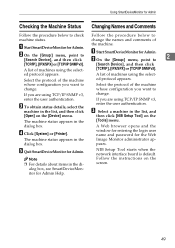
...49 Follow the instructions on the The machine status appears in the [Tools] menu. change . A list of A Start SmartDeviceMonitor for Admin. whose configuration you are using TCP/IP SNMP v3, change the names and comments of machines using the select- NIB Setup Tool ...starts when the network interface board is default. A Start SmartDeviceMonitor for Admin. pears. ed protocol appears. enter the user authentication. dialog box. window for entering the login user name and password for the...
...49 Follow the instructions on the The machine status appears in the [Tools] menu. change . A list of A Start SmartDeviceMonitor for Admin. whose configuration you are using TCP/IP SNMP v3, change the names and comments of machines using the select- NIB Setup Tool ...starts when the network interface board is default. A Start SmartDeviceMonitor for Admin. pears. ed protocol appears. enter the user authentication. dialog box. window for entering the login user name and password for the...
Network Guide
Page 58
... the machine G Quit Web Image Monitor. A Web browser opens and the window for entering the login user name and password for Admin. Select the protocol of machines using up to change the ed protocol appears. If you want to 31 characters. For details about ...and password, consult your network administrator. Note ❒ For details, see Help in the Web Image Monitor. settings. F Quit SmartDeviceMonitor for Admin. Monitoring and Configuring the Printer D Enter the login user name and password, and then click [Login]. tings] area., and then change . ...
... the machine G Quit Web Image Monitor. A Web browser opens and the window for entering the login user name and password for Admin. Select the protocol of machines using up to change the ed protocol appears. If you want to 31 characters. For details about ...and password, consult your network administrator. Note ❒ For details, see Help in the Web Image Monitor. settings. F Quit SmartDeviceMonitor for Admin. Monitoring and Configuring the Printer D Enter the login user name and password, and then click [Login]. tings] area., and then change . ...
Network Guide
Page 59
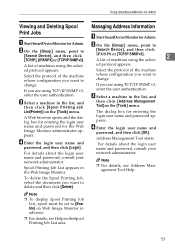
... Job List, spool must be set to change . enter the user authentication. Address Management Tool starts. Using SmartDeviceMonitor for Admin Viewing and Deleting Spool Managing Address Information Print Jobs A Start SmartDeviceMonitor for Admin. To delete the Spool Printing Job, select the document you want to [Search Device], and then click [TCP/IP...
... Job List, spool must be set to change . enter the user authentication. Address Management Tool starts. Using SmartDeviceMonitor for Admin Viewing and Deleting Spool Managing Address Information Print Jobs A Start SmartDeviceMonitor for Admin. To delete the Spool Printing Job, select the document you want to [Search Device], and then click [TCP/IP...

Network Guide
Page 67
... Using telnet changes, enter "return" at a time can log on the model type. A Use the IP address or the host name of Web Image Monitor admin- For user code authentication, enter a user code in User Name. 59 is allowed to use telnet. saving the changes appears. Remote Maintenance by telnet Remote...
... Using telnet changes, enter "return" at a time can log on the model type. A Use the IP address or the host name of Web Image Monitor admin- For user code authentication, enter a user code in User Name. 59 is allowed to use telnet. saving the changes appears. Remote Maintenance by telnet Remote...
Network Guide
Page 83
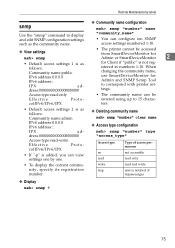
...settings such as the community name. ❖ View settings msh> snmp • Default access settings 1 is as follows: Community name:admin IPv4 address:0.0.0.0 IPv6 address::: IPX ad- Remote Maintenance by one. ❖ Deleting community name msh> snmp "number" clear name &#...set- read -only Effective Proto- col:IPv4/IPv6/IPX "community_name" • You can be accessed from SmartDeviceMonitor for Admin or SmartDeviceMonitor 2 for Admin and SNMP Setup Tool to 15 characters. • Default access settings 2 is as follows: Community name:public IPv4 address...
...settings such as the community name. ❖ View settings msh> snmp • Default access settings 1 is as follows: Community name:admin IPv4 address:0.0.0.0 IPv6 address::: IPX ad- Remote Maintenance by one. ❖ Deleting community name msh> snmp "number" clear name &#...set- read -only Effective Proto- col:IPv4/IPv6/IPX "community_name" • You can be accessed from SmartDeviceMonitor for Admin or SmartDeviceMonitor 2 for Admin and SNMP Setup Tool to 15 characters. • Default access settings 2 is as follows: Community name:public IPv4 address...
Network Guide
Page 93
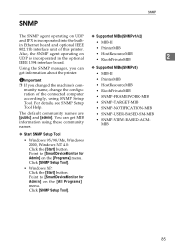
...[SNMP Setup Tool]. 85 You can ❖ Supported MIBs(SNMPv3) get MIB information using SNMP Setup Tool. Point to [SmartDeviceMonitor for Admin] on the [All Programs] menu. For details, see SNMP Setup Tool Help. • HostResourceMIB • RicohPrivateMIB • SNMP-...SNMP-TARGET-MIB • SNMP-NOTIFICATION-MIB The default community names are [public] and [admin]. Click [SNMP Setup Tool]. • Windows XP: Click the [Start] button. Point to [SmartDeviceMonitor for Admin] on UDP is incorporated in the optional • HostResourceMIB • RicohPrivateMIB 2 IEEE ...
...[SNMP Setup Tool]. 85 You can ❖ Supported MIBs(SNMPv3) get MIB information using SNMP Setup Tool. Point to [SmartDeviceMonitor for Admin] on the [All Programs] menu. For details, see SNMP Setup Tool Help. • HostResourceMIB • RicohPrivateMIB • SNMP-...SNMP-TARGET-MIB • SNMP-NOTIFICATION-MIB The default community names are [public] and [admin]. Click [SNMP Setup Tool]. • Windows XP: Click the [Start] button. Point to [SmartDeviceMonitor for Admin] on UDP is incorporated in the optional • HostResourceMIB • RicohPrivateMIB 2 IEEE ...
Network Guide
Page 137
S set, 72 Setting a Password, 48 Setting Up as a Print Server, 26, 27, 28 Setting Up as a Remote Printer, 30, 32 Setup, 113 show, 74 slp, 74 SmartDeviceMonitor for Admin, 43 smb, 74 SNMP, 85 snmp, 75 sntp, 77 specifications, 126 spoolsw, 78 status, 79 syslog, 79 T TCP/IP address, 68 telnet, 59, 61, 84 Types of Menu Configuration and Mode, 39 U Using a Host Name Instead of an IP Address, 113 W Web Image Monitor, 35 WINS, 84 129
S set, 72 Setting a Password, 48 Setting Up as a Print Server, 26, 27, 28 Setting Up as a Remote Printer, 30, 32 Setup, 113 show, 74 slp, 74 SmartDeviceMonitor for Admin, 43 smb, 74 SNMP, 85 snmp, 75 sntp, 77 specifications, 126 spoolsw, 78 status, 79 syslog, 79 T TCP/IP address, 68 telnet, 59, 61, 84 Types of Menu Configuration and Mode, 39 U Using a Host Name Instead of an IP Address, 113 W Web Image Monitor, 35 WINS, 84 129
PostScript Supplement
Page 97
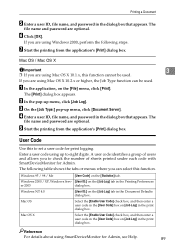
... and password in the dialog box that appears. User Code Use this to check the number of sheets printed under each code with SmartDeviceMonitor for Admin. Windows NT 4.0 [User ID:] on [Job Log] in the Document Defaults dialog box. The file name and password are optional. Mac ...Reference For details about using Mac OS X 10.1.x, this function. Mac OS / Mac OS X Important 3 ❒ If you to set a user code for Admin, see Help. 89 The [Print] dialog box appears. B In the pop-up menu, click [Document Server]. E Start the printing from the application's [Print...
... and password in the dialog box that appears. User Code Use this to check the number of sheets printed under each code with SmartDeviceMonitor for Admin. Windows NT 4.0 [User ID:] on [Job Log] in the Document Defaults dialog box. The file name and password are optional. Mac ...Reference For details about using Mac OS X 10.1.x, this function. Mac OS / Mac OS X Important 3 ❒ If you to set a user code for Admin, see Help. 89 The [Print] dialog box appears. B In the pop-up menu, click [Document Server]. E Start the printing from the application's [Print...

Facsimile Reference
Page 10
... of the LAN-Fax....257 Editing Fax Cover Sheets 258 Creating a cover sheet 258 Attaching a created cover sheet 259 Managing Facsimile Functions Using SmartDeviceMonitor for Admin 260 LAN-Fax Operation Messages 260 Viewing Fax Information Using a Web Browser 261 Viewing, Printing, and Deleting Received Fax Documents Using a Web Image Monitor...261...
... of the LAN-Fax....257 Editing Fax Cover Sheets 258 Creating a cover sheet 258 Attaching a created cover sheet 259 Managing Facsimile Functions Using SmartDeviceMonitor for Admin 260 LAN-Fax Operation Messages 260 Viewing Fax Information Using a Web Browser 261 Viewing, Printing, and Deleting Received Fax Documents Using a Web Image Monitor...261...

Facsimile Reference
Page 92
... can also register programmed fax numbers, e-mail addresses, IP-Fax destinations, and folder destinations in the Address Book using Web Image Monitor or SmartDeviceMonitor for Admin.
... can also register programmed fax numbers, e-mail addresses, IP-Fax destinations, and folder destinations in the Address Book using Web Image Monitor or SmartDeviceMonitor for Admin.

Facsimile Reference
Page 262
...this machine increases, the message may differ from the LAN-Fax Driver via Computer Checking Transmission Using LAN-Fax Driver From "SmartDeviceMonitor for Admin", "SmartDeviceMonitor for Client", or Web Image Monitor, you have done [Send] or [Send & Print] using LAN-Fax Driver. ...appear during communication between this machine and a computer. C Enter the destination. In that case, refer to the differences in "SmartDeviceMonitor for Admin". However, if the volume of the Destination key in the [Specify destinations] field. When entering the e-mail address directly, click the ...
...this machine increases, the message may differ from the LAN-Fax Driver via Computer Checking Transmission Using LAN-Fax Driver From "SmartDeviceMonitor for Admin", "SmartDeviceMonitor for Client", or Web Image Monitor, you have done [Send] or [Send & Print] using LAN-Fax Driver. ...appear during communication between this machine and a computer. C Enter the destination. In that case, refer to the differences in "SmartDeviceMonitor for Admin". However, if the volume of the Destination key in the [Specify destinations] field. When entering the e-mail address directly, click the ...
Facsimile Reference
Page 267
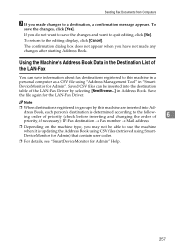
... Note ❒ When destinations registered in groups by selecting [New/Browse...] in a personal computer as a CSV file using SmartDeviceMonitor for Admin) that contain user codes. ❒ For details, see "SmartDeviceMonitor for Admin" Help. 257 If you do not want to save the changes and want to use the machine when it is...LAN-Fax Driver. To return to the editing display, click [Cancel]. Saved CSV files can save the changes, click [Yes]. Save the file again for Admin". To save information about fax destinations registered to a destination, a confirmation message appears.
... Note ❒ When destinations registered in groups by selecting [New/Browse...] in a personal computer as a CSV file using SmartDeviceMonitor for Admin) that contain user codes. ❒ For details, see "SmartDeviceMonitor for Admin" Help. 257 If you do not want to save the changes and want to use the machine when it is...LAN-Fax Driver. To return to the editing display, click [Cancel]. Saved CSV files can save the changes, click [Yes]. Save the file again for Admin". To save information about fax destinations registered to a destination, a confirmation message appears.


