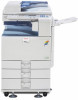
Troubleshooting Guide
Page 1
For safe and correct use, be sure to read the Safety Information in "About This Machine" before you use this manual carefully before using the machine. Operating Instructions Troubleshooting 1 When the Machine Does Not Operate As Wanted 2 Troubleshooting When Using the Copy Function 3 Troubleshooting When Using the Facsimile Function 4 Troubleshooting When Using the Printer Function 5 Troubleshooting When Using the Scanner Function 6 Adding Paper and Replacing Toner 7 Clearing Misfeeds 8 Remarks Read this machine and keep it handy for future reference.
For safe and correct use, be sure to read the Safety Information in "About This Machine" before you use this manual carefully before using the machine. Operating Instructions Troubleshooting 1 When the Machine Does Not Operate As Wanted 2 Troubleshooting When Using the Copy Function 3 Troubleshooting When Using the Facsimile Function 4 Troubleshooting When Using the Printer Function 5 Troubleshooting When Using the Scanner Function 6 Adding Paper and Replacing Toner 7 Clearing Misfeeds 8 Remarks Read this machine and keep it handy for future reference.
Troubleshooting Guide
Page 2
...your local dealer. For details about power source, see "Machine Types", About This Machine.) • Type 1: MP 1600/Aficio MP 1600/IS 2316 • Type 2: MP 2000/Aficio MP 2000/IS 2320 Certain types might result in the following pages. Introduction This manual contains detailed instructions and notes ...on which country you use genuine toner from the use of this machine. For details, please contact your machine...
...your local dealer. For details about power source, see "Machine Types", About This Machine.) • Type 1: MP 1600/Aficio MP 1600/IS 2316 • Type 2: MP 2000/Aficio MP 2000/IS 2320 Certain types might result in the following pages. Introduction This manual contains detailed instructions and notes ...on which country you use genuine toner from the use of this machine. For details, please contact your machine...
Troubleshooting Guide
Page 3
... to this manual for explanations on how to connect the machine. ❖ Troubleshooting Provides a guide to solving common problems, and explains how to replace paper, toner, and other consumables. ❖ Security Reference This manual is for registering administrators, as well as setting user and administrator authentication. ❖ Copy Reference Explains Copier...
... to this manual for explanations on how to connect the machine. ❖ Troubleshooting Provides a guide to solving common problems, and explains how to replace paper, toner, and other consumables. ❖ Security Reference This manual is for registering administrators, as well as setting user and administrator authentication. ❖ Copy Reference Explains Copier...

Troubleshooting Guide
Page 6
...When a Message Is Displayed on the Display Panel 56 When a Message Is Displayed on the Client Computer 60 6. Adding Paper and Replacing Toner Loading Paper ...65 Loading Paper into the Paper Trays 65 Loading Paper into the Optional Paper Tray Unit 67 Orientation-Fixed Paper or Two-... Size in the Paper Tray 71 Changing a Paper Size in the Optional Paper Tray Unit 79 Adding Toner...84 Replacing Toner...85 Sending Fax Messages When Toner Has Run Out 86 Waste Toner...86 Replacing the Transmission Stamp Cartridge 87 7. Troubleshooting When Using the Scanner Function When Scanning Is Not ...
...When a Message Is Displayed on the Display Panel 56 When a Message Is Displayed on the Client Computer 60 6. Adding Paper and Replacing Toner Loading Paper ...65 Loading Paper into the Paper Trays 65 Loading Paper into the Optional Paper Tray Unit 67 Orientation-Fixed Paper or Two-... Size in the Paper Tray 71 Changing a Paper Size in the Optional Paper Tray Unit 79 Adding Toner...84 Replacing Toner...85 Sending Fax Messages When Toner Has Run Out 86 Waste Toner...86 Replacing the Transmission Stamp Cartridge 87 7. Troubleshooting When Using the Scanner Function When Scanning Is Not ...

Troubleshooting Guide
Page 9
... explains the indicators that are applicable to remove misfed paper, add paper, or perform other procedures. See p.84 "Adding Toner". 3 1. Appears when paper-out condition occurs. h: Error indicator B: Load Paper indicator D: Add Toner indicator Appears when there is a misfeed, a cover is left open, or another problem occurs. When the Machine Does Not...
... explains the indicators that are applicable to remove misfed paper, add paper, or perform other procedures. See p.84 "Adding Toner". 3 1. Appears when paper-out condition occurs. h: Error indicator B: Load Paper indicator D: Add Toner indicator Appears when there is a misfeed, a cover is left open, or another problem occurs. When the Machine Does Not...
Troubleshooting Guide
Page 10
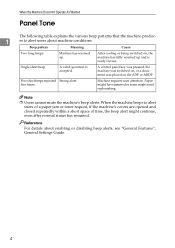
...pressed, the machine was switched on, or a document was placed on , the machine has fully warmed up . Paper might have jammed or toner might continue, even after normal status has resumed. Reference For details about machine conditions. When the Machine Does Not Operate As Wanted Panel Tone... The following table explains the various beep patterns that the machine produc- 1 es to alert users of a paper jam or toner request, if the machine's covers are opened and closed repeatedly within a short space of time, the beep alert might need replenishing. After cooling...
...pressed, the machine was switched on, or a document was placed on , the machine has fully warmed up . Paper might have jammed or toner might continue, even after normal status has resumed. Reference For details about machine conditions. When the Machine Does Not Operate As Wanted Panel Tone... The following table explains the various beep patterns that the machine produc- 1 es to alert users of a paper jam or toner request, if the machine's covers are opened and closed repeatedly within a short space of time, the beep alert might need replenishing. After cooling...

Troubleshooting Guide
Page 12
... another screen by function. Wait a little longer. to get start up when switched on the operation switch or ed within 2 minutes, contact your change the toner bottle. Check if the machine is not adjusted. appears. service representative. The operation switch indicator continues blinking and does not turn on . Problem Cause Solution...
... another screen by function. Wait a little longer. to get start up when switched on the operation switch or ed within 2 minutes, contact your change the toner bottle. Check if the machine is not adjusted. appears. service representative. The operation switch indicator continues blinking and does not turn on . Problem Cause Solution...

Troubleshooting Guide
Page 19
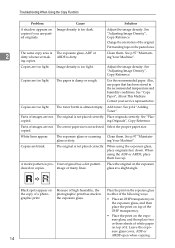
... reverse side of an Image density is creased, curled, or are dirty. See "Copy Paper", About This Machine. Use manufacturer-genuine toner. See "Adjusting Image Density", Copy Reference. 13 Image density is damp. Copies are patchy. Check the paper loaded on the paper tray...check its surface carefully. When You Cannot Make Clear Copies When You Cannot Make Clear Copies This section describes likely causes of non-recommended toner can damage the machine's internal components. See "Adjusting Image Density", Copy Reference. original image is not on a too light. Adjust ...
... reverse side of an Image density is creased, curled, or are dirty. See "Copy Paper", About This Machine. Use manufacturer-genuine toner. See "Adjusting Image Density", Copy Reference. 13 Image density is damp. Copies are patchy. Check the paper loaded on the paper tray...check its surface carefully. When You Cannot Make Clear Copies When You Cannot Make Clear Copies This section describes likely causes of non-recommended toner can damage the machine's internal components. See "Adjusting Image Density", Copy Reference. original image is not on a too light. Adjust ...
Troubleshooting Guide
Page 20
...a dot pattern duced on the pasted area. 2 The same copy area is not placed correctly. The paper is almost empty. The toner bottle is damp or rough. Place originals correctly. When using the exposure glass, place originals face down. Leave the exposure glass cover, ...too light. ing copies. Copies are not The original is The exposure glass, ADF or dirty whenever mak- Contact your service representative. Add toner. ing Originals", Copy Reference. copied. White lines appear. See p.97 "Maintain- The original is too dark. Place the original on ...
...a dot pattern duced on the pasted area. 2 The same copy area is not placed correctly. The paper is almost empty. The toner bottle is damp or rough. Place originals correctly. When using the exposure glass, place originals face down. Leave the exposure glass cover, ...too light. ing copies. Copies are not The original is The exposure glass, ADF or dirty whenever mak- Contact your service representative. Add toner. ing Originals", Copy Reference. copied. White lines appear. See p.97 "Maintain- The original is too dark. Place the original on ...

Troubleshooting Guide
Page 36
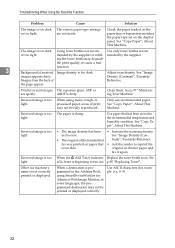
... Press the {Clear/Stop} key. If this happened when the Re- • Load paper into the paper tray. Replace the toner bottle. See p.85 "Replacing Toner". Check the setting. Press the {Clear/Stop} key. group. See p.65 "Loading Paper". See "Canceling a Transmission", Facsimile Reference... for the tions exceeds the maximum following, reception number that can be specified as a was set for a group. per or toner might have run out. Check the setting. but The terminal adaptor setting is impossible. Although a group spec- tray. correct. Reception...
... Press the {Clear/Stop} key. If this happened when the Re- • Load paper into the paper tray. Replace the toner bottle. See p.85 "Replacing Toner". Check the setting. Press the {Clear/Stop} key. group. See p.65 "Loading Paper". See "Canceling a Transmission", Facsimile Reference... for the tions exceeds the maximum following, reception number that can be specified as a was set for a group. per or toner might have run out. Check the setting. but The terminal adaptor setting is impossible. Although a group spec- tray. correct. Reception...
Troubleshooting Guide
Page 38
.... Received image is dirty. See "Copy Paper", About This Machine. fax was printed on the display panel. When the D Add Toner indicator Replace the toner bottle soon. When a destination is too thin. Use ASCII characters (for Admin or Web Image Monitor, in the Address Book using ...moist, rough, or processed paper, areas of received Image density is too dark Using toner bottles not recom- See "Copy Paper", About This Machine. mended by the supplier or refill- Adjust scan density. When using SmartDeviceMonitor for example:...
.... Received image is dirty. See "Copy Paper", About This Machine. fax was printed on the display panel. When the D Add Toner indicator Replace the toner bottle soon. When a destination is too thin. Use ASCII characters (for Admin or Web Image Monitor, in the Address Book using ...moist, rough, or processed paper, areas of received Image density is too dark Using toner bottles not recom- See "Copy Paper", About This Machine. mended by the supplier or refill- Adjust scan density. When using SmartDeviceMonitor for example:...
Troubleshooting Guide
Page 52
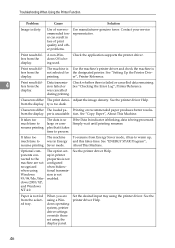
... dif- er", Printer Reference. 4 Print result dif- Printing on recommended paper produces better resolufrom the display. Use of non-recommended toner can result in Energy resume printing. Check the application supports the printer driver. Characters differ The loaded pa- See "Copy Paper", ...not selected for the designated printer. per is too dark. was in loss of print quality and other problems. Use manufacturer-genuine toner. See the printer driver Help. See "ENERGY STAR Program", About This Machine. Paper is fers from the display. display. Simply...
... dif- er", Printer Reference. 4 Print result dif- Printing on recommended paper produces better resolufrom the display. Use of non-recommended toner can result in Energy resume printing. Check the application supports the printer driver. Characters differ The loaded pa- See "Copy Paper", ...not selected for the designated printer. per is too dark. was in loss of print quality and other problems. Use manufacturer-genuine toner. See the printer driver Help. See "ENERGY STAR Program", About This Machine. Paper is fers from the display. display. Simply...

Troubleshooting Guide
Page 71
... in the bypass tray, see "Copying from the Bypass Tray", Copy Reference. A Pull the paper tray out slowly until it stops. Adding Paper and Replacing Toner This chapter describes troubleshooting procedures that are applicable to trap or injure your fingers. ZENY380E 65
... in the bypass tray, see "Copying from the Bypass Tray", Copy Reference. A Pull the paper tray out slowly until it stops. Adding Paper and Replacing Toner This chapter describes troubleshooting procedures that are applicable to trap or injure your fingers. ZENY380E 65

Troubleshooting Guide
Page 72
Check that the top of paper are flush, and load the paper. Reference p.71 "Changing the Paper Size" 66 Adding Paper and Replacing Toner C Press the metal plate down until it clicks. ZENY300E D Make sure the edges of the deck of the stack is not higher than the limit mark inside the tray. 6 ASB003S E Position the end fence flush against the paper. F Push the paper tray in Paper Trays, see "Changing the Paper Size". Note ❒ Fan the paper before loading. ❒ For details about loading paper of a size not selectable with the paper size selectors in until it stops.
Check that the top of paper are flush, and load the paper. Reference p.71 "Changing the Paper Size" 66 Adding Paper and Replacing Toner C Press the metal plate down until it clicks. ZENY300E D Make sure the edges of the deck of the stack is not higher than the limit mark inside the tray. 6 ASB003S E Position the end fence flush against the paper. F Push the paper tray in Paper Trays, see "Changing the Paper Size". Note ❒ Fan the paper before loading. ❒ For details about loading paper of a size not selectable with the paper size selectors in until it stops.

Troubleshooting Guide
Page 74
... example, letterhead paper, prepunched paper, or copied paper) might not print correctly, depending on how the originals and paper are placed. Adding Paper and Replacing Toner Orientation-Fixed Paper or Two-Sided Paper The following describes paper with the printer function, placing orientation is L, place originals as shown below .
... example, letterhead paper, prepunched paper, or copied paper) might not print correctly, depending on how the originals and paper are placed. Adding Paper and Replacing Toner Orientation-Fixed Paper or Two-Sided Paper The following describes paper with the printer function, placing orientation is L, place originals as shown below .
Troubleshooting Guide
Page 76
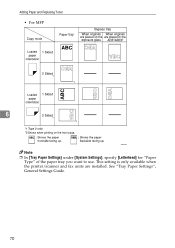
This setting is only available when the printer/scanner and fax units are installed. See "Tray Paper Settings", General Settings Guide. 70 Adding Paper and Replacing Toner • For MFP 6 ASB002S Note ❒ In [Tray Paper Settings] under [System Settings], specify [Letterhead] for "Paper Type" of the paper tray you want to use.
This setting is only available when the printer/scanner and fax units are installed. See "Tray Paper Settings", General Settings Guide. 70 Adding Paper and Replacing Toner • For MFP 6 ASB002S Note ❒ In [Tray Paper Settings] under [System Settings], specify [Letterhead] for "Paper Type" of the paper tray you want to use.

Troubleshooting Guide
Page 78
ZENY300E 72 Adding Paper and Replacing Toner E Press down until it clicks. F While pressing the release lever, slide the side fences outward. 6 ZENY390E G Push the metal plate down the release button.
ZENY300E 72 Adding Paper and Replacing Toner E Press down until it clicks. F While pressing the release lever, slide the side fences outward. 6 ZENY390E G Push the metal plate down the release button.

Troubleshooting Guide
Page 80
... selector to the new paper size using {U} or {T}, and then press the {OK} key. 74 B Press the {User Tools/Counter} key. Adding Paper and Replacing Toner K Adjust the tray size to "p".
... selector to the new paper size using {U} or {T}, and then press the {OK} key. 74 B Press the {User Tools/Counter} key. Adding Paper and Replacing Toner K Adjust the tray size to "p".

Troubleshooting Guide
Page 82
L Press down the release button. 6 ASB020S M While pressing the release lever, slide the side fences outward. 76 ASB021S Adding Paper and Replacing Toner J Place it in the corner pocket on the left. K Remove any remaining copy paper.
L Press down the release button. 6 ASB020S M While pressing the release lever, slide the side fences outward. 76 ASB021S Adding Paper and Replacing Toner J Place it in the corner pocket on the left. K Remove any remaining copy paper.

Troubleshooting Guide
Page 84
... {T}, and then press the {OK} key. F Select the paper size using the scroll keys, and then press the {OK} key. 78 Adding Paper and Replacing Toner Changing to a Size Other Than Indicated on the Paper Size Selector This procedure explains how to change to "p".
... {T}, and then press the {OK} key. F Select the paper size using the scroll keys, and then press the {OK} key. 78 Adding Paper and Replacing Toner Changing to a Size Other Than Indicated on the Paper Size Selector This procedure explains how to change to "p".


