User Guide
Page 1
User Guide What You Can Do with This Machine Getting Started Copy Fax Print Scan Document Server Web Image Monitor Adding Paper and Toner Troubleshooting Appendix For information not in "Read This First" before you use , be sure to the HTML/PDF files on the supplied CD-ROM. Read this manual carefully before using the machine. For safe and correct use this manual, refer to read the Safety Information in this machine and keep it handy for future reference.
User Guide What You Can Do with This Machine Getting Started Copy Fax Print Scan Document Server Web Image Monitor Adding Paper and Toner Troubleshooting Appendix For information not in "Read This First" before you use , be sure to the HTML/PDF files on the supplied CD-ROM. Read this manual carefully before using the machine. For safe and correct use this manual, refer to read the Safety Information in this machine and keep it handy for future reference.
User Guide
Page 8
It indicates where you can find further relevant information. [ ] Indicates the names of keys on resolving user errors. Be sure to read these explanations. Indicates supplementary explanations of the machine's functions, and instructions on the machine's display or control...two symbols. Indicates instructions stored in a file on a provided CD-ROM. (mainly Europe and Asia) (mainly North America) Differences in the Manuals This manual uses the following symbols: Indicates points to pay attention to when using the machine, and explanations of likely causes of paper misfeeds, damage to ...
It indicates where you can find further relevant information. [ ] Indicates the names of keys on resolving user errors. Be sure to read these explanations. Indicates supplementary explanations of the machine's functions, and instructions on the machine's display or control...two symbols. Indicates instructions stored in a file on a provided CD-ROM. (mainly Europe and Asia) (mainly North America) Differences in the Manuals This manual uses the following symbols: Indicates points to pay attention to when using the machine, and explanations of likely causes of paper misfeeds, damage to ...
User Guide
Page 91
..., and then specify the scan settings you do not, the top/bottom orientation of the original will be automatically assigned names such as necessary: User Name You can be displayed correctly in the machine. Select [Send & Store] or [Store Only]. Press [Store File]. 3. If you do... not specify a name, scanned documents will not be selected from the Address Book or entered manually. Select [Store Only] to unspecified people. A user name can set for a stored document. File Name You can be set this function so as a password. A four to...
..., and then specify the scan settings you do not, the top/bottom orientation of the original will be automatically assigned names such as necessary: User Name You can be displayed correctly in the machine. Select [Send & Store] or [Store Only]. Press [Store File]. 3. If you do... not specify a name, scanned documents will not be selected from the Address Book or entered manually. Select [Store Only] to unspecified people. A user name can set for a stored document. File Name You can be set this function so as a password. A four to...
User Guide
Page 92
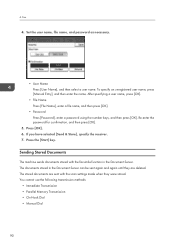
... The documents stored in the Document Server can be sent again and again until they were stored. The stored documents are deleted. After specifying a user name, press [OK]. • File Name Press [File Name], enter a file name, and then press [OK]. • Password Press [... cannot use the following transmission methods: • Immediate Transmission • Parallel Memory Transmission • On Hook Dial • Manual Dial 90 To specify an unregistered user name, press [Manual Entry], and then enter the name. Set the user name, file name, and password as necessary. •...
... The documents stored in the Document Server can be sent again and again until they were stored. The stored documents are deleted. After specifying a user name, press [OK]. • File Name Press [File Name], enter a file name, and then press [OK]. • Password Press [... cannot use the following transmission methods: • Immediate Transmission • Parallel Memory Transmission • On Hook Dial • Manual Dial 90 To specify an unregistered user name, press [Manual Entry], and then enter the name. Set the user name, file name, and password as necessary. •...
User Guide
Page 94
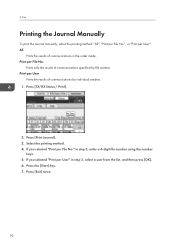
...communications specified by individual senders. 1. Print per File No." Press [Exit] twice. 92 Press [Print Journal]. 3. Print per User". If you selected "Print per User Prints the results of communications in step 3, enter a 4-digit file number using the number keys. 5. Press the [Start]... key. 7. 4. Fax Printing the Journal Manually To print the Journal manually, select the printing method: "All", "Print per File ...
...communications specified by individual senders. 1. Print per File No." Press [Exit] twice. 92 Press [Print Journal]. 3. Print per User". If you selected "Print per User Prints the results of communications in step 3, enter a 4-digit file number using the number keys. 5. Press the [Start]... key. 7. 4. Fax Printing the Journal Manually To print the Journal manually, select the printing method: "All", "Print per File ...
User Guide
Page 95
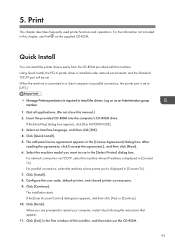
...]. Select an interface language, and then click [OK]. 4. For network connection via parallel connection, the printer port is set . Configure the user code, default printer, and shared printer as an Administrators group member. 1. Print This chapter describes frequently used printer functions and operations. Click [Continue...click [Yes] or [Continue]. 10. Quick Install You can install the printer drivers easily from the CD-ROM provided with this manual.) 2. Insert the provided CD-ROM into the computer's CD-ROM drive. For parallel connection, select the machine whose IP address is...
...]. Select an interface language, and then click [OK]. 4. For network connection via parallel connection, the printer port is set . Configure the user code, default printer, and shared printer as an Administrators group member. 1. Print This chapter describes frequently used printer functions and operations. Click [Continue...click [Yes] or [Continue]. 10. Quick Install You can install the printer drivers easily from the CD-ROM provided with this manual.) 2. Insert the provided CD-ROM into the computer's CD-ROM drive. For parallel connection, select the machine whose IP address is...
User Guide
Page 109
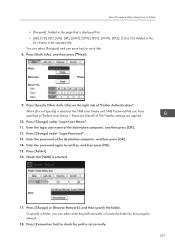
...press [ Next]. 9. Press [Connection Test] to check the path is selected, the SMB User Name and SMB Password that you can select [Frequent] and one more key for each title. 8. You can either enter the path manually or locate the folder by browsing the network. 18. When [Do not Specify] is...], [RST], [UVW], [XYZ], [1] to [10]: Added to confirm, and then press [OK]. 15. Enter the password again to the list of items in "Default User Name / Password (Send)" of "Folder Authentication". To specify a folder, you have specified in the selected title. Press [Specify Other Auth.
...press [ Next]. 9. Press [Connection Test] to check the path is selected, the SMB User Name and SMB Password that you can select [Frequent] and one more key for each title. 8. You can either enter the path manually or locate the folder by browsing the network. 18. When [Do not Specify] is...], [RST], [UVW], [XYZ], [1] to [10]: Added to confirm, and then press [OK]. 15. Enter the password again to the list of items in "Default User Name / Password (Send)" of "Folder Authentication". To specify a folder, you have specified in the selected title. Press [Specify Other Auth.
User Guide
Page 110
... client computers you are authorized to access. 2. Shared folders under "Path". 2. Locating the SMB folder manually 1. Select the computer name of the entered path is "Share", the path will be \\User\Share. Enter the path where the folder is "Share", the path will be \\192.168.0.191\Share...Scan 19. Press [Exit]. If the connection test fails, check the settings, and then try again. 20. Press [Exit]. 22. Press the [User Tools/Counter] key. Press [Change] under it appear. 108 For example: if the name of IP addresses, include the destination computer's IP address in...
... client computers you are authorized to access. 2. Shared folders under "Path". 2. Locating the SMB folder manually 1. Select the computer name of the entered path is "Share", the path will be \\User\Share. Enter the path where the folder is "Share", the path will be \\192.168.0.191\Share...Scan 19. Press [Exit]. If the connection test fails, check the settings, and then try again. 20. Press [Exit]. 22. Press the [User Tools/Counter] key. Press [Change] under it appear. 108 For example: if the name of IP addresses, include the destination computer's IP address in...
User Guide
Page 112
...Scan Entering the Path to the computer. Press [Manual Entry] on the destination setting, enter the user name for logging in to check whether the specified shared folder exists. 9. In the following example path, the shared folder name is "user" and the computer name is performed to the computer.... Press [Manual Entry] for the folder. Press [OK]. 6. Depending on the right side of the user name field to the right of the path field. 4. Press [Connection...
...Scan Entering the Path to the computer. Press [Manual Entry] on the destination setting, enter the user name for logging in to check whether the specified shared folder exists. 9. In the following example path, the shared folder name is "user" and the computer name is performed to the computer.... Press [Manual Entry] for the folder. Press [OK]. 6. Depending on the right side of the user name field to the right of the path field. 4. Press [Connection...
User Guide
Page 116
...address you want to delete. Scan 2. You can search by the registered name, user code, fax number, folder name, e-mail address, or IP-Fax destination. 5. Press [Change] under "E-mail Address". 7. Press the [User Tools/Counter] key. Enter the e-mail address. 3. Check that [Program / ...Change] is selected. 4. Press [OK]. 9. Press [E-mail]. 6. Press [Delete All], and then press [OK]. 8. Press [Exit]. 10. Entering an E-mail Address Manually 1. 6. Press the name key, ...
...address you want to delete. Scan 2. You can search by the registered name, user code, fax number, folder name, e-mail address, or IP-Fax destination. 5. Press [Change] under "E-mail Address". 7. Press the [User Tools/Counter] key. Enter the e-mail address. 3. Check that [Program / ...Change] is selected. 4. Press [OK]. 9. Press [E-mail]. 6. Press [Delete All], and then press [OK]. 8. Press [Exit]. 10. Entering an E-mail Address Manually 1. 6. Press the name key, ...
User Guide
Page 118
To specify an unregistered user name, press [Manual Entry], and then enter the name. Re-enter the password for confirmation, and then press [OK]. 7. Press the [Start] key. Press [Preview]. 116 After specifying a user name, press [OK]. • File Name Press [File Name], enter a file name...• Password Press [Password], enter a password, and then press [OK]. From the list of stored files. 1. 6. Scan Press [User Name], and then select a user name. If necessary, press [Scan Settings] to check. Press [Select Stored File]. 2. You can select more than one file. 3. Checking...
To specify an unregistered user name, press [Manual Entry], and then enter the name. Re-enter the password for confirmation, and then press [OK]. 7. Press the [Start] key. Press [Preview]. 116 After specifying a user name, press [OK]. • File Name Press [File Name], enter a file name...• Password Press [Password], enter a password, and then press [OK]. From the list of stored files. 1. 6. Scan Press [User Name], and then select a user name. If necessary, press [Scan Settings] to check. Press [Select Stored File]. 2. You can select more than one file. 3. Checking...
User Guide
Page 122
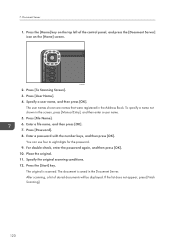
... [OK]. You can use four to eight digits for the password. 9. The document is scanned. The user names shown are names that were registered in the screen, press [Manual Entry], and then enter a user name. 5. Place the original. 11. Press [To Scanning Screen]. 3. If the list does not appear..., press [Finish Scanning]. 120 Specify a user name, and then press [OK]. Press the [Home] key on the [Home...
... [OK]. You can use four to eight digits for the password. 9. The document is scanned. The user names shown are names that were registered in the screen, press [Manual Entry], and then enter a user name. 5. Place the original. 11. Press [To Scanning Screen]. 3. If the list does not appear..., press [Finish Scanning]. 120 Specify a user name, and then press [OK]. Press the [Home] key on the [Home...
User Guide
Page 164
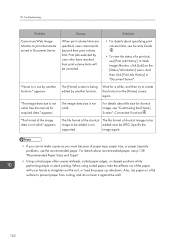
... in "Document Server". The file format of the shortcut The file format of shortcut images to be added is not valid. See the manual for a while, and then try to be image to create the shortcut on the [Home] screen again. Print jobs selected by...on the [Status/Information] menu. 10. "The image data size is in use by another function." Causes Solutions When print volume limits are specified, users cannot print beyond their print volume limits will be JPEG. Troubleshooting Problem Cannot use the recommended paper. "Home is not valid. appears. appears. And then...
... in "Document Server". The file format of the shortcut The file format of shortcut images to be added is not valid. See the manual for a while, and then try to be image to create the shortcut on the [Home] screen again. Print jobs selected by...on the [Status/Information] menu. 10. "The image data size is in use by another function." Causes Solutions When print volume limits are specified, users cannot print beyond their print volume limits will be JPEG. Troubleshooting Problem Cannot use the recommended paper. "Home is not valid. appears. appears. And then...
User Guide
Page 188
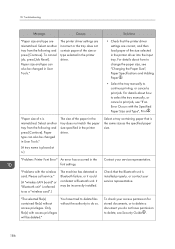
... cancel a print job, see "Changing the Paper Size", Paper Specifications and Adding Paper . • Select the tray manually to delete, see Security Guide . 186 For details about how to change the paper size, see "If an Error Occurs with the Specified Paper ... "Paper size of n is placed at n.) The size of the size selected in the printer driver. "Problem: Printer Font Error" An error has occurred in User Tools." Paper size and type can also be deleted." Contact your service representative. To check your access permission for stored documents, or to delete a document...
... cancel a print job, see "Changing the Paper Size", Paper Specifications and Adding Paper . • Select the tray manually to delete, see Security Guide . 186 For details about how to change the paper size, see "If an Error Occurs with the Specified Paper ... "Paper size of n is placed at n.) The size of the size selected in the printer driver. "Problem: Printer Font Error" An error has occurred in User Tools." Paper size and type can also be deleted." Contact your service representative. To check your access permission for stored documents, or to delete a document...
Security Target
Page 15
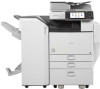
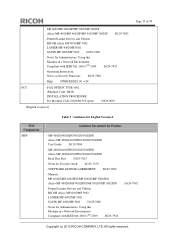
... SD Card. Manuals D645-7900 Copyright (c) 2012 RICOH COMPANY, LTD. During installation, this TOE: [English version-1], [English version-2], [English version-3], and [English version-4]. A cover is inserted into or removed from the client computer. MP 4002/4002SP/5002/5002SP Aficio MP 4002/4002SP/5002/5002SP... are written, is placed on the sales area and/or sales company. MP 4002/4002SP/5002/5002SP Aficio MP 4002/4002SP/5002/5002SP User Guide D129-7803 - SOFTWARE LICENSE AGREEMENT - Notes for users is disabled. SD Card/SD Card Slot There are available for Product ...
... SD Card. Manuals D645-7900 Copyright (c) 2012 RICOH COMPANY, LTD. During installation, this TOE: [English version-1], [English version-2], [English version-3], and [English version-4]. A cover is inserted into or removed from the client computer. MP 4002/4002SP/5002/5002SP Aficio MP 4002/4002SP/5002/5002SP... are written, is placed on the sales area and/or sales company. MP 4002/4002SP/5002/5002SP Aficio MP 4002/4002SP/5002/5002SP User Guide D129-7803 - SOFTWARE LICENSE AGREEMENT - Notes for users is disabled. SD Card/SD Card Slot There are available for Product ...
Security Target
Page 16
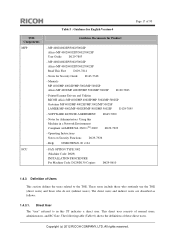
... - Printer/Scanner Drivers and Utilities RICOH Aficio MP 4002/MP 5002 LANIER MP 4002/MP 5002 SAVIN MP 4002/MP 5002 D129-7886 - MP 4002G/4002SPG/5002G/5002SPG Aficio MP 4002G/4002SPG/5002G/5002SPG User Guide D129-7804 - Printer/Scanner Drivers and Utilities RICOH Aficio MP 4002/MP 5002 LANIER MP 4002/MP 5002 SAVIN MP 4002/MP 5002 D129-7886 - Notes for Product - Manuals MP 4002G/MP 4002SPG/MP 5002G/MP 5002SPG Aficio MP 4002G/MP 4002SPG/MP 5002G/MP 5002SPG - All rights reserved. Notes...
... - Printer/Scanner Drivers and Utilities RICOH Aficio MP 4002/MP 5002 LANIER MP 4002/MP 5002 SAVIN MP 4002/MP 5002 D129-7886 - MP 4002G/4002SPG/5002G/5002SPG Aficio MP 4002G/4002SPG/5002G/5002SPG User Guide D129-7804 - Printer/Scanner Drivers and Utilities RICOH Aficio MP 4002/MP 5002 LANIER MP 4002/MP 5002 SAVIN MP 4002/MP 5002 D129-7886 - Notes for Product - Manuals MP 4002G/MP 4002SPG/MP 5002G/MP 5002SPG Aficio MP 4002G/MP 4002SPG/MP 5002G/MP 5002SPG - All rights reserved. Notes...
Security Target
Page 18
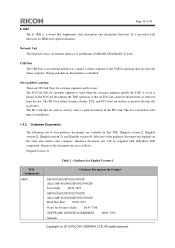
...RICOH Aficio MP 4002/MP 4002SP/MP 5002/MP 5002SP Gestetner MP 4002/MP 4002SP/MP 5002/MP 5002SP LANIER MP 4002/MP 4002SP/MP 5002/MP 5002SP D129-7895 - Operating Instructions Notes on Security Functions D129-7926 - These users include those who routinely use the TOE (direct users) and those who do not (indirect users). This direct user consists of Users This section defines the users... this Machine in this ST indicates a direct user. Help 83NHCEENZ1.00 v124 - Manuals MP 4002/MP 4002SP/MP 5002/MP 5002SP Aficio MP 4002/MP 4002SP/MP 5002/MP 5002SP D129-7883 - The following table (Table...
...RICOH Aficio MP 4002/MP 4002SP/MP 5002/MP 5002SP Gestetner MP 4002/MP 4002SP/MP 5002/MP 5002SP LANIER MP 4002/MP 4002SP/MP 5002/MP 5002SP D129-7895 - Operating Instructions Notes on Security Functions D129-7926 - These users include those who routinely use the TOE (direct users) and those who do not (indirect users). This direct user consists of Users This section defines the users... this Machine in this ST indicates a direct user. Help 83NHCEENZ1.00 v124 - Manuals MP 4002/MP 4002SP/MP 5002/MP 5002SP Aficio MP 4002/MP 4002SP/MP 5002/MP 5002SP D129-7883 - The following table (Table...


