Copy Reference
Page 33
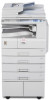
...", About This Machine. E Enter the number of copies using the number keys. Basic Procedure This section describes the basic procedure for the login user name and login password. A Make sure "Ready" appears on the screen. D Make desired settings. The maximum copy quantity that the machine accepts copy jobs... ❖ Initial copy display B Make sure no previous settings remain. Important ❒ When User Code Authentication is set is set, enter your login user name and user password so that can be set , enter your user code (up to eight digits) with the number keys so that ...
...", About This Machine. E Enter the number of copies using the number keys. Basic Procedure This section describes the basic procedure for the login user name and login password. A Make sure "Ready" appears on the screen. D Make desired settings. The maximum copy quantity that the machine accepts copy jobs... ❖ Initial copy display B Make sure no previous settings remain. Important ❒ When User Code Authentication is set is set, enter your login user name and user password so that can be set , enter your user code (up to eight digits) with the number keys so that ...
Facsimile Reference
Page 188
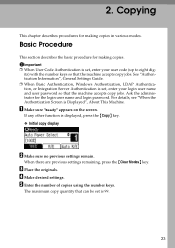
... running under the same network environment as full mode in the Address Book. The top screen is displayed. The [Change User] page appears. 178 C Click [Login], and then enter the Administrator's name and password. A Start the Web browser. Otherwise, the Web browser may not open and an error may occur. 5 ❒...
... running under the same network environment as full mode in the Address Book. The top screen is displayed. The [Change User] page appears. 178 C Click [Login], and then enter the Administrator's name and password. A Start the Web browser. Otherwise, the Web browser may not open and an error may occur. 5 ❒...
Facsimile Reference
Page 189
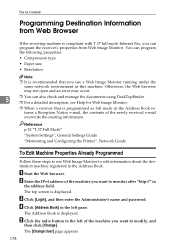
B Enter the IPv4 address of the machine you cannot set machine properties. C Click [Login], and then enter the Administrator's name and password. If you change the mode to monitor after entering the e-mail address. The Address Book is displayed. ...
B Enter the IPv4 address of the machine you cannot set machine properties. C Click [Login], and then enter the Administrator's name and password. If you change the mode to monitor after entering the e-mail address. The Address Book is displayed. ...
General Settings Guide
Page 14
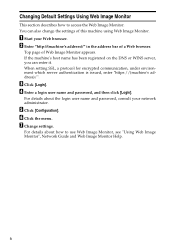
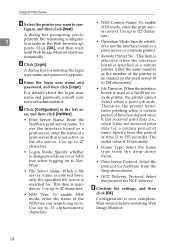
...F Click the menu. B Enter "http://(machine's address)/" in the address bar of Web Image Monitor appears. D Enter a login user name and password, and then click [Login]. Changing Default Settings Using Web Image Monitor This section describes how to use Web Image Monitor, see "Using Web Image Monitor", ...Network Guide and Web Image Monitor Help. 6 C Click [Login]. For details about the login user name and password, consult your Web browser. G Change settings. You can enter it. For details about how to access...
...F Click the menu. B Enter "http://(machine's address)/" in the address bar of Web Image Monitor appears. D Enter a login user name and password, and then click [Login]. Changing Default Settings Using Web Image Monitor This section describes how to use Web Image Monitor, see "Using Web Image Monitor", ...Network Guide and Web Image Monitor Help. 6 C Click [Login]. For details about the login user name and password, consult your Web browser. G Change settings. You can enter it. For details about how to access...

General Settings Guide
Page 61
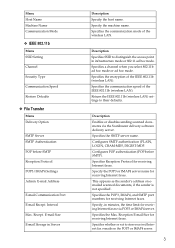
... security using the number keys, and then press the {OK} key. When not using DNS, enter the host name. is PLAIN, LOGIN, CRAM-MD5, or DIGEST-MD5. Enter [Password] using up to 63 characters. Spaces cannot be specified. File Transfer File Transfer This ..."@" after the user name, as follows: "Encrypt"-[Auto]: Use if the authentication method is 25. ❖ SMTP Authentication Specify SMTP authentication (PLAIN, LOGIN, CRAMMD5, DIGEST-MD5). Specify this option when selecting whether or not to [On], and then specify [User Name], [Password], and [Encrypt]. Spaces...
... security using the number keys, and then press the {OK} key. When not using DNS, enter the host name. is PLAIN, LOGIN, CRAM-MD5, or DIGEST-MD5. Enter [Password] using up to 63 characters. Spaces cannot be specified. File Transfer File Transfer This ..."@" after the user name, as follows: "Encrypt"-[Auto]: Use if the authentication method is 25. ❖ SMTP Authentication Specify SMTP authentication (PLAIN, LOGIN, CRAMMD5, DIGEST-MD5). Specify this option when selecting whether or not to [On], and then specify [User Name], [Password], and [Encrypt]. Spaces...

General Settings Guide
Page 143
... Addresses and Users for Facsimile/Scanner Functions This chapter describes how to be responsible for managing user of memory failure. You can also register login user names and login passwords to register destinations and users in memory. You can also use of the user. It can register the name of each function...
... Addresses and Users for Facsimile/Scanner Functions This chapter describes how to be responsible for managing user of memory failure. You can also register login user names and login passwords to register destinations and users in memory. You can also use of the user. It can register the name of each function...

General Settings Guide
Page 200
H Select [Auth. Info] using {U} or {T}, and then press the {OK} key. Registering Addresses and Users for Facsimile/Scanner Functions G Press [Details]. J Select [Specify Other Auth. L Press [Password]. 192 I Select [Folder Authentication] using {U} or {T}, and then press [User]. 7 K Enter the login user name, and then press the {OK} key. Info] using {U} or {T}, and then press the {OK} key.
H Select [Auth. Info] using {U} or {T}, and then press the {OK} key. Registering Addresses and Users for Facsimile/Scanner Functions G Press [Details]. J Select [Specify Other Auth. L Press [Password]. 192 I Select [Folder Authentication] using {U} or {T}, and then press [User]. 7 K Enter the login user name, and then press the {OK} key. Info] using {U} or {T}, and then press the {OK} key.

General Settings Guide
Page 205
...System Settings] using {U} or {T}, and then press the {OK} key. 197 Registering Folders If a Login Screen Appears This section explains how to log in to the machine if a login screen appears when you have not specified folder authentication, or if an incorrect user name or password has... been entered for folder authentication. If a message appears, press [Exit], and then enter the login user name and 7 password again. Enter the login user name specified for folder authentication. B Select [Administrator Tools] using {U} or {T}, and then press the {OK} key...
...System Settings] using {U} or {T}, and then press the {OK} key. 197 Registering Folders If a Login Screen Appears This section explains how to log in to the machine if a login screen appears when you have not specified folder authentication, or if an incorrect user name or password has... been entered for folder authentication. If a message appears, press [Exit], and then enter the login user name and 7 password again. Enter the login user name specified for folder authentication. B Select [Administrator Tools] using {U} or {T}, and then press the {OK} key...

General Settings Guide
Page 213
Info] using {U} or {T}, and then press the {OK} key. J Select [Specify Other Auth. Registering Folders H Select [Auth. K Enter the login user name, and then press the {OK} key. 7 L Press [Password]. M Enter the password, and then press the {OK} key. 205 I Select [Folder Authentication] using {U} or {T}, and then press [User]. Info] using {U} or {T}, and then press the {OK} key.
Info] using {U} or {T}, and then press the {OK} key. J Select [Specify Other Auth. Registering Folders H Select [Auth. K Enter the login user name, and then press the {OK} key. 7 L Press [Password]. M Enter the password, and then press the {OK} key. 205 I Select [Folder Authentication] using {U} or {T}, and then press [User]. Info] using {U} or {T}, and then press the {OK} key.

General Settings Guide
Page 216
... up to 64 characters. ❒ You can enter an absolute path, using this format: directory/sub-directory". ❒ If you leave the path blank, the login directory is assumed to be the current working directory. ❒ You can also enter an IPv4 address. ❒ You can enter a path using up to...
... up to 64 characters. ❒ You can enter an absolute path, using this format: directory/sub-directory". ❒ If you leave the path blank, the login directory is assumed to be the current working directory. ❒ You can also enter an IPv4 address. ❒ You can enter a path using up to...
General Settings Guide
Page 224
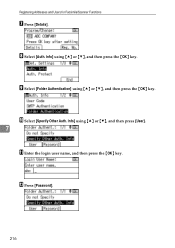
J Select [Specify Other Auth. H Select [Auth. Registering Addresses and Users for Facsimile/Scanner Functions G Press [Details]. L Press [Password]. 216 Info] using {U} or {T}, and then press the {OK} key. I Select [Folder Authentication] using {U} or {T}, and then press [User]. 7 K Enter the login user name, and then press the {OK} key. Info] using {U} or {T}, and then press the {OK} key.
J Select [Specify Other Auth. H Select [Auth. Registering Addresses and Users for Facsimile/Scanner Functions G Press [Details]. L Press [Password]. 216 Info] using {U} or {T}, and then press the {OK} key. I Select [Folder Authentication] using {U} or {T}, and then press [User]. 7 K Enter the login user name, and then press the {OK} key. Info] using {U} or {T}, and then press the {OK} key.
General Settings Guide
Page 258
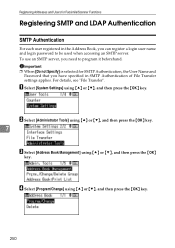
... the {OK} key. 250 D Select [Program/Change] using {U} or {T}, and then press the {OK} key. To use an SMTP server, you can register a login user name and login password to program it beforehand. Important ❒ When [Do not Specify] is selected for Facsimile/Scanner Functions Registering SMTP and LDAP Authentication SMTP Authentication...
... the {OK} key. 250 D Select [Program/Change] using {U} or {T}, and then press the {OK} key. To use an SMTP server, you can register a login user name and login password to program it beforehand. Important ❒ When [Do not Specify] is selected for Facsimile/Scanner Functions Registering SMTP and LDAP Authentication SMTP Authentication...

General Settings Guide
Page 260
P Press [End]. 252 N Enter the password again to confirm, and then press the {OK} key. 7 O Press the {Escape} key twice. Registering Addresses and Users for Facsimile/Scanner Functions K Enter the login user name, and then press the {OK} key. M Enter the password, and then press the {OK} key. L Press the [Password].
P Press [End]. 252 N Enter the password again to confirm, and then press the {OK} key. 7 O Press the {Escape} key twice. Registering Addresses and Users for Facsimile/Scanner Functions K Enter the login user name, and then press the {OK} key. M Enter the password, and then press the {OK} key. L Press the [Password].
General Settings Guide
Page 261
..., repeat step B to program it beforehand. Q Press the {OK} key. Note ❒ To register the name, see Registering Names". ❒ You can register a login user name and login password to 191 characters for the user name. ❒ When using {U} or {T}, and then press the {OK} key. 253 To use an LDAP server...
..., repeat step B to program it beforehand. Q Press the {OK} key. Note ❒ To register the name, see Registering Names". ❒ You can register a login user name and login password to 191 characters for the user name. ❒ When using {U} or {T}, and then press the {OK} key. 253 To use an LDAP server...

General Settings Guide
Page 263
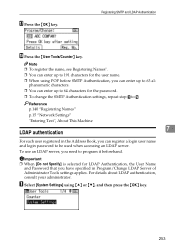
I Select [LDAP Authentication] using {U} or {T}, and then press [User]. J Select [Specify Other Auth. Info] using {U} or {T}, and then press the {OK} key. K Enter the login user name, and then press the {OK} key. 7 L Press [Password]. Registering SMTP and LDAP Authentication H Select [Auth. M Enter the password, and then press the {OK} key. 255 Info] using {U} or {T}, and then press the {OK} key.
I Select [LDAP Authentication] using {U} or {T}, and then press [User]. J Select [Specify Other Auth. Info] using {U} or {T}, and then press the {OK} key. K Enter the login user name, and then press the {OK} key. 7 L Press [Password]. Registering SMTP and LDAP Authentication H Select [Auth. M Enter the password, and then press the {OK} key. 255 Info] using {U} or {T}, and then press the {OK} key.

General Settings Guide
Page 272
...Start your network administrator. B Enter "http://(machine's address)/" in the address bar of Web Image Monitor appears. C Click [Login]. Note ❒ For details about the login user name and password, consult your Web browser. If the machine's host name has been registered on the DNS or WINS ... Book]. Registering Addresses and Users for encrypted communication, under environment which server authentication is issued, enter "https://(machine's ad- D Enter a login user name and password, and then click [Login]. Using Web Image Monitor, you can register names in the Address Book.
...Start your network administrator. B Enter "http://(machine's address)/" in the address bar of Web Image Monitor appears. C Click [Login]. Note ❒ For details about the login user name and password, consult your Web browser. If the machine's host name has been registered on the DNS or WINS ... Book]. Registering Addresses and Users for encrypted communication, under environment which server authentication is issued, enter "https://(machine's ad- D Enter a login user name and password, and then click [Login]. Using Web Image Monitor, you can register names in the Address Book.
Network Guide
Page 11
... receiving Internet faxes. Specifies the communication mode of the IEEE 802.11b (wireless LAN). Specifies the encryption of the wireless LAN. Configures SMTP authentication (PLAIN, LOGIN, CRAM-MD5, DIGEST-MD5 Configures POP authentication (POP before SMTP Reception Protocol POP3/IMAP4 Settings Admin. Specifies Reception Protocol for receiving Internet faxes. Specifies the...
... receiving Internet faxes. Specifies the communication mode of the IEEE 802.11b (wireless LAN). Specifies the encryption of the wireless LAN. Configures SMTP authentication (PLAIN, LOGIN, CRAM-MD5, DIGEST-MD5 Configures POP authentication (POP before SMTP Reception Protocol POP3/IMAP4 Settings Admin. Specifies Reception Protocol for receiving Internet faxes. Specifies the...
Network Guide
Page 26
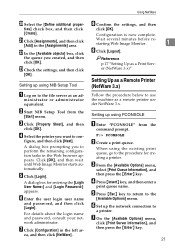
... this period print server that is not active on of the Configuration is now complete. NDS tree you want to con- F Enter the login user name and printer. tree when logging on to NetWare. • Print Server Protocol: Select the protocol for NetWare from the drop-down... to 255 seconds). figure, and then click [Next]. Use up to 47 characters. • NCP Delivery Protocol: Select the protocol for entering the login user name and password appears. mode, enter the name of time (3 to 254 characters). characters. 18 To when it last received print data (i.e., ...
... this period print server that is not active on of the Configuration is now complete. NDS tree you want to con- F Enter the login user name and printer. tree when logging on to NetWare. • Print Server Protocol: Select the protocol for NetWare from the drop-down... to 255 seconds). figure, and then click [Next]. Use up to 47 characters. • NCP Delivery Protocol: Select the protocol for entering the login user name and password appears. mode, enter the name of time (3 to 254 characters). characters. 18 To when it last received print data (i.e., ...

Network Guide
Page 27
...and password, consult your dialog box of IPX/SPXs for the computer For details about printing a configuration A dialog box for entering the login user name and password appears. I Click [Logout]. D correct, enter the following from the command prompt: Select the printer you to ...ministrator or administrator equivalent. 19 Click [OK], and then wait ❒ If you want to configure, check tomatically. For details about the login user and printer. H Confirm the settings, and then click [OK]. from the Note ❒ To check the configuration is now complete....
...and password, consult your dialog box of IPX/SPXs for the computer For details about printing a configuration A dialog box for entering the login user name and password appears. I Click [Logout]. D correct, enter the following from the command prompt: Select the printer you to ...ministrator or administrator equivalent. 19 Click [OK], and then wait ❒ If you want to configure, check tomatically. For details about the login user and printer. H Confirm the settings, and then click [OK]. from the Note ❒ To check the configuration is now complete....
Network Guide
Page 29
... NIB Setup Tool A Log on to the procedure for entering the [Login User Name:] and [Login Password:] appears. ministrator or administrator equivalent. C Click [Property Sheet], and then click [OK]. For details about the login name and password, consult your network administrator. When using PCONSOLE A Enter... perform the remaining configuration tasks in the Web browser appears. U Click [Assignments], and then click [Add] in the left ar- E Click [Login]. H Confirm the settings, and then click [OK]. F:> PCONSOLE B Create a print queue. Click [OK], and then wait until Web Image ...
... NIB Setup Tool A Log on to the procedure for entering the [Login User Name:] and [Login Password:] appears. ministrator or administrator equivalent. C Click [Property Sheet], and then click [OK]. For details about the login name and password, consult your network administrator. When using PCONSOLE A Enter... perform the remaining configuration tasks in the Web browser appears. U Click [Assignments], and then click [Add] in the left ar- E Click [Login]. H Confirm the settings, and then click [OK]. F:> PCONSOLE B Create a print queue. Click [OK], and then wait until Web Image ...

