Setup Guide
Page 17
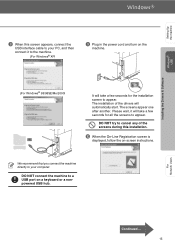
... cancel any of the drivers will take a few seconds for the installation screen to your PC, and then connect it will automatically start. Setting Up the machine Windows® USB Installing the Drivers & Software 8 When this installation. 0 When the On-Line Registration screen is displayed, follow the on-screen instructions. The installation of the screens during this screen appears, connect the USB interface cable to a USB port on a keyboard or a nonpowered USB...
... cancel any of the drivers will take a few seconds for the installation screen to your PC, and then connect it will automatically start. Setting Up the machine Windows® USB Installing the Drivers & Software 8 When this installation. 0 When the On-Line Registration screen is displayed, follow the on-screen instructions. The installation of the screens during this screen appears, connect the USB interface cable to a USB port on a keyboard or a nonpowered USB...

Setup Guide
Page 21
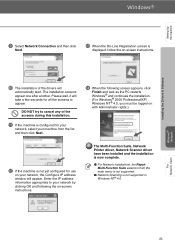
... installation. Follow the instructions on the screen. (For Windows® 2000 Professional/XP, you must be logged on with Administrator rights.) D For Windows® 2000 Professional users, if the Digital Signature Not Found dialog boxes appear, click Yes to install the drivers. The Multi-Function Suite, Printer driver and Scanner driver have been installed and the installation is now complete. 19 For Network Users...
... installation. Follow the instructions on the screen. (For Windows® 2000 Professional/XP, you must be logged on with Administrator rights.) D For Windows® 2000 Professional users, if the Digital Signature Not Found dialog boxes appear, click Yes to install the drivers. The Multi-Function Suite, Printer driver and Scanner driver have been installed and the installation is now complete. 19 For Network Users...
Setup Guide
Page 25
... network, select your network, the Configure IP address window will automatically start. A If the machine is not supported in Windows NT® 4.0. Windows® Network For Network Users 23 Setting Up the machine Installing the Drivers & Software 9 Select Network Connection and then click Next. C When the On-Line Registration screen is displayed, follow the on your machine from the main menu is not supported. ■ Network Scanning is configured for use on -screen instructions. 0 The installation...
... network, select your network, the Configure IP address window will automatically start. A If the machine is not supported in Windows NT® 4.0. Windows® Network For Network Users 23 Setting Up the machine Installing the Drivers & Software 9 Select Network Connection and then click Next. C When the On-Line Registration screen is displayed, follow the on your machine from the main menu is not supported. ■ Network Scanning is configured for use on -screen instructions. 0 The installation...
Setup Guide
Page 68
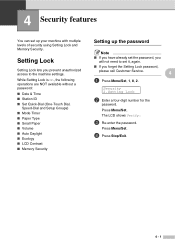
..., Speed-Dial and Setup Groups) ■ Mode Timer ■ Paper Type ■ Small Paper ■ Volume ■ Auto Daylight ■ Ecology ■ LCD Contrast ■ Memory Security Setting up your machine with multiple levels of security using Setting Lock and Memory Security. The LCD shows Verify: 3 Re-enter the password. Setting Lock Setting Lock lets you forget the Setting Lock password, please call Customer Service. 4 1 Press Menu/Set, 1, 8, 2. Press Menu/Set. 4 Security features...
..., Speed-Dial and Setup Groups) ■ Mode Timer ■ Paper Type ■ Small Paper ■ Volume ■ Auto Daylight ■ Ecology ■ LCD Contrast ■ Memory Security Setting up your machine with multiple levels of security using Setting Lock and Memory Security. The LCD shows Verify: 3 Re-enter the password. Setting Lock Setting Lock lets you forget the Setting Lock password, please call Customer Service. 4 1 Press Menu/Set, 1, 8, 2. Press Menu/Set. 4 Security features...

Setup Guide
Page 69
... password. Press Menu/Set. 3 Enter the registered four-digit password. Press Menu/Set. 3 Enter the registered four-digit password. Press Menu/Set twice. 3 Press Stop/Exit. Turning Setting Lock off 1 Press Menu/Set, 1, 8, 2. Press Menu/Set. 4 Press Stop/Exit. Note If you enter the wrong Password, the LCD shows Wrong Password. Security 2.Setting Lock 2 Press ▲ or ▼ to select Set Password. Press Menu/Set. 4 Enter a four-digit number for the new password. Chapter 4 Changing the Setting Lock password 1 Press Menu/Set...
... password. Press Menu/Set. 3 Enter the registered four-digit password. Press Menu/Set. 3 Enter the registered four-digit password. Press Menu/Set twice. 3 Press Stop/Exit. Turning Setting Lock off 1 Press Menu/Set, 1, 8, 2. Press Menu/Set. 4 Press Stop/Exit. Note If you enter the wrong Password, the LCD shows Wrong Password. Security 2.Setting Lock 2 Press ▲ or ▼ to select Set Password. Press Menu/Set. 4 Enter a four-digit number for the new password. Chapter 4 Changing the Setting Lock password 1 Press Menu/Set...

Setup Guide
Page 71
... offline. Press Menu/Set. 4 Enter a four-digit number for up to 60 hours. Memory Security is entered. 4 - 4 Turning Memory Security on 1 Press Menu/Set, 1, 8, 1. The machine goes offline and the LCD shows Secure Mode. Turning Memory Security off and the LCD shows the date and time. Press Menu/Set. 5 If the LCD shows Verify:, re-enter the new password. Press Menu/Set. Press Menu/Set. 3 Enter the registered four-digit password. Press Menu/Set. 6 Press Stop...
... offline. Press Menu/Set. 4 Enter a four-digit number for up to 60 hours. Memory Security is entered. 4 - 4 Turning Memory Security on 1 Press Menu/Set, 1, 8, 1. The machine goes offline and the LCD shows Secure Mode. Turning Memory Security off and the LCD shows the date and time. Press Menu/Set. 5 If the LCD shows Verify:, re-enter the new password. Press Menu/Set. Press Menu/Set. 3 Enter the registered four-digit password. Press Menu/Set. 6 Press Stop...
Setup Guide
Page 102
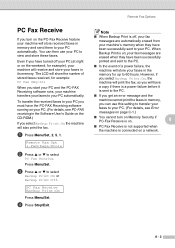
...Print is connected on a network. 8 - 3 Press Menu/Set. 3 Press ▲ or ▼ to select PC Fax Receive. PC Fax Receive Backup Print:On Press Menu/Set. 4 Press Stop/Exit. You can use your PC. (For details, see PC-FAX receiving in the Software User's Guide on the CD-ROM.) If you select Backup Print:On the machine will also print the fax. 1 Press Menu/Set, 2, 5, 1. To transfer... if you select Backup Print:On, the machine will print the fax, so you will have a copy if there is a power failure before it is off, your fax messages are erased when they have turned off your PC (at...
...Print is connected on a network. 8 - 3 Press Menu/Set. 3 Press ▲ or ▼ to select PC Fax Receive. PC Fax Receive Backup Print:On Press Menu/Set. 4 Press Stop/Exit. You can use your PC. (For details, see PC-FAX receiving in the Software User's Guide on the CD-ROM.) If you select Backup Print:On the machine will also print the fax. 1 Press Menu/Set, 2, 5, 1. To transfer... if you select Backup Print:On, the machine will print the fax, so you will have a copy if there is a power failure before it is off, your fax messages are erased when they have turned off your PC (at...

Setup Guide
Page 123
... models sold and used in response to an incoming call. This equipment complies with the FCC if you disconnect the equipment until the problem is designed to be required. See installation instructions for repair or warranty information, please contact Customer Service. Excessive RENs on the label. If this equipment does not disable your telephone company or a qualified installer. Connection to the telephone network...
... models sold and used in response to an incoming call. This equipment complies with the FCC if you disconnect the equipment until the problem is designed to be required. See installation instructions for repair or warranty information, please contact Customer Service. Excessive RENs on the label. If this equipment does not disable your telephone company or a qualified installer. Connection to the telephone network...

Setup Guide
Page 124
...) Responsible Party: Ricoh Corporation Address: 5 Dedrick Place, West Caldwell, NJ 07006 Telephone number: 973-882-2000 declares, that the products Product Name: SP C210SF comply with the limits for a Class B digital device, pursuant to Part 15 of the FCC Rules. A A - 2 WARNING ■ For protection against harmful interference in a particular installation. Important information This equipment has been tested and found...
...) Responsible Party: Ricoh Corporation Address: 5 Dedrick Place, West Caldwell, NJ 07006 Telephone number: 973-882-2000 declares, that the products Product Name: SP C210SF comply with the limits for a Class B digital device, pursuant to Part 15 of the FCC Rules. A A - 2 WARNING ■ For protection against harmful interference in a particular installation. Important information This equipment has been tested and found...
Setup Guide
Page 149
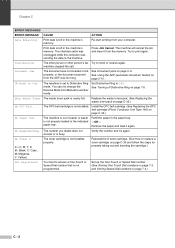
... will cancel the job and clear it again. machine stopped the call. See Using the ADF (automatic document feeder) on page C-32.) No OPC Belt The OPC belt cartridge is not programmed. Verify the number and try again. Print data is left in the machine's memory. The interface cable was unplugged while the computer was too long. Refill the paper in the indicated paper tray. Reinstall the X toner cartridge...
... will cancel the job and clear it again. machine stopped the call. See Using the ADF (automatic document feeder) on page C-32.) No OPC Belt The OPC belt cartridge is not programmed. Verify the number and try again. Print data is left in the machine's memory. The interface cable was unplugged while the computer was too long. Refill the paper in the indicated paper tray. Reinstall the X toner cartridge...
Setup Guide
Page 150
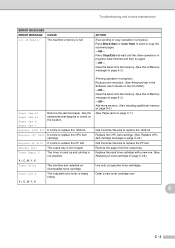
... diagram to send or copy the scanned pages. -OR- Stacker Full The output tray is not possible. ACTION (Fax sending or copy operation in progress) Press Black Start or Color Start to check on the location. Clear the faxes from the memory. (See Out of paper. Replace the used up and printing is full of Memory message on page 5-3.) -OR- C C - 3 X = C, M, Y, K Toner Error The machine has detected an incompatible toner cartridge. Replace the OPC belt cartridge...
... diagram to send or copy the scanned pages. -OR- Stacker Full The output tray is not possible. ACTION (Fax sending or copy operation in progress) Press Black Start or Color Start to check on the location. Clear the faxes from the memory. (See Out of paper. Replace the used up and printing is full of Memory message on page 5-3.) -OR- C C - 3 X = C, M, Y, K Toner Error The machine has detected an incompatible toner cartridge. Replace the OPC belt cartridge...

Setup Guide
Page 160
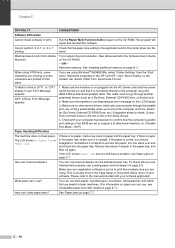
... application software. -OR- Add more memory. Make sure the TWAIN driver is unchecked. There is online. C C - 13 Select 'SP C210SF' and right-click. See Installing additional memory on the screen but do not appear when I print them. Turn off for this. If the error message continues leave the machine for several minutes and then try again. Adjust the top and bottom margins in the Software User's Guide on...
... application software. -OR- Add more memory. Make sure the TWAIN driver is unchecked. There is online. C C - 13 Select 'SP C210SF' and right-click. See Installing additional memory on the screen but do not appear when I print them. Turn off for this. If the error message continues leave the machine for several minutes and then try again. Adjust the top and bottom margins in the Software User's Guide on...
Setup Guide
Page 161
... 1' Check that the computer's parallel port settings in the Page Setup or Document Setup menu of the 'SP C210SF'. Make sure the machine is connected directly to the computer using . Make sure no paper, load a new stack of paper in the win.ini file or the Setup Group) 4. i.e. (Parallel Port Mode - How can I use plain paper, recycled paper, envelopes, transparencies and labels that it . What paper can I clear paper jams? Run the Repair Multi-Function Suite program on the LCD Display. 3. Add...
... 1' Check that the computer's parallel port settings in the Page Setup or Document Setup menu of the 'SP C210SF'. Make sure the machine is connected directly to the computer using . Make sure no paper, load a new stack of paper in the win.ini file or the Setup Group) 4. i.e. (Parallel Port Mode - How can I use plain paper, recycled paper, envelopes, transparencies and labels that it . What paper can I clear paper jams? Run the Repair Multi-Function Suite program on the LCD Display. 3. Add...

Setup Guide
Page 163
... the toner cartridges gently. ■ Clean the laser glass. (See Cleaning the laser glass on page C-24.) ■ Turn off Toner Save. (See Toner Save on the printout, then match it out as the problem may not lie with print quality, please do a test print first (Menu/Set, 4, 1). abcdefghijklmnopqrstuvwxyz. abcdefghijklmnopqrstuvwxyz. abcdefghijklmnopqrstuvwxyz. Colors are having problems with the machine. R ■ Check that the recommended paper was used. (See Recommended paper on page C-29.) The toner has...
... the toner cartridges gently. ■ Clean the laser glass. (See Cleaning the laser glass on page C-24.) ■ Turn off Toner Save. (See Toner Save on the printout, then match it out as the problem may not lie with print quality, please do a test print first (Menu/Set, 4, 1). abcdefghijklmnopqrstuvwxyz. abcdefghijklmnopqrstuvwxyz. abcdefghijklmnopqrstuvwxyz. Colors are having problems with the machine. R ■ Check that the recommended paper was used. (See Recommended paper on page C-29.) The toner has...
Setup Guide
Page 204
... to print 9-2 Network Configuration 9-2 Quick-Dial List 9-2 Transmission Verification 9-1 User Settings 9-2 Resolution copy E-4 fax (Standard, Fine, SuperFine, Photo E-3 print E-6 scan E-5 setting for next fax 5-5 Ring Delay, setting 6-2 S Safety Instructions A-4, A-7 Setting Lock 4-1 Sleep Time 3-8 Speed-Dial changing 7-4 setting up 7-4 using 7-1 T TAD (telephone answering device), external 3-4, 3-5, 6-1 connecting 3-5, 3-6 receive mode 6-1 recording OGM 3-7 with two-line jack 3-4 Text, entering B-15 special characters B-15 Transparency 2-6 Tray use, setting copy 11...
... to print 9-2 Network Configuration 9-2 Quick-Dial List 9-2 Transmission Verification 9-1 User Settings 9-2 Resolution copy E-4 fax (Standard, Fine, SuperFine, Photo E-3 print E-6 scan E-5 setting for next fax 5-5 Ring Delay, setting 6-2 S Safety Instructions A-4, A-7 Setting Lock 4-1 Sleep Time 3-8 Speed-Dial changing 7-4 setting up 7-4 using 7-1 T TAD (telephone answering device), external 3-4, 3-5, 6-1 connecting 3-5, 3-6 receive mode 6-1 recording OGM 3-7 with two-line jack 3-4 Text, entering B-15 special characters B-15 Transparency 2-6 Tray use, setting copy 11...
Setup Guide
Page 212
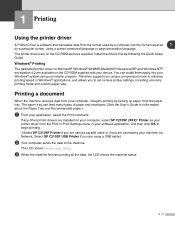
... types of paper and envelopes. (See the User's Guide for Microsoft® Windows® 98/98SE/Me/2000 Professional/XP and Windows NT® workstation 4.0 are connecting your device. Select SP C210SF USB Printer if you are using a USB cable.) 2 Your computer sends the data to begin printing. *(Select SP C210SF Printer if you are on the CD-ROM supplied with your machine via Network. The printer drivers are using a printer command language or page description language. The driver supports...
... types of paper and envelopes. (See the User's Guide for Microsoft® Windows® 98/98SE/Me/2000 Professional/XP and Windows NT® workstation 4.0 are connecting your device. Select SP C210SF USB Printer if you are using a USB cable.) 2 Your computer sends the data to begin printing. *(Select SP C210SF Printer if you are on the CD-ROM supplied with your machine via Network. The printer drivers are using a printer command language or page description language. The driver supports...

Setup Guide
Page 292
... does not start automatically 8-1 How to reset the print server to factory default 8-1 Network print software installation problems 8-1 The print server is not found during setup of the network print software installation or from the printer driver of the machine in Windows 8-1 Printing problems...8-3 Print job is not printed...8-3 Protocol-specific troubleshooting...8-3 Windows® 98/98SE/Me and Windows NT® 4.0 Peer-to-Peer print (LPR) troubleshooting.......... 8-3 Windows® 2000/XP IPP troubleshooting 8-4 Want to use a different Port number other than 631 8-4 Get More Info...
... does not start automatically 8-1 How to reset the print server to factory default 8-1 Network print software installation problems 8-1 The print server is not found during setup of the network print software installation or from the printer driver of the machine in Windows 8-1 Printing problems...8-3 Print job is not printed...8-3 Protocol-specific troubleshooting...8-3 Windows® 98/98SE/Me and Windows NT® 4.0 Peer-to-Peer print (LPR) troubleshooting.......... 8-3 Windows® 2000/XP IPP troubleshooting 8-4 Want to use a different Port number other than 631 8-4 Get More Info...

Setup Guide
Page 302
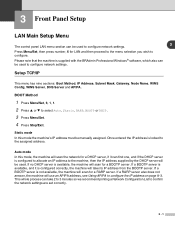
... be used to change your print server settings using a DHCP/BOOTP/RARP server, the device will appear as BRN_xxxxxx where xxxxxx is the last six digits of the Ethernet address. 2 Click Network Configuration. 3 Enter a user name and a password. The NetBIOS name can also enter the DNS name of the print server. See Printing the Network Configuration List on page 3-16 for information on how to print the Network 2 Configuration List on your print server. As the print server supports TCP...
... be used to change your print server settings using a DHCP/BOOTP/RARP server, the device will appear as BRN_xxxxxx where xxxxxx is the last six digits of the Ethernet address. 2 Click Network Configuration. 3 Enter a user name and a password. The NetBIOS name can also enter the DNS name of the print server. See Printing the Network Configuration List on page 3-16 for information on how to print the Network 2 Configuration List on your print server. As the print server supports TCP...
Setup Guide
Page 303
... a RARP server. Auto mode In this mode the machine's IP address must be used . If no DHCP server is available, the machine will take 2 to 3 minutes so we recommend printing a Network Configuration List to configure network settings. This whole process can be manually assigned. If a RARP server also does not answer, the machine will scan for a BOOTP server. If a BOOTP server is supplied with the BRAdmin Professional Windows® software, which also...
... a RARP server. Auto mode In this mode the machine's IP address must be used . If no DHCP server is available, the machine will take 2 to 3 minutes so we recommend printing a Network Configuration List to configure network settings. This whole process can be manually assigned. If a RARP server also does not answer, the machine will scan for a BOOTP server. If a BOOTP server is supplied with the BRAdmin Professional Windows® software, which also...
Setup Guide
Page 334
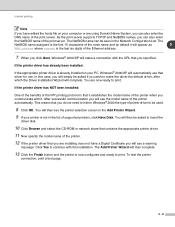
... the hosts file on your PC, Windows® 2000/XP will automatically use that driver for use. If the printer driver has NOT been installed: One of the benefits of the printer automatically. You will then see the printer selection screen in the Network Configuration List. As the print server supports TCP/IP and NetBIOS names, you can be asked if you wish to make a connection with the...
... the hosts file on your PC, Windows® 2000/XP will automatically use that driver for use. If the printer driver has NOT been installed: One of the benefits of the printer automatically. You will then see the printer selection screen in the Network Configuration List. As the print server supports TCP/IP and NetBIOS names, you can be asked if you wish to make a connection with the...


