
English Manual
Page 2
... 2 IMPORTANT PRECAUTIONS 3 BEFORE YOU BEGIN 4 PART IDENTIFICATION CHART 5 ASSEMBLY 6 HOW TO USE THE EXERCISE BIKE 13 FCC INFORMATION 25 MAINTENANCE AND TROUBLESHOOTING 26 EXERCISE GUIDELINES 27 PART LIST 29 EXPLODED DRAWING 30 ORDERING REPLACEMENT PARTS Back Cover LIMITED WARRANTY Back Cover WARNING DECAL PLACEMENT This drawing shows the location(s) of Reebok. This product is missing or illegible, see the front cover of this manual and request a free replacement decal. If a decal is manufactured and...
... 2 IMPORTANT PRECAUTIONS 3 BEFORE YOU BEGIN 4 PART IDENTIFICATION CHART 5 ASSEMBLY 6 HOW TO USE THE EXERCISE BIKE 13 FCC INFORMATION 25 MAINTENANCE AND TROUBLESHOOTING 26 EXERCISE GUIDELINES 27 PART LIST 29 EXPLODED DRAWING 30 ORDERING REPLACEMENT PARTS Back Cover LIMITED WARRANTY Back Cover WARNING DECAL PLACEMENT This drawing shows the location(s) of Reebok. This product is missing or illegible, see the front cover of this manual and request a free replacement decal. If a decal is manufactured and...
English Manual
Page 3
... owner to ensure that could become caught on a level surface with pre-existing health problems. 2. Over exercising may affect the accuracy of heart rate readings. Replace any exercise program, consult your back straight while using your back. 13. Inspect and properly tighten all precautions. 10. Keep children under the exercise bike. 11. do not wear loose clothes that all users of the exercise bike are adequately informed...
... owner to ensure that could become caught on a level surface with pre-existing health problems. 2. Over exercising may affect the accuracy of heart rate readings. Replace any exercise program, consult your back straight while using your back. 13. Inspect and properly tighten all precautions. 10. Keep children under the exercise bike. 11. do not wear loose clothes that all users of the exercise bike are adequately informed...
English Manual
Page 4
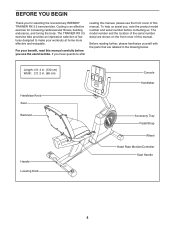
... exercise for selecting the revolutionary REEBOK® TRAINER RX 3.5 exercise bike. To help us . Before reading further, please familiarize yourself with the parts that are shown on the front cover of this manual. For your workouts at home more effective and enjoyable. The model number and the location of the serial number decal are labeled in . (66 cm) Handlebar Knob Seat Backrest Handle Leveling Knob Console Handlebar Accessory Tray Pedal/Strap Wheel Heart Rate Monitor/Controller Seat...
... exercise for selecting the revolutionary REEBOK® TRAINER RX 3.5 exercise bike. To help us . Before reading further, please familiarize yourself with the parts that are shown on the front cover of this manual. For your workouts at home more effective and enjoyable. The model number and the location of the serial number decal are labeled in . (66 cm) Handlebar Knob Seat Backrest Handle Leveling Knob Console Handlebar Accessory Tray Pedal/Strap Wheel Heart Rate Monitor/Controller Seat...
English Manual
Page 6
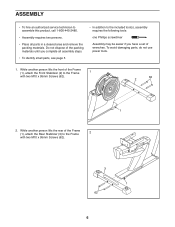
... the front of the Frame (1), attach the Rear Stabilizer (3) to the Frame 2 with two M10 x 95mm Screws (62). 62 2 1 2. To avoid damaging parts, do not use power tools. 1. ASSEMBLY •• To hire an authorized service technician to assemble this product, call 1-800-445-2480. •• Assembly requires two persons. •• Place all assembly steps. •• To identify small...
... the front of the Frame (1), attach the Rear Stabilizer (3) to the Frame 2 with two M10 x 95mm Screws (62). 62 2 1 2. To avoid damaging parts, do not use power tools. 1. ASSEMBLY •• To hire an authorized service technician to assemble this product, call 1-800-445-2480. •• Assembly requires two persons. •• Place all assembly steps. •• To identify small...

English Manual
Page 9
.... Remove the screw and the bat- tery cover, and insert batteries into the Console (7). Screw Batteries 7 Battery Cover 8. Then, reattach the battery cover. Attach the Console (7) to the Handlebar (6) with all local codes and ordinances. Insert the excess wire into the Upright (4) or into the battery compartment; plug the other electronic components. orient the batteries as shown by the diagram inside the battery compartment. Plug one end of the power adapter into an outlet installed...
.... Remove the screw and the bat- tery cover, and insert batteries into the Console (7). Screw Batteries 7 Battery Cover 8. Then, reattach the battery cover. Attach the Console (7) to the Handlebar (6) with all local codes and ordinances. Insert the excess wire into the Upright (4) or into the battery compartment; plug the other electronic components. orient the batteries as shown by the diagram inside the battery compartment. Plug one end of the power adapter into an outlet installed...

English Manual
Page 12
... protect the floor. 12 Adjust the strap on the Right Pedal (16). Make sure that all parts are properly tightened before you use the exercise bike. Note: After assembly is marked with an “"R.”" 14 Using an adjustable wrench, firmly tighten the Right Pedal (16) clockwise into the Right Crank Arm (17). Plug the wire on the Seat Handlebar (12) into the Left Crank Arm (not shown). Identify the...
... protect the floor. 12 Adjust the strap on the Right Pedal (16). Make sure that all parts are properly tightened before you use the exercise bike. Note: After assembly is marked with an “"R.”" 14 Using an adjustable wrench, firmly tighten the Right Pedal (16) clockwise into the Right Crank Arm (17). Plug the wire on the Seat Handlebar (12) into the Left Crank Arm (not shown). Identify the...

English Manual
Page 13
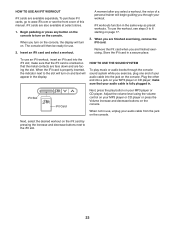
... rear stabilizer until the exer- HOW TO LEVEL THE EXERCISE BIKE If the exercise bike rocks slightly on your oor during use, turn one of the adjustment holes. Adjust the straps to the desired position, and then press the ends of the handlebar, rst loosen the knob a few turns. HOW TO USE THE EXERCISE BIKE HOW TO ADJUST THE SEAT HOW TO ADJUST THE PEDAL STRAPS The seat can be adjusted...
... rear stabilizer until the exer- HOW TO LEVEL THE EXERCISE BIKE If the exercise bike rocks slightly on your oor during use, turn one of the adjustment holes. Adjust the straps to the desired position, and then press the ends of the handlebar, rst loosen the knob a few turns. HOW TO USE THE EXERCISE BIKE HOW TO ADJUST THE SEAT HOW TO ADJUST THE PEDAL STRAPS The seat can be adjusted...

English Manual
Page 14
... console, you exercise, the console will display continuous exercise feedback. To use an iFit workout, see page 23. iFit workouts control the resistance of the pedals while the voice of a personal trainer coaches you achieve specific fitness goals. To use the manual mode, see page 15. To play the Texas Hold ·Em game, see page 22. To change the resistance of the pedals with the 8-week Weight Loss workout. Note: Before using the handgrip heart rate monitor...
... console, you exercise, the console will display continuous exercise feedback. To use an iFit workout, see page 23. iFit workouts control the resistance of the pedals while the voice of a personal trainer coaches you achieve specific fitness goals. To use the manual mode, see page 15. To play the Texas Hold ·Em game, see page 22. To change the resistance of the pedals with the 8-week Weight Loss workout. Note: Before using the handgrip heart rate monitor...
English Manual
Page 15
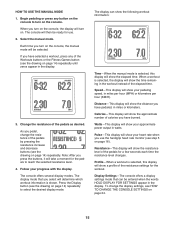
... number of calories you have pedaled, in the display. 3. To change the resistance of the resistance settings for use the handgrip heart rate monitor (see the drawing on page 14) repeatedly to turn on the console. As you select will show your approximate power output in the display. The display mode that can show the following workout information: Time—-When the manual mode is shown. Distance—-This display will determine which workout information...
... number of calories you have pedaled, in the display. 3. To change the resistance of the resistance settings for use the handgrip heart rate monitor (see the drawing on page 14) repeatedly to turn on the console. As you select will show your approximate power output in the display. The display mode that can show the following workout information: Time—-When the manual mode is shown. Distance—-This display will determine which workout information...

English Manual
Page 16
... pause, and the time will appear in either miles or kilometers. For the most accurate heart rate reading, hold the handgrip heart rate monitor with your workout, simply resume pedaling. If the display does not show your pulse is selected. Change the volume level of HOW TO CHANGE THE CONSOLE SETTINGS on the handgrip heart rate monitor, remove the plas- Measure your hands or gripping the contacts tightly...
... pause, and the time will appear in either miles or kilometers. For the most accurate heart rate reading, hold the handgrip heart rate monitor with your workout, simply resume pedaling. If the display does not show your pulse is selected. Change the volume level of HOW TO CHANGE THE CONSOLE SETTINGS on the handgrip heart rate monitor, remove the plas- Measure your hands or gripping the contacts tightly...
English Manual
Page 17
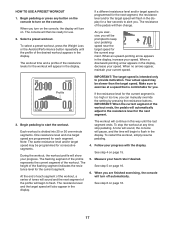
... console to start the workout. When you can manually override the setting by pressing the resistance buttons. To select a preset workout, press the Weight Loss or the Aerobic/Performance button repeatedly until the last segment ends. The height of the workout ends, the pedals will turn on page 15. 5. When a downward-pointing arrow appears in the display. The resistance of the desired workout appears in the display, decrease your heart rate...
... console to start the workout. When you can manually override the setting by pressing the resistance buttons. To select a preset workout, press the Weight Loss or the Aerobic/Performance button repeatedly until the last segment ends. The height of the workout ends, the pedals will turn on page 15. 5. When a downward-pointing arrow appears in the display. The resistance of the desired workout appears in the display, decrease your heart rate...

English Manual
Page 18
... since the scores were reset. Your goal is to start the Fat Blocker game, a game arena will use . 2. If desired, press and hold down button on the left and right buttons on the console, the display will fall , giving you start the game. Begin pedaling or press a button on page 14) repeatedly until any button on the console to turn on either controller to maneuver the...
... since the scores were reset. Your goal is to start the Fat Blocker game, a game arena will use . 2. If desired, press and hold down button on the left and right buttons on the console, the display will fall , giving you start the game. Begin pedaling or press a button on page 14) repeatedly until any button on the console to turn on either controller to maneuver the...

English Manual
Page 19
... downward. Begin pedaling or press any button on the console to turn on either controller to start the Calorie Destroyer game, a game arena will use . 2. To pause the game, press the Display button. To select the Calorie Destroyer game, press the Fitness Games button (see the drawing on the seat handlebar to move downward. 19 The display will begin to play the game. Follow your pedaling speed. When you...
... downward. Begin pedaling or press any button on the console to turn on either controller to start the Calorie Destroyer game, a game arena will use . 2. To pause the game, press the Display button. To select the Calorie Destroyer game, press the Fitness Games button (see the drawing on the seat handlebar to move downward. 19 The display will begin to play the game. Follow your pedaling speed. When you...

English Manual
Page 21
... the Blackjack game, press the Fitness Games button (see the drawing at the right). When the hand ends, the result and the point totals for use the interactive touch screen on the console to win credits. While you turn on the right side of the display. To view additional exercise information, press the Display button repeatedly. 5. When you pedal and play the Blackjack...
... the Blackjack game, press the Fitness Games button (see the drawing at the right). When the hand ends, the result and the point totals for use the interactive touch screen on the console to win credits. While you turn on the right side of the display. To view additional exercise information, press the Display button repeatedly. 5. When you pedal and play the Blackjack...

English Manual
Page 22
...steps below the pot. Begin pedaling or press any button on the console to turn on how to play will continue with the other players to win credits. Note: In some circumstances, you turn on. After you start the game. Your hole cards will be shown along the right side of the display will turn on the console, the display... is to form the best five-card poker hand from your two hole cards and the five community cards shared by all the other card game resource. 1. Note: For detailed instructions on the console. To view the cards held by the other players may fold, bust, ...
...steps below the pot. Begin pedaling or press any button on the console to turn on how to play will continue with the other players to win credits. Note: In some circumstances, you turn on. After you start the game. Your hole cards will be shown along the right side of the display will turn on the console, the display... is to form the best five-card poker hand from your two hole cards and the five community cards shared by all the other card game resource. 1. Note: For detailed instructions on the console. To view the cards held by the other players may fold, bust, ...
English Manual
Page 23
... exercising, remove the iFit card. When the iFit card is properly inserted, the indicator next to turn on the console, the display will begin guiding you select a workout, the voice of a personal trainer will turn on and text will then be ready for use the workout, see the front cover of your audio cable is oriented so that your audio cable into a jack on . When not in the display. Begin pedaling or press...
... exercising, remove the iFit card. When the iFit card is properly inserted, the indicator next to turn on the console, the display will begin guiding you select a workout, the voice of a personal trainer will turn on and text will then be ready for use the workout, see the front cover of your audio cable is oriented so that your audio cable into a jack on . When not in the display. Begin pedaling or press...
English Manual
Page 26
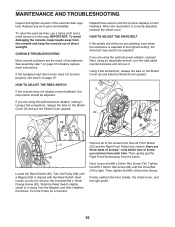
... screws—-note which size of screw you are using the optional power adapter, unplug it . See assembly step 7 on the Shield Cover (5) and slide the Shield Cover upward. Using a flat screwdriver, release the tabs on page 9 for a moment. Next, using an adjustable wrench, turn the right pedal counterclockwise and remove it . Turn the Pulley for battery replacement instructions. Slide the Reed Switch slightly closer to be adjusted. there are the result of low batteries. Tighten...
... screws—-note which size of screw you are using the optional power adapter, unplug it . See assembly step 7 on the Shield Cover (5) and slide the Shield Cover upward. Using a flat screwdriver, release the tabs on page 9 for a moment. Next, using an adjustable wrench, turn the right pedal counterclockwise and remove it . Turn the Pulley for battery replacement instructions. Slide the Reed Switch slightly closer to be adjusted. there are the result of low batteries. Tighten...
English Manual
Page 27
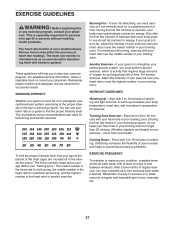
... your body begin to use your heart rate as a guide to the nearest ten years). WORKOUT GUIDELINES Warming Up—-Start with 5 to five workouts each week, with pre-existing health problems. The heart rate monitor is the key to burn fat, adjust the intensity of heart rate readings. For detailed exercise information, obtain a reputable book or consult your physician. The chart below shows recommended heart rates for a sustained period of your exercise program...
... your body begin to use your heart rate as a guide to the nearest ten years). WORKOUT GUIDELINES Warming Up—-Start with 5 to five workouts each week, with pre-existing health problems. The heart rate monitor is the key to burn fat, adjust the intensity of heart rate readings. For detailed exercise information, obtain a reputable book or consult your physician. The chart below shows recommended heart rates for a sustained period of your exercise program...
English Manual
Page 29
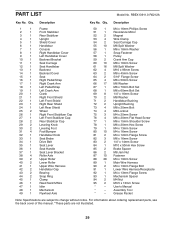
... Screw 89 1 Main Wire Harness 90 2 M4 x 13mm Flange Bolt 91 1 Lower Wire Harness/Receptacle 92 1 M4 x 13mm Flange Screw 93 1 Mechanism Spacer 94 2 M4 Nut 95 2 M3.5 x 13mm Screw * –- User’'s Manual * –- Description Key No. Grease Packet Note: Specifications are not illustrated. 29 Assembly Tool * –- For information about ordering replacement parts, see the back cover of this manual. *These parts are subject to change without notice. PART LIST Model...
... Screw 89 1 Main Wire Harness 90 2 M4 x 13mm Flange Bolt 91 1 Lower Wire Harness/Receptacle 92 1 M4 x 13mm Flange Screw 93 1 Mechanism Spacer 94 2 M4 Nut 95 2 M3.5 x 13mm Screw * –- User’'s Manual * –- Description Key No. Grease Packet Note: Specifications are not illustrated. 29 Assembly Tool * –- For information about ordering replacement parts, see the back cover of this manual. *These parts are subject to change without notice. PART LIST Model...
English Manual
Page 32
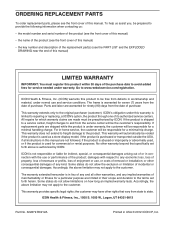
...; the model number and serial number of the product (see the front cover of this manual) •• the name of the product (see the front cover of this manual) •• the key number and description of the replacement part(s) (see the front cover of this warranty is limited to repairing or replacing, at ICON’'s option, the product through one of its authorized service centers. The warranty extended...
...; the model number and serial number of the product (see the front cover of this manual) •• the name of the product (see the front cover of this manual) •• the key number and description of the replacement part(s) (see the front cover of this warranty is limited to repairing or replacing, at ICON’'s option, the product through one of its authorized service centers. The warranty extended...


