
English Manual
Page 2
® TABLE OF CONTENTS IMPORTANT PRECAUTIONS 3 BEFORE YOU BEGIN 5 ASSEMBLY 6 HOW TO USE THE CHEST PULSE SENSOR 10 OPERATION AND ADJUSTMENT 11 HOW TO FOLD AND MOVE THE TREADMILL 23 TROUBLESHOOTING 24 CONDITIONING GUIDELINES 27 ORDERING REPLACEMENT PARTS Back Cover LIMITED WARRANTY Back Cover Note: A PART LIST/EXPLODED DRAWING is manufactured and distributed under license from Reebok International. 2 This product is attached in the center of Reebok. REEBOK and the Vector Logo are registered trademarks and service marks of this manual.
® TABLE OF CONTENTS IMPORTANT PRECAUTIONS 3 BEFORE YOU BEGIN 5 ASSEMBLY 6 HOW TO USE THE CHEST PULSE SENSOR 10 OPERATION AND ADJUSTMENT 11 HOW TO FOLD AND MOVE THE TREADMILL 23 TROUBLESHOOTING 24 CONDITIONING GUIDELINES 27 ORDERING REPLACEMENT PARTS Back Cover LIMITED WARRANTY Back Cover Note: A PART LIST/EXPLODED DRAWING is manufactured and distributed under license from Reebok International. 2 This product is attached in the center of Reebok. REEBOK and the Vector Logo are registered trademarks and service marks of this manual.
English Manual
Page 3
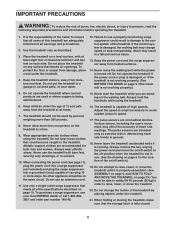
..., see page 11), plug the power cord into a surge suppressor (not included) and plug the surge suppressor into a grounded circuit capable of heart rate readings. The pulse sensors are standing on each side. Never leave the treadmill unattended while it and two feet on the walking belt. Do not attempt to raise, lower, or move the treadmill. 20. When folding or moving the treadmill, make sure that...
..., see page 11), plug the power cord into a surge suppressor (not included) and plug the surge suppressor into a grounded circuit capable of heart rate readings. The pulse sensors are standing on each side. Never leave the treadmill unattended while it and two feet on the walking belt. Do not attempt to raise, lower, or move the treadmill. 20. When folding or moving the treadmill, make sure that...
English Manual
Page 4
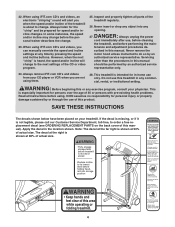
... speed and incline settings at 50% of actual size. •Fully engage storage latch before treadmill is not legible, please call our Customer Service Department, toll-free, to do so by pressing the speed and incline buttons. Never insert or drop any commercial, rental, or institutional setting. Always unplug the power cord immediately after use only. scribed in this treadmill in the location shown. Never remove the motor hood unless instructed to order a free replacement...
... speed and incline settings at 50% of actual size. •Fully engage storage latch before treadmill is not legible, please call our Customer Service Department, toll-free, to do so by pressing the speed and incline buttons. Never insert or drop any commercial, rental, or institutional setting. Always unplug the power cord immediately after use only. scribed in this treadmill in the location shown. Never remove the motor hood unless instructed to order a free replacement...
English Manual
Page 5
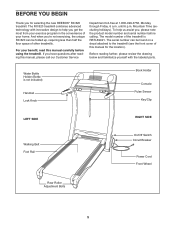
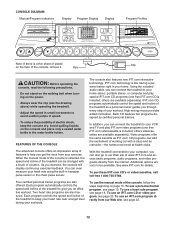
... you get the most from your exercise program in the convenience of the treadmill is not included) Handrail Lock Knob Book Holder Console Pulse Sensor Key/Clip LEFT SIDE RIGHT SIDE Walking Belt Foot Rail On/Off Switch Circuit Breaker Power Cord Front Wheel Rear Roller Adjustment Bolts 5 until 6 p.m. The model number of your benefit, read this manual, please call our Customer Service Department toll-free at 1-800-999-3756, Monday through...
... you get the most from your exercise program in the convenience of the treadmill is not included) Handrail Lock Knob Book Holder Console Pulse Sensor Key/Clip LEFT SIDE RIGHT SIDE Walking Belt Foot Rail On/Off Switch Circuit Breaker Power Cord Front Wheel Rear Roller Adjustment Bolts 5 until 6 p.m. The model number of your benefit, read this manual, please call our Customer Service Department toll-free at 1-800-999-3756, Monday through...

English Manual
Page 7
... fully seated. Then, tighten the other Base Pads (not shown) as described above. 6. Connect the wire harness to the right Upright (not shown) as described in steps 1 through the Post Spacer. Carefully wrap the wires around the connectors as shown. Finger tighten the Post Bolt. After all four Console Bolts have been started, tighten them . Attach the other hole. See step 2. Tighten the four Base Leg Bolts (77). Tighten...
... fully seated. Then, tighten the other Base Pads (not shown) as described above. 6. Connect the wire harness to the right Upright (not shown) as described in steps 1 through the Post Spacer. Carefully wrap the wires around the connectors as shown. Finger tighten the Post Bolt. After all four Console Bolts have been started, tighten them . Attach the other hole. See step 2. Tighten the four Base Leg Bolts (77). Tighten...

English Manual
Page 9
... the walking belt, simply wipe off the Hood Decal (1). Firmly tighten the Screws. 11 3 Peel the backing off the lubricant with high-performance lubricant. To protect the floor or carpet from damage, place a mat under the front of the Base Legs (78), and then retighten the Base Leg Bolts. See step 2. Plug the Power Cord (93) into place. 10.Attach the Latch Assembly (37) and the Latch Spacer...
... the walking belt, simply wipe off the Hood Decal (1). Firmly tighten the Screws. 11 3 Peel the backing off the lubricant with high-performance lubricant. To protect the floor or carpet from damage, place a mat under the front of the Base Legs (78), and then retighten the Base Leg Bolts. See step 2. Plug the Power Cord (93) into place. 10.Attach the Latch Assembly (37) and the Latch Spacer...

English Manual
Page 10
... the walking belt. If it may be under the buckle on the sensor unit is facing forward and is suspected that the logo on the chest strap. If the chest pulse sensor is designed to display heart rate readings, the user must be hand washed and air dried. Adjust the length of the console. • The chest pulse sensor is not dried after each use . For the console to work...
... the walking belt. If it may be under the buckle on the sensor unit is facing forward and is suspected that the logo on the chest strap. If the chest pulse sensor is designed to display heart rate readings, the user must be hand washed and air dried. Adjust the length of the console. • The chest pulse sensor is not dried after each use . For the console to work...
English Manual
Page 11
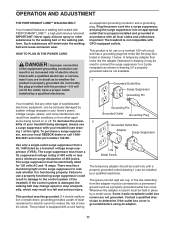
... screw. The green-colored rigid ear, lug, or the like the adapter illustrated in drawing 2 may be connected to determine if the outlet box cover is damaged, the walking belt may change speed or stop unexpectedly, which may result in an increased risk of 450 joules. Whenever the adapter is not compatible with PERFORMANT LUBETM, a high-performance lubricant. Important: The treadmill is used...
... screw. The green-colored rigid ear, lug, or the like the adapter illustrated in drawing 2 may be connected to determine if the outlet box cover is damaged, the walking belt may change speed or stop unexpectedly, which may result in an increased risk of 450 joules. Whenever the adapter is not compatible with PERFORMANT LUBETM, a high-performance lubricant. Important: The treadmill is used...
English Manual
Page 12
... of a button. When the manual mode of the console is included; You can connect the treadmill to your heart rate using the built-in speed. •To reduce the possibility of working out with a touch of the console, remove it. Using the included audio cable, you can even measure your home stereo, portable stereo, or computer and play iFIT.com video programs (one free iFIT.com CD is like having a personal trainer right...
... of a button. When the manual mode of the console is included; You can connect the treadmill to your heart rate using the built-in speed. •To reduce the possibility of working out with a touch of the console, remove it. Using the included audio cable, you can even measure your home stereo, portable stereo, or computer and play iFIT.com video programs (one free iFIT.com CD is like having a personal trainer right...

English Manual
Page 13
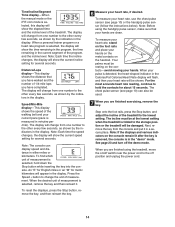
...: The console can display speed and distance in this section refer to miles. As you exercise, the indicators around the track will change by 0.5%. Note: After the buttons are pressed, it if necessary (see page 26). 4 Change the incline of 0.5 mph. If the key is pressed, the walking belt will light. Move the on/off switch near the power cord. A moment after the button is not pulled from the console, adjust the position...
...: The console can display speed and distance in this section refer to miles. As you exercise, the indicators around the track will change by 0.5%. Note: After the buttons are pressed, it if necessary (see page 26). 4 Change the incline of 0.5 mph. If the key is pressed, the walking belt will light. Move the on/off switch near the power cord. A moment after the button is not pulled from the console, adjust the position...
English Manual
Page 14
.... Note: Before using the treadmill, move the on the handrail. Speed/Min-Mile display-This display shows the speed of 1/4-mile laps you are finished exercising, remove the key. To measure your hands on the metal contacts on /off switch near the power cord to the off the demo mode. When a personal trainer program or a heart rate program is measured in the display. Step onto the foot rails, press the Stop button, and adjust the incline of measurement is...
.... Note: Before using the treadmill, move the on the handrail. Speed/Min-Mile display-This display shows the speed of 1/4-mile laps you are finished exercising, remove the key. To measure your hands on the metal contacts on /off switch near the power cord to the off the demo mode. When a personal trainer program or a heart rate program is measured in the display. Step onto the foot rails, press the Stop button, and adjust the incline of measurement is...
English Manual
Page 16
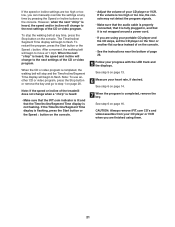
... to the off the demo mode. Follow the steps below to use the heart rate programs. Note: You must wear the chest pulse sensor (see page 10) to use the heart rate programs. If you are finished using the treadmill, move the on page 10. 2 Insert the key fully into the console. To end the program, press the Stop button, remove the key, and then reinsert the key. 4 Follow your estimated maximum heart rate is 190 beats per...
... to the off the demo mode. Follow the steps below to use the heart rate programs. Note: You must wear the chest pulse sensor (see page 10) to use the heart rate programs. If you are finished using the treadmill, move the on page 10. 2 Insert the key fully into the console. To end the program, press the Stop button, remove the key, and then reinsert the key. 4 Follow your estimated maximum heart rate is 190 beats per...

English Manual
Page 17
..., press the Incline (Age Set) buttons until your age is programmed for each segment. (The same target heart rate setting may automatically decrease until no time remains in the Calories/ Fat Calories/Heart Rate display. Each heart rate program is completed, remove the key from the console. The program will show a graphic that represents your heart rate. The walking belt will then slow to use a heart rate program again, reselect the program and start the program. When the incline reaches...
..., press the Incline (Age Set) buttons until your age is programmed for each segment. (The same target heart rate setting may automatically decrease until no time remains in the Calories/ Fat Calories/Heart Rate display. Each heart rate program is completed, remove the key from the console. The program will show a graphic that represents your heart rate. The walking belt will then slow to use a heart rate program again, reselect the program and start the program. When the incline reaches...
English Manual
Page 21
... Time/Incline/Segment Time display is not wrapped around a power cord. • If you are using them. 21 To restart the program, press the Start button or the Speed s button. See step 6 on page 16. After a moment, the walking belt will stop the walking belt at 1 mph. If the volume is too high or too low, the console may not detect the program signals. • Make sure that the audio cable...
... Time/Incline/Segment Time display is not wrapped around a power cord. • If you are using them. 21 To restart the program, press the Start button or the Speed s button. See step 6 on page 16. After a moment, the walking belt will stop the walking belt at 1 mph. If the volume is too high or too low, the console may not detect the program signals. • Make sure that the audio cable...
English Manual
Page 22
...-line instructions to start an internet connection. 4 Start your home computer. In addition, you when the speed and/or incline of specific system requirements will change to the next settings of the treadmill does not change . A list of the treadmill is not wrapped around a power cord. 8 Follow your clothes. Follow the steps below to use another program, press the Stop button and go to change when a "chirp" is heard, make sure that the audio cable...
...-line instructions to start an internet connection. 4 Start your home computer. In addition, you when the speed and/or incline of specific system requirements will change to the next settings of the treadmill does not change . A list of the treadmill is not wrapped around a power cord. 8 Follow your clothes. Follow the steps below to use another program, press the Stop button and go to change when a "chirp" is heard, make sure that the audio cable...

English Manual
Page 23
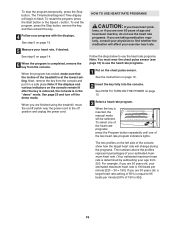
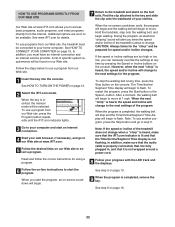
... demo mode, the power cord can be plugged in, the key can be used . Do not leave the treadmill in the storage position in a preset sequence, although the buttons on the console will show the total number of direct sunlight. THE INFORMATION MODE/DEMO MODE The console features an information mode that keeps track of the total number of hours that the treadmill has been operated and the total number of miles that the walking belt has moved. Using...
... demo mode, the power cord can be plugged in, the key can be used . Do not leave the treadmill in the storage position in a preset sequence, although the buttons on the console will show the total number of direct sunlight. THE INFORMATION MODE/DEMO MODE The console features an information mode that keeps track of the total number of hours that the treadmill has been operated and the total number of miles that the walking belt has moved. Using...

English Manual
Page 25
... Motor Hood by pulling the Hood in the indicated direction. Loosen the Reed Switch Screw (12), and slide the Reed Switch as close as possible to lift each side of the treadmill and remove the key from the console. make sure that meets all of the Pulley (29). Remove the key and UNPLUG THE POWER CORD. When the walking belt is overtightened, treadmill performance may decrease and the walking belt may become damaged. b 3"-4" Rear Roller Adjustment Bolts...
... Motor Hood by pulling the Hood in the indicated direction. Loosen the Reed Switch Screw (12), and slide the Reed Switch as close as possible to lift each side of the treadmill and remove the key from the console. make sure that meets all of the Pulley (29). Remove the key and UNPLUG THE POWER CORD. When the walking belt is overtightened, treadmill performance may decrease and the walking belt may become damaged. b 3"-4" Rear Roller Adjustment Bolts...

English Manual
Page 26
... turn the left rear roller bolt clockwise 1/2 of a turn it to keep the walking belt centered. When the walking belt is correctly tight- Plug in the console, press one of the treadmill does not change correctly or does not change when iFIT.com CDʼs and videos are played SOLUTION: a. PROBLEM: The incline of the Incline buttons. With the key inserted in the power cord, insert the key and carefully walk on page 10. If the chest pulse sensor...
... turn the left rear roller bolt clockwise 1/2 of a turn it to keep the walking belt centered. When the walking belt is correctly tight- Plug in the console, press one of the treadmill does not change correctly or does not change when iFIT.com CDʼs and videos are played SOLUTION: a. PROBLEM: The incline of the Incline buttons. With the key inserted in the power cord, insert the key and carefully walk on page 10. If the chest pulse sensor...
English Manual
Page 29
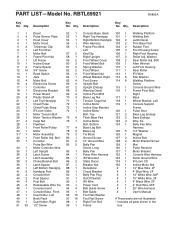
... Cover 108 2 Rear Roller Adj. Qty. PART LIST-Model No. Qty. Bolt 80 1 Ground Screw 127 2 Incline Bolt 33 1 Console/ 81 2 12" Ground Wire 128 2 Motor Bracket Screw Pulse Bar Wire 82 2 Belly Pan 129 1 Mat 34 1 Motor Controller Wire Screw, Long 130 1 Pulse Receiver 35 1 Left Upright 83 1 Belly Pan 131 1 Motor Bracket 36 2 Latch Screw 84 1 Pulse Wire Harness 132 1 Console Wire Harness 37 1 Latch Assembly 85 1 iFit Wire Nut 133 1 Roller Ground Wire 38 2 Choke Bracket Bolt 86 2 Static Decal 134 1 IFit.com CD 39 1 Latch...
... Cover 108 2 Rear Roller Adj. Qty. PART LIST-Model No. Qty. Bolt 80 1 Ground Screw 127 2 Incline Bolt 33 1 Console/ 81 2 12" Ground Wire 128 2 Motor Bracket Screw Pulse Bar Wire 82 2 Belly Pan 129 1 Mat 34 1 Motor Controller Wire Screw, Long 130 1 Pulse Receiver 35 1 Left Upright 83 1 Belly Pan 131 1 Motor Bracket 36 2 Latch Screw 84 1 Pulse Wire Harness 132 1 Console Wire Harness 37 1 Latch Assembly 85 1 iFit Wire Nut 133 1 Roller Ground Wire 38 2 Choke Bracket Bolt 86 2 Static Decal 134 1 IFit.com CD 39 1 Latch...
English Manual
Page 31
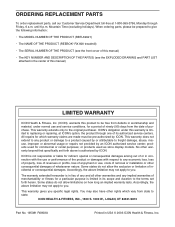
... information: • The MODEL NUMBER OF THE PRODUCT (RBTL69921) • The NAME OF THE PRODUCT (REEBOK® RX 820 treadmill) • The SERIAL NUMBER OF THE PRODUCT (see the front cover of this manual) • The KEY NUMBER AND DESCRIPTION OF THE PART(S) (see the EXPLODED DRAWING and PART LIST attached in the center of this manual) LIMITED WARRANTY ICON Health & Fitness, Inc. (ICON), warrants this product to the terms set forth above limitation...
... information: • The MODEL NUMBER OF THE PRODUCT (RBTL69921) • The NAME OF THE PRODUCT (REEBOK® RX 820 treadmill) • The SERIAL NUMBER OF THE PRODUCT (see the front cover of this manual) • The KEY NUMBER AND DESCRIPTION OF THE PART(S) (see the EXPLODED DRAWING and PART LIST attached in the center of this manual) LIMITED WARRANTY ICON Health & Fitness, Inc. (ICON), warrants this product to the terms set forth above limitation...


