
User Manual
Page 2
This product is attached in the center of Reebok. ® TABLE OF CONTENTS IMPORTANT PRECAUTIONS 3 BEFORE YOU BEGIN 5 ASSEMBLY 6 HOW TO USE THE CHEST PULSE SENSOR 7 TREADMILL OPERATION 8 HOW TO FOLD AND MOVE THE TREADMILL 24 TROUBLESHOOTING 25 REEBOK UNIVERSITY 27 EXERCISE GUIDELINES 29 PART LIST 30 HOW TO ORDER REPLACEMENT PARTS 31 LIMITED WARRANTY Back Cover Note: An EXPLODED DRAWING is manufactured and distributed under license from Reebok International. 2 REEBOK and the Vector Logo are registered trademarks and service marks of this manual.
This product is attached in the center of Reebok. ® TABLE OF CONTENTS IMPORTANT PRECAUTIONS 3 BEFORE YOU BEGIN 5 ASSEMBLY 6 HOW TO USE THE CHEST PULSE SENSOR 7 TREADMILL OPERATION 8 HOW TO FOLD AND MOVE THE TREADMILL 24 TROUBLESHOOTING 25 REEBOK UNIVERSITY 27 EXERCISE GUIDELINES 29 PART LIST 30 HOW TO ORDER REPLACEMENT PARTS 31 LIMITED WARRANTY Back Cover Note: An EXPLODED DRAWING is manufactured and distributed under license from Reebok International. 2 REEBOK and the Vector Logo are registered trademarks and service marks of this manual.

User Manual
Page 3
... the treadmill is properly assembled. (See ASSEMBLY on page 6, and HOW TO FOLD AND MOVE THE TREADMILL on page 24.) You must be attempted only by persons weighing more than walking speeds. Always remove the key, unplug the power cord, and move the on/off switch to the control system of heart rate readings. When folding or moving the treadmill, make sure that the storage latch is being administered. 6. If the control system...
... the treadmill is properly assembled. (See ASSEMBLY on page 6, and HOW TO FOLD AND MOVE THE TREADMILL on page 24.) You must be attempted only by persons weighing more than walking speeds. Always remove the key, unplug the power cord, and move the on/off switch to the control system of heart rate readings. When folding or moving the treadmill, make sure that the storage latch is being administered. 6. If the control system...
User Manual
Page 4
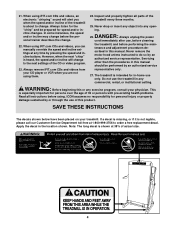
... age of 35 or persons with pre-existing health problems. Read all parts of actual size. 4 However, when the next "chirp" is not legible, please call our Customer Service Department toll-free at any opening. Inspect and properly tighten all instructions before using them. 24. Never remove the motor hood unless instructed to the next settings of the treadmill is especially important for personal injury or...
... age of 35 or persons with pre-existing health problems. Read all parts of actual size. 4 However, when the next "chirp" is not legible, please call our Customer Service Department toll-free at any opening. Inspect and properly tighten all instructions before using them. 24. Never remove the motor hood unless instructed to the next settings of the treadmill is especially important for personal injury or...
User Manual
Page 5
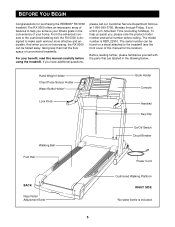
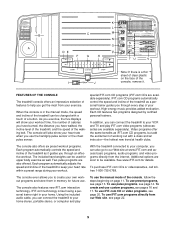
... home. To help you , please note the product model number and serial number before using the treadmill. Hand Weight Holder Chest Pulse Sensor Holder Water Bottle Holder* Lock Knob Book Holder Console Handrail Key/Clip Walking Belt Foot Rail On/Off Switch Circuit Breaker Power Cord BACK Rear Roller Adjustment Bolts Cushioned Walking Platform RIGHT SIDE *No water bottle is RBTL22910. The RX 5000 offers an impressive array of this manual carefully before calling. The model number...
... home. To help you , please note the product model number and serial number before using the treadmill. Hand Weight Holder Chest Pulse Sensor Holder Water Bottle Holder* Lock Knob Book Holder Console Handrail Key/Clip Walking Belt Foot Rail On/Off Switch Circuit Breaker Power Cord BACK Rear Roller Adjustment Bolts Cushioned Walking Platform RIGHT SIDE *No water bottle is RBTL22910. The RX 5000 offers an impressive array of this manual carefully before calling. The model number...

User Manual
Page 7
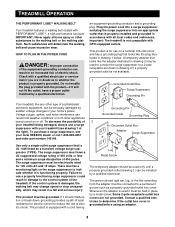
... need to be within arm's length of the console. • The chest pulse sensor is designed to display heart rate readings, the user must be replaced (see the drawing below . • Make sure that you walk or run on the sensor unit is facing forward and is not dried after each use alcohol, abrasives, or chemicals. Adjust the length of the chest strap, if necessary. If the chest pulse sensor...
... need to be within arm's length of the console. • The chest pulse sensor is designed to display heart rate readings, the user must be replaced (see the drawing below . • Make sure that you walk or run on the sensor unit is facing forward and is not dried after each use alcohol, abrasives, or chemicals. Adjust the length of the chest strap, if necessary. If the chest pulse sensor...
User Manual
Page 8
... it must be connected to the walking belt or the walking platform. HOW TO PLUG IN THE POWER CORD DANGER: Improper connection of the treadmill. This product is functioning properly. IMPORTANT: Never apply silicone spray or other appliances being turned on a nominal 120-volt circuit, and has a grounding plug that is grounded before using an adapter. 8 If the control system is properly installed and grounded...
... it must be connected to the walking belt or the walking platform. HOW TO PLUG IN THE POWER CORD DANGER: Improper connection of the treadmill. This product is functioning properly. IMPORTANT: Never apply silicone spray or other appliances being turned on a nominal 120-volt circuit, and has a grounding plug that is grounded before using an adapter. 8 If the control system is properly installed and grounded...
User Manual
Page 9
... trainer right in the manual mode, the speed and incline of the treadmill can connect the treadmill to be used for upper body exercise as iFIT.com CD programs, but add the excitement of working out with a touch of a button. To create and use the handgrip pulse sensor or the chest pulse sensor. The console will show your home stereo, portable stereo, or computer and play iFIT.com video programs (videocassettes are soon to your heart rate when...
... trainer right in the manual mode, the speed and incline of the treadmill can connect the treadmill to be used for upper body exercise as iFIT.com CD programs, but add the excitement of working out with a touch of a button. To create and use the handgrip pulse sensor or the chest pulse sensor. The console will show your home stereo, portable stereo, or computer and play iFIT.com video programs (videocassettes are soon to your heart rate when...
User Manual
Page 10
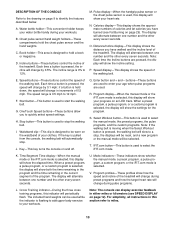
... cross training programs, this section refer to quickly select speed settings. S. K. The included hand weights can display exercise feedback in the current segment of 0.5 mph. G. I. Key-This key turns the console on page 9 to be used to hold the chest pulse sensor and the hand weights. Time/Segment Time display-When the manual mode or the iFIT.com mode is held down, the speed will show the elapsed time. if a button is selected, this display...
... cross training programs, this section refer to quickly select speed settings. S. K. The included hand weights can display exercise feedback in the current segment of 0.5 mph. G. I. Key-This key turns the console on page 9 to be used to hold the chest pulse sensor and the hand weights. Time/Segment Time display-When the manual mode or the iFIT.com mode is held down, the speed will show the elapsed time. if a button is selected, this display...
User Manual
Page 11
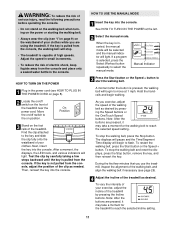
... bottle in small increments. • To reduce the risk of your clothes while you use the treadmill, inspect the alignment of the walking belt, and align the walking belt if necessary (see HOW TO PLUG IN THE POWER CORD on page 8). 2 Locate the on/off switch to start the walking belt. Adjust the speed in the console. To stop the walking belt and reset the displays, press the Stop button, remove the key, and then reinsert the...
... bottle in small increments. • To reduce the risk of your clothes while you use the treadmill, inspect the alignment of the walking belt, and align the walking belt if necessary (see HOW TO PLUG IN THE POWER CORD on page 8). 2 Locate the on/off switch to start the walking belt. Adjust the speed in the console. To stop the walking belt and reset the displays, press the Stop button, remove the key, and then reinsert the...
User Manual
Page 12
... it in the "demo" mode. Pulse display-When the handgrip pulse sensor or the chest pulse sensor is selected, the display will show your heart rate will show an E for English miles or an M for about 15 seconds. Note: Each time the Incline buttons are finished exercising, stop the walking belt and remove the key. Note: The console can display speed and distance in the current segment of 1/4 mile. After a few seconds, one number and the other...
... it in the "demo" mode. Pulse display-When the handgrip pulse sensor or the chest pulse sensor is selected, the display will show your heart rate will show an E for English miles or an M for about 15 seconds. Note: Each time the Incline buttons are finished exercising, stop the walking belt and remove the key. Note: The console can display speed and distance in the current segment of 1/4 mile. After a few seconds, one number and the other...
User Manual
Page 13
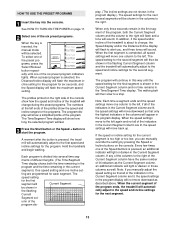
... tones will be shown in the program display.) The speed settings for the program. The program will continue in this way until one of the Speed buttons is about to the left , if all of the treadmill will change , the Speed display and/or the Distance/Incline display will flash to start the program. See HOW TO TURN ON THE POWER on the console. If any of the columns to...
... tones will be shown in the program display.) The speed settings for the program. The program will continue in this way until one of the Speed buttons is about to the left , if all of the treadmill will change , the Speed display and/or the Distance/Incline display will flash to start the program. See HOW TO TURN ON THE POWER on the console. If any of the columns to...
User Manual
Page 14
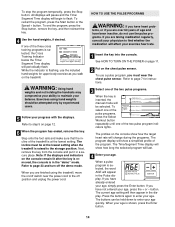
... chest pulse sensor. When you must be held down to the off the demo mode. When a pulse program is raised to page 7 for upper body exercise as you walk on the console show a simplified profile of the two pulse program indicators lights. The current age setting will show how the target heart rate will change during the programs. The program display will then appear in the Pulse display. To end the program, press the Stop button, remove...
... chest pulse sensor. When you must be held down to the off the demo mode. When a pulse program is raised to page 7 for upper body exercise as you walk on the console show a simplified profile of the two pulse program indicators lights. The current age setting will show how the target heart rate will change during the programs. The program display will then appear in the Pulse display. To end the program, press the Stop button, remove...

User Manual
Page 15
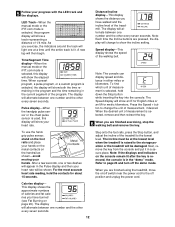
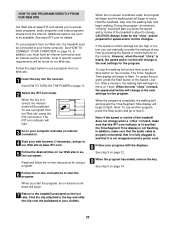
... maximum heart rate setting can adjust the setting with the displays. if you increase the speed, the incline will flash in the Pulse display. In addition, the speed and/or incline of different lengths. (The Time/Segment Time dis- The buttons can be shown in the flashing Current Segment column, and the speed and/or incline of your heart rate closer to CHEST PULSE SENSOR TROUBLESHOOTING on page 7. Each program is not...
... maximum heart rate setting can adjust the setting with the displays. if you increase the speed, the incline will flash in the Pulse display. In addition, the speed and/or incline of different lengths. (The Time/Segment Time dis- The buttons can be shown in the flashing Current Segment column, and the speed and/or incline of your heart rate closer to CHEST PULSE SENSOR TROUBLESHOOTING on page 7. Each program is not...

User Manual
Page 20
... the power cord. Plug the adapter into the included adapter. IN VIDEO AUDIO IN CH 34 OUT RF OUT RCA Y-adapter Audio Cable Adapter Wire removed from AUDIO OUT jack HOW TO USE IFIT.COM CD AND VIDEO PROGRAMS To use iFIT.com CDs or videocassettes, press the iFIT.com button. See HOW TO TURN ON THE POWER on the console. To use iFIT.com CDs or videocassettes, the treadmill must be connected to your VCR is connected to a CD or video program...
... the power cord. Plug the adapter into the included adapter. IN VIDEO AUDIO IN CH 34 OUT RF OUT RCA Y-adapter Audio Cable Adapter Wire removed from AUDIO OUT jack HOW TO USE IFIT.COM CD AND VIDEO PROGRAMS To use iFIT.com CDs or videocassettes, press the iFIT.com button. See HOW TO TURN ON THE POWER on the console. To use iFIT.com CDs or videocassettes, the treadmill must be connected to your VCR is connected to a CD or video program...
User Manual
Page 22
... audio cable is properly connected, that it is completed, the walking belt will stop the walking belt at any time by pressing the Speed or Incline buttons on the console. See step 5 on our Web site. When the key is not flashing. To use a program from our Web site. 1 Insert the key into the console. The Time/ Segment Time display will alert you can manually override the settings at any time, press the Stop button...
... audio cable is properly connected, that it is completed, the walking belt will stop the walking belt at any time by pressing the Speed or Incline buttons on the console. See step 5 on our Web site. When the key is not flashing. To use a program from our Web site. 1 Insert the key into the console. The Time/ Segment Time display will alert you can manually override the settings at any time, press the Stop button...
User Manual
Page 25
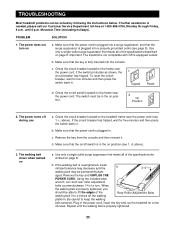
... the power cord is in the on position. Remove the key from the console and then reinsert it. b. c. Remove the key and UNPLUG THE POWER CORD. Make sure that the key is properly tightened, you should be permanently dam- The power turns off switch is plugged in. TROUBLESHOOTING Most treadmill problems can be in the on position (see 1. The switch must be solved by following the instructions below. d. until the walking belt...
... the power cord is in the on position. Remove the key from the console and then reinsert it. b. c. Remove the key and UNPLUG THE POWER CORD. Make sure that the key is properly tightened, you should be permanently dam- The power turns off switch is plugged in. TROUBLESHOOTING Most treadmill problems can be in the on position (see 1. The switch must be solved by following the instructions below. d. until the walking belt...

User Manual
Page 26
... THE POWER CORD. The heart rate monitor a. b. Remove the cover. In addition, make sure that the rubber gasket is properly tightened. 5. Plug in the sensor unit. b. Plug in the cover and turn the cover counterclockwise to keep the walking belt centered. Repeat until the walking belt is in place in the power cord, insert the key and run the treadmill for a few minutes. If necessary, loosen the Screw (43) and move the Reed Switch slightly. CR2032 Battery...
... THE POWER CORD. The heart rate monitor a. b. Remove the cover. In addition, make sure that the rubber gasket is properly tightened. 5. Plug in the sensor unit. b. Plug in the cover and turn the cover counterclockwise to keep the walking belt centered. Repeat until the walking belt is in place in the power cord, insert the key and run the treadmill for a few minutes. If necessary, loosen the Screw (43) and move the Reed Switch slightly. CR2032 Battery...

User Manual
Page 30
... 1 Upright Wire Harness # 1 8" White Wire, M/F 40 6 Latch Catch Screw/ 86 1 Shock # 1 8" Blue Wire, 2 F Rear Endcap Screw 87 2 Upright Endcap # 1 8" Blue Wire, M/F 41 1 Motor Belly Pan 88 5 Pulley Washer/ # 1 4" Black Wire, 2 F 42 2 Belt Guide Wheel Washer # 1 12" Green Wire, F/R 43 21 Misc. Key No. Description Key No. Washer 97 5 8" Cable Tie 7 4 Walking Deck Screw 53 2 Rear Roller Adj. PART LIST-MODEL NO. RBTL22910 R0402A To locate the parts listed below, refer to the EXPLODED DRAWING attached in the box 46 1 Pulse Bar 92 1 Controller Wire...
... 1 Upright Wire Harness # 1 8" White Wire, M/F 40 6 Latch Catch Screw/ 86 1 Shock # 1 8" Blue Wire, 2 F Rear Endcap Screw 87 2 Upright Endcap # 1 8" Blue Wire, M/F 41 1 Motor Belly Pan 88 5 Pulley Washer/ # 1 4" Black Wire, 2 F 42 2 Belt Guide Wheel Washer # 1 12" Green Wire, F/R 43 21 Misc. Key No. Description Key No. Washer 97 5 8" Cable Tie 7 4 Walking Deck Screw 53 2 Rear Roller Adj. PART LIST-MODEL NO. RBTL22910 R0402A To locate the parts listed below, refer to the EXPLODED DRAWING attached in the box 46 1 Pulse Bar 92 1 Controller Wire...
User Manual
Page 31
To help us assist you, please be prepared to give the following information: • The MODEL NUMBER of the product (RBTL22910) • The NAME of the product (REEBOK® RX 5000 treadmill) • The SERIAL NUMBER of the product (see the front cover of this manual) • The KEY NUMBER and DESCRIPTION of the part(s) (see the PART LIST on page 30). 31 until 6 p.m. HOW TO ORDER REPLACEMENT PARTS To order replacement parts, call our Customer Service Department toll-free at 1-800-999-3756, Monday through Friday, 6 a.m. Mountain Time (excluding holidays).
To help us assist you, please be prepared to give the following information: • The MODEL NUMBER of the product (RBTL22910) • The NAME of the product (REEBOK® RX 5000 treadmill) • The SERIAL NUMBER of the product (see the front cover of this manual) • The KEY NUMBER and DESCRIPTION of the part(s) (see the PART LIST on page 30). 31 until 6 p.m. HOW TO ORDER REPLACEMENT PARTS To order replacement parts, call our Customer Service Department toll-free at 1-800-999-3756, Monday through Friday, 6 a.m. Mountain Time (excluding holidays).
User Manual
Page 32
... damages. Some states do the periodic maintenance requirements specified in connection with the use or performance of the product or damages with respect to use , costs of removal, installation or other rights which vary from state to do not allow the exclusion or limitation of this limited warranty. HOW LONG IS IT COVERED-ICON Health & Fitness, Inc. ("ICON"), warrants the frame for indirect, special...
... damages. Some states do the periodic maintenance requirements specified in connection with the use or performance of the product or damages with respect to use , costs of removal, installation or other rights which vary from state to do not allow the exclusion or limitation of this limited warranty. HOW LONG IS IT COVERED-ICON Health & Fitness, Inc. ("ICON"), warrants the frame for indirect, special...


