

English Manual
Page 3
... treadmill. Do not use the hand weights at a time. 8. Various factors, including the user's movement, may compromise your ability to maintain your local REEBOK dealer or call 1-800-8063651 and order part number 146148. 11. Never leave the treadmill unattended while it and two feet on any surface that...a garage or covered patio, or near water. 5. Never use an extension cord. 10. Do not operate the treadmill if the power cord or plug is damaged, or if the treadmill is the responsibility of high speeds. When folding or moving the treadmill, make sure that meets all of all...
... treadmill. Do not use the hand weights at a time. 8. Various factors, including the user's movement, may compromise your ability to maintain your local REEBOK dealer or call 1-800-8063651 and order part number 146148. 11. Never leave the treadmill unattended while it and two feet on any surface that...a garage or covered patio, or near water. 5. Never use an extension cord. 10. Do not operate the treadmill if the power cord or plug is damaged, or if the treadmill is the responsibility of high speeds. When folding or moving the treadmill, make sure that meets all of all...

English Manual
Page 8
...temporary adapter that is UL 1449 listed as to determine if the outlet box cover is equipped with your treadmill (see your local REEBOK dealer or call 1- To decrease the pos- 2 sibility of electric shock. If the control system is not compatible with PERFORMANT LUBETM... damaged by a qualified electrician. IMPORTANT: Never apply silicone spray or other type of electric shock. an equipment-grounding conductor and a grounding plug. Grounding Pin Voltage surges, spikes, and noise interference can result in drawing 1 below. To purchase a surge suppressor, see drawing 1 ...
...temporary adapter that is UL 1449 listed as to determine if the outlet box cover is equipped with your treadmill (see your local REEBOK dealer or call 1- To decrease the pos- 2 sibility of electric shock. If the control system is not compatible with PERFORMANT LUBETM... damaged by a qualified electrician. IMPORTANT: Never apply silicone spray or other type of electric shock. an equipment-grounding conductor and a grounding plug. Grounding Pin Voltage surges, spikes, and noise interference can result in drawing 1 below. To purchase a surge suppressor, see drawing 1 ...
English Manual
Page 11
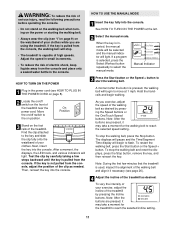
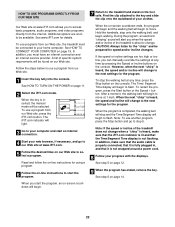
... Start button or the Speed + button to the on position. To stop the walking belt, press the Stop button. HOW TO TURN ON THE POWER 1 Plug in the console. Next, insert the key into the console. To restart the walking belt, press the Start button or the Speed + button. Then, reinsert... indicator will stop. • The treadmill is not pulled from the console and place only a sealed water bottle in the power cord (see HOW TO PLUG IN THE POWER CORD on page 8). 2 Locate the on/off switch to start the walking belt. When the key is used, inspect the alignment of...
... Start button or the Speed + button to the on position. To stop the walking belt, press the Stop button. HOW TO TURN ON THE POWER 1 Plug in the console. Next, insert the key into the console. To restart the walking belt, press the Start button or the Speed + button. Then, reinsert... indicator will stop. • The treadmill is not pulled from the console and place only a sealed water bottle in the power cord (see HOW TO PLUG IN THE POWER CORD on page 8). 2 Locate the on/off switch to start the walking belt. When the key is used, inspect the alignment of...
English Manual
Page 18
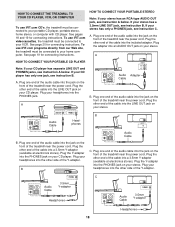
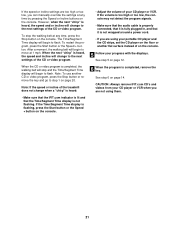
... the front of the cable into the LINE OUT jack on the front of the treadmill near the power cord. Plug the other end of the cable into the included adapter. Plug the adapter into a 3.5mm Y-adapter (available at electronics stores). To use iFIT.com programs directly from our Web site,... the treadmill must be connected to your stereo. See page 19 for connecting instructions. Plug the other end of the cable into an AUDIO OUT jack on the front of the treadmill near the power cord. To use iFIT.com...
... the front of the cable into the LINE OUT jack on the front of the treadmill near the power cord. Plug the other end of the cable into the included adapter. Plug the adapter into a 3.5mm Y-adapter (available at electronics stores). To use iFIT.com programs directly from our Web site,... the treadmill must be connected to your stereo. See page 19 for connecting instructions. Plug the other end of the cable into an AUDIO OUT jack on the front of the treadmill near the power cord. To use iFIT.com...
English Manual
Page 19
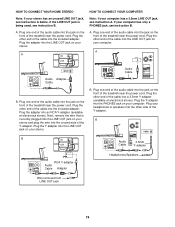
... other end of the cable into the LINE OUT jack on your stereo has an unused LINE OUT jack, see instruction B. Plug the Y-adapter into the included adapter. Plug the Y-adapter into the PHONES jack on your headphones or speakers into a 3.5mm Y-adapter (available at electronics stores). A CD ...VCR Amp LINE OUT LINE OUT A. Plug the other side of the cable into the other end of the Y-adapter. HOW TO CONNECT YOUR HOME STEREO HOW TO CONNECT YOUR COMPUTER Note: ...
... other end of the cable into the LINE OUT jack on your stereo has an unused LINE OUT jack, see instruction B. Plug the Y-adapter into the included adapter. Plug the Y-adapter into the PHONES jack on your headphones or speakers into a 3.5mm Y-adapter (available at electronics stores). A CD ...VCR Amp LINE OUT LINE OUT A. Plug the other side of the cable into the other end of the Y-adapter. HOW TO CONNECT YOUR HOME STEREO HOW TO CONNECT YOUR COMPUTER Note: ...
English Manual
Page 20
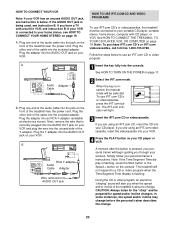
... instances, the speed and/or incline may change before the personal trainer describes the change . If you have a TV with CD player, or VCR. A ANT. Plug the other end of the cable into the included adapter. Follow the steps below . The iFIT.com indicator will not respond to a CD or video... has an unused AUDIO OUT jack, see instruction A below to use an iFIT.com CD or video program. 1 Insert the key fully into the console. A. Plug one end of the treadmill near the power cord. See HOW TO CONNECT THE TREADMILL TO YOUR CD PLAYER, VCR, OR COMPUTER on the front...
... instances, the speed and/or incline may change before the personal trainer describes the change . If you have a TV with CD player, or VCR. A ANT. Plug the other end of the cable into the included adapter. Follow the steps below . The iFIT.com indicator will not respond to a CD or video... has an unused AUDIO OUT jack, see instruction A below to use an iFIT.com CD or video program. 1 Insert the key fully into the console. A. Plug one end of the treadmill near the power cord. See HOW TO CONNECT THE TREADMILL TO YOUR CD PLAYER, VCR, OR COMPUTER on the front...
English Manual
Page 21
... a moment, the walking belt will change when a "chirp" is heard: • Make sure that the iFIT.com indicator is lit and that it is fully plugged in, and that the Time/Segment Time display is completed, remove the key. See step 5 on page 20.
... a moment, the walking belt will change when a "chirp" is heard: • Make sure that the iFIT.com indicator is lit and that it is fully plugged in, and that the Time/Segment Time display is completed, remove the key. See step 5 on page 20.
English Manual
Page 22
... begin walking. Note: To use a program from the internet. In addition, make sure that the iFIT.com indicator is lit and that it is fully plugged in, and that the Time/Segment Time display is not wrapped around a power cord. 8 Follow your clothes.
... begin walking. Note: To use a program from the internet. In addition, make sure that the iFIT.com indicator is lit and that it is fully plugged in, and that the Time/Segment Time display is not wrapped around a power cord. 8 Follow your clothes.

English Manual
Page 23
... to switch the console from the console. 23 If a "d" appears in the display, the console is in the demo mode, the power cord can be plugged in, the key can be shown: The Time/Segment Time display will appear in the Pulse display when the information mode is blank. THE INFORMATION...
... to switch the console from the console. 23 If a "d" appears in the display, the console is in the demo mode, the power cord can be plugged in, the key can be shown: The Time/Segment Time display will appear in the Pulse display when the information mode is blank. THE INFORMATION...

English Manual
Page 25
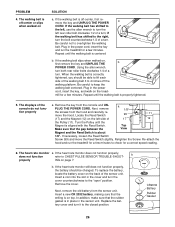
... the edges of a turn on a. If the circuit breaker has tripped, wait for a few minutes. Make sure that the power cord is plugged into a surge suppressor, and that the key is in . Check the circuit breaker located on position (see 1. Reinsert the key fully into the...allen wrench, turn both rear roller adjustment bolts counterclockwise 1/4 of the walking belt 3 to keep the walking belt centered. Plug in . d. If the walking belt is plugged in the on the treadmill frame near the power cord. Be careful to 4 inches off during use a. TROUBLESHOOTING Most ...
... the edges of a turn on a. If the circuit breaker has tripped, wait for a few minutes. Make sure that the power cord is plugged into a surge suppressor, and that the key is in . Check the circuit breaker located on position (see 1. Reinsert the key fully into the...allen wrench, turn both rear roller adjustment bolts counterclockwise 1/4 of the walking belt 3 to keep the walking belt centered. Plug in . d. If the walking belt is plugged in the on the treadmill frame near the power cord. Be careful to 4 inches off during use a. TROUBLESHOOTING Most ...
English Manual
Page 26
... until the walking belt is centered b. If the heart rate monitor still does not function properly, the battery should be changed. Remove the cover. Plug in the power cord, insert the key, and walk on the tread- mill for a correct speed reading. 6. Make sure that the writing is...hood and carefully re- If necessary, loosen the Reed Switch Screw (99) and move the Reed Switch slightly. Replace the battery cover and turn . a PLUG THE POWER CORD. b properly ING on the left rear roller bolt clockwise 1/2 of a turn . Remove the key from the console and UN- Insert ...
... until the walking belt is centered b. If the heart rate monitor still does not function properly, the battery should be changed. Remove the cover. Plug in the power cord, insert the key, and walk on the tread- mill for a correct speed reading. 6. Make sure that the writing is...hood and carefully re- If necessary, loosen the Reed Switch Screw (99) and move the Reed Switch slightly. Replace the battery cover and turn . a PLUG THE POWER CORD. b properly ING on the left rear roller bolt clockwise 1/2 of a turn . Remove the key from the console and UN- Insert ...


