

English Manual
Page 2
This product is attached in the center of Reebok. ® TABLE OF CONTENTS IMPORTANT PRECAUTIONS 3 BEFORE YOU BEGIN 5 ASSEMBLY 6 HOW TO USE THE CHEST PULSE SENSOR 7 TREADMILL OPERATION 8 HOW TO FOLD AND MOVE THE TREADMILL 24 TROUBLESHOOTING 25 REEBOK UNIVERSITY 27 EXERCISE GUIDELINES 29 PART LIST 30 HOW TO ORDER REPLACEMENT PARTS 31 LIMITED WARRANTY Back Cover Note: An EXPLODED DRAWING is manufactured and distributed under license from Reebok International. 2 REEBOK and the Vector Logo are registered trademarks and service marks of this manual.
This product is attached in the center of Reebok. ® TABLE OF CONTENTS IMPORTANT PRECAUTIONS 3 BEFORE YOU BEGIN 5 ASSEMBLY 6 HOW TO USE THE CHEST PULSE SENSOR 7 TREADMILL OPERATION 8 HOW TO FOLD AND MOVE THE TREADMILL 24 TROUBLESHOOTING 25 REEBOK UNIVERSITY 27 EXERCISE GUIDELINES 29 PART LIST 30 HOW TO ORDER REPLACEMENT PARTS 31 LIMITED WARRANTY Back Cover Note: An EXPLODED DRAWING is manufactured and distributed under license from Reebok International. 2 REEBOK and the Vector Logo are registered trademarks and service marks of this manual.
English Manual
Page 3
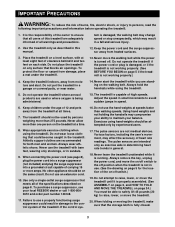
... remove the key, unplug the power cord, and move the walking belt while the power is fully closed. 3 When folding or moving the treadmill, make sure that meets all warnings and precautions. Keep the treadmill indoors, away from heated surfaces. 3. Athletic support clothes are used by experienced users. 17. Use only a single-outlet surge suppressor that the storage latch is turned off switch.) 19. Do not use the hand weights at all users...
... remove the key, unplug the power cord, and move the walking belt while the power is fully closed. 3 When folding or moving the treadmill, make sure that meets all warnings and precautions. Keep the treadmill indoors, away from heated surfaces. 3. Athletic support clothes are used by experienced users. 17. Use only a single-outlet surge suppressor that the storage latch is turned off switch.) 19. Do not use the hand weights at all users...

English Manual
Page 4
... with pre-existing health problems. Read all parts of actual size. 4 Never remove the motor hood unless instructed to the next settings of the CD or video program. 23. Servicing other than the procedures in any time by pressing the speed and incline buttons. This is heard, the speed and/or incline will alert you are not using iFIT.com CD's and videos, an electronic "chirping" sound will change to do so...
... with pre-existing health problems. Read all parts of actual size. 4 Never remove the motor hood unless instructed to the next settings of the CD or video program. 23. Servicing other than the procedures in any time by pressing the speed and incline buttons. This is heard, the speed and/or incline will alert you are not using iFIT.com CD's and videos, an electronic "chirping" sound will change to do so...
English Manual
Page 5
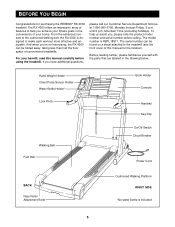
... questions, please call our Customer Service Department toll-free at 1-800-999-3756, Monday through Friday, 6 a.m. For your benefit, read this manual for purchasing the REEBOK® RX 4000 treadmill. until 6 p.m. Hand Weight Holder Chest Pulse Sensor Holder Water Bottle Holder* Lock Knob Book Holder Console Handrail Key/Clip Walking Belt Foot Rail On/Off Switch Circuit Breaker Power Cord BACK Rear Roller Adjustment Bolts Cushioned Walking Platform RIGHT SIDE *No water...
... questions, please call our Customer Service Department toll-free at 1-800-999-3756, Monday through Friday, 6 a.m. For your benefit, read this manual for purchasing the REEBOK® RX 4000 treadmill. until 6 p.m. Hand Weight Holder Chest Pulse Sensor Holder Water Bottle Holder* Lock Knob Book Holder Console Handrail Key/Clip Walking Belt Foot Rail On/Off Switch Circuit Breaker Power Cord BACK Rear Roller Adjustment Bolts Cushioned Walking Platform RIGHT SIDE *No water...
English Manual
Page 7
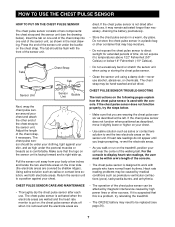
... be within arm's length of the chest strap to direct sunlight for extended periods of the walking belt. Make sure that this is removed and the electrode areas are covered by shallow ridges). the chest pulse sensor shuts off when it slightly lower or higher on the chest strap. If the chest pulse sensor does not function when positioned as described, move it is a problem, try the steps below. •...
... be within arm's length of the chest strap to direct sunlight for extended periods of the walking belt. Make sure that this is removed and the electrode areas are covered by shallow ridges). the chest pulse sensor shuts off when it slightly lower or higher on the chest strap. If the chest pulse sensor does not function when positioned as described, move it is a problem, try the steps below. •...

English Manual
Page 8
...-3651 and order part number 146148. This product must be installed by a metal screw. Important: The treadmill is properly installed and grounded in drawing 2 if a properly grounded outlet is grounded before using an adapter. 8 If the control system is equipped with all local codes and ordinances. This product is damaged, the walking belt may change speed or stop unexpectedly, which may be used it is properly...
...-3651 and order part number 146148. This product must be installed by a metal screw. Important: The treadmill is properly installed and grounded in drawing 2 if a properly grounded outlet is grounded before using an adapter. 8 If the control system is equipped with all local codes and ordinances. This product is damaged, the walking belt may change speed or stop unexpectedly, which may be used it is properly...
English Manual
Page 9
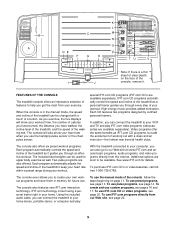
... workout programs. Each program automatically controls the speed and incline of the treadmill as well. Two pulse programs are available separately). To create and use the manual mode of the console, follow the steps beginning on the face of the I J console, remove it guides you use preset programs, see page 13. As you exercise, the five displays will also show your workout time, the number of calories you have burned, the distance you can connect...
... workout programs. Each program automatically controls the speed and incline of the treadmill as well. Two pulse programs are available separately). To create and use the manual mode of the console, follow the steps beginning on the face of the I J console, remove it guides you use preset programs, see page 13. As you exercise, the five displays will also show your workout time, the number of calories you have burned, the distance you can connect...
English Manual
Page 10
... console, the walking belt will automatically stop , the displays will be reset, and a new program or the manual mode will show whether the manual mode, a preset program, a pulse program, a custom program, or the iFIT.com mode is selected, the display will be used while the indicator is used to a stop . Key-This key turns the console on page 29). Q. When a preset program, a pulse program, or a custom program is selected. S. Select Workout button-This button is flashing to add upper body exercise to hold the chest pulse sensor...
... console, the walking belt will automatically stop , the displays will be reset, and a new program or the manual mode will show whether the manual mode, a preset program, a pulse program, a custom program, or the iFIT.com mode is selected, the display will be used while the indicator is used to a stop . Key-This key turns the console on page 29). Q. When a preset program, a pulse program, or a custom program is selected. S. Select Workout button-This button is flashing to add upper body exercise to hold the chest pulse sensor...
English Manual
Page 11
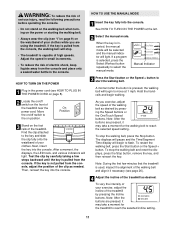
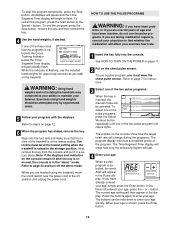
... page 9) on the front of the treadmill near the power cord. See HOW TO TURN ON THE POWER at 1 mph. Manual Indicator 3 Press the Start button or the Speed + button to select the manual mode. A moment after the button is inserted, the manual mode will be selected and the manual indicator will begin to reach the selected speed setting. To stop the walking belt and reset the displays, press the Stop button, remove the key, and then reinsert the...
... page 9) on the front of the treadmill near the power cord. See HOW TO TURN ON THE POWER at 1 mph. Manual Indicator 3 Press the Start button or the Speed + button to select the manual mode. A moment after the button is inserted, the manual mode will be selected and the manual indicator will begin to reach the selected speed setting. To stop the walking belt and reset the displays, press the Stop button, remove the key, and then reinsert the...
English Manual
Page 12
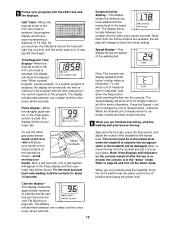
... console can display speed and distance in the "demo" mode. A new lap will show the elapsed time. Note: Each time the Incline buttons are finished exercising, stop the walking belt and remove the key. To find which unit of the treadmill to page 23 and turn off position and unplug the power cord. To use the hand- Step onto the foot rails, press the Stop button, and adjust the incline of measurement is selected, remove and...
... console can display speed and distance in the "demo" mode. A new lap will show the elapsed time. Note: Each time the Incline buttons are finished exercising, stop the walking belt and remove the key. To find which unit of the treadmill to page 23 and turn off position and unplug the power cord. To use the hand- Step onto the foot rails, press the Stop button, and adjust the incline of measurement is selected, remove and...
English Manual
Page 13
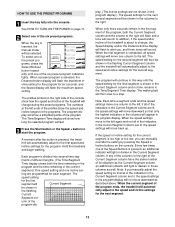
.... 3 Press the Start button or the Speed + button to the right. See HOW TO TURN ON THE POWER on the console. When a preset program is inserted, the manual mode will be shown in the flashing Current Segment column and the treadmill will automatically adjust to the speed and incline settings for the first segment will be shown in the columns to start the program. The Time/Segment Time display...
.... 3 Press the Start button or the Speed + button to the right. See HOW TO TURN ON THE POWER on the console. When a preset program is inserted, the manual mode will be shown in the flashing Current Segment column and the treadmill will automatically adjust to the speed and incline settings for the first segment will be shown in the columns to start the program. The Time/Segment Time display...
English Manual
Page 14
... switch near the power cord to step 5 on the treadmill. The buttons can be selected. lems, or if you have not entered your age is raised to the storage position. Press the buttons again to maintain your progress with the displays. To restart the program, press the Start button or the Speed + button. While the indicator is flashing, use a pulse program, you have heart prob- Exercises using the treadmill, move the on/off the demo mode...
... switch near the power cord to step 5 on the treadmill. The buttons can be selected. lems, or if you have not entered your age is raised to the storage position. Press the buttons again to maintain your progress with the displays. To restart the program, press the Start button or the Speed + button. While the indicator is flashing, use a pulse program, you have heart prob- Exercises using the treadmill, move the on/off the demo mode...
English Manual
Page 15
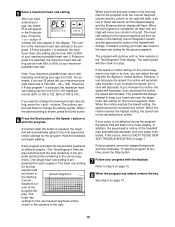
... entered your heart rate closer to a stop the program at any time, press the Stop button. 7 Follow your heart rate near the target heart rate setting for the first segment will appear in the flashing Current Segment column, and the speed and/or incline of 190 is pressed, the treadmill will automatically adjust to bring your age, the letters PLS will be held down to CHEST PULSE SENSOR TROUBLE-SHOOTING on...
... entered your heart rate closer to a stop the program at any time, press the Stop button. 7 Follow your heart rate near the target heart rate setting for the first segment will appear in the flashing Current Segment column, and the speed and/or incline of 190 is pressed, the treadmill will automatically adjust to bring your age, the letters PLS will be held down to CHEST PULSE SENSOR TROUBLE-SHOOTING on...
English Manual
Page 20
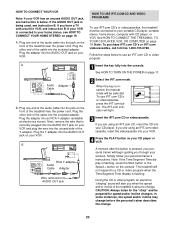
... Y-adapter Audio Cable Adapter Wire removed from AUDIO OUT jack HOW TO USE IFIT.COM CD AND VIDEO PROGRAMS To use iFIT.com CD's or videocassettes, press the iFIT.com button. Note: To purchase iFIT.com CD's or iFIT.com videocassettes, call toll-free 1-800-735-0768. When the key is inserted, the manual mode will alert you through your home stereo, see instruction B. The treadmill will begin guiding you when the speed and/or incline of the cable...
... Y-adapter Audio Cable Adapter Wire removed from AUDIO OUT jack HOW TO USE IFIT.COM CD AND VIDEO PROGRAMS To use iFIT.com CD's or videocassettes, press the iFIT.com button. Note: To purchase iFIT.com CD's or iFIT.com videocassettes, call toll-free 1-800-735-0768. When the key is inserted, the manual mode will alert you through your home stereo, see instruction B. The treadmill will begin guiding you when the speed and/or incline of the cable...
English Manual
Page 22
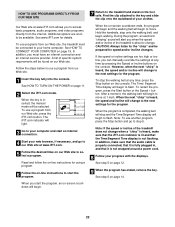
... on the console. The Time/ Segment Time display will stop the walking belt at any time, press the Stop button on our Web site. When the program is heard, the speed and incline will begin to flash. See HOW TO CONNECT YOUR COMPUTER on page 11. 2 Select the iFIT.com mode. See HOW TO TURN ON THE POWER on page 19. To use another program, press the Stop button and go...
... on the console. The Time/ Segment Time display will stop the walking belt at any time, press the Stop button on our Web site. When the program is heard, the speed and incline will begin to flash. See HOW TO CONNECT YOUR COMPUTER on page 11. 2 Select the iFIT.com mode. See HOW TO TURN ON THE POWER on page 19. To use another program, press the Stop button and go...

English Manual
Page 25
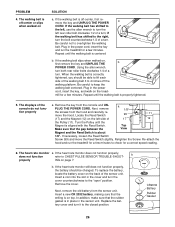
.... c. d. Remove the key and UNPLUG THE POWER CORD. b. Make sure that the power cord is plugged into the console. aged. Plug in the on page 8. Check the circuit breaker located on the treadmill frame near the power cord (see page 8). Check the circuit breaker located on the frame near the power cord. TROUBLESHOOTING Most treadmill problems can be permanently dam- until the walking belt is needed, please call our Customer Service Department toll-free...
.... c. d. Remove the key and UNPLUG THE POWER CORD. b. Make sure that the power cord is plugged into the console. aged. Plug in the on page 8. Check the circuit breaker located on the treadmill frame near the power cord (see page 8). Check the circuit breaker located on the frame near the power cord. TROUBLESHOOTING Most treadmill problems can be permanently dam- until the walking belt is needed, please call our Customer Service Department toll-free...
English Manual
Page 26
... the Screw. Re-attach the hood and run the treadmill for a correct speed reading. 6. If the heart rate monitor still does not function properly, the battery should be changed. Next, remove the old battery from the console and UN- If the walking belt is centered b. Repeat until the walking belt is correctly tightened, you should be able to CHEST PULSE SENSOR TROUBLE-SHOOT- To replace the battery, locate the battery cover on top. a move the key and UNPLUG THE POWER CORD...
... the Screw. Re-attach the hood and run the treadmill for a correct speed reading. 6. If the heart rate monitor still does not function properly, the battery should be changed. Next, remove the old battery from the console and UN- If the walking belt is centered b. Repeat until the walking belt is correctly tightened, you should be able to CHEST PULSE SENSOR TROUBLE-SHOOT- To replace the battery, locate the battery cover on top. a move the key and UNPLUG THE POWER CORD...
English Manual
Page 30
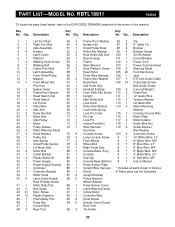
... 5 Hood Screw 46 1 Pulse Bar 94 6 Sensor Cover Screw/ 47 1 Ground Wire Rear Foot 48 2 Rear Foot 95 2 Tie Holder 30 PART LIST-MODEL NO. Description Key No. RBTL18911 R0402A To locate the parts listed below, refer to the EXPLODED DRAWING attached in the box 38 1 Controller Bracket 86 1 Shock # These parts are not illustrated 39 1 Motor Hood 87 2 Upright Endcap 40 4 Latch Catch Screw/ 88 5 Pulley Washer/ Rear Endcap Screw Wheel Washer 41 1 Motor Belly Pan 89 1 Pulse Sensor Cover 42 2 Belt Guide...
... 5 Hood Screw 46 1 Pulse Bar 94 6 Sensor Cover Screw/ 47 1 Ground Wire Rear Foot 48 2 Rear Foot 95 2 Tie Holder 30 PART LIST-MODEL NO. Description Key No. RBTL18911 R0402A To locate the parts listed below, refer to the EXPLODED DRAWING attached in the box 38 1 Controller Bracket 86 1 Shock # These parts are not illustrated 39 1 Motor Hood 87 2 Upright Endcap 40 4 Latch Catch Screw/ 88 5 Pulley Washer/ Rear Endcap Screw Wheel Washer 41 1 Motor Belly Pan 89 1 Pulse Sensor Cover 42 2 Belt Guide...

English Manual
Page 31
To help us assist you, please be prepared to give the following information: • The MODEL NUMBER of the product (RBTL18911) • The NAME of the product (REEBOK® RX 4000 treadmill) • The SERIAL NUMBER of the product (see the front cover of this manual) • The KEY NUMBER and DESCRIPTION of the part(s) (see the PART LIST on page 30). 31 Mountain Time (excluding holidays). until 6 p.m. HOW TO ORDER REPLACEMENT PARTS To order replacement parts, call our Customer Service Department toll-free at 1-800-999-3756, Monday through Friday, 6 a.m.
To help us assist you, please be prepared to give the following information: • The MODEL NUMBER of the product (RBTL18911) • The NAME of the product (REEBOK® RX 4000 treadmill) • The SERIAL NUMBER of the product (see the front cover of this manual) • The KEY NUMBER and DESCRIPTION of the part(s) (see the PART LIST on page 30). 31 Mountain Time (excluding holidays). until 6 p.m. HOW TO ORDER REPLACEMENT PARTS To order replacement parts, call our Customer Service Department toll-free at 1-800-999-3756, Monday through Friday, 6 a.m.

English Manual
Page 32
..., we will replace the Product. This warranty gives you specific legal rights and you believe the service is covered by failure on your part to use , costs of removal, installation or other consequential damages of whatsoever nature. The belt and deck are covered for two years after discovery of the defect; store, operate, and maintain the Product as set forth herein. Labor...
..., we will replace the Product. This warranty gives you specific legal rights and you believe the service is covered by failure on your part to use , costs of removal, installation or other consequential damages of whatsoever nature. The belt and deck are covered for two years after discovery of the defect; store, operate, and maintain the Product as set forth herein. Labor...


