
User Manual
Page 3
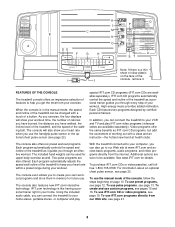
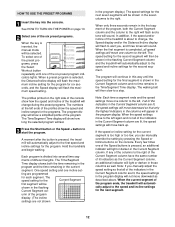
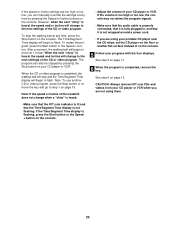
... air openings. Place the treadmill on /off switch to the off switch.) 19. To purchase a surge suppressor, see page 7), plug the power cord into a surge suppressor (not included) and plug the surge suppressor into a grounded circuit capable of heart rate readings. tem is intended only as described in a garage or covered patio, or near water. 5. The pulse sensor is damaged, the walking belt may change speed or stop...
... air openings. Place the treadmill on /off switch to the off switch.) 19. To purchase a surge suppressor, see page 7), plug the power cord into a surge suppressor (not included) and plug the surge suppressor into a grounded circuit capable of heart rate readings. tem is intended only as described in a garage or covered patio, or near water. 5. The pulse sensor is damaged, the walking belt may change speed or stop...
User Manual
Page 4
... the power cord immediately after use the treadmill in any time by or through the use only. ICON assumes no responsibility for personal injury or property damage sustained by pressing the speed and incline buttons. scribed in -home use of the CD or video program. 23. Note: The long decal is about to order a free replacement decal. When using iFIT.com CDs and videos, you can manually override the speed and incline settings...
... the power cord immediately after use the treadmill in any time by or through the use only. ICON assumes no responsibility for personal injury or property damage sustained by pressing the speed and incline buttons. scribed in -home use of the CD or video program. 23. Note: The long decal is about to order a free replacement decal. When using iFIT.com CDs and videos, you can manually override the speed and incline settings...
User Manual
Page 5
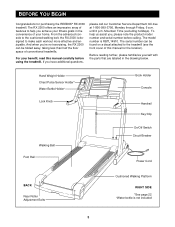
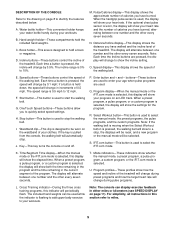
... 2000 treadmill. Hand Weight Holder Chest Pulse Sensor Holder* Water Bottle Holder† Lock Knob Book Holder Console Handrail Key/Clip Walking Belt Foot Rail On/Off Switch Circuit Breaker Power Cord BACK Rear Roller Adjustment Bolts Cushioned Walking Platform RIGHT SIDE *See page 22 †Water bottle is RBTL14910. The RX 2000 offers an impressive array of features to help us assist you achieve your home. until 6 p.m. The serial number...
... 2000 treadmill. Hand Weight Holder Chest Pulse Sensor Holder* Water Bottle Holder† Lock Knob Book Holder Console Handrail Key/Clip Walking Belt Foot Rail On/Off Switch Circuit Breaker Power Cord BACK Rear Roller Adjustment Bolts Cushioned Walking Platform RIGHT SIDE *See page 22 †Water bottle is RBTL14910. The RX 2000 offers an impressive array of features to help us assist you achieve your home. until 6 p.m. The serial number...
User Manual
Page 7
... voltage rating of 400 volts or less and a minimum surge dissipation of the treadmill. Do not modify the plug provided with the product-if it should be used only until a properly grounded outlet (drawing 1) can result from weather conditions or from the adapter must be installed by a metal screw. Important: The treadmill is damaged, the walking belt may change speed or stop unexpectedly...
... voltage rating of 400 volts or less and a minimum surge dissipation of the treadmill. Do not modify the plug provided with the product-if it should be used only until a properly grounded outlet (drawing 1) can result from weather conditions or from the adapter must be installed by a metal screw. Important: The treadmill is damaged, the walking belt may change speed or stop unexpectedly...
User Manual
Page 8
... treadmill can be available. For information about an optional chest pulse sensor, see page 21. 8 To use iFIT.com programs directly from the internet. Each CD features two programs designed by certified personal trainers. Video programs offer the same benefits as well. The console even allows you through every step of your own workout programs and store them in the manual mode, the speed and incline of the walking belt. To create and use...
... treadmill can be available. For information about an optional chest pulse sensor, see page 21. 8 To use iFIT.com programs directly from the internet. Each CD features two programs designed by certified personal trainers. Video programs offer the same benefits as well. The console even allows you through every step of your own workout programs and store them in the manual mode, the speed and incline of the walking belt. To create and use...
User Manual
Page 9
... whether the manual mode, a preset program, a pulse program, a custom program, or the iFIT.com mode is used, the display will periodically flash. Key-This key turns the console on an LED track. Q. The included hand weights can display exercise feedback in the current segment of calories you to quickly select speed settings. If the optional chest pulse sensor is flashing to add upper body exercise to your workouts. if a button is pressed, the walking belt will slow to a stop the walking belt. Waistband...
... whether the manual mode, a preset program, a pulse program, a custom program, or the iFIT.com mode is used, the display will periodically flash. Key-This key turns the console on an LED track. Q. The included hand weights can display exercise feedback in the current segment of calories you to quickly select speed settings. If the optional chest pulse sensor is flashing to add upper body exercise to your workouts. if a button is pressed, the walking belt will slow to a stop the walking belt. Waistband...
User Manual
Page 10
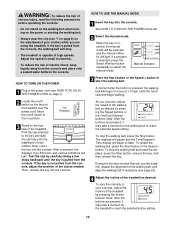
... manual mode will be selected and the manual indicator will light. A moment after the button is selected, press the Select Workout button repeatedly to reach the selected speed setting. HOW TO TURN ON THE POWER 1 Plug in the console. Move the on/off switch on the foot rails of the treadmill. As you exercise, adjust the speed of the walking belt as desired by pressing the Incline buttons. To restart the walking belt, press the Start button or the Speed + button...
... manual mode will be selected and the manual indicator will light. A moment after the button is selected, press the Select Workout button repeatedly to reach the selected speed setting. HOW TO TURN ON THE POWER 1 Plug in the console. Move the on/off switch on the foot rails of the treadmill. As you exercise, adjust the speed of the walking belt as desired by pressing the Incline buttons. To restart the walking belt, press the Start button or the Speed + button...
User Manual
Page 11
... time the Incline buttons are on /off the demo mode. Step onto the foot rails, press the Stop button, and adjust the incline of the treadmill to page 22 and turn off switch near the power cord to show your hands are pressed, the display will be at a time until the entire track is used, the display will show a track representing a distance of the walking belt. To change to the storage position or the treadmill will alternate...
... time the Incline buttons are on /off the demo mode. Step onto the foot rails, press the Stop button, and adjust the incline of the treadmill to page 22 and turn off switch near the power cord to show your hands are pressed, the display will be at a time until the entire track is used, the display will show a track representing a distance of the walking belt. To change to the storage position or the treadmill will alternate...
User Manual
Page 12
... TO TURN ON THE POWER on the console. When a preset program is selected, the Distance/Incline display will flash the maximum incline setting for the program for the final segment is inserted, the manual mode will be selected. Hold the handrails and begin walking. When the first segment is divided into the console. The program will continue in this way until one of the Speed buttons is...
... TO TURN ON THE POWER on the console. When a preset program is selected, the Distance/Incline display will flash the maximum incline setting for the program for the final segment is inserted, the manual mode will be selected. Hold the handrails and begin walking. When the first segment is divided into the console. The program will continue in this way until one of the Speed buttons is...
User Manual
Page 13
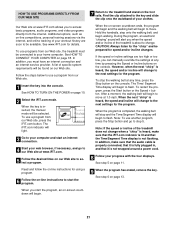
... the chest pulse sensor. 3 Select one of the program. See HOW TO TURN ON THE POWER on page 10. 2 Put on /off switch near the power cord to the off the demo mode. If you have already entered your exercise heart rate. 1 Insert the key into the console. Press the buttons again to step 5 on the chest pulse sensor, follow the instructions included with the four displays. To stop the program temporarily, press the Stop button. HOW TO USE THE PULSE PROGRAMS...
... the chest pulse sensor. 3 Select one of the program. See HOW TO TURN ON THE POWER on page 10. 2 Put on /off switch near the power cord to the off the demo mode. If you have already entered your exercise heart rate. 1 Insert the key into the console. Press the buttons again to step 5 on the chest pulse sensor, follow the instructions included with the four displays. To stop the program temporarily, press the Stop button. HOW TO USE THE PULSE PROGRAMS...
User Manual
Page 14
... change the maximum heart rate setting, press the + and - The buttons can be shown in the Pulse/ Calories display. 5 Enter a maximum heart rate setting. After you increase the speed, the incline will automatically adjust to the heart rate setting for the program. This number is 190 (220 - 30 = 190). if Pulse program 2 is pressed, the treadmill will decrease. A moment after the button is selected, the maximum heart rate setting can be increased any time, press the Stop button. 7 Follow your heart rate...
... change the maximum heart rate setting, press the + and - The buttons can be shown in the Pulse/ Calories display. 5 Enter a maximum heart rate setting. After you increase the speed, the incline will automatically adjust to the heart rate setting for the program. This number is 190 (220 - 30 = 190). if Pulse program 2 is pressed, the treadmill will decrease. A moment after the button is selected, the maximum heart rate setting can be increased any time, press the Stop button. 7 Follow your heart rate...
User Manual
Page 19
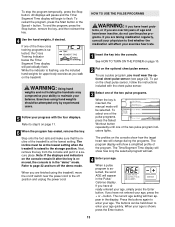
... the button is pressed, your VCR. 4 Press the PLAY button on the console. Note: If the Time/Segment Time display is being used, see instruction B. Plug the adapter into the AUDIO OUT jack on page 18. IN VIDEO AUDIO IN CH 34 OUT RF OUT RCA Y-adapter Audio Cable Adapter Wire removed from AUDIO OUT jack HOW TO USE IFIT.COM CD AND VIDEO PROGRAMS To use iFIT.com CDs or videocassettes, the treadmill must be connected to change...
... the button is pressed, your VCR. 4 Press the PLAY button on the console. Note: If the Time/Segment Time display is being used, see instruction B. Plug the adapter into the AUDIO OUT jack on page 18. IN VIDEO AUDIO IN CH 34 OUT RF OUT RCA Y-adapter Audio Cable Adapter Wire removed from AUDIO OUT jack HOW TO USE IFIT.COM CD AND VIDEO PROGRAMS To use iFIT.com CDs or videocassettes, the treadmill must be connected to change...
User Manual
Page 20
... a power cord. • If you can also be stopped by pressing the Speed or Incline buttons on the console. When the CD or video program is flashing, press the Start button or the Speed + button on the console. • Adjust the volume of the treadmill does not change to the next settings of on the console. 5 Follow your progress with the four displays. If the Time/Segment Time display is completed, the walking belt will stop...
... a power cord. • If you can also be stopped by pressing the Speed or Incline buttons on the console. When the CD or video program is flashing, press the Start button or the Speed + button on the console. • Adjust the volume of the treadmill does not change to the next settings of on the console. 5 Follow your progress with the four displays. If the Time/Segment Time display is completed, the walking belt will stop...
User Manual
Page 21
... audio cable is properly connected, that it is about to the treadmill and stand on -line instructions for the program. To restart the program, press the Start button or the Speed + button. When the program is completed, the walking belt will begin to the next settings for using a program. 6 Follow the on -screen countdown ends, the program will begin to access basic programs, audio programs, and video programs directly from our Web site, press the iFIT.com button...
... audio cable is properly connected, that it is about to the treadmill and stand on -line instructions for the program. To restart the program, press the Start button or the Speed + button. When the program is completed, the walking belt will begin to the next settings for using a program. 6 Follow the on -screen countdown ends, the program will begin to access basic programs, audio programs, and video programs directly from our Web site, press the iFIT.com button...

User Manual
Page 22
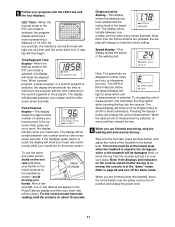
... in , the key can be plugged in the display, the console is blank. When the console is in the demo mode, the power cord can be shown: The Time/Segment Time display will show the total number of hours that the walking belt has moved. button so the Pulse/Calories display is in the Speed display. The chest pulse sensor continuously monitors your heart rate during your workouts and allows you to switch the console from miles per hour...
... in , the key can be plugged in the display, the console is blank. When the console is in the demo mode, the power cord can be shown: The Time/Segment Time display will show the total number of hours that the walking belt has moved. button so the Pulse/Calories display is in the Speed display. The chest pulse sensor continuously monitors your heart rate during your workouts and allows you to switch the console from miles per hour...
User Manual
Page 24
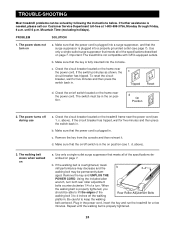
.... Plug in the power cord, insert the key and run the treadmill for five minutes and then press the switch back in. c Tripped Reesseett d. The power turns off switch located on /off the walking platform. If the circuit breaker has tripped, wait for a few minutes. d. Using the included allen wrench, turn both rear roller adjustment bolts counterclockwise 1/4 of the Rear Roller Adjustment Bolts walking belt 3 to 4 inches off switch is fully inserted into the console. Be...
.... Plug in the power cord, insert the key and run the treadmill for five minutes and then press the switch back in. c Tripped Reesseett d. The power turns off switch located on /off the walking platform. If the circuit breaker has tripped, wait for a few minutes. d. Using the included allen wrench, turn both rear roller adjustment bolts counterclockwise 1/4 of the Rear Roller Adjustment Bolts walking belt 3 to 4 inches off switch is fully inserted into the console. Be...

User Manual
Page 28
... intensity. The key to use the handgrip pulse sensor or the optional chest pulse sensor (see page 22). Various factors, including your exercise program. The following three parts: A Warm-up increases your training zone. This is especially important for exercise. The chart below shows recommended heart rates for fat burning; If your goal is to burn fat, adjust the speed or incline of the treadmill until your pulse is near...
... intensity. The key to use the handgrip pulse sensor or the optional chest pulse sensor (see page 22). Various factors, including your exercise program. The following three parts: A Warm-up increases your training zone. This is especially important for exercise. The chart below shows recommended heart rates for fat burning; If your goal is to burn fat, adjust the speed or incline of the treadmill until your pulse is near...
User Manual
Page 30
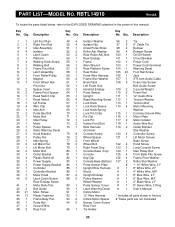
... 1 Chest Pulse Strap 98 4 Bumper 4 4 Isolator 52 2 Roller Adj. Bolt 100 1 On/Off Switch 6 1 Platform 54 1 Rear Endcap 101 1 Circuit Breaker 7 4 Walking Deck Screw 55 1 Frame 102 1 Power Cord 8 1 Walking Belt 56 1 Allen Wrench 103 1 Power Cord Grommet 9 2 Frame Pivot Bolt 57 2 Rear Platform Screw 104 1 Warning Decal 10 1 Latch Assembly 58 1 Rear Roller 105 20 Foot Rail Screw 11 1 Front Roller/Pulley 59 1 Pulse Wire Harness 106 1 Jack 12 1 Magnet 60 2 Frame Star Washer 107 1 iFIT.com Audio Cable...
... 1 Chest Pulse Strap 98 4 Bumper 4 4 Isolator 52 2 Roller Adj. Bolt 100 1 On/Off Switch 6 1 Platform 54 1 Rear Endcap 101 1 Circuit Breaker 7 4 Walking Deck Screw 55 1 Frame 102 1 Power Cord 8 1 Walking Belt 56 1 Allen Wrench 103 1 Power Cord Grommet 9 2 Frame Pivot Bolt 57 2 Rear Platform Screw 104 1 Warning Decal 10 1 Latch Assembly 58 1 Rear Roller 105 20 Foot Rail Screw 11 1 Front Roller/Pulley 59 1 Pulse Wire Harness 106 1 Jack 12 1 Magnet 60 2 Frame Star Washer 107 1 iFIT.com Audio Cable...
User Manual
Page 31
To help us assist you, please be prepared to give the following information: • The MODEL NUMBER of the product (RBTL14910) • The NAME of the product (REEBOK® RX 2000 treadmill) • The SERIAL NUMBER of the product (see the front cover of this manual) • The KEY NUMBER and DESCRIPTION of the part(s) (see the PART LIST on page 30). 31 Mountain Time (excluding holidays). HOW TO ORDER REPLACEMENT PARTS To order replacement parts, call our Customer Service Department toll-free at 1-800-999-3756, Monday through Friday, 6 a.m. until 6 p.m.
To help us assist you, please be prepared to give the following information: • The MODEL NUMBER of the product (RBTL14910) • The NAME of the product (REEBOK® RX 2000 treadmill) • The SERIAL NUMBER of the product (see the front cover of this manual) • The KEY NUMBER and DESCRIPTION of the part(s) (see the PART LIST on page 30). 31 Mountain Time (excluding holidays). HOW TO ORDER REPLACEMENT PARTS To order replacement parts, call our Customer Service Department toll-free at 1-800-999-3756, Monday through Friday, 6 a.m. until 6 p.m.
User Manual
Page 34
... of purchase. USER'S MANUAL-It is VERY IMPORTANT THAT YOU READ THE MANUAL before operating the Product. Accordingly, the above limitation may not apply to state. This warranty gives you specific legal rights and you believe the service is covered by warranty. ICON HEALTH & FITNESS, INC., 1500 S. 1000 W., LOGAN, UT 84321-9813 Part No. 178071 R0102A Printed in connection with the use or performance of...
... of purchase. USER'S MANUAL-It is VERY IMPORTANT THAT YOU READ THE MANUAL before operating the Product. Accordingly, the above limitation may not apply to state. This warranty gives you specific legal rights and you believe the service is covered by warranty. ICON HEALTH & FITNESS, INC., 1500 S. 1000 W., LOGAN, UT 84321-9813 Part No. 178071 R0102A Printed in connection with the use or performance of...


