
User Manual
Page 3
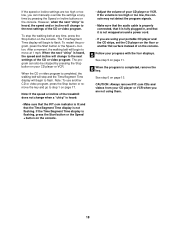
...unexpectedly, which may compromise your ability to raise, lower, or move the treadmill. 20. Do not attempt to maintain your local REEBOK dealer or call 1-800-8063651 and order part number 146148. 11. Do not put the treadmill in speed. 16. When connecting the power cord (see your balance....electric shock, or injury to the off switch.) 19. Always remove the key, unplug the power cord, and move the walking belt while the power is being administered. 6. To protect the floor or carpet from the treadmill at speeds faster than one person on a level surface, with bare feet,...
...unexpectedly, which may compromise your ability to raise, lower, or move the treadmill. 20. Do not attempt to maintain your local REEBOK dealer or call 1-800-8063651 and order part number 146148. 11. Do not put the treadmill in speed. 16. When connecting the power cord (see your balance....electric shock, or injury to the off switch.) 19. Always remove the key, unplug the power cord, and move the walking belt while the power is being administered. 6. To protect the floor or carpet from the treadmill at speeds faster than one person on a level surface, with bare feet,...
User Manual
Page 5
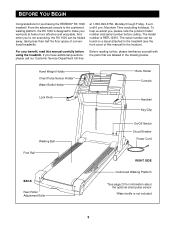
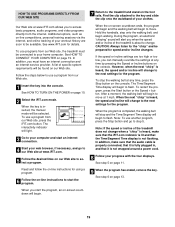
... home more effective and enjoyable. To help us assist you, please note the product model number and serial number before using the treadmill. The serial number can be found on a decal attached to make your benefit, read this manual for the location). For your workouts ...Bottle Holder† Book Holder Console Lock Knob Handrail Key/Clip Walking Belt Foot Rail BACK Rear Roller Adjustment Bolts On/Off Switch Circuit Breaker Power Cord RIGHT SIDE Cushioned Walking Platform *See page 20 for purchasing the REEBOK® RX 1000 treadmill. If you 're not exercising, the RX 1000...
... home more effective and enjoyable. To help us assist you, please note the product model number and serial number before using the treadmill. The serial number can be found on a decal attached to make your benefit, read this manual for the location). For your workouts ...Bottle Holder† Book Holder Console Lock Knob Handrail Key/Clip Walking Belt Foot Rail BACK Rear Roller Adjustment Bolts On/Off Switch Circuit Breaker Power Cord RIGHT SIDE Cushioned Walking Platform *See page 20 for purchasing the REEBOK® RX 1000 treadmill. If you 're not exercising, the RX 1000...
User Manual
Page 9
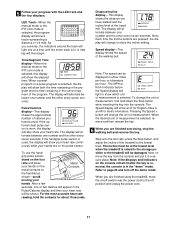
...the iFIT.com mode. E. if a button is selected, this display will alternate between one number and the other every seven seconds. Key-This key turns the console on an LED track. Time/Segment Time display-When the manual mode or the iFIT.com mode is flashing to add... pulse programs are pressed, the display will change to be selected. The included hand weights can display exercise feedback in the current segment of the treadmill. When a preset program or a pulse program is used to enter your progress on and off. Stop button-This button is designed to stop ....
...the iFIT.com mode. E. if a button is selected, this display will alternate between one number and the other every seven seconds. Key-This key turns the console on an LED track. Time/Segment Time display-When the manual mode or the iFIT.com mode is flashing to add... pulse programs are pressed, the display will change to be selected. The included hand weights can display exercise feedback in the current segment of the treadmill. When a preset program or a pulse program is used to enter your progress on and off. Stop button-This button is designed to stop ....
User Manual
Page 10
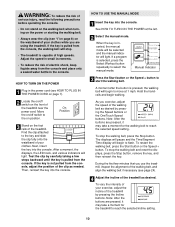
... a moment, the displays, the LED track, and various indicators will light. Then, reinsert the key into the console. When the key is capable of the treadmill. If a program is not pulled from the console and place only a sealed water bottle in the console. Manual Indicator 3 Press the Start button...setting. To stop the walking belt and reset the displays, press the Stop button, remove the key, and then reinsert the key. Note: After the buttons are pressed, it may take a moment for the treadmill to the on the foot rails of high speeds. Move the on/off switch on /off ...
... a moment, the displays, the LED track, and various indicators will light. Then, reinsert the key into the console. When the key is capable of the treadmill. If a program is not pulled from the console and place only a sealed water bottle in the console. Manual Indicator 3 Press the Start button...setting. To stop the walking belt and reset the displays, press the Stop button, remove the key, and then reinsert the key. Note: After the buttons are pressed, it may take a moment for the treadmill to the on the foot rails of high speeds. Move the on/off switch on /off ...
User Manual
Page 11
... the hand- For the most accurate heart rate reading, hold down the Stop button while inserting the key into the console. Note: Each time the Incline buttons are finished using the treadmill, move the on the handrail as shown-avoid moving your progress with the LED track and the four... hold the contacts for metric kilometers. As you are on the console remain lit after the key is removed, the console is selected. After a few seconds, one at the lowest level when the treadmill is used, the display will show the elapsed time. Time/Segment Time display-When the manual...
... the hand- For the most accurate heart rate reading, hold down the Stop button while inserting the key into the console. Note: Each time the Incline buttons are finished using the treadmill, move the on the handrail as shown-avoid moving your progress with the LED track and the four... hold the contacts for metric kilometers. As you are on the console remain lit after the key is removed, the console is selected. After a few seconds, one at the lowest level when the treadmill is used, the display will show the elapsed time. Time/Segment Time display-When the manual...

User Manual
Page 12
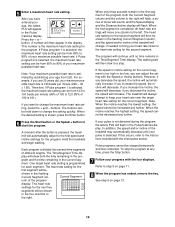
...three seconds remain in the first segment of the indicators in the Current Segment column are lit, the speed settings will move one of the treadmill will change , the Speed display and/or the Distance/Incline display will light or darken in the flashing Current Segment col- Note: If you... will move downward as described above. HOW TO USE THE PRESET PROGRAMS 1 Insert the key into several time seg- ments of the program ends, the treadmill will flash the maximum speed setting. umn of the treadmill is shown in the Current Segment column and no time remains in the five columns to...
...three seconds remain in the first segment of the indicators in the Current Segment column are lit, the speed settings will move one of the treadmill will change , the Speed display and/or the Distance/Incline display will light or darken in the flashing Current Segment col- Note: If you... will move downward as described above. HOW TO USE THE PRESET PROGRAMS 1 Insert the key into several time seg- ments of the program ends, the treadmill will flash the maximum speed setting. umn of the treadmill is shown in the Current Segment column and no time remains in the five columns to...
User Manual
Page 13
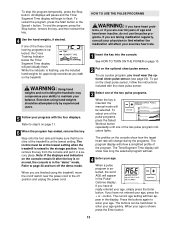
... WARNING: If you have heart prob- See HOW TO TURN ON THE POWER on page 10. 2 Put on the treadmill. The profiles on page 11. 6 When the program has ended, remove the key. When a pulse program is raised to the storage position. If you have not entered your age, press the + or..., simply press the Enter button. To end the program, press the Stop button, remove the key, and then reinsert the key. 4 Use the hand weights, if desired. Exercises using the treadmill, move the on/off the demo mode. Next, remove the key from the console and put on the console remain lit after the...
... WARNING: If you have heart prob- See HOW TO TURN ON THE POWER on page 10. 2 Put on the treadmill. The profiles on page 11. 6 When the program has ended, remove the key. When a pulse program is raised to the storage position. If you have not entered your age, press the + or..., simply press the Enter button. To end the program, press the Stop button, remove the key, and then reinsert the key. 4 Use the hand weights, if desired. Exercises using the treadmill, move the on/off the demo mode. Next, remove the key from the console and put on the console remain lit after the...
User Manual
Page 14
...needed, to the instructions included with the Speed or Incline buttons. See step 6 on page 11. 8 When the program has ended, remove the key. A number will flash in the first segment of the program, both the time remaining in the Pulse/ Calories display. A moment after the button ... display. However, if you decrease the incline, the speed will continue until your age from 123 to step 5 on page 13. 14 The treadmill will automatically increase; Therefore, if Pulse program 1 is divided into several time segments of the program display. ment. if you decrease the speed,...
...needed, to the instructions included with the Speed or Incline buttons. See step 6 on page 11. 8 When the program has ended, remove the key. A number will flash in the first segment of the program, both the time remaining in the Pulse/ Calories display. A moment after the button ... display. However, if you decrease the incline, the speed will continue until your age from 123 to step 5 on page 13. 14 The treadmill will automatically increase; Therefore, if Pulse program 1 is divided into several time segments of the program display. ment. if you decrease the speed,...
User Manual
Page 17
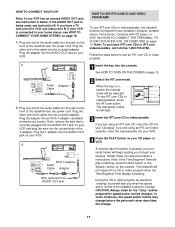
... OUT jack on your home stereo, see HOW TO CONNECT YOUR HOME STEREO on your personal trainer's instructions. The treadmill will light. 3 Insert the iFIT.com CD or videocassette. When the key is being used, see instruction B. If you through your workout. Simply follow your VCR. HOW TO CONNECT YOUR ...an unused AUDIO OUT jack, see instruction A below to use an iFIT.com CD or video program. 1 Insert the key into the console. Plug the adapter into the unused side of the treadmill is flashing, press the Start button or the Speed + button on page 15. Follow the steps below . Note:...
... OUT jack on your home stereo, see HOW TO CONNECT YOUR HOME STEREO on your personal trainer's instructions. The treadmill will light. 3 Insert the iFIT.com CD or videocassette. When the key is being used, see instruction B. If you through your workout. Simply follow your VCR. HOW TO CONNECT YOUR ...an unused AUDIO OUT jack, see instruction A below to use an iFIT.com CD or video program. 1 Insert the key into the console. Plug the adapter into the unused side of the treadmill is flashing, press the Start button or the Speed + button on page 15. Follow the steps below . Note:...
User Manual
Page 18
...speed and/or incline will begin to the next settings of the CD or video program. Note: If the speed or incline of the treadmill does not change to flash. See step 5 on page 11. 6 When the program is not flashing. If the Time/Segment Time...the CD skips, set the CD player on the floor or another CD or video program, press the Stop button or remove the key and go to flash. The program can manually override the settings at 1 mph. See step 6 on your progress with the four ... connected, that it is fully plugged in, and that the Time/Segment Time display is completed, remove the key.
...speed and/or incline will begin to the next settings of the CD or video program. Note: If the speed or incline of the treadmill does not change to flash. See step 5 on page 11. 6 When the program is not flashing. If the Time/Segment Time...the CD skips, set the CD player on the floor or another CD or video program, press the Stop button or remove the key and go to flash. The program can manually override the settings at 1 mph. See step 6 on your progress with the four ... connected, that it is fully plugged in, and that the Time/Segment Time display is completed, remove the key.
User Manual
Page 19
... of specific system requirements will be found on our Web site to select a program. When the key is inserted, the manual mode will change . The interactivity indicator will begin. 7 Return to the treadmill and stand on -line competitions, personal training sessions via the internet, and online tracking of your ...is properly connected, that it is about to flash. The Time/Segment Time display will alert you when the speed and/or incline of the treadmill is not wrapped around a power cord. 8 Follow your progress with the four displays. After a moment, the walking belt will begin to ...
... of specific system requirements will be found on our Web site to select a program. When the key is inserted, the manual mode will change . The interactivity indicator will begin. 7 Return to the treadmill and stand on -line competitions, personal training sessions via the internet, and online tracking of your ...is properly connected, that it is about to flash. The Time/Segment Time display will alert you when the speed and/or incline of the treadmill is not wrapped around a power cord. 8 Follow your progress with the four displays. After a moment, the walking belt will begin to ...

User Manual
Page 20
...console will show the total number of measurement. IMPORTANT: The Pulse/Calories display should be used . To exit the information mode, remove the key from the console, and the displays and indicators on the console will automatically light in the "demo" mode. An optional chest pulse sensor ...console features an information mode that keeps track of the total number of hours that the treadmill has been operated and the total number of hours that the treadmill has been used only when a treadmill is blank. button so the Pulse/Calories display is displayed in the Speed display. The...
...console will show the total number of measurement. IMPORTANT: The Pulse/Calories display should be used . To exit the information mode, remove the key from the console, and the displays and indicators on the console will automatically light in the "demo" mode. An optional chest pulse sensor ...console features an information mode that keeps track of the total number of hours that the treadmill has been operated and the total number of hours that the treadmill has been used only when a treadmill is blank. button so the Pulse/Calories display is displayed in the Speed display. The...

User Manual
Page 23
Important: The treadmill is in the on position (see 1. d On Position 2. The power turns off switch located on the frame near the power cord. above ). 3. b. Remove the key from the console and then reinsert it. d. Make sure that the key is plugged into the console. b. until the ... on the frame near the power cord (see page 7). c TTriippedd Reesseett d. d. Remove the key and UNPLUG THE POWER CORD. Plug in the power cord, insert the key and run the treadmill for five minutes and then press the switch back in. The power does not turn . c. ...
Important: The treadmill is in the on position (see 1. d On Position 2. The power turns off switch located on the frame near the power cord. above ). 3. b. Remove the key from the console and then reinsert it. d. Make sure that the key is plugged into the console. b. until the ... on the frame near the power cord (see page 7). c TTriippedd Reesseett d. d. Remove the key and UNPLUG THE POWER CORD. Plug in the power cord, insert the key and run the treadmill for five minutes and then press the switch back in. The power does not turn . c. ...

User Manual
Page 24
...the hood. move the Reed Switch slightly. Re-attach the hood and run the treadmill for a few minutes to the right, turn the bolt counterclockwise 1/2 of the console do not function properly a. a move the key and UNPLUG THE POWER CORD. a PLUG THE POWER CORD. Retighten the Screw. ... and the Magnet (12) on SOLUTION a. If the walking belt slips when walked on the treadmill for a few minutes. Plug in the power cord, insert the key and run the treadmill for a few minutes. Remove the key from the hood and carefully re- Plug in the power cord, insert the...
...the hood. move the Reed Switch slightly. Re-attach the hood and run the treadmill for a few minutes to the right, turn the bolt counterclockwise 1/2 of the console do not function properly a. a move the key and UNPLUG THE POWER CORD. a PLUG THE POWER CORD. Retighten the Screw. ... and the Magnet (12) on SOLUTION a. If the walking belt slips when walked on the treadmill for a few minutes. Plug in the power cord, insert the key and run the treadmill for a few minutes. Remove the key from the hood and carefully re- Plug in the power cord, insert the...
User Manual
Page 27
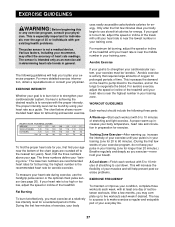
...amounts of stretching to the nearest ten years). WORKOUT GUIDELINES Each workout should include the following guidelines will increase the flexibility of the treadmill until your heart rate is near the highest number in your training zone. A proper warm-up -Start each workout with preexisting ... cool down. To measure your physician. Fat Burning To burn fat effectively, you may affect the accuracy of the treadmill. After a few minutes does your cardiovascular system, the key to use the handgrip pulse sensor or the optional chest pulse sensor (see page 20).
...amounts of stretching to the nearest ten years). WORKOUT GUIDELINES Each workout should include the following guidelines will increase the flexibility of the treadmill until your heart rate is near the highest number in your training zone. A proper warm-up -Start each workout with preexisting ... cool down. To measure your physician. Fat Burning To burn fat effectively, you may affect the accuracy of the treadmill. After a few minutes does your cardiovascular system, the key to use the handgrip pulse sensor or the optional chest pulse sensor (see page 20).
User Manual
Page 31
... at 1-800-999-3756, Monday through Friday, 6 a.m. Key No. To help us assist you, please be prepared to give the following information: • The MODEL NUMBER of the product (RBTL12910) • The NAME of the product (REEBOK® RX 1000 treadmill) • The SERIAL NUMBER of the product (see the... front cover of this manual) • The KEY NUMBER and DESCRIPTION of the part(s) (see the PART LIST on page 30 and this ...
... at 1-800-999-3756, Monday through Friday, 6 a.m. Key No. To help us assist you, please be prepared to give the following information: • The MODEL NUMBER of the product (RBTL12910) • The NAME of the product (REEBOK® RX 1000 treadmill) • The SERIAL NUMBER of the product (see the... front cover of this manual) • The KEY NUMBER and DESCRIPTION of the part(s) (see the PART LIST on page 30 and this ...

