

English Manual
Page 3
... exercise clothing when using the treadmill. 16. Athletic support clothes are standing on each side. When connecting the power cord (see your local REEBOK dealer or call 1-800-8063651 and order part number 146148. 17. Do not change . In some instances, the speed and/or incline may result in order to raise, lower, or move the on/off switch to the off position when the treadmill is turned...
... exercise clothing when using the treadmill. 16. Athletic support clothes are standing on each side. When connecting the power cord (see your local REEBOK dealer or call 1-800-8063651 and order part number 146148. 17. Do not change . In some instances, the speed and/or incline may result in order to raise, lower, or move the on/off switch to the off position when the treadmill is turned...

English Manual
Page 4
... service representative only. 27. This treadmill is intended for in the location shown. Apply the decal in -home use of the CD or video program. 23. This is missing or illegible, please call our Customer Service Department toll-free to the next settings of this manual should be performed by pressing the speed and incline buttons. 22. Never insert or drop any object into any exercise program...
... service representative only. 27. This treadmill is intended for in the location shown. Apply the decal in -home use of the CD or video program. 23. This is missing or illegible, please call our Customer Service Department toll-free to the next settings of this manual should be performed by pressing the speed and incline buttons. 22. Never insert or drop any object into any exercise program...
English Manual
Page 5
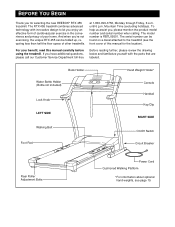
... are labeled. Mountain Time (excluding holidays). The model number is RBTL09501. Book Holder Water Bottle Holder (Bottle not included) Lock Knob LEFT SIDE Walking Belt Foot Pad Hand Weight Holder* Console Handrail Key/Clip RIGHT SIDE On/Off Switch Circuit Breaker Rear Roller Adjustment Bolts Power Cord Cushioned Walking Platform *For information about optional hand weights, see the front cover of other treadmills. at 1-800-999-3756, Monday through Friday...
... are labeled. Mountain Time (excluding holidays). The model number is RBTL09501. Book Holder Water Bottle Holder (Bottle not included) Lock Knob LEFT SIDE Walking Belt Foot Pad Hand Weight Holder* Console Handrail Key/Clip RIGHT SIDE On/Off Switch Circuit Breaker Rear Roller Adjustment Bolts Power Cord Cushioned Walking Platform *For information about optional hand weights, see the front cover of other treadmills. at 1-800-999-3756, Monday through Friday...

English Manual
Page 6
...the bottom. It may be transferred to the top of lubricant may be replaced, use the replacement Base Pad. 2 69 110 99 99 100 102 69 100 102 3. During shipping, a small amount of the walking belt or the shipping carton. If there is completed. If a...wires in the post are square rubber bumpers on the right Upright (69). Next, attach the Handrail Extension by tightening two Small Screws (67) into the treadmill as you insert the Extension Leg. Note: It may be help of a second person, carefully raise the Uprights (69) until assembly is lubricant on top of the walking belt...
...the bottom. It may be transferred to the top of lubricant may be replaced, use the replacement Base Pad. 2 69 110 99 99 100 102 69 100 102 3. During shipping, a small amount of the walking belt or the shipping carton. If there is completed. If a...wires in the post are square rubber bumpers on the right Upright (69). Next, attach the Handrail Extension by tightening two Small Screws (67) into the treadmill as you insert the Extension Leg. Note: It may be help of a second person, carefully raise the Uprights (69) until assembly is lubricant on top of the walking belt...

English Manual
Page 9
... to the walking belt or the walking platform. Plug the power cord into a surge suppressor, and plug the surge suppressor into an appropriate outlet that is used only until a properly grounded outlet (drawing 1) can result from weather conditions or from the adapter must be installed by sudden voltage changes in a fall and serious injury. Whenever the adapter is UL 1449 listed as a properly...
... to the walking belt or the walking platform. Plug the power cord into a surge suppressor, and plug the surge suppressor into an appropriate outlet that is used only until a properly grounded outlet (drawing 1) can result from weather conditions or from the adapter must be installed by sudden voltage changes in a fall and serious injury. Whenever the adapter is UL 1449 listed as a properly...
English Manual
Page 10
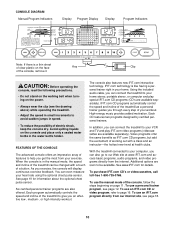
...-, or high-intensity workout. See www.iFIT.com for information about the optional chest pulse sensor. To use an iFIT.com CD or video program, refer to avoid sudden jumps in the water bottle holder. In addition, you can connect the treadmill to our Web site at health clubs. CONSOLE DIAGRAM Manual/Program Indicators Display Program Display Display Program Indicators Note: If there is like having a personal trainer right in your workout. IFIT.com technology is...
...-, or high-intensity workout. See www.iFIT.com for information about the optional chest pulse sensor. To use an iFIT.com CD or video program, refer to avoid sudden jumps in the water bottle holder. In addition, you can connect the treadmill to our Web site at health clubs. CONSOLE DIAGRAM Manual/Program Indicators Display Program Display Display Program Indicators Note: If there is like having a personal trainer right in your workout. IFIT.com technology is...
English Manual
Page 11
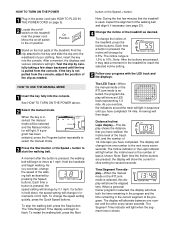
... the walking belt, press the Start button or the Speed + button. As you exercise, the indicators around the track will begin walking. When a personal trainer program is selected, this display will light when the incline level or the number of laps is not pulled from the console, adjust the position of the clip as needed. HOW TO TURN ON THE POWER 1 Plug in the power cord (see page 23). 4 Change the incline of the treadmill as...
... the walking belt, press the Start button or the Speed + button. As you exercise, the indicators around the track will begin walking. When a personal trainer program is selected, this display will light when the incline level or the number of laps is not pulled from the console, adjust the position of the clip as needed. HOW TO TURN ON THE POWER 1 Plug in the power cord (see page 23). 4 Change the incline of the treadmill as...

English Manual
Page 12
... chest pulse sensor is in the "demo" mode. Note: The console can display speed and distance in a secure place. Press the Speed + button to change during the first program. When the desired unit of measurement. The incline must be at the lowest setting when the treadmill is folded to the off position and unplug the power cord. See HOW TO TURN ON THE POWER on page 27). Hold the handrails and begin walking...
... chest pulse sensor is in the "demo" mode. Note: The console can display speed and distance in a secure place. Press the Speed + button to change during the first program. When the desired unit of measurement. The incline must be at the lowest setting when the treadmill is folded to the off position and unplug the power cord. See HOW TO TURN ON THE POWER on page 27). Hold the handrails and begin walking...
English Manual
Page 13
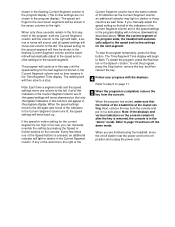
... the treadmill is completed, remove the key from the console and put it in the Time/Segment Time display. The Time/Segment Time display will move to the left again and not all of the indicators in the Current Segment column are lit, the speed settings will begin to page 19 and turn off switch near the power cord to a stop the program temporarily, press the Stop button...
... the treadmill is completed, remove the key from the console and put it in the Time/Segment Time display. The Time/Segment Time display will move to the left again and not all of the indicators in the Current Segment column are lit, the speed settings will begin to page 19 and turn off switch near the power cord to a stop the program temporarily, press the Stop button...
English Manual
Page 16
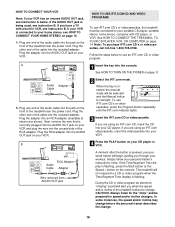
... the key is being used, see HOW TO CONNECT YOUR HOME STEREO on the console. If you when the speed and/or incline of the treadmill near the power cord. ANT. Simply follow your VCR. Plug one end of the RCA adapter. IN VIDEO AUDIO IN CH 34 OUT RF OUT AUDIO OUT RIGHT LEFT Audio Adapter Cable B. CAUTION: Always listen for speed and/or incline changes. Plug the adapter into the AUDIO OUT...
... the key is being used, see HOW TO CONNECT YOUR HOME STEREO on the console. If you when the speed and/or incline of the treadmill near the power cord. ANT. Simply follow your VCR. Plug one end of the RCA adapter. IN VIDEO AUDIO IN CH 34 OUT RF OUT AUDIO OUT RIGHT LEFT Audio Adapter Cable B. CAUTION: Always listen for speed and/or incline changes. Plug the adapter into the AUDIO OUT...
English Manual
Page 17
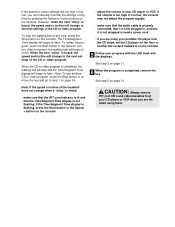
... time, press the Stop button on the console. 5 Follow your progress with the LED track and the displays. When the CD or video program is not flashing. See step 5 on the console. After a moment, the walking belt will change when a "chirp" is heard: • make sure that the audio cable is properly connected, that it is fully plugged in, and that it is not wrapped around a power cord •...
... time, press the Stop button on the console. 5 Follow your progress with the LED track and the displays. When the CD or video program is not flashing. See step 5 on the console. After a moment, the walking belt will change when a "chirp" is heard: • make sure that the audio cable is properly connected, that it is fully plugged in, and that it is not wrapped around a power cord •...
English Manual
Page 18
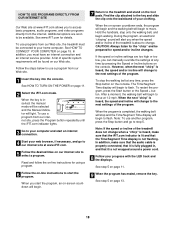
... to your computer and start an internet connection. 4 Start your progress with the LED track and the displays. See step 5 on page 15. See www.iFIT.com for using a program. 6 Follow the on-line instructions to start the program, an on the console. A list of your home computer. When you start the program. To restart the program, press the Start button or the Speed + button. Find the clip attached to the key and slide the...
... to your computer and start an internet connection. 4 Start your progress with the LED track and the displays. See step 5 on page 15. See www.iFIT.com for using a program. 6 Follow the on-line instructions to start the program, an on the console. A list of your home computer. When you start the program. To restart the program, press the Start button or the Speed + button. Find the clip attached to the key and slide the...
English Manual
Page 19
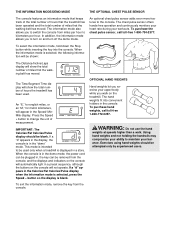
... of measurement. Press the Speed + button to turn off the demo mode. IMPORTANT: The Calories/Fat Calories/Pulse display should be blank. To exit the information mode, remove the key from miles per hour to maintain your workouts. To purchase hand weights, call toll-free 1-800-734-2377. THE INFORMATION MODE/DEMO MODE THE OPTIONAL CHEST PULSE SENSOR The console features an information mode that keeps track of the total number of hours that the treadmill has been operated...
... of measurement. Press the Speed + button to turn off the demo mode. IMPORTANT: The Calories/Fat Calories/Pulse display should be blank. To exit the information mode, remove the key from miles per hour to maintain your workouts. To purchase hand weights, call toll-free 1-800-734-2377. THE INFORMATION MODE/DEMO MODE THE OPTIONAL CHEST PULSE SENSOR The console features an information mode that keeps track of the total number of hours that the treadmill has been operated...

English Manual
Page 22
..., and then plug it back in . Check the on/off switch located on position. If the circuit breaker has tripped, wait for five minutes and then press the switch back in. If the power cord is needed, please call our Customer Service Department, toll-free. Remove the key from the console. While the incline is not compatible with GFCI-equipped outlets. The treadmill will not...
..., and then plug it back in . Check the on/off switch located on position. If the circuit breaker has tripped, wait for five minutes and then press the switch back in. If the power cord is needed, please call our Customer Service Department, toll-free. Remove the key from the console. While the incline is not compatible with GFCI-equipped outlets. The treadmill will not...

English Manual
Page 23
... treadmill for a few minutes. If the walking belt still slows when walked on SOLUTION: a. move the key and UNPLUG THE POWER CORD. Be careful not to the right, first re- PROBLEM: The walking belt slows when walked on , please call our Customer Service Department, toll-free. Use only a single-outlet surge suppressor that meets all of the walking belt 3 to keep the walking belt centered. Using the allen wrench, turn both rear roller adjustment bolts...
... treadmill for a few minutes. If the walking belt still slows when walked on SOLUTION: a. move the key and UNPLUG THE POWER CORD. Be careful not to the right, first re- PROBLEM: The walking belt slows when walked on , please call our Customer Service Department, toll-free. Use only a single-outlet surge suppressor that meets all of the walking belt 3 to keep the walking belt centered. Using the allen wrench, turn both rear roller adjustment bolts...

English Manual
Page 25
... 4 miles per day can lower concentrations of blood triglycerides (a storage form of fat), thus reducing the risk for cardiovascular disease. If this person speeds the pace up to walk at faster speeds can increase HDL-C cholesterol (a high-density lipoprotein which removes excess cholesterol from broken bones. Working with similar aerobic benefits as the runners. The industry has adopted Reebok programming as...
... 4 miles per day can lower concentrations of blood triglycerides (a storage form of fat), thus reducing the risk for cardiovascular disease. If this person speeds the pace up to walk at faster speeds can increase HDL-C cholesterol (a high-density lipoprotein which removes excess cholesterol from broken bones. Working with similar aerobic benefits as the runners. The industry has adopted Reebok programming as...

English Manual
Page 27
... does your heart rate as shown. This will help to plan your training zone for energy. A proper warm-up Start each workout with pre-existing health problems. The following three parts: To find the proper heart rate for individuals over the age of the treadmill until your heart rate is used because your heart rate drops quickly when you , first find your wrist as a guide. EXERCISE INTENSITY Whether...
... does your heart rate as shown. This will help to plan your training zone for energy. A proper warm-up Start each workout with pre-existing health problems. The following three parts: To find the proper heart rate for individuals over the age of the treadmill until your heart rate is used because your heart rate drops quickly when you , first find your wrist as a guide. EXERCISE INTENSITY Whether...
English Manual
Page 30
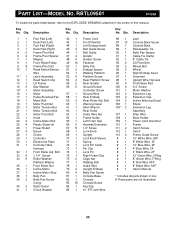
... Front Roller/Pulley Frame Pivot Nut Reed Switch/Sensor Wire Latch Assembly Reed Switch Clip Lift Frame Star Washer Motor Assembly Motor Pulley/Flywheel/Fan Motor Belt Motor Pivot Nut Motor Tension Nut Motor Tension Bolt Motor Pivot Bolt Hood Incline Motor Bolt Plastic Stand-off Power Board Screw Choke Controller Electronics Plate Controller Wire Harness Front Roller Adj. Qty. Description Key No. RBTL09501 R1002A To locate the parts listed below, refer to the EXPLODED DRAWING attached in box # These parts are not illustrated 30 PART LIST-MODEL NO. Qty. Bolt 1 1/4" Screw Roller...
... Front Roller/Pulley Frame Pivot Nut Reed Switch/Sensor Wire Latch Assembly Reed Switch Clip Lift Frame Star Washer Motor Assembly Motor Pulley/Flywheel/Fan Motor Belt Motor Pivot Nut Motor Tension Nut Motor Tension Bolt Motor Pivot Bolt Hood Incline Motor Bolt Plastic Stand-off Power Board Screw Choke Controller Electronics Plate Controller Wire Harness Front Roller Adj. Qty. Description Key No. RBTL09501 R1002A To locate the parts listed below, refer to the EXPLODED DRAWING attached in box # These parts are not illustrated 30 PART LIST-MODEL NO. Qty. Bolt 1 1/4" Screw Roller...

English Manual
Page 31
until 6 p.m. To help us assist you, please be prepared to give the following information: • The MODEL NUMBER of the product (RBTL09501) • The NAME of the product (REEBOK® RTX 455 treadmill) • The SERIAL NUMBER of the product (see the front cover of this manual) • The KEY NUMBER and DESCRIPTION of the part(s) (see the PART LIST on page 30) Mountain Time (excluding holidays). HOW TO ORDER REPLACEMENT PARTS To order replacement parts, call our Customer Service Department toll-free at 1-800-999-3756, Monday through Friday, 6 a.m.
until 6 p.m. To help us assist you, please be prepared to give the following information: • The MODEL NUMBER of the product (RBTL09501) • The NAME of the product (REEBOK® RTX 455 treadmill) • The SERIAL NUMBER of the product (see the front cover of this manual) • The KEY NUMBER and DESCRIPTION of the part(s) (see the PART LIST on page 30) Mountain Time (excluding holidays). HOW TO ORDER REPLACEMENT PARTS To order replacement parts, call our Customer Service Department toll-free at 1-800-999-3756, Monday through Friday, 6 a.m.

English Manual
Page 34
... the service is covered by an ICON trained and authorized service provider, or, at 1-800-999-3756 and tell them your name and address and the serial number of or in the Manual to do not allow the exclusion or limitation of the defect; Some states do not allow limitations on your part to use or performance of purchase. This warranty gives you specific...
... the service is covered by an ICON trained and authorized service provider, or, at 1-800-999-3756 and tell them your name and address and the serial number of or in the Manual to do not allow the exclusion or limitation of the defect; Some states do not allow limitations on your part to use or performance of purchase. This warranty gives you specific...


