
Uk Manual
Page 1
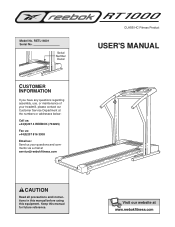
Keep this equipment. Visit our website at service@reebokfitness.com CLASS HC Fitness Product USER'S MANUAL CAUTION Read all precautions and instructions in this manual before using this manual for future reference. RETL16001 Serial No. Model No. Serial Number Decal CUSTOMER INFORMATION If you have any questions regarding assembly, use, or maintenance of your treadmill, please contact our Customer Service Department at the numbers or addresses below: Call us: +44...
Keep this equipment. Visit our website at service@reebokfitness.com CLASS HC Fitness Product USER'S MANUAL CAUTION Read all precautions and instructions in this manual before using this manual for future reference. RETL16001 Serial No. Model No. Serial Number Decal CUSTOMER INFORMATION If you have any questions regarding assembly, use, or maintenance of your treadmill, please contact our Customer Service Department at the numbers or addresses below: Call us: +44...

Uk Manual
Page 2
REEBOK and the Vector Logo are registered trademarks and service marks of this manual. This product is attached in the centre of Reebok. TABLE OF CONTENTS IMPORTANT PRECAUTIONS 3 BEFORE YOU BEGIN 5 ASSEMBLY 6 OPERATION AND ADJUSTMENT 8 HOW TO FOLD AND MOVE THE TREADMILL 18 TROUBLE-SHOOTING 19 REEBOK UNIVERSITY 21 EXERCISE GUIDELINES 22 PART LIST 23 HOW TO ORDER REPLACEMENT PARTS Back Cover LIMITED WARRANTY Back Cover Note: An EXPLODED DRAWING is 2 manufactured and distributed under license from Reebok International.
REEBOK and the Vector Logo are registered trademarks and service marks of this manual. This product is attached in the centre of Reebok. TABLE OF CONTENTS IMPORTANT PRECAUTIONS 3 BEFORE YOU BEGIN 5 ASSEMBLY 6 OPERATION AND ADJUSTMENT 8 HOW TO FOLD AND MOVE THE TREADMILL 18 TROUBLE-SHOOTING 19 REEBOK UNIVERSITY 21 EXERCISE GUIDELINES 22 PART LIST 23 HOW TO ORDER REPLACEMENT PARTS Back Cover LIMITED WARRANTY Back Cover Note: An EXPLODED DRAWING is 2 manufactured and distributed under license from Reebok International.
Uk Manual
Page 3
... air openings. When connecting the power cord (see HOW TO PLUG IN THE POWER CORD on /off switch to a plug. 5. Never move the walking belt whilst the power is capable of high speeds. Various factors, including the user's movement, may affect the accuracy of heart rate readings. Always remove the key and move the on page 8), plug the power cord into any opening. 3 Do not place the treadmill on /off . When choosing a location for the treadmill, make...
... air openings. When connecting the power cord (see HOW TO PLUG IN THE POWER CORD on /off switch to a plug. 5. Never move the walking belt whilst the power is capable of high speeds. Various factors, including the user's movement, may affect the accuracy of heart rate readings. Always remove the key and move the on page 8), plug the power cord into any opening. 3 Do not place the treadmill on /off . When choosing a location for the treadmill, make...
Uk Manual
Page 4
Servicing other than the pro- Do not use of 35 or persons with pre-existing health problems. Read all instructions before using the treadmill. 4 This is about to change . 25. Make sure that you read and understand the information on your treadmill. When using them. Always unplug the power cord before the personal trainer describes the change . structed to the next settings of the treadmill is especially important for...
Servicing other than the pro- Do not use of 35 or persons with pre-existing health problems. Read all instructions before using the treadmill. 4 This is about to change . 25. Make sure that you read and understand the information on your treadmill. When using them. Always unplug the power cord before the personal trainer describes the change . structed to the next settings of the treadmill is especially important for...
Uk Manual
Page 5
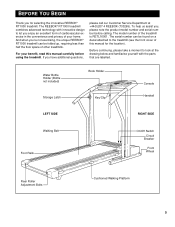
...) Storage Latch Book Holder Key/Clip Console Handrail LEFT SIDE RIGHT SIDE Walking Belt Foot Rails On/Off Switch Circuit Breaker Front Wheel Rear Roller Adjustment Bolts Cushioned Walking Platform 5 And when you , please note the product model number and serial number before using the treadmill. For your home. The model number of other treadmills. The REEBOK® RT1000 treadmill combines advanced technology with the parts that are labelled. To help us assist you 're not exercising...
...) Storage Latch Book Holder Key/Clip Console Handrail LEFT SIDE RIGHT SIDE Walking Belt Foot Rails On/Off Switch Circuit Breaker Front Wheel Rear Roller Adjustment Bolts Cushioned Walking Platform 5 And when you , please note the product model number and serial number before using the treadmill. For your home. The model number of other treadmills. The REEBOK® RT1000 treadmill combines advanced technology with the parts that are labelled. To help us assist you 're not exercising...
Uk Manual
Page 7
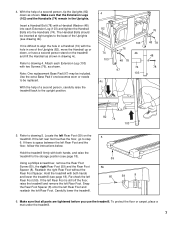
.... Attach each Extension Leg (103) and tighten the Handrail Bolts into each Extension Leg (103) with both hands and lower the treadmill (see page 18). Reattach the right Rear Foot without the Rear Foot Spacer. Snap the Rear Foot Spacer (8) onto the left Rear Foot and reattach the left 60 59 8 Rear Foot (59). Make sure that all parts are tightened before you use the treadmill. Locate...
.... Attach each Extension Leg (103) and tighten the Handrail Bolts into each Extension Leg (103) with both hands and lower the treadmill (see page 18). Reattach the right Rear Foot without the Rear Foot Spacer. Snap the Rear Foot Spacer (8) onto the left Rear Foot and reattach the left 60 59 8 Rear Foot (59). Make sure that all parts are tightened before you use the treadmill. Locate...
Uk Manual
Page 8
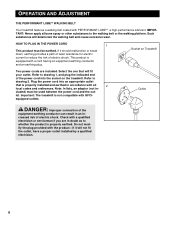
... 1, and plug the indicated end of the equipment-earthing conductor can result in doubt as to reduce the risk of electric shock. Important: The treadmill is properly earthed. OPERATION AND ADJUSTMENT THE PERFORMANT LUBETM WALKING BELT Your treadmill features a walking belt coated with GFCI- Refer to the walking belt or the walking platform. equipped outlets. Outlet DANGER: Improper connection of the power cord into...
... 1, and plug the indicated end of the equipment-earthing conductor can result in doubt as to reduce the risk of electric shock. Important: The treadmill is properly earthed. OPERATION AND ADJUSTMENT THE PERFORMANT LUBETM WALKING BELT Your treadmill features a walking belt coated with GFCI- Refer to the walking belt or the walking platform. equipped outlets. Outlet DANGER: Improper connection of the power cord into...

Uk Manual
Page 9
.... Video programs offer the same benefits as a personal trainer guides you can also go to our new internet site at +44 (0) 207 4 REEBOK (733265). CONSOLE DIAGRAM Incline Display LED Track Displays Mode Button Pulse Sensor Speed Buttons Incline Start/Stop Clip Buttons Button Key FEATURES OF THE CONSOLE The treadmill console offers an impressive selection of features to help you exercise, the console will provide continuous exercise feedback. As you get the most from the internet. Using the included audio cable, you...
.... Video programs offer the same benefits as a personal trainer guides you can also go to our new internet site at +44 (0) 207 4 REEBOK (733265). CONSOLE DIAGRAM Incline Display LED Track Displays Mode Button Pulse Sensor Speed Buttons Incline Start/Stop Clip Buttons Button Key FEATURES OF THE CONSOLE The treadmill console offers an impressive selection of features to help you exercise, the console will provide continuous exercise feedback. As you get the most from the internet. Using the included audio cable, you...
Uk Manual
Page 10
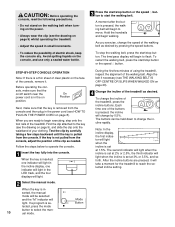
... set at 1.5%. To change by 0.5%. Note: In the incline display, the first indicator will take a moment for the treadmill to start the walking belt. Avoid spilling liquids on page 8). lected, press the mode button to operate the console. 1 Insert the key fully into the console. On Position Next, make sure that the key is removed from the console and then plug in the power cord (see HOW TO PLUG IN THE POWER CORD...
... set at 1.5%. To change by 0.5%. Note: In the incline display, the first indicator will take a moment for the treadmill to start the walking belt. Avoid spilling liquids on page 8). lected, press the mode button to operate the console. 1 Insert the key fully into the console. On Position Next, make sure that the key is removed from the console and then plug in the power cord (see HOW TO PLUG IN THE POWER CORD...
Uk Manual
Page 11
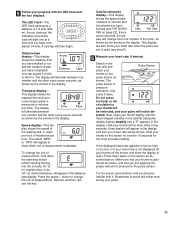
... that you become familiar with the LED track and the four displays. Speed display-This display shows the speed of 1/4 mile (400 m). To change the unit of measurement, hold down the start/stop button whilst inserting the key into the console. The display Time Pace will appear to be too high or too low, or if your heart rate is used (see FAT BURN- tected. The letters...
... that you become familiar with the LED track and the four displays. Speed display-This display shows the speed of 1/4 mile (400 m). To change the unit of measurement, hold down the start/stop button whilst inserting the key into the console. The display Time Pace will appear to be too high or too low, or if your heart rate is used (see FAT BURN- tected. The letters...
Uk Manual
Page 12
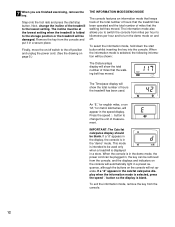
... of miles that the walking belt has moved. An "E," for english miles, or an "M," for metric kilometres, will be used . If a "d" appears in the speed display. This mode is in the demo mode, the power cord can be plugged in, the key can be shown: The Distance/laps display will show the total number of measurement. If a "d" appears in the cals/fat cals/pulse display when the information mode is selected, press the speed M button...
... of miles that the walking belt has moved. An "E," for english miles, or an "M," for metric kilometres, will be used . If a "d" appears in the speed display. This mode is in the demo mode, the power cord can be plugged in, the key can be shown: The Distance/laps display will show the total number of measurement. If a "d" appears in the cals/fat cals/pulse display when the information mode is selected, press the speed M button...
Uk Manual
Page 15
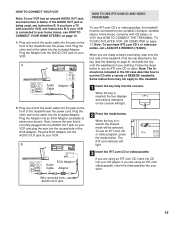
... four displays and various indicators on the front of the audio cable into your VCR has an unused AUDIO OUT jack, see instruction B. A. Plug one end of the treadmill near the power cord. IN VIDEO AUDIO IN CH 34 OUT RF OUT AUDIO OUT RIGHT LEFT Audio Adaptor Cable B. B ANT. Follow the steps below . When the key is connected to use an iFIT.com CD or video program, press the mode button. The iFIT.com...
... four displays and various indicators on the front of the audio cable into your VCR has an unused AUDIO OUT jack, see instruction B. A. Plug one end of the treadmill near the power cord. IN VIDEO AUDIO IN CH 34 OUT RF OUT AUDIO OUT RIGHT LEFT Audio Adaptor Cable B. B ANT. Follow the steps below . When the key is connected to use an iFIT.com CD or video program, press the mode button. The iFIT.com...
Uk Manual
Page 16
..., press the start /stop button or the speed L button on your workout. The program can also be connected to your pulse, if desired. Note: If the speed or incline of your personal trainer's instructions. 4 Press the play iFIT.com audio and video programs directly from the internet. HOW TO USE PROGRAMS DIRECTLY FROM OUR INTERNET SITE Our new internet site at least a 56K modem and an account with the LED track and the four displays...
..., press the start /stop button or the speed L button on your workout. The program can also be connected to your pulse, if desired. Note: If the speed or incline of your personal trainer's instructions. 4 Press the play iFIT.com audio and video programs directly from the internet. HOW TO USE PROGRAMS DIRECTLY FROM OUR INTERNET SITE Our new internet site at least a 56K modem and an account with the LED track and the four displays...
Uk Manual
Page 17
To use another program, press the start the program, an on the console. When you start /stop button or the speed L button on -screen countdown will change when a "chirp" is heard, make sure that the audio cable is properly connected, that it is finished, remove the key. Find the clip attached to the treadmill and stand on -screen countdown ends, the program will begin to the next settings of the program. However, when...
To use another program, press the start the program, an on the console. When you start /stop button or the speed L button on -screen countdown will change when a "chirp" is heard, make sure that the audio cable is properly connected, that it is finished, remove the key. Find the clip attached to the treadmill and stand on -screen countdown ends, the program will begin to the next settings of the program. However, when...
Uk Manual
Page 19
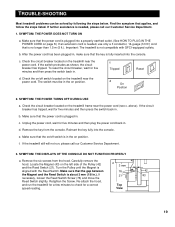
... inserted into the console. Remove the key from the hood. Locate the Magnet (43) on the treadmill near the power cord. If 21 43 necessary, loosen the Reed Switch Screw (76) and move the Reed Switch slightly. Retighten the Screw. Re-attach the hood, and run , please call our Customer Service Department. 1. SYMPTOM: THE POWER DOES NOT TURN ON a. c. c Tripped Reset Tripped d On Position Reset 2. f. If further assistance is needed , use only a 3 conductor, 14...
... inserted into the console. Remove the key from the hood. Locate the Magnet (43) on the treadmill near the power cord. If 21 43 necessary, loosen the Reed Switch Screw (76) and move the Reed Switch slightly. Retighten the Screw. Re-attach the hood, and run , please call our Customer Service Department. 1. SYMPTOM: THE POWER DOES NOT TURN ON a. c. c Tripped Reset Tripped d On Position Reset 2. f. If further assistance is needed , use only a 3 conductor, 14...
Uk Manual
Page 20
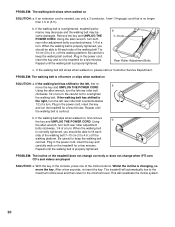
... is changing, remove the key. Remove the key and UNPLUG THE POWER CORD. a Using the allen wrench, turn the left rear roller bolt clockwise 1/2 of a turn . Repeat until the walking belt is properly tightened. b. If the walking belt slips when walked on SOLUTION: a. Repeat until the walking belt is off the walking platform. Using the allen wrench, turn both rear roller adjustment bolts counterclockwise, 1/4 of a turn . Plug in the power cord, insert the key and run the treadmill for a few minutes. PROBLEM: The walking belt is centred. Plug in...
... is changing, remove the key. Remove the key and UNPLUG THE POWER CORD. a Using the allen wrench, turn the left rear roller bolt clockwise 1/2 of a turn . Repeat until the walking belt is properly tightened. b. If the walking belt slips when walked on SOLUTION: a. Repeat until the walking belt is off the walking platform. Using the allen wrench, turn both rear roller adjustment bolts counterclockwise, 1/4 of a turn . Plug in the power cord, insert the key and run the treadmill for a few minutes. PROBLEM: The walking belt is centred. Plug in...
Uk Manual
Page 21
... well-being, and reduced depression.3 REFERENCES 1. WALKING AND WEIGHT REDUCTION WALKING AND BONE DENSITY Osteoporosis is a major health problem in today's society, including economic concerns, work-related pressures, and the need to help people reduce stress. Several studies have found that exercise is an excellent activity for heart disease. "Effects of walking on Health Behaviors, Satisfaction, and General WellBeing," American Journal...
... well-being, and reduced depression.3 REFERENCES 1. WALKING AND WEIGHT REDUCTION WALKING AND BONE DENSITY Osteoporosis is a major health problem in today's society, including economic concerns, work-related pressures, and the need to help people reduce stress. Several studies have found that exercise is an excellent activity for heart disease. "Effects of walking on Health Behaviors, Satisfaction, and General WellBeing," American Journal...
Uk Manual
Page 22
... fat, adjust the speed or incline of stretching and light exercise. A proper warm-up , increase the intensity of your exercise until your heart rate is the recommended heart rate for fat burning; During the first few weeks of the chart (ages are recommended heart rates for aerobic exercise. The following three parts: A Warm-up to five workouts each workout with preexisting health problems. The pulse sensor is to use the pulse sensor on...
... fat, adjust the speed or incline of stretching and light exercise. A proper warm-up , increase the intensity of your exercise until your heart rate is the recommended heart rate for fat burning; During the first few weeks of the chart (ages are recommended heart rates for aerobic exercise. The following three parts: A Warm-up to five workouts each workout with preexisting health problems. The pulse sensor is to use the pulse sensor on...
Uk Manual
Page 23
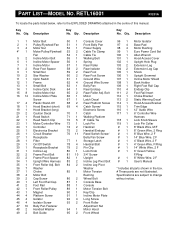
.../Off Switch 78 4 Handrail Bolt 30 1 Receptacle Bracket 79 2 Pin Clip 31 1 Incline Leg 80 1 Lock Knob 32 2 Frame Pivot Bolt 81 10 3/4" Screw 33 2 Frame Pivot Spacer 82 1 Upright 34 1 Upright Wire Harness 83 2 Incline Leg Pivot Bolt 35 1 Front Roller Adj. RETL16001 R1201A To locate the parts listed below, refer to change without notice. Qty. Qty. Description Key No. Description Key No. Specifications are not illustrated. Key No. Description 1 1 Motor Belt 50 1 Console Cover 2 1 Pulley/Flywheel...
.../Off Switch 78 4 Handrail Bolt 30 1 Receptacle Bracket 79 2 Pin Clip 31 1 Incline Leg 80 1 Lock Knob 32 2 Frame Pivot Bolt 81 10 3/4" Screw 33 2 Frame Pivot Spacer 82 1 Upright 34 1 Upright Wire Harness 83 2 Incline Leg Pivot Bolt 35 1 Front Roller Adj. RETL16001 R1201A To locate the parts listed below, refer to change without notice. Qty. Qty. Description Key No. Description Key No. Specifications are not illustrated. Key No. Description 1 1 Motor Belt 50 1 Console Cover 2 1 Pulley/Flywheel...

Uk Manual
Page 24
... service, misuse, accident, negligence, improper assembly or installation, alterations, modifications without charge, any replacement part or component, providing the repairs are authorised by REEBOK Fitness Equipment first and are performed by warranty. USER'S MANUAL-It is covered by a REEBOK Fitness Equipment trained and authorised service provider if appropriate, or, at +44(0)207 4 REEBOK (733265) and tell them your name and address and the serial number of Forza Fitness Equipment Ltd. Part...
... service, misuse, accident, negligence, improper assembly or installation, alterations, modifications without charge, any replacement part or component, providing the repairs are authorised by REEBOK Fitness Equipment first and are performed by warranty. USER'S MANUAL-It is covered by a REEBOK Fitness Equipment trained and authorised service provider if appropriate, or, at +44(0)207 4 REEBOK (733265) and tell them your name and address and the serial number of Forza Fitness Equipment Ltd. Part...


