
English Manual
Page 2
... pulse sensor is missing or illegible, call toll-free 1-877-994-4999, Monday through the use the exercise cycle in this product. 2 If you feel pain or dizziness while exercising, stop immediately and cool down. 13. until 6 p.m. TABLE OF CONTENTS IMPORTANT PRECAUTIONS 2 BEFORE YOU BEGIN 3 ASSEMBLY 4 EXERCISE CYCLE OPERATION 8 MAINTENANCE AND TROUBLESHOOTING 20 EXERCISE GUIDELINES 21 PART LIST 22 EXPLODED DRAWING 23 ORDERING REPLACEMENT PARTS Back Cover LIMITED WARRANTY...
... pulse sensor is missing or illegible, call toll-free 1-877-994-4999, Monday through the use the exercise cycle in this product. 2 If you feel pain or dizziness while exercising, stop immediately and cool down. 13. until 6 p.m. TABLE OF CONTENTS IMPORTANT PRECAUTIONS 2 BEFORE YOU BEGIN 3 ASSEMBLY 4 EXERCISE CYCLE OPERATION 8 MAINTENANCE AND TROUBLESHOOTING 20 EXERCISE GUIDELINES 21 PART LIST 22 EXPLODED DRAWING 23 ORDERING REPLACEMENT PARTS Back Cover LIMITED WARRANTY...
English Manual
Page 3
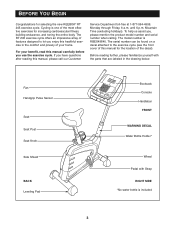
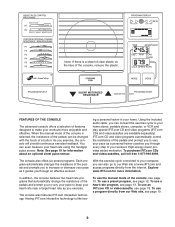
... designed to the exercise cycle (see the front cover of your benefit, read this manual, please call our Customer Service Department toll-free at 1-877-994-4999, Monday through Friday, 6 a.m. To help us assist you enjoy this manual for the location of the most effective exercises for selecting the new REEBOK® RT 245 exercise cycle. Fan Handgrip Pulse Sensor Seat Seat Post Seat Knob Side Shield BACK...
... designed to the exercise cycle (see the front cover of your benefit, read this manual, please call our Customer Service Department toll-free at 1-877-994-4999, Monday through Friday, 6 a.m. To help us assist you enjoy this manual for the location of the most effective exercises for selecting the new REEBOK® RT 245 exercise cycle. Fan Handgrip Pulse Sensor Seat Seat Post Seat Knob Side Shield BACK...

English Manual
Page 5
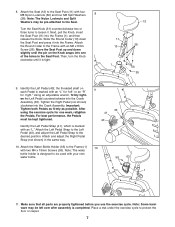
... the Frame (1), connect the Upper Wire Harness (16) to one side. Next, pull the excess Upper Wire Harness out of the top of the Handlebar Post, and insert the Handlebar Post into the Frame (1). Attach the Rear Stabilizer (3) to ...press it can be attached at the desired height with two M10 x 92mm Carriage Bolts (62) and two M10 Nylon Locknuts (48). 17 2 62 1 48 2. Attach the Handlebar Post to the Frame (1) with an M6 x 8mm Screw (26). Identify the Front Stabilizer (2), which has Wheels 1 (17) attached to the Lower Wire Harness (24). Note: There are two sets...
... the Frame (1), connect the Upper Wire Harness (16) to one side. Next, pull the excess Upper Wire Harness out of the top of the Handlebar Post, and insert the Handlebar Post into the Frame (1). Attach the Rear Stabilizer (3) to ...press it can be attached at the desired height with two M10 x 92mm Carriage Bolts (62) and two M10 Nylon Locknuts (48). 17 2 62 1 48 2. Attach the Handlebar Post to the Frame (1) with an M6 x 8mm Screw (26). Identify the Front Stabilizer (2), which has Wheels 1 (17) attached to the Lower Wire Harness (24). Note: There are two sets...
English Manual
Page 7
... 10. Next, pull the Knob, insert the Seat Post (11) into the Crank Assembly. Using an adjustable wrench, firmly tighten the Left Pedal counterclockwise into the Frame. Attach the Water Bottle Holder (63) to loosen it is marked with two M4 x 19mm Screws (59). Make sure that all parts are properly tightened before you use the exercise cycle. 8. Identify the Left Pedal Strap (41), which is...
... 10. Next, pull the Knob, insert the Seat Post (11) into the Crank Assembly. Using an adjustable wrench, firmly tighten the Left Pedal counterclockwise into the Frame. Attach the Water Bottle Holder (63) to loosen it is marked with two M4 x 19mm Screws (59). Make sure that all parts are properly tightened before you use the exercise cycle. 8. Identify the Left Pedal Strap (41), which is...
English Manual
Page 8
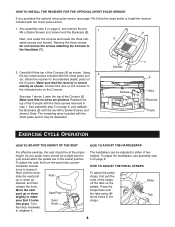
... release the knob. Screws Screws 7 9 Wire Receiver Posts EXERCISE CYCLE OPERATION HOW TO ADJUST THE HEIGHT OF THE SEAT HOW TO ADJUST THE HANDLEBARS For effective exercise, the seat should be a slight bend in your knees when the pedals are pinched. Lower the top of two heights. See assembly step 5 on the Console. Remove the three screws. HOW TO INSTALL THE RECEIVER FOR THE OPTIONAL CHEST PULSE SENSOR If you pedal, there...
... release the knob. Screws Screws 7 9 Wire Receiver Posts EXERCISE CYCLE OPERATION HOW TO ADJUST THE HEIGHT OF THE SEAT HOW TO ADJUST THE HANDLEBARS For effective exercise, the seat should be a slight bend in your knees when the pedals are pinched. Lower the top of two heights. See assembly step 5 on the Console. Remove the three screws. HOW TO INSTALL THE RECEIVER FOR THE OPTIONAL CHEST PULSE SENSOR If you pedal, there...
English Manual
Page 9
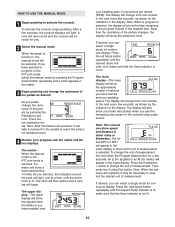
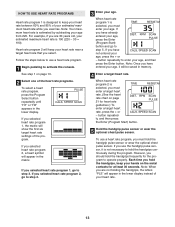
... exercise cycle connected to your home stereo, portable stereo, computer, or VCR and play special iFIT.com CD and video programs (iFIT.com CDs and videocassettes are available separately). The console also features iFIT.com interactive technology. To use the manual mode of the pedals and prompt you to vary your pace as a personal trainer coaches you can connect the exercise cycle to your workouts more information. To use a heart rate program...
... exercise cycle connected to your home stereo, portable stereo, computer, or VCR and play special iFIT.com CD and video programs (iFIT.com CDs and videocassettes are available separately). The console also features iFIT.com interactive technology. To use the manual mode of the pedals and prompt you to vary your pace as a personal trainer coaches you can connect the exercise cycle to your workouts more information. To use a heart rate program...
English Manual
Page 10
... display. Press the right Mode button repeatedly until a track appears in either miles or kilometers. make sure that the Scan indicator is turned on, the manual mode will appear in the lower display. As you can select a single mode for metric) will be selected. There are replaced, it will appear in the lower display to show speed and distance in the matrix. 3 Begin pedaling and change the resistance of the pedals...
... display. Press the right Mode button repeatedly until a track appears in either miles or kilometers. make sure that the Scan indicator is turned on, the manual mode will appear in the lower display. As you can select a single mode for metric) will be selected. There are replaced, it will appear in the lower display to show speed and distance in the matrix. 3 Begin pedaling and change the resistance of the pedals...
English Manual
Page 11
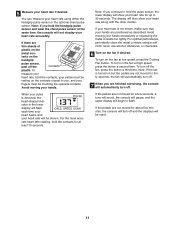
...; Avoid moving your heart rate using a soft cloth; 5 Measure your hands are positioned as described. tacts on but the pedals are not moved for thirty seconds, the fan will automatically turn off. 7 When you are finished exercising, the console will automatically turn off and the displays will be shown. For the most accurate heart rate reading, hold the pulse sensor, the lower display will not display your heart rate will...
...; Avoid moving your heart rate using a soft cloth; 5 Measure your hands are positioned as described. tacts on but the pedals are not moved for thirty seconds, the fan will automatically turn off. 7 When you are finished exercising, the console will automatically turn off and the displays will be shown. For the most accurate heart rate reading, hold the pulse sensor, the lower display will not display your heart rate will...
English Manual
Page 12
... segment by pressing the Resistance buttons. When only three seconds remain in the lower display. See step 5 on page 11. 7 Turn on page 11. 12 However, when the next segment begins, the resistance will automatically change if a different resistance setting is programmed for the last segment is programmed for each segment. (The same resistance setting may be shown in the program. During preset programs, the pace guide will...
... segment by pressing the Resistance buttons. When only three seconds remain in the lower display. See step 5 on page 11. 7 Turn on page 11. 12 However, when the next segment begins, the resistance will automatically change if a different resistance setting is programmed for the last segment is programmed for each segment. (The same resistance setting may be shown in the program. During preset programs, the pace guide will...
English Manual
Page 13
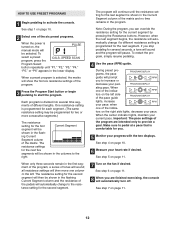
..., press the Enter (Program Start) button and go to activate the console. button repeatedly to step 3. button repeatedly, and then press the Enter (Program Start) button. 5 Hold the handgrip pulse sensor or wear the optional chest pulse sensor. Each time you hold the handgrips frequently for heart rate guidelines.) To enter a target heart rate, press the + or - See step 1 on the metal contacts for at least 30 seconds. If you use the handgrip pulse sensor, it...
..., press the Enter (Program Start) button and go to activate the console. button repeatedly to step 3. button repeatedly, and then press the Enter (Program Start) button. 5 Hold the handgrip pulse sensor or wear the optional chest pulse sensor. Each time you hold the handgrips frequently for heart rate guidelines.) To enter a target heart rate, press the + or - See step 1 on the metal contacts for at least 30 seconds. If you use the handgrip pulse sensor, it...
English Manual
Page 14
... exercising, the console will pause. If heart rate pro- therefore, the target heart rate settings will continue until the target heart rate setting for all segments; As you can manually change . When the center indicator lights, maintain your progress with the two displays. See step 6 on page 11. 9 When you to provide a goal. The program will not be shown in the matrix. Note: During the program, you pedal...
... exercising, the console will pause. If heart rate pro- therefore, the target heart rate settings will continue until the target heart rate setting for all segments; As you can manually change . When the center indicator lights, maintain your progress with the two displays. See step 6 on page 11. 9 When you to provide a goal. The program will not be shown in the matrix. Note: During the program, you pedal...
English Manual
Page 15
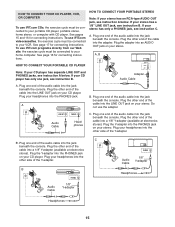
... headphones into the jack beneath the console. HOW TO CONNECT YOUR CD PLAYER, VCR, OR COMPUTER To use iFIT.com CDs, the exercise cycle must be connected to your home computer. Plug one jack, see instruction B. Plug your headphones into the other end of the Y-adapter. C. Plug the other end of the audio cable into the jack beneath the console. Plug your CD player has only...
... headphones into the jack beneath the console. HOW TO CONNECT YOUR CD PLAYER, VCR, OR COMPUTER To use iFIT.com CDs, the exercise cycle must be connected to your home computer. Plug one jack, see instruction B. Plug your headphones into the other end of the Y-adapter. C. Plug the other end of the audio cable into the jack beneath the console. Plug your CD player has only...

English Manual
Page 16
... OUT Audio Cable RCA Y-adapter Adapter Audio Cable 1/8" Y-adapter Headphones/Speakers Wire removed from LINE OUT jack 16 Plug the adapter into the PHONES jack on your stereo. Plug the other side of the audio cable into a 1/8" Y-adapter (available at electronics stores). A LINE OUT Audio Cable Adapter Audio Cable B. Plug one end of the Y-adapter. Note: If your computer has a 1/8" LINE OUT jack, see instruction A below. HOW TO CONNECT YOUR HOME STEREO HOW TO CONNECT YOUR...
... OUT Audio Cable RCA Y-adapter Adapter Audio Cable 1/8" Y-adapter Headphones/Speakers Wire removed from LINE OUT jack 16 Plug the adapter into the PHONES jack on your stereo. Plug the other side of the audio cable into a 1/8" Y-adapter (available at electronics stores). A LINE OUT Audio Cable Adapter Audio Cable B. Plug one end of the Y-adapter. Note: If your computer has a 1/8" LINE OUT jack, see instruction A below. HOW TO CONNECT YOUR HOME STEREO HOW TO CONNECT YOUR...

English Manual
Page 17
... connected to your home stereo, see instruction B. Plug the adapter into the ANT. IN VIDEO AUDIO IN CH 34 OUT RF OUT AUDIO OUT jack on your VCR. A ANT. Plug the Y-adapter into the jack beneath the console. Plug one end of the audio cable into the AUDIO OUT jack on your VCR. IN VIDEO AUDIO IN CH 34 OUT RF OUT AUDIO OUT RIGHT LEFT Adapter Audio Cable RCA Y-adapter Audio Cable Adapter Wire removed from AUDIO...
... connected to your home stereo, see instruction B. Plug the adapter into the ANT. IN VIDEO AUDIO IN CH 34 OUT RF OUT AUDIO OUT jack on your VCR. A ANT. Plug the Y-adapter into the jack beneath the console. Plug one end of the audio cable into the AUDIO OUT jack on your VCR. IN VIDEO AUDIO IN CH 34 OUT RF OUT AUDIO OUT RIGHT LEFT Adapter Audio Cable RCA Y-adapter Audio Cable Adapter Wire removed from AUDIO...
English Manual
Page 18
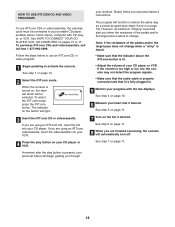
... . 5 Monitor your heart rate if desired. Note: If the resistance of your personal trainer's instructions. To select the iFIT.com mode, press the iFIT.com button. See step 7 on the fan if desired. If you through your workout. However, an electronic "chirping" sound will be connected to your portable CD player, portable stereo, home stereo, computer with the two displays. HOW TO USE IFIT.COM CD AND VIDEO PROGRAMS To use...
... . 5 Monitor your heart rate if desired. Note: If the resistance of your personal trainer's instructions. To select the iFIT.com mode, press the iFIT.com button. See step 7 on the fan if desired. If you through your workout. However, an electronic "chirping" sound will be connected to your portable CD player, portable stereo, home stereo, computer with the two displays. HOW TO USE IFIT.COM CD AND VIDEO PROGRAMS To use...
English Manual
Page 19
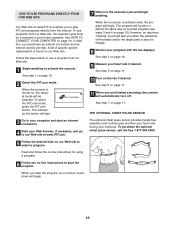
... Turn on page 11. See step 6 on the button will begin pedaling. THE OPTIONAL CHEST PULSE SENSOR The optional chest pulse sensor provides hands-free operation and continuously monitors your heart rate during your heart rate if desired. HOW TO USE PROGRAMS DIRECTLY FROM OUR WEB SITE Our Web site at www.iFIT.com. 7 Return to the exercise cycle and begin . 19 To use a program from our Web site. 1 Begin pedaling to activate the console...
... Turn on page 11. See step 6 on the button will begin pedaling. THE OPTIONAL CHEST PULSE SENSOR The optional chest pulse sensor provides hands-free operation and continuously monitors your heart rate during your heart rate if desired. HOW TO USE PROGRAMS DIRECTLY FROM OUR WEB SITE Our Web site at www.iFIT.com. 7 Return to the exercise cycle and begin . 19 To use a program from our Web site. 1 Begin pedaling to activate the console...
English Manual
Page 20
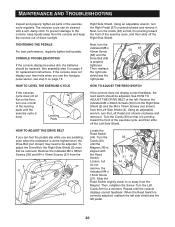
... reed switch should be removed. Turn the Crank (33) so that it . MAINTENANCE AND TROUBLESHOOTING Inspect and properly tighten all parts of the exercise cycle, and then slide off the Right Side Shield. The exercise cycle can feel the pedals slip while you use the handgrip pulse sensor, see step 5 on page 13. See assembly step 5 on the floor, turn the Crank (33) so that it . If the console does not display your heart rate...
... reed switch should be removed. Turn the Crank (33) so that it . MAINTENANCE AND TROUBLESHOOTING Inspect and properly tighten all parts of the exercise cycle, and then slide off the Right Side Shield. The exercise cycle can feel the pedals slip while you use the handgrip pulse sensor, see step 5 on page 13. See assembly step 5 on the floor, turn the Crank (33) so that it . If the console does not display your heart rate...

English Manual
Page 21
... workouts each week, with pre-existing health problems. • The pulse sensor is make exercise a regular and enjoyable part of your exercise until your heart rate is near the highest number in your training zone for longer than 20 minutes.) To find the proper heart rate for energy. Fat Burning To burn fat effectively, you exercise. Aerobic exercise is the recommended heart rate for successful results. the middle number...
... workouts each week, with pre-existing health problems. • The pulse sensor is make exercise a regular and enjoyable part of your exercise until your heart rate is near the highest number in your training zone for longer than 20 minutes.) To find the proper heart rate for energy. Fat Burning To burn fat effectively, you exercise. Aerobic exercise is the recommended heart rate for successful results. the middle number...
English Manual
Page 22
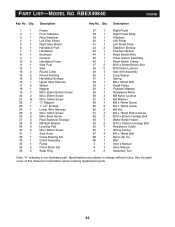
... Pedal Strap Flywheel Left Pedal Left Pedal Strap Stabilizer Endcap Flywheel Spacer Reed Switch/Wire Pulse Sensor Assembly Reed Switch Clamp M10 x 60mm Button Bolt M10 Nylon Locknut Idler Arm Assembly Long Spacer Spring M6 x 50mm Bolt Small Pulley Flywheel Washer Resistance Motor M8 Nylon Locknut M5 Washer M8 x 40mm Screw M4 x 19mm Screw M6 Nut M6 x 13mm Button Screw M10 x 92mm Carriage Bolt Water Bottle Holder M10 x 105mm Carriage Bolt Resistance Cable Wiring Anchor M6 x 18mm Bolt Nylon Zip Tie Belt User's Manual...
... Pedal Strap Flywheel Left Pedal Left Pedal Strap Stabilizer Endcap Flywheel Spacer Reed Switch/Wire Pulse Sensor Assembly Reed Switch Clamp M10 x 60mm Button Bolt M10 Nylon Locknut Idler Arm Assembly Long Spacer Spring M6 x 50mm Bolt Small Pulley Flywheel Washer Resistance Motor M8 Nylon Locknut M5 Washer M8 x 40mm Screw M4 x 19mm Screw M6 Nut M6 x 13mm Button Screw M10 x 92mm Carriage Bolt Water Bottle Holder M10 x 105mm Carriage Bolt Resistance Cable Wiring Anchor M6 x 18mm Bolt Nylon Zip Tie Belt User's Manual...
English Manual
Page 24
... must be free from defects in workmanship and material, under normal use , costs of removal, installation or other rights which warranty claims are registered trademarks and service marks of merchantability or fitness for commercial or rental purposes, or products used as store display models. This warranty gives you . LIMITED WARRANTY ICON Health & Fitness, Inc. (ICON), warrants this manual) • The KEY NUMBER and DESCRIPTION of the part(s) (see the PART LIST on how...
... must be free from defects in workmanship and material, under normal use , costs of removal, installation or other rights which warranty claims are registered trademarks and service marks of merchantability or fitness for commercial or rental purposes, or products used as store display models. This warranty gives you . LIMITED WARRANTY ICON Health & Fitness, Inc. (ICON), warrants this manual) • The KEY NUMBER and DESCRIPTION of the part(s) (see the PART LIST on how...


