
English Manual
Page 1
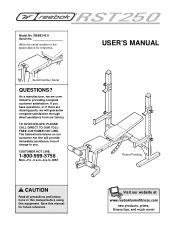
....com new products, prizes, fitness tips, and much more! If you have questions, or if there are committed to you. As a manufacturer, we are missing parts, we will provide immediate assistance, free of charge to providing complete customer satisfaction. MST CAUTION Read all precautions and instructions in the space above for...
....com new products, prizes, fitness tips, and much more! If you have questions, or if there are committed to you. As a manufacturer, we are missing parts, we will provide immediate assistance, free of charge to providing complete customer satisfaction. MST CAUTION Read all precautions and instructions in the space above for...
English Manual
Page 2
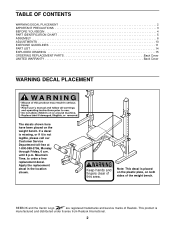
...TABLE OF CONTENTS WARNING DECAL PLACEMENT 2 IMPORTANT PRECAUTIONS 3 BEFORE YOU BEGIN 4 PART IDENTIFICATION CHART 5 ASSEMBLY 6 ADJUSTMENTS 10 EXERCISE GUIDELINES 11 PART LIST 14 EXPLODED DRAWING 15 ORDERING REPLACEMENT PARTS Back Cover LIMITED WARRANTY Back Cover WARNING DECAL PLACEMENT The decals shown here have ...been placed on both sides of the weight bench. If a decal is missing, or if it is manufactured and distributed under license from Reebok International....
...TABLE OF CONTENTS WARNING DECAL PLACEMENT 2 IMPORTANT PRECAUTIONS 3 BEFORE YOU BEGIN 4 PART IDENTIFICATION CHART 5 ASSEMBLY 6 ADJUSTMENTS 10 EXERCISE GUIDELINES 11 PART LIST 14 EXPLODED DRAWING 15 ORDERING REPLACEMENT PARTS Back Cover LIMITED WARRANTY Back Cover WARNING DECAL PLACEMENT The decals shown here have ...been placed on both sides of the weight bench. If a decal is missing, or if it is manufactured and distributed under license from Reebok International....
English Manual
Page 3
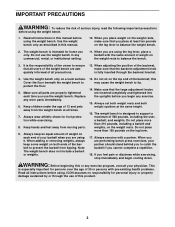
... with the same amount of the owner to catch the barbell if you feel pain or dizziness while exercising, stop immediately and begin any worn parts immediately. 6. Read all instructions before using the weight bench. 1. Use the weight bench only as described in this manual. 10. Do not use... only. It is designed to protect the floor. 5. Use the weight bench only on both weight spotters at all parts are properly tightened each end of weight on the leg lever. 17. Make sure all times. 7. Always keep some weight on a level surface....
... with the same amount of the owner to catch the barbell if you feel pain or dizziness while exercising, stop immediately and begin any worn parts immediately. 6. Read all instructions before using the weight bench. 1. Use the weight bench only as described in this manual. 10. Do not use... only. It is designed to protect the floor. 5. Use the weight bench only on both weight spotters at all parts are properly tightened each end of weight on the leg lever. 17. Make sure all times. 7. Always keep some weight on a level surface....
English Manual
Page 4
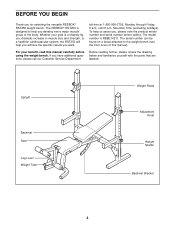
...your goal is RBBE14211. toll-free at 1-800-999-3756, Monday through Friday, 6 a.m. To help you for selecting the versatile REEBOK® RST250 weight bench. Upright Backrest Seat Leg Lever Weight Tube Weight Rests Adjustment Knob Weight Spotter Backrest Bracket 4 The serial number ...Department Before reading further, please review the drawing below and familiarize yourself with the parts that are labeled. Whether your benefit, read this manual). until 6 p.m. Mountain Time (excluding holidays). The REEBOK® RST250 is designed to the weight bench (see the front cover of the...
...your goal is RBBE14211. toll-free at 1-800-999-3756, Monday through Friday, 6 a.m. To help you for selecting the versatile REEBOK® RST250 weight bench. Upright Backrest Seat Leg Lever Weight Tube Weight Rests Adjustment Knob Weight Spotter Backrest Bracket 4 The serial number ...Department Before reading further, please review the drawing below and familiarize yourself with the parts that are labeled. Whether your benefit, read this manual). until 6 p.m. Mountain Time (excluding holidays). The REEBOK® RST250 is designed to the weight bench (see the front cover of the...
English Manual
Page 5
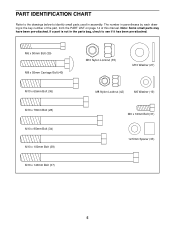
... have been pre-attached. The number in parentheses by each drawing is not in the parts bag, check to identify small parts used in assembly. If a part is the key number of the part, from the PART LIST on page 14 of this manual. M6 x 50mm Bolt (39) M8 x 55mm Carriage Bolt (40) M10 x 65mm... x 140mm Bolt (37) M10 Nylon Locknut (35) M10 Washer (27) M8 Nylon Locknut (42) M6 Washer (19) M6 x 16mm Bolt (31) 12.5mm Spacer (33) 5 PART IDENTIFICATION CHART Refer to the drawings below to see if it has been pre-attached.
... have been pre-attached. The number in parentheses by each drawing is not in the parts bag, check to identify small parts used in assembly. If a part is the key number of the part, from the PART LIST on page 14 of this manual. M6 x 50mm Bolt (39) M8 x 55mm Carriage Bolt (40) M10 x 65mm... x 140mm Bolt (37) M10 Nylon Locknut (35) M10 Washer (27) M8 Nylon Locknut (42) M6 Washer (19) M6 x 16mm Bolt (31) 12.5mm Spacer (33) 5 PART IDENTIFICATION CHART Refer to the drawings below to see if it has been pre-attached.
English Manual
Page 6
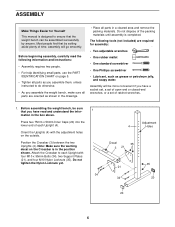
...cleared area and remove the packing materials. Attach the Crossbar to each Upright (4). mation in the drawings. • Place all parts as you assemble them, unless instructed to ensure that the weight bench can be assembled successfully by setting aside plenty of ratchet wrenches... that by anyone. The following information and instructions: • Assembly requires two people. • For help identifying small parts, use the PART IDENTIFICATION CHART on the outside. Before beginning assembly, carefully read and understand the infor- Do not dispose of each Upright with...
...cleared area and remove the packing materials. Attach the Crossbar to each Upright (4). mation in the drawings. • Place all parts as you assemble them, unless instructed to ensure that the weight bench can be assembled successfully by setting aside plenty of ratchet wrenches... that by anyone. The following information and instructions: • Assembly requires two people. • For help identifying small parts, use the PART IDENTIFICATION CHART on the outside. Before beginning assembly, carefully read and understand the infor- Do not dispose of each Upright with...

English Manual
Page 9
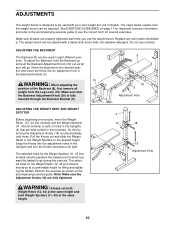
... 11 18 16 17 4 Adjustment Hole 9 Press an Upright Cap (17) into the top and bot- 11 tom of the Upright. The use of all parts are set at the same height. 12. Attach the other end of the lower adjustment holes in the same manner. Slide the Weight Spotter over... the left Upright (4). Repeat this step with an M6 Washer (19) and an M6 x 50mm Bolt (39). 11. Note: Make sure that all remaining parts will go. Snap the Knob into the Weight Rest and the Weight Spotter. Turn the Knob clockwise until it will be explained in ADJUSTMENTS on...
... 11 18 16 17 4 Adjustment Hole 9 Press an Upright Cap (17) into the top and bot- 11 tom of the Upright. The use of all parts are set at the same height. 12. Attach the other end of the lower adjustment holes in the same manner. Slide the Weight Spotter over... the left Upright (4). Repeat this step with an M6 Washer (19) and an M6 x 50mm Bolt (39). 11. Note: Make sure that all remaining parts will go. Snap the Knob into the Weight Rest and the Weight Spotter. Turn the Knob clockwise until it will be explained in ADJUSTMENTS on...
English Manual
Page 10
...mild, non-abrasive detergent. Pull the Knobs out and slide the Weight Rests or the Weight Spotters to sets of the Backrest (8), first remove all parts are fully tightened. Snap the Knobs into an adjustment hole in the Backrest Bracket (9). 15 WARNING: When adjusting the position of holes in eight ... be at the same height. 4 12 18 18 Adjustment Hole 11 10 The selected holes for lifting and replacing the barbell. Replace any worn parts immediately. The weight bench can be cleaned with your own weight set both Weight Rests (12, 44) at the same height and both Weight...
...mild, non-abrasive detergent. Pull the Knobs out and slide the Weight Rests or the Weight Spotters to sets of the Backrest (8), first remove all parts are fully tightened. Snap the Knobs into an adjustment hole in the Backrest Bracket (9). 15 WARNING: When adjusting the position of holes in eight ... be at the same height. 4 12 18 18 Adjustment Hole 11 10 The selected holes for lifting and replacing the barbell. Replace any worn parts immediately. The weight bench can be cleaned with your own weight set both Weight Rests (12, 44) at the same height and both Weight...
English Manual
Page 11
... . Select a moderate amount of weight and increase the number of repetitions in each set " is an essential part of an effective exercise program. Rest for 1 minute after each exercise, and moving only the appropriate parts of the body. Weight Loss To lose weight, use a low amount of weight and increase the number...
... . Select a moderate amount of weight and increase the number of repetitions in each set " is an essential part of an effective exercise program. Rest for 1 minute after each exercise, and moving only the appropriate parts of the body. Weight Loss To lose weight, use a low amount of weight and increase the number...
English Manual
Page 12
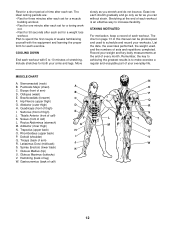
... life. Obliques (waist) E. Spinae Erectors (lower back) K T. Remember, the key to achieving the greatest results is an effective way to make exercise a regular and enjoyable part of every month. Deltoid (shoulder) I . COOLING DOWN End each exercise. Stretching at the end of your arms and legs. Sternomastoid (neck) B. Adductor (inner thigh) M N. Ease...
... life. Obliques (waist) E. Spinae Erectors (lower back) K T. Remember, the key to achieving the greatest results is an effective way to make exercise a regular and enjoyable part of every month. Deltoid (shoulder) I . COOLING DOWN End each exercise. Stretching at the end of your arms and legs. Sternomastoid (neck) B. Adductor (inner thigh) M N. Ease...
English Manual
Page 14
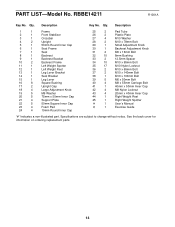
... Cap 42 4 M8 Nylon Locknut 43 4 20mm x 40mm Inner Cap 44 1 Right Weight Rest 45 1 Right Weight Spotter # 1 User's Manual # 1 Exercise Guide "#" Indicates a non-illustrated part. RBBE14211 R1001A Key No. Qty. Description Key No. See the back cover for information on ordering replacement...
... Cap 42 4 M8 Nylon Locknut 43 4 20mm x 40mm Inner Cap 44 1 Right Weight Rest 45 1 Right Weight Spotter # 1 User's Manual # 1 Exercise Guide "#" Indicates a non-illustrated part. RBBE14211 R1001A Key No. Qty. Description Key No. See the back cover for information on ordering replacement...
English Manual
Page 16
...prepared to give the following information when calling: • The MODEL NUMBER of the product (RBBE14211) • The NAME of the product (REEBOK® RST250 weight bench) • The SERIAL NUMBER of the product (see the front cover of this product to be received by ICON ... holidays). LIMITED WARRANTY ICON Health & Fitness, Inc. (ICON), warrants this manual) • The KEY NUMBER and DESCRIPTION of the desired part(s) (see the PART LIST and the EXPLODED DRAWING on how long an implied warranty lasts. Some states do not allow the exclusion or limitation of incidental or...
...prepared to give the following information when calling: • The MODEL NUMBER of the product (RBBE14211) • The NAME of the product (REEBOK® RST250 weight bench) • The SERIAL NUMBER of the product (see the front cover of this product to be received by ICON ... holidays). LIMITED WARRANTY ICON Health & Fitness, Inc. (ICON), warrants this manual) • The KEY NUMBER and DESCRIPTION of the desired part(s) (see the PART LIST and the EXPLODED DRAWING on how long an implied warranty lasts. Some states do not allow the exclusion or limitation of incidental or...


