
English Manual
Page 2
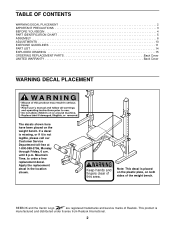
Mountain Time, to order a free replacement decal. until 6 p.m. Keep hands and fingers clear of Reebok. REEBOK and the Vector Logo are registered trademarks and service marks of this area. Apply the replacement decal in the location shown. This...Customer Service Department toll-free at 1-800-999-3756, Monday through Friday, 6 a.m. Note: This decal is placed on the plastic plate, on the weight bench. TABLE OF CONTENTS WARNING DECAL PLACEMENT 2 IMPORTANT PRECAUTIONS 3 BEFORE YOU BEGIN 4 PART IDENTIFICATION CHART 5 ASSEMBLY 6 ADJUSTMENTS 10 EXERCISE GUIDELINES 11 PART LIST 14...
Mountain Time, to order a free replacement decal. until 6 p.m. Keep hands and fingers clear of Reebok. REEBOK and the Vector Logo are registered trademarks and service marks of this area. Apply the replacement decal in the location shown. This...Customer Service Department toll-free at 1-800-999-3756, Monday through Friday, 6 a.m. Note: This decal is placed on the plastic plate, on the weight bench. TABLE OF CONTENTS WARNING DECAL PLACEMENT 2 IMPORTANT PRECAUTIONS 3 BEFORE YOU BEGIN 4 PART IDENTIFICATION CHART 5 ASSEMBLY 6 ADJUSTMENTS 10 EXERCISE GUIDELINES 11 PART LIST 14...
English Manual
Page 3
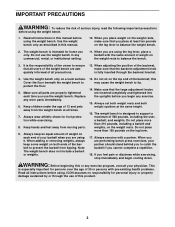
... the backrest; Replace any commercial, rental, or institutional setting. 11. Keep children under the age of 12 and pets away from the weight bench at the same height. 16. Always wear athletic shoes for personal injury or property damage sustained by or through the backrest bracket. 4. Do...place more than 150 pounds on the weight rests. ICON assumes no responsibility for foot protection while exercising. 8. Cover the floor beneath the weight bench to tip. 14. Keep hands and feet away from tipping. Do not place more than 310 pounds, including a barbell and weights, on ...
... the backrest; Replace any commercial, rental, or institutional setting. 11. Keep children under the age of 12 and pets away from the weight bench at the same height. 16. Always wear athletic shoes for personal injury or property damage sustained by or through the backrest bracket. 4. Do...place more than 150 pounds on the weight rests. ICON assumes no responsibility for foot protection while exercising. 8. Cover the floor beneath the weight bench to tip. 14. Keep hands and feet away from tipping. Do not place more than 310 pounds, including a barbell and weights, on ...
English Manual
Page 4
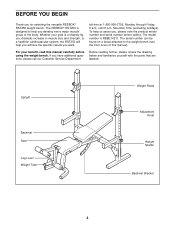
..., Monday through Friday, 6 a.m. To help you develop every major muscle group of this manual carefully before calling. The REEBOK® RST250 is designed to the weight bench (see the front cover of the body. The model number is a shapely figure, dramatic increase in muscle size and ... serial number can be found on a decal attached to help us assist you want. If you for selecting the versatile REEBOK® RST250 weight bench. Upright Backrest Seat Leg Lever Weight Tube Weight Rests Adjustment Knob Weight Spotter Backrest Bracket 4 until 6 p.m. For your goal ...
..., Monday through Friday, 6 a.m. To help you develop every major muscle group of this manual carefully before calling. The REEBOK® RST250 is designed to the weight bench (see the front cover of the body. The model number is a shapely figure, dramatic increase in muscle size and ... serial number can be found on a decal attached to help us assist you want. If you for selecting the versatile REEBOK® RST250 weight bench. Upright Backrest Seat Leg Lever Weight Tube Weight Rests Adjustment Knob Weight Spotter Backrest Bracket 4 until 6 p.m. For your goal ...
English Manual
Page 6
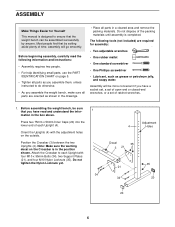
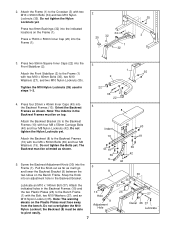
... closed-end wrenches, or a set of time, assembly will be sure 1 that by anyone. Most people find that you assemble the weight bench, make sure all parts are required for Yourself This manual is designed to each Upright (4). Do not tighten the Nylon Locknuts yet. 34 Adjustment...the packing materials. mation in the position shown. Note: Make sure the warning decal on the Crossbar is completed. Before assembling the weight bench, be more convenient if you have read the following tools (not included) are oriented as grease or petroleum jelly, and soapy water. ...
... closed-end wrenches, or a set of time, assembly will be sure 1 that by anyone. Most people find that you assemble the weight bench, make sure all parts are required for Yourself This manual is designed to each Upright (4). Do not tighten the Nylon Locknuts yet. 34 Adjustment...the packing materials. mation in the position shown. Note: Make sure the warning decal on the Crossbar is completed. Before assembling the weight bench, be more convenient if you have read the following tools (not included) are oriented as grease or petroleum jelly, and soapy water. ...
English Manual
Page 7
... lower the Backrest Bracket (9) between the two tubes on the Frame (1). Press two 50mm Square Inner Caps (22) into the indicated locations on the Bench Frame. Do not tighten the Bolts yet. Press two 8mm Bushings (32) into the Front Stabilizer (2). 3 Attach the Front Stabilizer (2) to the... M8 x 55mm Carriage Bolts (40) and four M8 Nylon Locknuts (42). Do not overtighten the M10 Nylon Locknut; The Backrest must face away from the bench. Snap the Knob into the Backrest Frames (10). Attach the Backrest Bracket (9) to the Crossbar (3) with two M10 x 65mm Bolts (36), two M10 ...
... lower the Backrest Bracket (9) between the two tubes on the Frame (1). Press two 50mm Square Inner Caps (22) into the indicated locations on the Bench Frame. Do not tighten the Bolts yet. Press two 8mm Bushings (32) into the Front Stabilizer (2). 3 Attach the Front Stabilizer (2) to the... M8 x 55mm Carriage Bolts (40) and four M8 Nylon Locknuts (42). Do not overtighten the M10 Nylon Locknut; The Backrest must face away from the bench. Snap the Knob into the Backrest Frames (10). Attach the Backrest Bracket (9) to the Crossbar (3) with two M10 x 65mm Bolts (36), two M10 ...

English Manual
Page 9
... Bolt (39). 11. Make sure that both Weight Rests (12, 44) and both Weight Spotters (11, 45) are properly tightened before you use the weight bench. Attach the Left Weight Rest (12) to the Seat Frame with the right Upright (not shown). The use of the lower adjustment holes in the...
... Bolt (39). 11. Make sure that both Weight Rests (12, 44) and both Weight Spotters (11, 45) are properly tightened before you use the weight bench. Attach the Left Weight Rest (12) to the Seat Frame with the right Upright (not shown). The use of the lower adjustment holes in the...
English Manual
Page 10
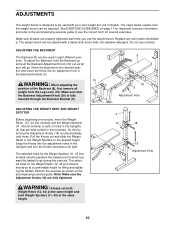
... both Weight Spotters (11, 45) at a comfortable height for lifting and replacing the barbell. WARNING: Always set (not included). The weight bench can be adjusted. Perform the exercise as it will go during the exercise. The steps below explain how the weight...the lowest point to which you use solvents. See EXERCISE GUIDELINES on the accompanying exercise guide. Do not use the weight bench. Make sure that exercise. ADJUSTMENTS The weight bench is fully inserted through the Backrest Bracket (9). 8 30 9 Adjustment Hole ADJUSTING THE WEIGHT REST AND WEIGHT SPOTTER Before ...
... both Weight Spotters (11, 45) at a comfortable height for lifting and replacing the barbell. WARNING: Always set (not included). The weight bench can be adjusted. Perform the exercise as it will go during the exercise. The steps below explain how the weight...the lowest point to which you use solvents. See EXERCISE GUIDELINES on the accompanying exercise guide. Do not use the weight bench. Make sure that exercise. ADJUSTMENTS The weight bench is fully inserted through the Backrest Bracket (9). 8 30 9 Adjustment Hole ADJUSTING THE WEIGHT REST AND WEIGHT SPOTTER Before ...
English Manual
Page 16
... extends only to give the following information when calling: • The MODEL NUMBER of the product (RBBE14211) • The NAME of the product (REEBOK® RST250 weight bench) • The SERIAL NUMBER of the product (see the front cover of this manual) • The KEY NUMBER and DESCRIPTION of the desired part...
... extends only to give the following information when calling: • The MODEL NUMBER of the product (RBBE14211) • The NAME of the product (REEBOK® RST250 weight bench) • The SERIAL NUMBER of the product (see the front cover of this manual) • The KEY NUMBER and DESCRIPTION of the desired part...
