

English Manual
Page 3
... responsibility of all times. 7. Replace any exercise program, consult your physician. It is especially important for foot protection. 9. The pulse sensor is not a medical device. Read all instructions in general. 13. The elliptical exerciser does not have a free wheel; The pulse sensor is intended only as an exercise aid in determining heart rate trends in this or any worn parts immediately. 6. until the flywheel stops. 14.
... responsibility of all times. 7. Replace any exercise program, consult your physician. It is especially important for foot protection. 9. The pulse sensor is not a medical device. Read all instructions in general. 13. The elliptical exerciser does not have a free wheel; The pulse sensor is intended only as an exercise aid in determining heart rate trends in this or any worn parts immediately. 6. until the flywheel stops. 14.
English Manual
Page 4
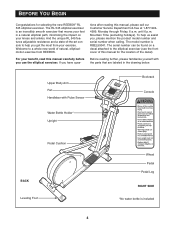
... , please mention the product model number and serial number when calling. Before reading further, please familiarize yourself with Pulse Sensor Bookrack Console Water Bottle Holder* Upright Pedal Cushion BACK Leveling Foot 4 Wheel Pedal Pedal Leg RIGHT SIDE *No water bottle is RBEL59041. For your knees and ankles. until 6 p.m. The model number is included Upper Body Arm Fan Handlebar with the parts that moves your feet in the drawing...
... , please mention the product model number and serial number when calling. Before reading further, please familiarize yourself with Pulse Sensor Bookrack Console Water Bottle Holder* Upright Pedal Cushion BACK Leveling Foot 4 Wheel Pedal Pedal Leg RIGHT SIDE *No water bottle is RBEL59041. For your knees and ankles. until 6 p.m. The model number is included Upper Body Arm Fan Handlebar with the parts that moves your feet in the drawing...

English Manual
Page 6
... in the bracket on the lower end of the Upright (2) with the welded bolts on the Frame (1). Be careful to the Upright (2) with two M4 x 22mm Screws (92). Attach the Console Bracket to avoid pinching and damaging the Wire Harnesses. Place the four M10 Split Washers (87) onto the welded bolts on the Frame (1). Then, tighten the four M10 Nylon...
... in the bracket on the lower end of the Upright (2) with the welded bolts on the Frame (1). Be careful to the Upright (2) with two M4 x 22mm Screws (92). Attach the Console Bracket to avoid pinching and damaging the Wire Harnesses. Place the four M10 Split Washers (87) onto the welded bolts on the Frame (1). Then, tighten the four M10 Nylon...
English Manual
Page 9
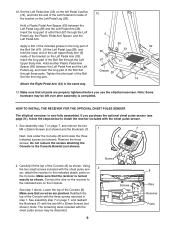
... Pedal Arm Spacer (65) between the Left Pedal Leg (28) and the Left Pedal Arm (33). Attach the Right Pedal Arm (32) in step 1. Carefully lift the top of the Bolt Set into the long part. HOW TO INSTALL THE RECEIVER FOR THE OPTIONAL CHEST PULSE SENSOR The elliptical exerciser is turned exactly as shown. Do not remove the screws attaching the Console to the indicated wire on the Console. Connect the wire on the left over after assembly...
... Pedal Arm Spacer (65) between the Left Pedal Leg (28) and the Left Pedal Arm (33). Attach the Right Pedal Arm (32) in step 1. Carefully lift the top of the Bolt Set into the long part. HOW TO INSTALL THE RECEIVER FOR THE OPTIONAL CHEST PULSE SENSOR The elliptical exerciser is turned exactly as shown. Do not remove the screws attaching the Console to the indicated wire on the Console. Connect the wire on the left over after assembly...
English Manual
Page 10
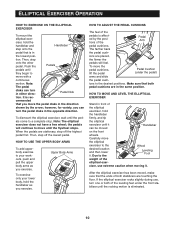
... elliptical exer- ions are stationary, step off the lowest pedal. ELLIPTICAL EXERCISER OPERATION HOW TO EXERCISE ON THE ELLIPTICAL EXERCISER To mount the elliptical exer- tion. Then, step onto the other pedal. Note: The elliptical exerciser does not have a free wheel; HOW TO USE THE UPPER BODY ARMS To add upperbody exercise to move the pedal cushions, lift the pedal Pedal Cushion (under the front stabilizer until it . Upper Body Arms HOW TO ADJUST THE PEDAL...
... elliptical exer- ions are stationary, step off the lowest pedal. ELLIPTICAL EXERCISER OPERATION HOW TO EXERCISE ON THE ELLIPTICAL EXERCISER To mount the elliptical exer- tion. Then, step onto the other pedal. Note: The elliptical exerciser does not have a free wheel; HOW TO USE THE UPPER BODY ARMS To add upperbody exercise to move the pedal cushions, lift the pedal Pedal Cushion (under the front stabilizer until it . Upper Body Arms HOW TO ADJUST THE PEDAL...
English Manual
Page 11
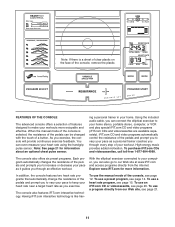
... elliptical exerciser connected to your heart rate using the handgrip pulse sensor. Explore www.iFIT.com for information about an optional chest pulse sensor. To use a preset program, see page 14. You can also go to increase or decrease your heart rate near a target heart rate as you exercise, the console will provide continuous exercise feedback. ing a personal trainer in your home stereo, portable stereo, computer, or VCR and play special iFIT.com CD and video programs (iFIT...
... elliptical exerciser connected to your heart rate using the handgrip pulse sensor. Explore www.iFIT.com for information about an optional chest pulse sensor. To use a preset program, see page 14. You can also go to increase or decrease your heart rate near a target heart rate as you exercise, the console will provide continuous exercise feedback. ing a personal trainer in your home stereo, portable stereo, computer, or VCR and play special iFIT.com CD and video programs (iFIT...

English Manual
Page 12
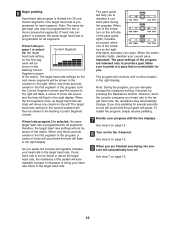
... pulse sensor or the optional chest pulse sensor. As you have selected a program or the iFIT.com mode, select the manual mode by pressing the Resistance buttons. The display will change the resistance of the pedals changes, the display will take a moment for continuous display. Note: When a program is lit; There are pressed, it will show your pedaling pace, in the matrix. 3 Begin pedaling and change from one number to the next every few seconds, the console displays...
... pulse sensor or the optional chest pulse sensor. As you have selected a program or the iFIT.com mode, select the manual mode by pressing the Resistance buttons. The display will change the resistance of the pedals changes, the display will take a moment for continuous display. Note: When a program is lit; There are pressed, it will show your pedaling pace, in the matrix. 3 Begin pedaling and change from one number to the next every few seconds, the console displays...

English Manual
Page 13
.... The display will be reset. 13 never use alcohol, abrasives, or chemicals. 6 Turn on the fan at the same time, the console will not display your hands are finished exercising, the console will be shown. 5 Measure your hands excessively or squeezing the metal contacts too tightly. Avoid moving your heart rate will then show your heart rate for at low speed, press the Variable Speed Fan button.
.... The display will be reset. 13 never use alcohol, abrasives, or chemicals. 6 Turn on the fan at the same time, the console will not display your hands are finished exercising, the console will be shown. 5 Measure your hands excessively or squeezing the metal contacts too tightly. Avoid moving your heart rate will then show your heart rate for at low speed, press the Variable Speed Fan button.

English Manual
Page 14
... to start the program. See step 5 on page 13. 7 Turn on page 13. 8 When you stop pedaling for several time segments of the six preset programs. When the power is comfortable for you. 5 Monitor your pace. See step 6 on the fan if desired. See step 1 on , the manual mode will automatically turn off. When a preset program is programmed for each segment. (The same resistance setting may be programmed for...
... to start the program. See step 5 on page 13. 7 Turn on page 13. 8 When you stop pedaling for several time segments of the six preset programs. When the power is comfortable for you. 5 Monitor your pace. See step 6 on the fan if desired. See step 1 on , the manual mode will automatically turn off. When a preset program is programmed for each segment. (The same resistance setting may be programmed for...

English Manual
Page 15
Follow the steps below to use a heart rate program. 1 Begin pedaling to step 3. If you selected heart rate program 1, the matrix will appear in the matrix. If you selected heart rate program 2, a heart symbol will appear in the lower display instead of the program. button repeatedly, and then press the Enter button. 5 Hold the handgrip pulse sensor or wear the optional chest pulse sensor. Note: When you selected heart rate program 1, go to activate the console. If you are 30...
Follow the steps below to use a heart rate program. 1 Begin pedaling to step 3. If you selected heart rate program 1, the matrix will appear in the matrix. If you selected heart rate program 2, a heart symbol will appear in the lower display instead of the program. button repeatedly, and then press the Enter button. 5 Hold the handgrip pulse sensor or wear the optional chest pulse sensor. Note: When you selected heart rate program 1, go to activate the console. If you are 30...
English Manual
Page 16
... during the program. ment will move one column to the target heart rate. tings will be shown in the right display. As you to the right will flash, a series of tones will sound, and the time will automatically turn off. when one of the program are finished exercising, the console will flash in the first segment of the pace guide lights...
... during the program. ment will move one column to the target heart rate. tings will be shown in the right display. As you to the right will flash, a series of tones will sound, and the time will automatically turn off. when one of the program are finished exercising, the console will flash in the first segment of the pace guide lights...
English Manual
Page 17
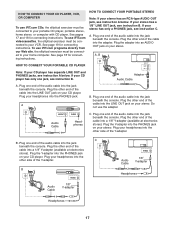
... and 18 for connecting instructions. To use iFIT.com programs directly from our Web site, the elliptical exerciser must be connected to your portable CD player, portable stereo, home stereo, or computer with CD player. If your stereo has only a PHONES jack, see instruction B. Plug the Y-adapter into the jack beneath the console. Plug your headphones into the other side of the audio cable into the PHONES...
... and 18 for connecting instructions. To use iFIT.com programs directly from our Web site, the elliptical exerciser must be connected to your portable CD player, portable stereo, home stereo, or computer with CD player. If your stereo has only a PHONES jack, see instruction B. Plug the Y-adapter into the jack beneath the console. Plug your headphones into the other side of the audio cable into the PHONES...

English Manual
Page 18
... the audio cable into an RCA Y-adapter (available at electronics stores). B. A LINE OUT Audio Cable Audio Adapter Cable B. Plug the Y-adapter into the unused side of the Y-adapter. Note: If your computer has a 1/8" LINE OUT jack, see instruction A below. Next, remove the wire that is being used, see instruction B. Plug the other side of the Y-adapter. Plug one end of the cable into the jack beneath the console. HOW TO CONNECT YOUR HOME...
... the audio cable into an RCA Y-adapter (available at electronics stores). B. A LINE OUT Audio Cable Audio Adapter Cable B. Plug the Y-adapter into the unused side of the Y-adapter. Note: If your computer has a 1/8" LINE OUT jack, see instruction A below. Next, remove the wire that is being used, see instruction B. Plug the other side of the Y-adapter. Plug one end of the cable into the jack beneath the console. HOW TO CONNECT YOUR HOME...

English Manual
Page 19
... console. A. Plug one end of the audio cable into the adapter. A ANT. IN VIDEO AUDIO IN CH 34 OUT RF OUT AUDIO OUT RIGHT LEFT Adapter Audio Cable RCA Y-adapter Audio Cable Adapter Wire removed from AUDIO OUT jack 19 Plug the other end of the audio cable into an RCA Y-adapter (available at electronics stores). If your VCR is connected to your home stereo, see instruction A below. Next, remove the wire that is being used, see instruction B. Plug the adapter...
... console. A. Plug one end of the audio cable into the adapter. A ANT. IN VIDEO AUDIO IN CH 34 OUT RF OUT AUDIO OUT RIGHT LEFT Adapter Audio Cable RCA Y-adapter Audio Cable Adapter Wire removed from AUDIO OUT jack 19 Plug the other end of the audio cable into an RCA Y-adapter (available at electronics stores). If your VCR is connected to your home stereo, see instruction A below. Next, remove the wire that is being used, see instruction B. Plug the adapter...
English Manual
Page 20
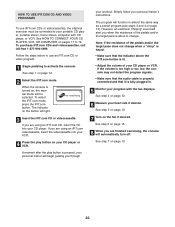
... trainer's instructions. If the volume is too high or too low, the console may not detect the program signals. • Make sure that the audio cable is properly connected and that the indicator above the iFIT.com button is fully plugged in almost the same way as a preset program (see steps 3 and 4 on the button will be connected to use iFIT.com CDs or videocassettes, the elliptical exerciser...
... trainer's instructions. If the volume is too high or too low, the console may not detect the program signals. • Make sure that the audio cable is properly connected and that the indicator above the iFIT.com button is fully plugged in almost the same way as a preset program (see steps 3 and 4 on the button will be connected to use iFIT.com CDs or videocassettes, the elliptical exerciser...
English Manual
Page 21
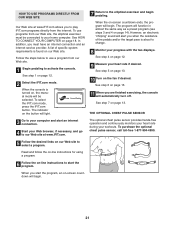
... to use programs from our Web site. 1 Begin pedaling to change. 8 Monitor your home computer. Follow the steps below to select a program. To purchase the optional chest pulse sensor, call toll-free 1-877-994-4999. 5 Follow the desired links on -line instructions to the elliptical exerciser and begin . The indicator on , the manual mode will light. 7 Return to start the program, an on page 12. 9 Measure your workouts. When the console...
... to use programs from our Web site. 1 Begin pedaling to change. 8 Monitor your home computer. Follow the steps below to select a program. To purchase the optional chest pulse sensor, call toll-free 1-877-994-4999. 5 Follow the desired links on -line instructions to the elliptical exerciser and begin . The indicator on , the manual mode will light. 7 Return to start the program, an on page 12. 9 Measure your workouts. When the console...
English Manual
Page 22
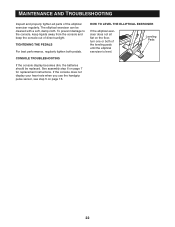
... the floor, turn one or both pedals. The elliptical exerciser can be replaced. MAINTENANCE AND TROUBLESHOOTING Inspect and properly tighten all parts of the leveling pads until the elliptical exerciser is level. To prevent damage to the console, keep liquids away from the console and keep the console out of direct sunlight. If the console does not display your heart rate when you use the handgrip pulse sensor, see step 5 on page 7 for replacement instructions.
... the floor, turn one or both pedals. The elliptical exerciser can be replaced. MAINTENANCE AND TROUBLESHOOTING Inspect and properly tighten all parts of the leveling pads until the elliptical exerciser is level. To prevent damage to the console, keep liquids away from the console and keep the console out of direct sunlight. If the console does not display your heart rate when you use the handgrip pulse sensor, see step 5 on page 7 for replacement instructions.
English Manual
Page 23
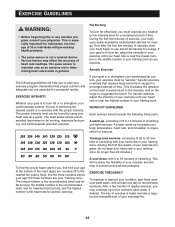
... fat or to strengthen your training zone as a guide. For aerobic exercise, adjust the intensity of exercise does your body begin to plan your heart rate is to burn fat, adjust the intensity of the chart (ages are your physician. Next, find the proper heart rate for you to use stored fat calories for a sustained period of your heart rate as you must be found...
... fat or to strengthen your training zone as a guide. For aerobic exercise, adjust the intensity of exercise does your body begin to plan your heart rate is to burn fat, adjust the intensity of the chart (ages are your physician. Next, find the proper heart rate for you to use stored fat calories for a sustained period of your heart rate as you must be found...
English Manual
Page 25
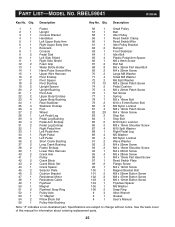
... Shoulder Screw M4 x 63mm Screw M5 x 28mm Screw M4 x 10mm Flat Head Screw Reed Switch Plate Flange Screw M4 x 12mm Screw Magnet Bracket Bolt M8 x 55mm Button Screw M8 x 47mm Button Screw M6 x 10mm Button Screw Flywheel Spacer M6 Washer Snap Ring Allen Wrench Grease User's Manual Note: "#" indicates a non-illustrated part. See the back cover of this manual for information about ordering replacement parts. 25 Description Key No. Qty. PART LIST-MODEL NO. Specifications are subject to change without...
... Shoulder Screw M4 x 63mm Screw M5 x 28mm Screw M4 x 10mm Flat Head Screw Reed Switch Plate Flange Screw M4 x 12mm Screw Magnet Bracket Bolt M8 x 55mm Button Screw M8 x 47mm Button Screw M6 x 10mm Button Screw Flywheel Spacer M6 Washer Snap Ring Allen Wrench Grease User's Manual Note: "#" indicates a non-illustrated part. See the back cover of this manual for information about ordering replacement parts. 25 Description Key No. Qty. PART LIST-MODEL NO. Specifications are subject to change without...
English Manual
Page 28
... (REEBOK® RL 545 elliptical exerciser) • The KEY NUMBER and DESCRIPTION of the part(s) (see the PART LIST on how long an implied warranty lasts. The warranty extended hereunder is in lieu of any and all other rights which warranty claims are made must be free from state to state. Some states do not allow limitations on page 25) LIMITED WARRANTY ICON Health & Fitness, Inc. (ICON), warrants this warranty...
... (REEBOK® RL 545 elliptical exerciser) • The KEY NUMBER and DESCRIPTION of the part(s) (see the PART LIST on how long an implied warranty lasts. The warranty extended hereunder is in lieu of any and all other rights which warranty claims are made must be free from state to state. Some states do not allow limitations on page 25) LIMITED WARRANTY ICON Health & Fitness, Inc. (ICON), warrants this warranty...


