
English Manual
Page 3
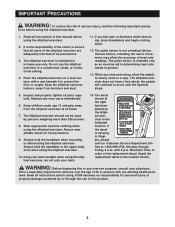
... determining heart rate trends in -home use only. Place the elliptical exerciser on the elliptical exerciser in a commercial, rental, or institutional setting. 4. The pulse sensor is missing or illegible, please call our Customer Service Department tollfree at 1-800-999-3756, Monday through the use the elliptical exerciser in the indicated location. The pulse sensor is the responsibility of the owner to ensure that all users of the elliptical exerciser are adequately informed of...
... determining heart rate trends in -home use only. Place the elliptical exerciser on the elliptical exerciser in a commercial, rental, or institutional setting. 4. The pulse sensor is missing or illegible, please call our Customer Service Department tollfree at 1-800-999-3756, Monday through the use the elliptical exerciser in the indicated location. The pulse sensor is the responsibility of the owner to ensure that all users of the elliptical exerciser are adequately informed of...
English Manual
Page 4
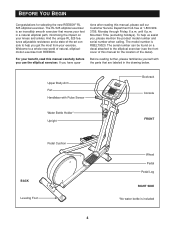
... selecting the new REEBOK® RL 525 elliptical exerciser. Upper Body Arm Fan Handlebar with the parts that moves your exercise. And the unique RL 525 features adjustable resistance and a state-of natural, ellipticalmotion exercise from your feet in the drawing below. Mountain Time (excluding holidays). The model number is included tions after reading this manual, please call our Customer Service Department toll-free at 1-800...
... selecting the new REEBOK® RL 525 elliptical exerciser. Upper Body Arm Fan Handlebar with the parts that moves your exercise. And the unique RL 525 features adjustable resistance and a state-of natural, ellipticalmotion exercise from your feet in the drawing below. Mountain Time (excluding holidays). The model number is included tions after reading this manual, please call our Customer Service Department toll-free at 1-800...

English Manual
Page 5
... the front of the elliptical exerciser in assembly. M4 x 16mm Screw (82)-6 M6 x 20mm Patch Screw (75)-4 M6 Split Washer (72)-2 Small M8 Washer (71)-2 M10 Nylon Locknut (85)-4 M4 x 19mm Screw (92)-2 M4 x 25mm Screw (96)-2 M8 x 19mm Patch Screw (81)-4 Large M8 Washer (70)-2 Plastic Pedal Arm Spacer (65)-4 M6 x 16mm Button M8 x 25mm Patch Screw (93)-2 Screw (73)-12 Bolt Set (67)-2 1.
... the front of the elliptical exerciser in assembly. M4 x 16mm Screw (82)-6 M6 x 20mm Patch Screw (75)-4 M6 Split Washer (72)-2 Small M8 Washer (71)-2 M10 Nylon Locknut (85)-4 M4 x 19mm Screw (92)-2 M4 x 25mm Screw (96)-2 M8 x 19mm Patch Screw (81)-4 Large M8 Washer (70)-2 Plastic Pedal Arm Spacer (65)-4 M6 x 16mm Button M8 x 25mm Patch Screw (93)-2 Screw (73)-12 Bolt Set (67)-2 1.
English Manual
Page 6
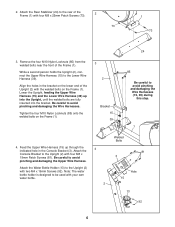
... 3. Align the holes in the Console Bracket (3). Feed the Upper Wire Harness (15) up into the Upright, until the welded bolts are fully inserted into the bracket. Attach the Water Bottle Holder (13) to the rear of the 2 Frame (1) with two M4 x 19mm Screws (92). Lower the Upright, feeding the Upper Wire Harness (15) and the Lower Wire Harness (39) up through...
... 3. Align the holes in the Console Bracket (3). Feed the Upper Wire Harness (15) up into the Upright, until the welded bolts are fully inserted into the bracket. Attach the Water Bottle Holder (13) to the rear of the 2 Frame (1) with two M4 x 19mm Screws (92). Lower the Upright, feeding the Upper Wire Harness (15) and the Lower Wire Harness (39) up through...
English Manual
Page 9
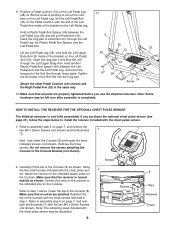
... a Plastic Pedal Arm Spacer (65) between the Left Pedal Arm and the Left Pedal Leg, and insert the long part of the Console (8) as shown. HOW TO INSTALL THE RECEIVER FOR THE OPTIONAL CHEST PULSE SENSOR The elliptical exerciser is turned exactly as shown. Carefully lift the top of the Bolt Set through these parts. If you use the elliptical exerciser. Note: The remaining wires included with the chest pulse sensor. 1. Insert the long part of...
... a Plastic Pedal Arm Spacer (65) between the Left Pedal Arm and the Left Pedal Leg, and insert the long part of the Console (8) as shown. HOW TO INSTALL THE RECEIVER FOR THE OPTIONAL CHEST PULSE SENSOR The elliptical exerciser is turned exactly as shown. Carefully lift the top of the Bolt Set through these parts. If you use the elliptical exerciser. Note: The remaining wires included with the chest pulse sensor. 1. Insert the long part of...

English Manual
Page 10
... direction. When the pedals are in front of the leveling feet under the pedal) arms and slide the pedal cush- Upper Body Arms HOW TO ADJUST THE PEDAL CUSHIONS The feel . ions to the desired location and then lower it. Carefully move the elliptical exerciser to the desired positions. Due to the Wheel Leveling Foot weight of the Pedal Arm pedal cushions. ciser, hold the handlebar and Handlebar step...
... direction. When the pedals are in front of the leveling feet under the pedal) arms and slide the pedal cush- Upper Body Arms HOW TO ADJUST THE PEDAL CUSHIONS The feel . ions to the desired location and then lower it. Carefully move the elliptical exerciser to the desired positions. Due to the Wheel Leveling Foot weight of the Pedal Arm pedal cushions. ciser, hold the handlebar and Handlebar step...
English Manual
Page 11
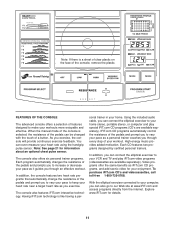
... connect the elliptical exerciser to keep your heart rate near a target heart rate as iFIT.com CD programs, and add scenic video for your heart rate using the handgrip pulse sensor. In addition, the console features two heart rate programs that automatically change the resistance of a button. In addition, you can connect the elliptical exerciser to increase or decrease your workout. Explore www.iFIT.com for information about an optional chest pulse sensor. The console also offers six personal trainer programs. Each program automatically changes the resistance...
... connect the elliptical exerciser to keep your heart rate near a target heart rate as iFIT.com CD programs, and add scenic video for your heart rate using the handgrip pulse sensor. In addition, the console features two heart rate programs that automatically change the resistance of a button. In addition, you can connect the elliptical exerciser to increase or decrease your workout. Explore www.iFIT.com for information about an optional chest pulse sensor. The console also offers six personal trainer programs. Each program automatically changes the resistance...
English Manual
Page 12
... entire track is supplied to the next every few seconds, as shown by the indicators around the display. make sure that you have pedaled and the approximate numbers of the pedals by pressing the Resistance buttons. The elliptical exerciser requires no batteries or external power source. There are pressed, it will change the resistance of calories and fat calories you have selected a program or the iFIT.com mode...
... entire track is supplied to the next every few seconds, as shown by the indicators around the display. make sure that you have pedaled and the approximate numbers of the pedals by pressing the Resistance buttons. The elliptical exerciser requires no batteries or external power source. There are pressed, it will change the resistance of calories and fat calories you have selected a program or the iFIT.com mode...
English Manual
Page 13
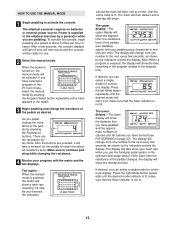
..., press the left Mode button again. For the most accurate heart rate reading, hold the handgrip pulse sensor and wear the chest pulse sensor at low speed, press the Low button. For optimal performance, periodically clean the metal contacts using either miles or kilometers. To turn on the fan at the same time, the console may not display your palms must select the console's user mode. If the pedals are not moved for...
..., press the left Mode button again. For the most accurate heart rate reading, hold the handgrip pulse sensor and wear the chest pulse sensor at low speed, press the Low button. For optimal performance, periodically clean the metal contacts using either miles or kilometers. To turn on the fan at the same time, the console may not display your palms must select the console's user mode. If the pedals are not moved for...
English Manual
Page 14
... pedaling. 4 Use the console's pace function if desired. To use the pace function, press the left . HOW TO USE PERSONAL TRAINER PROGRAMS 1 Begin pedaling to start the program. ing Current Segment column of the upper bar will be shown in the program. However, when the next segment begins, the resistance will show the first eight resistance settings of the six personal trainer programs. When the power is turned on, the manual mode...
... pedaling. 4 Use the console's pace function if desired. To use the pace function, press the left . HOW TO USE PERSONAL TRAINER PROGRAMS 1 Begin pedaling to start the program. ing Current Segment column of the upper bar will be shown in the program. However, when the next segment begins, the resistance will show the first eight resistance settings of the six personal trainer programs. When the power is turned on, the manual mode...
English Manual
Page 15
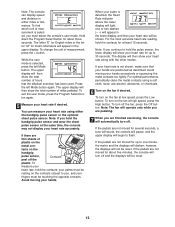
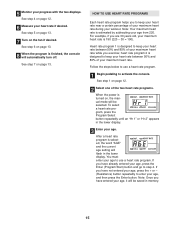
... you are 30 years old, your maximum heart rate while you have not entered your age, press the + or - (Resistance) button repeatedly to activate the console. Heart rate program 1 is turned on page 12. 2 Select one of your age, and then press the Enter button. Note: Once you exercise; Follow the steps below to use a heart rate program. See step 1 on , the manual mode will flash in memory. 15 You must...
... you are 30 years old, your maximum heart rate while you have not entered your age, press the + or - (Resistance) button repeatedly to activate the console. Heart rate program 1 is turned on page 12. 2 Select one of your age, and then press the Enter button. Note: Once you exercise; Follow the steps below to use a heart rate program. See step 1 on , the manual mode will flash in memory. 15 You must...

English Manual
Page 16
....) During the program, the resistance of your heart rate. 5 Press the Program Start button or begin pedaling to prompt you use a heart rate program, you can adjust the resistance by pressing the left Mode button repeatedly until no time remains in length, adjust your pace so that represents your hands on the metal contacts for you stop pedaling for the current segment. The upper bar in the lower display instead of the pedals will show...
....) During the program, the resistance of your heart rate. 5 Press the Program Start button or begin pedaling to prompt you use a heart rate program, you can adjust the resistance by pressing the left Mode button repeatedly until no time remains in length, adjust your pace so that represents your hands on the metal contacts for you stop pedaling for the current segment. The upper bar in the lower display instead of the pedals will show...
English Manual
Page 17
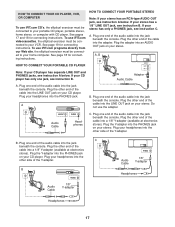
... beneath the console. Plug the Y-adapter into the LINE OUT jack on your stereo. Plug one end of the cable into the PHONES jack on your CD player. B PHONES PHONES Audio Cable 1/8" Y-adapter Audio Cable PHONES 1/8" Y-adapter Headphones Headphones 17 See pages 17 and 18 for connecting instructions. See page 18 for connecting instructions. Do not use iFIT.com programs directly from our Web site, the elliptical exerciser must be connected to...
... beneath the console. Plug the Y-adapter into the LINE OUT jack on your stereo. Plug one end of the cable into the PHONES jack on your CD player. B PHONES PHONES Audio Cable 1/8" Y-adapter Audio Cable PHONES 1/8" Y-adapter Headphones Headphones 17 See pages 17 and 18 for connecting instructions. See page 18 for connecting instructions. Do not use iFIT.com programs directly from our Web site, the elliptical exerciser must be connected to...

English Manual
Page 18
... the console. B PHONES B CD VCR Amp LINE OUT Audio Cable RCA Y-adapter Adapter Audio Cable 1/8" Y-adapter Headphones/Speakers Wire removed from LINE OUT jack 18 A CD VCR Amp LINE OUT LINE OUT A. A LINE OUT Audio Cable Audio Adapter Cable B. HOW TO CONNECT YOUR HOME STEREO HOW TO CONNECT YOUR COMPUTER Note: If your computer has only a PHONES jack, see instruction B. Note: If your stereo and plug the wire into the adapter. Plug one...
... the console. B PHONES B CD VCR Amp LINE OUT Audio Cable RCA Y-adapter Adapter Audio Cable 1/8" Y-adapter Headphones/Speakers Wire removed from LINE OUT jack 18 A CD VCR Amp LINE OUT LINE OUT A. A LINE OUT Audio Cable Audio Adapter Cable B. HOW TO CONNECT YOUR HOME STEREO HOW TO CONNECT YOUR COMPUTER Note: If your computer has only a PHONES jack, see instruction B. Note: If your stereo and plug the wire into the adapter. Plug one...
English Manual
Page 19
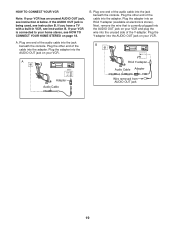
... instruction A below. B. A. IN VIDEO AUDIO IN CH 34 OUT RF OUT AUDIO OUT RIGHT LEFT Adapter Audio Cable RCA Y-adapter Audio Cable Adapter Wire removed from AUDIO OUT jack 19 If you have a TV with a built-in VCR, see HOW TO CONNECT YOUR HOME STEREO on your VCR and plug the wire into the adapter. Plug the adapter into the AUDIO OUT jack on your VCR. Plug the adapter into the jack beneath the console...
... instruction A below. B. A. IN VIDEO AUDIO IN CH 34 OUT RF OUT AUDIO OUT RIGHT LEFT Adapter Audio Cable RCA Y-adapter Audio Cable Adapter Wire removed from AUDIO OUT jack 19 If you have a TV with a built-in VCR, see HOW TO CONNECT YOUR HOME STEREO on your VCR and plug the wire into the adapter. Plug the adapter into the AUDIO OUT jack on your VCR. Plug the adapter into the jack beneath the console...
English Manual
Page 20
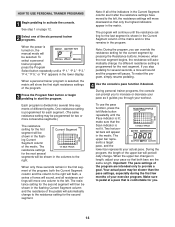
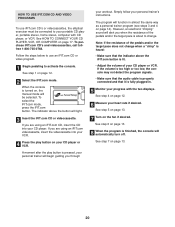
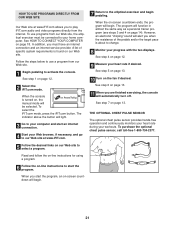
... resistance of the pedals and/or the target pace is finished, the console will function in . 5 Monitor your heart rate if desired. Follow the steps below to use iFIT.com CD's or videocassettes, the elliptical exerciser must be selected. See step 6 on page 13. 8 When the program is about to your personal trainer's instructions. To select the iFIT.com mode, press the iFIT.com button. The program will automatically turn off. See step...
... resistance of the pedals and/or the target pace is finished, the console will function in . 5 Monitor your heart rate if desired. Follow the steps below to use iFIT.com CD's or videocassettes, the elliptical exerciser must be selected. See step 6 on page 13. 8 When the program is about to your personal trainer's instructions. To select the iFIT.com mode, press the iFIT.com button. The program will automatically turn off. See step...
English Manual
Page 21
... iFIT.com mode, press the iFIT.com button. See step 5 on page 13. 10 Turn on page 13. Follow the steps below to use programs from our Web site. 1 Begin pedaling to start an internet connection. 4 Start your progress with the two displays. When the console is turned on -line instructions to activate the console. A list of the pedals and/or the target pace is found on page 12. 9 Measure your workouts...
... iFIT.com mode, press the iFIT.com button. See step 5 on page 13. 10 Turn on page 13. Follow the steps below to use programs from our Web site. 1 Begin pedaling to start an internet connection. 4 Start your progress with the two displays. When the console is turned on -line instructions to activate the console. A list of the pedals and/or the target pace is found on page 12. 9 Measure your workouts...
English Manual
Page 23
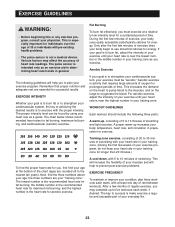
... strengthen your cardiovascular system, your exercise must exercise at the bottom of exercising with pre-existing health problems. • The pulse sensor is not a medical device. and the highest number is intended only as a guide. The pulse sensor is the heart rate for maximum fat burning; Only after the first few weeks of your exercise program, do not keep your heart rate in preparation for fat burning...
... strengthen your cardiovascular system, your exercise must exercise at the bottom of exercising with pre-existing health problems. • The pulse sensor is not a medical device. and the highest number is intended only as a guide. The pulse sensor is the heart rate for maximum fat burning; Only after the first few weeks of your exercise program, do not keep your heart rate in preparation for fat burning...
English Manual
Page 25
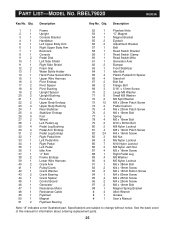
... Pedal 35 1 Left Pedal 36 1 Idler Arm 37 1 "J" Bolt 38 2 Frame Endcap 39 1 Lower Wire Harness 40 2 Crank Arm 41 1 Pulley/Crank 42 1 Crank Washer 43 2 Crank Bearing 44 1 Crank Spacer 45 1 Control Board 46 1 Generator 47 1 Resistance Motor 48 1 Resistance Cable 49 1 Flywheel 50 1 Magnet 51 2 Flywheel Bearing 52 1 Flywheel Axle 53 1 "C" Magnet 54 1 Magnet Bracket 55 2 Eyebolt 56 2 Adjustment Bracket 57 1 Belt 58 1 Reed Switch Bracket 59 1 Reed Switch Clamp 60 1 Reed Switch/Wire 61...
... Pedal 35 1 Left Pedal 36 1 Idler Arm 37 1 "J" Bolt 38 2 Frame Endcap 39 1 Lower Wire Harness 40 2 Crank Arm 41 1 Pulley/Crank 42 1 Crank Washer 43 2 Crank Bearing 44 1 Crank Spacer 45 1 Control Board 46 1 Generator 47 1 Resistance Motor 48 1 Resistance Cable 49 1 Flywheel 50 1 Magnet 51 2 Flywheel Bearing 52 1 Flywheel Axle 53 1 "C" Magnet 54 1 Magnet Bracket 55 2 Eyebolt 56 2 Adjustment Bracket 57 1 Belt 58 1 Reed Switch Bracket 59 1 Reed Switch Clamp 60 1 Reed Switch/Wire 61...
English Manual
Page 28
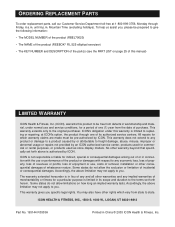
... order replacement parts, call our Customer Service Department toll-free at ICON's option, the product through Friday, 6 a.m. Accordingly, the above limitation may not apply to give the following information: • The MODEL NUMBER of the product (RBEL79020) • The NAME of the product (REEBOK® RL 525 elliptical exerciser) • The KEY NUMBER and DESCRIPTION of the part(s) (see the PART LIST on how long an implied warranty...
... order replacement parts, call our Customer Service Department toll-free at ICON's option, the product through Friday, 6 a.m. Accordingly, the above limitation may not apply to give the following information: • The MODEL NUMBER of the product (RBEL79020) • The NAME of the product (REEBOK® RL 525 elliptical exerciser) • The KEY NUMBER and DESCRIPTION of the part(s) (see the PART LIST on how long an implied warranty...


