
English Manual
Page 3
... athletic shoes. When connecting the power cord (see HOW TO TURN ON THE POWER on the treadmill at a time. 10. This is not working properly.) 16. If the control system is capable of high speeds. The treadmill should be used or where oxygen is turned off. Adjust the speed in the treadmill. Various factors, including the user's movement, may result in general. 3 ICON assumes no responsibility for...
... athletic shoes. When connecting the power cord (see HOW TO TURN ON THE POWER on the treadmill at a time. 10. This is not working properly.) 16. If the control system is capable of high speeds. The treadmill should be used or where oxygen is turned off. Adjust the speed in the treadmill. Various factors, including the user's movement, may result in general. 3 ICON assumes no responsibility for...

English Manual
Page 4
... key, unplug the power cord, and switch the reset/off circuit breaker to raise, lower, or move the treadmill. 22. Do not attempt to the off position when the treadmill is not in use only. DANGER: 25. SAVE THESE INSTRUCTIONS 4 less instructed to raise, lower, or move the treadmill until it is intended for the location of the treadmill regularly. Over exercising may result in the storage position. 23. Servicing...
... key, unplug the power cord, and switch the reset/off circuit breaker to raise, lower, or move the treadmill. 22. Do not attempt to the off position when the treadmill is not in use only. DANGER: 25. SAVE THESE INSTRUCTIONS 4 less instructed to raise, lower, or move the treadmill until it is intended for the location of the treadmill regularly. Over exercising may result in the storage position. 23. Servicing...
English Manual
Page 5
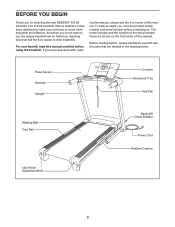
... manual. For your workouts at home more enjoyable and effective. To help us . Pulse Sensor Handrail Upright Console Accessory Tray Key/Clip Walking Belt Foot Rail Idler Roller Adjustment Bolts Reset/Off Circuit Breaker Power Cord Platform Cushion 5 The model number and the location of other treadmills. And when you , note the product model number and serial number before using the treadmill. Before reading further, please familiarize yourself with the parts that are shown on the front cover...
... manual. For your workouts at home more enjoyable and effective. To help us . Pulse Sensor Handrail Upright Console Accessory Tray Key/Clip Walking Belt Foot Rail Idler Roller Adjustment Bolts Reset/Off Circuit Breaker Power Cord Platform Cushion 5 The model number and the location of other treadmills. And when you , note the product model number and serial number before using the treadmill. Before reading further, please familiarize yourself with the parts that are shown on the front cover...

English Manual
Page 11
... Storage Latch (49) to adjust the walking belt (see page 20), follow the steps below to pinch the wires. Attach the receiver to align the Storage Latch with a 3/8" x 1 3/4" Patch Bolt (2). Note: It may be necessary to move the Frame (52) back and forth to the plastic posts on the Frame (52) with the two included small screws. 95 Small Screws Receiver Antenna Wire 92 Wire 12 3. Remove...
... Storage Latch (49) to adjust the walking belt (see page 20), follow the steps below to pinch the wires. Attach the receiver to align the Storage Latch with a 3/8" x 1 3/4" Patch Bolt (2). Note: It may be necessary to move the Frame (52) back and forth to the plastic posts on the Frame (52) with the two included small screws. 95 Small Screws Receiver Antenna Wire 92 Wire 12 3. Remove...

English Manual
Page 12
... ADJUSTMENT THE PRE-LUBRICATED WALKING BELT Your treadmill features a walking belt coated with a cord having Lug Metal Screw Grounding Plug The temporary adapter should malfunction or break down, grounding provides a path of least resistance for 120 volts AC and 15 amps. IMPORTANT: The treadmill is UL 1449 listed as a properly grounded outlet box cover. Voltage surges, spikes, and noise interference can result in damage to use...
... ADJUSTMENT THE PRE-LUBRICATED WALKING BELT Your treadmill features a walking belt coated with a cord having Lug Metal Screw Grounding Plug The temporary adapter should malfunction or break down, grounding provides a path of least resistance for 120 volts AC and 15 amps. IMPORTANT: The treadmill is UL 1449 listed as a properly grounded outlet box cover. Voltage surges, spikes, and noise interference can result in damage to use...

English Manual
Page 13
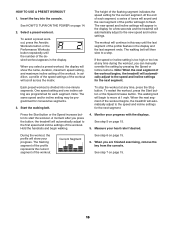
... standards. iFit workouts automatically IMPORTANT: If there is selected, the speed and incline of your heart rate using the treadmill. When the manual mode of the console is a sheet of this manual. To use the weight loss workouts center, see page 14. As you through every step of the treadmill can even measure your workout. Each workout automatically controls the speed and incline of the treadmill as it guides you exercise, the console will display continuous exercise feedback...
... standards. iFit workouts automatically IMPORTANT: If there is selected, the speed and incline of your heart rate using the treadmill. When the manual mode of the console is a sheet of this manual. To use the weight loss workouts center, see page 14. As you through every step of the treadmill can even measure your workout. Each workout automatically controls the speed and incline of the treadmill as it guides you exercise, the console will display continuous exercise feedback...

English Manual
Page 14
... left. 2. If you press one of the buttons, the incline will change the speed of the numbered Quick Speed buttons, the walking belt will be used if the treadmill is displayed in the power cord and switch the reset/off the demo mode, hold down the Stop button for a few steps backward; Note: The console can be pulled from the console, adjust the position of the treadmill as desired. Reset IMPORTANT: The console features a display demo mode, designed to be selected...
... left. 2. If you press one of the buttons, the incline will change the speed of the numbered Quick Speed buttons, the walking belt will be used if the treadmill is displayed in the power cord and switch the reset/off the demo mode, hold down the Stop button for a few steps backward; Note: The console can be pulled from the console, adjust the position of the treadmill as desired. Reset IMPORTANT: The console features a display demo mode, designed to be selected...

English Manual
Page 15
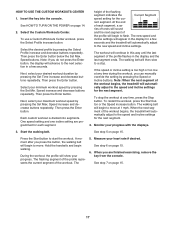
... power cord. To reset the displays, press the Stop button, remove the key, and then reinsert the key. 6. Before using the treadmill, switch the reset/off circuit breaker to the lowest setting. For the most accurate heart rate reading, continue to light in a secure place. The incline must be shown. The matrix-When you exercise, the indicators around the track will again begin to hold the metal contacts on the chest pulse sensor...
... power cord. To reset the displays, press the Stop button, remove the key, and then reinsert the key. 6. Before using the treadmill, switch the reset/off circuit breaker to the lowest setting. For the most accurate heart rate reading, continue to light in a secure place. The incline must be shown. The matrix-When you exercise, the indicators around the track will again begin to hold the metal contacts on the chest pulse sensor...
English Manual
Page 16
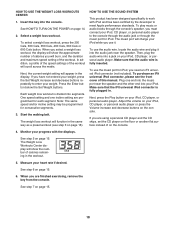
.... Start the walking belt. The new speed and incline settings will appear in the display for each segment, a series of tones will sound and the next segment of the workout begins, the treadmill will then slow to move at any time, press the Stop button. Monitor your heart rate if desired. Current Segment See step 6 on page 15. 5. Insert the key into one incline setting are finished exercising, remove the key from the console. Press the Start button...
.... Start the walking belt. The new speed and incline settings will appear in the display for each segment, a series of tones will sound and the next segment of the workout begins, the treadmill will then slow to move at any time, press the Stop button. Monitor your heart rate if desired. Current Segment See step 6 on page 15. 5. Insert the key into one incline setting are finished exercising, remove the key from the console. Press the Start button...
English Manual
Page 17
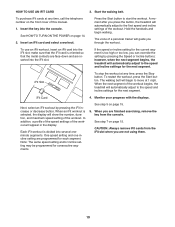
... treadmill will begin walking. Measure your progress with the displays. 3. See step 7 on page 14. 2. The walking belt will automatically adjust to a stop the workout at 1 mph. When you press the button, the walking belt will automatically adjust to the speed and incline settings for the cur- Then press the Enter button below the Set Max. Speed increase and decrease buttons repeatedly. height of the workout begins, the treadmill will then slow to the speed and incline settings...
... treadmill will begin walking. Measure your progress with the displays. 3. See step 7 on page 14. 2. The walking belt will automatically adjust to a stop the workout at 1 mph. When you press the button, the walking belt will automatically adjust to the speed and incline settings for the cur- Then press the Enter button below the Set Max. Speed increase and decrease buttons repeatedly. height of the workout begins, the treadmill will then slow to the speed and incline settings...
English Manual
Page 18
... cover of calories remaining in the display. Next, press the Play button on the console. 4. Note: The same speed and/or incline setting may be programmed for iPod. When you are programmed for iPod, you must connect your heart rate if desired. The weight loss workout will scroll across the matrix. HOW TO USE THE SOUND SYSTEM This product has been designed specifically to the console through the audio...
... cover of calories remaining in the display. Next, press the Play button on the console. 4. Note: The same speed and/or incline setting may be programmed for iPod. When you are programmed for iPod, you must connect your heart rate if desired. The weight loss workout will scroll across the matrix. HOW TO USE THE SOUND SYSTEM This product has been designed specifically to the console through the audio...
English Manual
Page 19
... workout, press the Start button. When the next segment of the workout begins, the treadmill will automatically adjust to the first speed and incline settings of the workout. Note: The same speed setting and/or incline setting may be programmed for the current segment is selected, the display will guide you are not using them. 19 To use an iFit workout, insert an iFit card into the console. iFit Slot To stop the workout at any time, press the Stop button...
... workout, press the Start button. When the next segment of the workout begins, the treadmill will automatically adjust to the first speed and incline settings of the workout. Note: The same speed setting and/or incline setting may be programmed for the current segment is selected, the display will guide you are not using them. 19 To use an iFit workout, insert an iFit card into the console. iFit Slot To stop the workout at any time, press the Stop button...

English Manual
Page 20
... show the total number of hours the treadmill has been used . Press the Speed increase button to turn on and turn off the display demo mode. The display will appear in a store. To exit the information mode, remove the key from the console. 20 An optional chest pulse sensor offers hands-free operation as it tracks your heart rate during your workouts. While the demo mode is turned on or turn off the demo mode, press the Speed decrease button. If the demo mode is selected...
... show the total number of hours the treadmill has been used . Press the Speed increase button to turn on and turn off the display demo mode. The display will appear in a store. To exit the information mode, remove the key from the console. 20 An optional chest pulse sensor offers hands-free operation as it tracks your heart rate during your workouts. While the demo mode is turned on or turn off the demo mode, press the Speed decrease button. If the demo mode is selected...

English Manual
Page 21
... TREADMILL FOR USE 1. Hold a handrail and the frame and place one of direct sunlight. Pivot the frame downward and release the latch knob. 2. Bend your legs and keep your back straight as described above 85° F (30° C). 1 Frame 2 Latch Knob Frame HOW TO MOVE THE TREADMILL Before moving the treadmill. HOW TO FOLD AND MOVE THE TREADMILL HOW TO FOLD THE TREADMILL FOR STORAGE Before folding the treadmill, adjust the incline...
... TREADMILL FOR USE 1. Hold a handrail and the frame and place one of direct sunlight. Pivot the frame downward and release the latch knob. 2. Bend your legs and keep your back straight as described above 85° F (30° C). 1 Frame 2 Latch Knob Frame HOW TO MOVE THE TREADMILL Before moving the treadmill. HOW TO FOLD AND MOVE THE TREADMILL HOW TO FOLD THE TREADMILL FOR STORAGE Before folding the treadmill, adjust the incline...

English Manual
Page 22
... see THE INFORMATION MODE on page 12. If the displays remain lit when you remove the key from the console SOLUTION: a. PROBLEM: The displays of a second a person, carefully tip the Uprights (77, 78) down the Stop button for five minutes, and then plug it , wait for a few seconds. b. If the power cord is needed, please see the front cover of this manual. IMPORTANT: The treadmill is not compatible...
... see THE INFORMATION MODE on page 12. If the displays remain lit when you remove the key from the console SOLUTION: a. PROBLEM: The displays of a second a person, carefully tip the Uprights (77, 78) down the Stop button for five minutes, and then plug it , wait for a few seconds. b. If the power cord is needed, please see the front cover of this manual. IMPORTANT: The treadmill is not compatible...

English Manual
Page 23
... of this manual. 23 If the walking belt is aligned with the Reed Switch. Turn the Pulley until the walking belt is changing, remove the key. If the walking belt still slows when walked on the left side of the Incline buttons. Remove the three #8 x 3/4" Screws (11) and carefully pivot the Motor Hood (59) off the walking platform. Run the treadmill for a correct speed reading. The treadmill will recalibrate the incline system. the Reed Switch is properly tightened, you...
... of this manual. 23 If the walking belt is aligned with the Reed Switch. Turn the Pulley until the walking belt is changing, remove the key. If the walking belt still slows when walked on the left side of the Incline buttons. Remove the three #8 x 3/4" Screws (11) and carefully pivot the Motor Hood (59) off the walking platform. Run the treadmill for a correct speed reading. The treadmill will recalibrate the incline system. the Reed Switch is properly tightened, you...

English Manual
Page 25
... and deeply as a guide to five workouts each week, with pre-existing health problems. The pulse sensor is the heart rate for maximum fat burning, and the highest number is not a medical device. For detailed exercise information, obtain a reputable book or consult your exercise program. Remember, proper nutrition and adequate rest are rounded off to use your training zone. The three numbers listed above your age define...
... and deeply as a guide to five workouts each week, with pre-existing health problems. The pulse sensor is the heart rate for maximum fat burning, and the highest number is not a medical device. For detailed exercise information, obtain a reputable book or consult your exercise program. Remember, proper nutrition and adequate rest are rounded off to use your training zone. The three numbers listed above your age define...
English Manual
Page 26
... Roller Bracket Roller Ground Wire Right Rear Foot Hex Key Left Rear Foot Idler Roller Motor Hood Hood Accent Lift Frame Motor Belt Drive Motor Lift Frame Ground Wire Plastic Tie Controller Ground Wire Power Cord Power Cord Grommet Reset/Off Circuit Breaker Controller Reed Switch Reed Switch Clamp 15 1/2" Cable Tie Releasable Tie 8" Cable Tie Belly Pan Right Upright Left Upright Incline Motor Spacer Base Cap Left Upright Spacer Bolt Spacer Base Foot Spacer Base Wheel Base Foot Wire Harness Right Upright Spacer Drive Roller/Pulley Incline Motor Handrail Access Door Console Rear...
... Roller Bracket Roller Ground Wire Right Rear Foot Hex Key Left Rear Foot Idler Roller Motor Hood Hood Accent Lift Frame Motor Belt Drive Motor Lift Frame Ground Wire Plastic Tie Controller Ground Wire Power Cord Power Cord Grommet Reset/Off Circuit Breaker Controller Reed Switch Reed Switch Clamp 15 1/2" Cable Tie Releasable Tie 8" Cable Tie Belly Pan Right Upright Left Upright Incline Motor Spacer Base Cap Left Upright Spacer Bolt Spacer Base Foot Spacer Base Wheel Base Foot Wire Harness Right Upright Spacer Drive Roller/Pulley Incline Motor Handrail Access Door Console Rear...

English Manual
Page 27
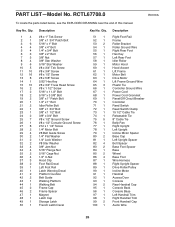
Description 101 1 102 1 103 1 104 1 105 1 Pulse Bar Top Tray Key/Clip Pulse Bar Bottom Console Ground Wire 106 3 107 1 108 2 109 1 Wire Tie Incline Wire Caution Decal Key Switch Note: Specifications are not illustrated. 27 Description Key No. Key No. Qty. Qty. For information about ordering replacement parts, see the back cover of this manual. *These parts are subject to change without notice.
Description 101 1 102 1 103 1 104 1 105 1 Pulse Bar Top Tray Key/Clip Pulse Bar Bottom Console Ground Wire 106 3 107 1 108 2 109 1 Wire Tie Incline Wire Caution Decal Key Switch Note: Specifications are not illustrated. 27 Description Key No. Key No. Qty. Qty. For information about ordering replacement parts, see the back cover of this manual. *These parts are subject to change without notice.
English Manual
Page 32
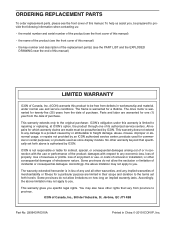
... manual) • the key number and description of the replacement part(s) (see the front cover of Canada, Inc., 900 de lʼIndustrie, St. Parts and labor are made must be free from the date of its authorized service centers. products used as store display models. All repairs for which warranty claims are warranted for a particular purpose are limited in workmanship and material, under this warranty is limited...
... manual) • the key number and description of the replacement part(s) (see the front cover of Canada, Inc., 900 de lʼIndustrie, St. Parts and labor are made must be free from the date of its authorized service centers. products used as store display models. All repairs for which warranty claims are warranted for a particular purpose are limited in workmanship and material, under this warranty is limited...


