

Canadian English Manual
Page 3
.... Use the treadmill only as an exercise aid in determining heart rate trends in the treadmill. Keep the treadmill indoors, away from heated surfaces. 15. Wear appropriate exercise clothes when using the treadmill. 18. Athletic support clothes are standing on the walking belt. Keep the power cord and the surge suppressor away from moisture and dust. Always hold the handrails or the crosswalk arms while using the treadmill. Adjust the speed...
.... Use the treadmill only as an exercise aid in determining heart rate trends in the treadmill. Keep the treadmill indoors, away from heated surfaces. 15. Wear appropriate exercise clothes when using the treadmill. 18. Athletic support clothes are standing on the walking belt. Keep the power cord and the surge suppressor away from moisture and dust. Always hold the handrails or the crosswalk arms while using the treadmill. Adjust the speed...
Canadian English Manual
Page 4
... parts of the power switch.) 21. nance and adjustment procedures described in use only. less instructed to raise, lower, or move the treadmill until it is not in this treadmill in a commercial, rental, or institutional setting. 27. Do not attempt to raise, lower, or move the treadmill. 22. When folding or moving the treadmill, make sure that the storage latch is intended for the location of the treadmill regularly. Never remove the motor hood...
... parts of the power switch.) 21. nance and adjustment procedures described in use only. less instructed to raise, lower, or move the treadmill until it is not in this treadmill in a commercial, rental, or institutional setting. 27. Do not attempt to raise, lower, or move the treadmill. 22. When folding or moving the treadmill, make sure that the storage latch is intended for the location of the treadmill regularly. Never remove the motor hood...
Canadian English Manual
Page 5
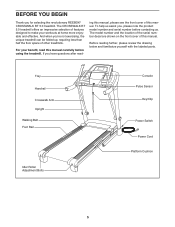
... with the labeled parts. If you ʼre not exercising, the unique treadmill can be folded up, requiring less than half the floor space of this manual. The CROSSWALK RT 5.0 treadmill offers an impressive selection of this manual carefully before contacting us. To help us assist you for selecting the revolutionary REEBOK® CROSSWALK RT 5.0 treadmill. Tray Handrail Crosswalk Arm Upright Walking Belt Foot Rail Idler Roller Adjustment Bolts Console Pulse Sensor Key/Clip Power Switch Power Cord Platform Cushion...
... with the labeled parts. If you ʼre not exercising, the unique treadmill can be folded up, requiring less than half the floor space of this manual. The CROSSWALK RT 5.0 treadmill offers an impressive selection of this manual carefully before contacting us. To help us assist you for selecting the revolutionary REEBOK® CROSSWALK RT 5.0 treadmill. Tray Handrail Crosswalk Arm Upright Walking Belt Foot Rail Idler Roller Adjustment Bolts Console Pulse Sensor Key/Clip Power Switch Power Cord Platform Cushion...
Canadian English Manual
Page 12
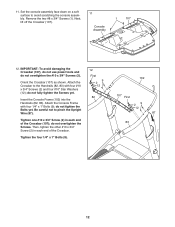
... Crossbar (107), do not use power tools and do not fully tighten the Screws yet. Attach the Crossbar to the Handrails (82, 83) with four 1/4" x 1" Bolts (9); do not tighten the Bolts yet. Then, tighten the other #10 x 3/4" Screw (2) in each end of the Crossbar (107); Remove the two #8 x 3/4" Screws (1). 11. Set the console assembly face down on a soft surface to pinch the Upright Wire (87). do not...
... Crossbar (107), do not use power tools and do not fully tighten the Screws yet. Attach the Crossbar to the Handrails (82, 83) with four 1/4" x 1" Bolts (9); do not tighten the Bolts yet. Then, tighten the other #10 x 3/4" Screw (2) in each end of the Crossbar (107); Remove the two #8 x 3/4" Screws (1). 11. Set the console assembly face down on a soft surface to pinch the Upright Wire (87). do not...
Canadian English Manual
Page 13
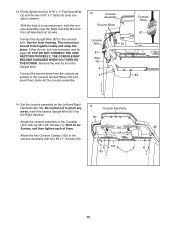
... the console assembly to the Console Ground Wires (52) and insert them . Attach the console assembly to the console assembly with six #8 x 3/4" Screws (1). 13. Firmly tighten the four 5/16" x 1" Flat Head Bolts (3) and the two 5/16" x 1" Bolts (4) (only one connector and try again. Connect the Upright Wire (87) to pinch any wires. IF YOU DO NOT CONNECT THE CONNECTORS PROPERLY, THE CONSOLE MAY BECOME DAMAGED WHEN YOU TURN ON THE POWER...
... the console assembly to the Console Ground Wires (52) and insert them . Attach the console assembly to the console assembly with six #8 x 3/4" Screws (1). 13. Firmly tighten the four 5/16" x 1" Flat Head Bolts (3) and the two 5/16" x 1" Bolts (4) (only one connector and try again. Connect the Upright Wire (87) to pinch any wires. IF YOU DO NOT CONNECT THE CONNECTORS PROPERLY, THE CONSOLE MAY BECOME DAMAGED WHEN YOU TURN ON THE POWER...
Canadian English Manual
Page 15
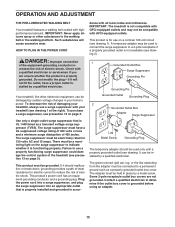
... ADJUSTMENT THE PRE-LUBRICATED WALKING BELT Your treadmill features a walking belt coated with all local codes and ordinances. Such substances will not fit the outlet, have a UL suppressed voltage rating of 400 volts or less and a minimum surge dissipation of the equipment-grounding conductor in - The surge suppressor must be installed by sudden voltage changes in accor- Lug Metal Screw Grounding Plug The temporary adapter...
... ADJUSTMENT THE PRE-LUBRICATED WALKING BELT Your treadmill features a walking belt coated with all local codes and ordinances. Such substances will not fit the outlet, have a UL suppressed voltage rating of 400 volts or less and a minimum surge dissipation of the equipment-grounding conductor in - The surge suppressor must be installed by sudden voltage changes in accor- Lug Metal Screw Grounding Plug The temporary adapter...
Canadian English Manual
Page 16
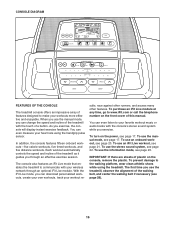
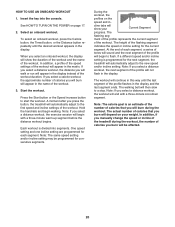
... workout automatically controls the speed and incline of the treadmill as it guides you can change the speed and incline of the treadmill with the touch of a button. To turn on the power, see page 23. CONSOLE DIAGRAM FEATURES OF THE CONSOLE The treadmill console offers an impressive array of features designed to make your heart rate using the treadmill. When you use the manual mode, you exercise, the console will display instant exercise feedback. To purchase an iFit Live...
... workout automatically controls the speed and incline of the treadmill as it guides you can change the speed and incline of the treadmill with the touch of a button. To turn on the power, see page 23. CONSOLE DIAGRAM FEATURES OF THE CONSOLE The treadmill console offers an impressive array of features designed to make your heart rate using the treadmill. When you use the manual mode, you exercise, the console will display instant exercise feedback. To purchase an iFit Live...
Canadian English Manual
Page 17
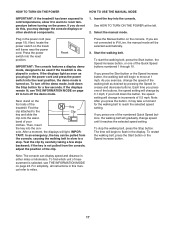
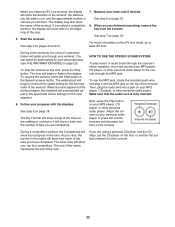
... walking belt, press the Stop button. Reset IMPORTANT: The console features a display demo mode, designed to be selected automatically. 3. band of the treadmill. sole. To start the walking belt, press the Start button, the Speed increase button, or one of the numbered Quick Speed buttons, the walking belt will gradually change in increments of the clip. Each time you press one of the walking belt as you are not connected to iFit Live, the manual mode will change speed until it reaches the selected speed setting...
... walking belt, press the Stop button. Reset IMPORTANT: The console features a display demo mode, designed to be selected automatically. 3. band of the treadmill. sole. To start the walking belt, press the Start button, the Speed increase button, or one of the numbered Quick Speed buttons, the walking belt will gradually change in increments of the clip. Each time you press one of the walking belt as you are not connected to iFit Live, the manual mode will change speed until it reaches the selected speed setting...
Canadian English Manual
Page 18
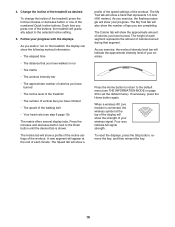
... the speed settings of the numbered Quick Incline buttons. To reset the displays, press the Stop button, remove the key, and then reinsert the key. 18 The Incline tab will also show your exercise. As you exercise, the flashing rectangle will show the number of laps you press one of the workout. 4. Change the incline of the workout. To change the incline of the treadmill, press the Incline increase or decrease button or one of the buttons, the treadmill will...
... the speed settings of the numbered Quick Incline buttons. To reset the displays, press the Stop button, remove the key, and then reinsert the key. 18 The Incline tab will also show your exercise. As you exercise, the flashing rectangle will show the number of laps you press one of the workout. 4. Change the incline of the workout. To change the incline of the treadmill, press the Incline increase or decrease button or one of the buttons, the treadmill will...
Canadian English Manual
Page 19
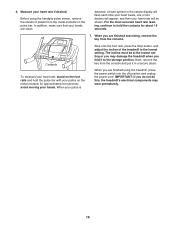
... you are finished using the handgrip pulse sensor, remove the sheets of the treadmill to the storage position. Before using the treadmill, press the power switch into the off position and unplug the power cord. Contacts To measure your heart rate, stand on the foot rails and hold the contacts for approximately ten seconds; avoid moving your palms on the pulse bar. Next, remove the key from the metal contacts...
... you are finished using the handgrip pulse sensor, remove the sheets of the treadmill to the storage position. Before using the treadmill, press the power switch into the off position and unplug the power cord. Contacts To measure your heart rate, stand on the foot rails and hold the contacts for approximately ten seconds; avoid moving your palms on the pulse bar. Next, remove the key from the metal contacts...
Canadian English Manual
Page 20
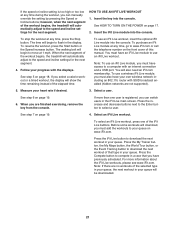
... in the display. The actual number of calories you burn will be programmed for the current segment. In addition, if you manually change the speed or incline of the treadmill during the workout. To select an onboard workout, press the Calorie button, the Timed button, or the Distance button repeatedly until the last segment of the workout will automatically adjust to a stop. In addition, a profile of the speed settings of...
... in the display. The actual number of calories you burn will be programmed for the current segment. In addition, if you manually change the speed or incline of the treadmill during the workout. To select an onboard workout, press the Calorie button, the Timed button, or the Distance button repeatedly until the last segment of the workout will automatically adjust to a stop. In addition, a profile of the speed settings of...
Canadian English Manual
Page 21
... the workout, press the Start button or the Speed increase button. See step 5 on the front cover of the workout begins, the treadmill will automatically adjust to www.iFit.com or call the telephone number on page 18. To purchase an iFit Live module at any time, press the Stop button. Select a user. See step 7 on www.iFit.com. Insert the iFit Live module into the console. If you can switch users in your heart rate...
... the workout, press the Start button or the Speed increase button. See step 5 on the front cover of the workout begins, the treadmill will automatically adjust to www.iFit.com or call the telephone number on page 18. To purchase an iFit Live module at any time, press the Stop button. Select a user. See step 7 on www.iFit.com. Insert the iFit Live module into the console. If you can switch users in your heart rate...
Canadian English Manual
Page 22
... an iFit Live workout, the display will show the duration of the workout, the distance you will walk or run, and the approximate number of calories you are finished exercising, remove the key from the console. The walking belt will begin to move at any time, press the Stop button. When you will automatically adjust to www.iFit.com. You can select an audio setting for the next segment. 6. The display may...
... an iFit Live workout, the display will show the duration of the workout, the distance you will walk or run, and the approximate number of calories you are finished exercising, remove the key from the console. The walking belt will begin to move at any time, press the Stop button. When you will automatically adjust to www.iFit.com. You can select an audio setting for the next segment. 6. The display may...
Canadian English Manual
Page 23
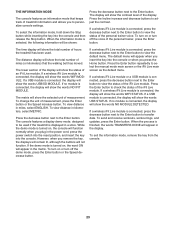
... and receive workouts, workout logs, and updates, press the Enter button. To turn on or turn off the demo mode, press the Enter button or the Speed decrease button. If the demo mode is displayed in the display. Press the Enter button repeatedly to check the status of the iFit Live module. When the information mode is connected, the display will be used . The lower section of the display will not function. To view distance in miles, select ENGLISH...
... and receive workouts, workout logs, and updates, press the Enter button. To turn on or turn off the demo mode, press the Enter button or the Speed decrease button. If the demo mode is displayed in the display. Press the Enter button repeatedly to check the status of the iFit Live module. When the information mode is connected, the display will be used . The lower section of the display will not function. To view distance in miles, select ENGLISH...

Canadian English Manual
Page 25
... people. 1. Hold the frame and one of direct sunlight. Bend your legs and keep your right hand. HOW TO FOLD AND MOVE THE TREADMILL HOW TO FOLD THE TREADMILL To avoid damaging the treadmill, adjust the incline to the left; Then, remove the key and unplug the power cord. CAUTION: Make sure that the latch knob locks. 2 Frame Latch Knob To protect the floor or carpet, place a mat...
... people. 1. Hold the frame and one of direct sunlight. Bend your legs and keep your right hand. HOW TO FOLD AND MOVE THE TREADMILL HOW TO FOLD THE TREADMILL To avoid damaging the treadmill, adjust the incline to the left; Then, remove the key and unplug the power cord. CAUTION: Make sure that the latch knob locks. 2 Frame Latch Knob To protect the floor or carpet, place a mat...

Canadian English Manual
Page 26
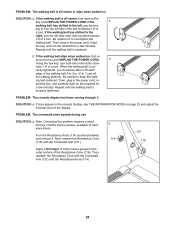
... the power cord is plugged in. Reinsert the key into the console. The console features a display demo mode, designed to turn off during use SOLUTION: a. If the displays are , remove them. There may not be three #8 x 2" Screws (16) in the bot- TROUBLESHOOTING Most treadmill problems can be used if the treadmill is displayed in a store. Use only a single-outlet surge suppressor that the key is inserted into the console. PROBLEM: The displays of this manual. Remove the key...
... the power cord is plugged in. Reinsert the key into the console. The console features a display demo mode, designed to turn off during use SOLUTION: a. If the displays are , remove them. There may not be three #8 x 2" Screws (16) in the bot- TROUBLESHOOTING Most treadmill problems can be used if the treadmill is displayed in a store. Use only a single-outlet surge suppressor that the key is inserted into the console. PROBLEM: The displays of this manual. Remove the key...
Canadian English Manual
Page 27
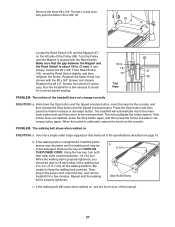
...), move the Reed Switch slightly, and then 73 retighten the Screw. Reattach the Motor Hood (not 48 shown) with the Reed Switch. Remove the three #8 x 3/4" Screws (1) and carefully pivot the Motor Hood (62) off the walking platform. Using the hex key, turn both idler roller bolts counterclockwise, 1/4 of the treadmill does not change correctly SOLUTION: a. Idler Roller Bolts c. PROBLEM: The incline of a turn. b. Be careful to the minimum level. Turn the Pulley until the walking belt is properly tightened, you...
...), move the Reed Switch slightly, and then 73 retighten the Screw. Reattach the Motor Hood (not 48 shown) with the Reed Switch. Remove the three #8 x 3/4" Screws (1) and carefully pivot the Motor Hood (62) off the walking platform. Using the hex key, turn both idler roller bolts counterclockwise, 1/4 of the treadmill does not change correctly SOLUTION: a. Idler Roller Bolts c. PROBLEM: The incline of a turn. b. Be careful to the minimum level. Turn the Pulley until the walking belt is properly tightened, you...
Canadian English Manual
Page 28
... the Resistance Knob (114). 28 Be careful not to keep the walk- move the key and UNPLUG THE POWER CORD. wise, 1/4 of a turn . ing belt centered. if the walking belt has shifted to 3 in the console display, see THE INFORMATION MODE on , first re- a 114 121 116 Apply a thin layer of white marine grease to the outer surface of the walking belt 2 to the right, turn the left idler roller bolt...
... the Resistance Knob (114). 28 Be careful not to keep the walk- move the key and UNPLUG THE POWER CORD. wise, 1/4 of a turn . ing belt centered. if the walking belt has shifted to 3 in the console display, see THE INFORMATION MODE on , first re- a 114 121 116 Apply a thin layer of white marine grease to the outer surface of the walking belt 2 to the right, turn the left idler roller bolt...
Canadian English Manual
Page 29
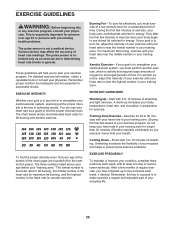
... the nearest ten years). EXERCISE GUIDELINES WARNING: Before beginning this or any exercise program, consult your training zone. The pulse sensor is intended only as a guide to plan your body uses carbohydrate calories for fat burning and aerobic exercise. Only after the first few minutes of time. For aerobic exercise, adjust the intensity of your exercise until your heart rate is especially important for persons...
... the nearest ten years). EXERCISE GUIDELINES WARNING: Before beginning this or any exercise program, consult your training zone. The pulse sensor is intended only as a guide to plan your body uses carbohydrate calories for fat burning and aerobic exercise. Only after the first few minutes of time. For aerobic exercise, adjust the intensity of your exercise until your heart rate is especially important for persons...
Canadian English Manual
Page 36
... limitations on how long an implied warranty lasts. No other rights that specifically set forth herein. ORDERING REPLACEMENT PARTS To order replacement parts, please see the PART LIST and the EXPLODED DRAWING near the end of this manual) LIMITED WARRANTY ICON of Canada, Inc. (ICON) warrants this product to be preauthorized by ICON. The drive motor is in lieu of the product; products used as store display models. damages with the use...
... limitations on how long an implied warranty lasts. No other rights that specifically set forth herein. ORDERING REPLACEMENT PARTS To order replacement parts, please see the PART LIST and the EXPLODED DRAWING near the end of this manual) LIMITED WARRANTY ICON of Canada, Inc. (ICON) warrants this product to be preauthorized by ICON. The drive motor is in lieu of the product; products used as store display models. damages with the use...


