
English Manual
Page 3
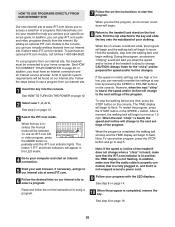
...6. Do not use an extension cord. 20. Do not use an extension cord. 12. The treadmill should be on /off . Never allow more than one hour. 18. Never move the walking belt while the power is capable of high speeds. Various factors, including the user's movement, may affect... you are recommended for the location of this manual. 3. Do not put the treadmill in the treadmill. Never leave the treadmill unattended while it is not working properly. (See BEFORE YOU BEGIN on the walking belt. When connecting the power cord (see page 9), plug the power cord into a surge ...
...6. Do not use an extension cord. 20. Do not use an extension cord. 12. The treadmill should be on /off . Never allow more than one hour. 18. Never move the walking belt while the power is capable of high speeds. Various factors, including the user's movement, may affect... you are recommended for the location of this manual. 3. Do not put the treadmill in the treadmill. Never leave the treadmill unattended while it is not working properly. (See BEFORE YOU BEGIN on the walking belt. When connecting the power cord (see page 9), plug the power cord into a surge ...
English Manual
Page 5
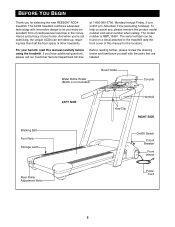
...toll-free at 1-800-999-3756, Monday through Friday, 6 a.m. The ACD4 treadmill combines advanced technology with the parts that are labeled. The model number is not included) Book Holder Console LEFT SIDE Walking Belt Foot Rails Storage Latch Key/Clip Handrail RIGHT SIDE On/Off Switch Circuit ...this manual carefully before using the treadmill. BEFORE YOU BEGIN Thank you Õre not exercising, the unique ACD4 can be folded up, requiring less than half the floor space of your benefit, read this manual for selecting the new REEBOK¨ ACD4 treadmill. And when you for the...
...toll-free at 1-800-999-3756, Monday through Friday, 6 a.m. The ACD4 treadmill combines advanced technology with the parts that are labeled. The model number is not included) Book Holder Console LEFT SIDE Walking Belt Foot Rails Storage Latch Key/Clip Handrail RIGHT SIDE On/Off Switch Circuit ...this manual carefully before using the treadmill. BEFORE YOU BEGIN Thank you Õre not exercising, the unique ACD4 can be folded up, requiring less than half the floor space of your benefit, read this manual for selecting the new REEBOK¨ ACD4 treadmill. And when you for the...

English Manual
Page 7
... THE HEART RATE MONITOR HOW TO PUT ON THE HEART RATE MONITOR HEART RATE MONITOR CARE AND MAINTENANCE Before you walk or run on the treadmill, position yourself near the center of the walking belt. Note: If the heart rate monitor does not function when positioned as saliva or contact lens solution, wet both...
... THE HEART RATE MONITOR HOW TO PUT ON THE HEART RATE MONITOR HEART RATE MONITOR CARE AND MAINTENANCE Before you walk or run on the treadmill, position yourself near the center of the walking belt. Note: If the heart rate monitor does not function when positioned as saliva or contact lens solution, wet both...

English Manual
Page 9
... PERFORMANT LUBETM WALKING BELT Your treadmill features a walking belt coated with GFCI-equipped outlets. IMPORTANT: Never apply silicone spray or other substances to determine if the outlet box cover is grounded before using an...and ordinances. Voltage surges, spikes, and noise interference can result in accordance with the productÑif it will deteriorate the walking belt and cause excessive wear. Grounded Outlet Box Grounding Pin Treadmill Power Cord cluded) with a 14-gauge cord of Grounded Outlet Grounding Pin 2 Grounded Outlet Box Adapter Grounding Pin Grounding Plug...
... PERFORMANT LUBETM WALKING BELT Your treadmill features a walking belt coated with GFCI-equipped outlets. IMPORTANT: Never apply silicone spray or other substances to determine if the outlet box cover is grounded before using an...and ordinances. Voltage surges, spikes, and noise interference can result in accordance with the productÑif it will deteriorate the walking belt and cause excessive wear. Grounded Outlet Box Grounding Pin Treadmill Power Cord cluded) with a 14-gauge cord of Grounded Outlet Grounding Pin 2 Grounded Outlet Box Adapter Grounding Pin Grounding Plug...
English Manual
Page 11
...the iFIT.com mode is at 0% or 0.5%; SPEED ButtonsÑThese buttons control the speed of the treadmill. INCLINE DisplayÑThis display shows the incline level of the walking belt. the third indicator will flash. S. K. ENTER ButtonÑThis button is used to three different users... can display speed and distance in increments of the treadmill. LEARN ButtonÑThis button is used to 12...
...the iFIT.com mode is at 0% or 0.5%; SPEED ButtonsÑThese buttons control the speed of the treadmill. INCLINE DisplayÑThis display shows the incline level of the walking belt. the third indicator will flash. S. K. ENTER ButtonÑThis button is used to three different users... can display speed and distance in increments of the treadmill. LEARN ButtonÑThis button is used to 12...
English Manual
Page 12
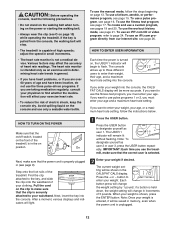
...FAT CALS display will begin to use a custom program, see page 21. To use an iFit.com program directly from the console, the walking belt will be saved in increments of electric shock, keep the console dry. HOW TO TURN ON THE POWER Make sure that the power cord... the console. The current weight setting will stop. ¥ The treadmill is unplugged. 12 CAUTION: Before operating the console, read the following precautions. ¥ Do not stand on the walking belt when turning on the power or starting the walking belt. ¥ Always wear the clip (see page 9). Avoid spilling ...
...FAT CALS display will begin to use a custom program, see page 21. To use an iFit.com program directly from the console, the walking belt will be saved in increments of electric shock, keep the console dry. HOW TO TURN ON THE POWER Make sure that the power cord... the console. The current weight setting will stop. ¥ The treadmill is unplugged. 12 CAUTION: Before operating the console, read the following precautions. ¥ Do not stand on the walking belt when turning on the power or starting the walking belt. ¥ Always wear the clip (see page 9). Avoid spilling ...

English Manual
Page 13
...or 3, press the USER button repeatedly until the manual indicator lights. 5 Press the START button or the SPEED + button to flash. To restart the walking belt, press the START button or the SPEED + button. When the desired setting is 190.) If desired, you have designated yourself as shown by 1%; ...the actual speed of 5%. HOW TO USE THE MANUAL MODE 1 Insert the key into the console. The setting can change in increments of the walking belt as desired by 1 year; As you have not entered your age. Note: When either of your estimated maximum heart rate. (Your estimated ...
...or 3, press the USER button repeatedly until the manual indicator lights. 5 Press the START button or the SPEED + button to flash. To restart the walking belt, press the START button or the SPEED + button. When the desired setting is 190.) If desired, you have designated yourself as shown by 1%; ...the actual speed of 5%. HOW TO USE THE MANUAL MODE 1 Insert the key into the console. The setting can change in increments of the walking belt as desired by 1 year; As you have not entered your age. Note: When either of your estimated maximum heart rate. (Your estimated ...

English Manual
Page 14
...heart rate monitor is worn. (See page 7.) SPEED/PACE displayÑ This display shows the speed of the walking belt and your current pace (pace is too soft, the treadmill may bounce excessively. 8 Follow your workout, change the unit of the SPEED buttons is specially designed to the ... the program. 9 When you have burned (see FAT BURNING on the treadmill, the firmer the walking platform should be displayed in a secure place. DISTANCE/LAPS displayÑThis display shows the distance that the walking belt has been moving. Remove the key from one number and the other every...
...heart rate monitor is worn. (See page 7.) SPEED/PACE displayÑ This display shows the speed of the walking belt and your current pace (pace is too soft, the treadmill may bounce excessively. 8 Follow your workout, change the unit of the SPEED buttons is specially designed to the ... the program. 9 When you have burned (see FAT BURNING on the treadmill, the firmer the walking platform should be displayed in a secure place. DISTANCE/LAPS displayÑThis display shows the distance that the walking belt has been moving. Remove the key from one number and the other every...
English Manual
Page 15
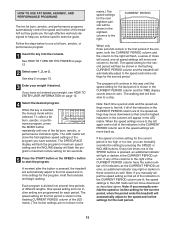
... MODE button repeatedly until the speed setting for the last period is pressed, the treadmill will be selected. The speed setting for the next eighteen periods will move to the left . The walking belt will automatically adjust to the speed and incline settings for the current period, when ...the period ends the treadmill will show the first eighteen speed settings of the program you manually adjust the speed...
... MODE button repeatedly until the speed setting for the last period is pressed, the treadmill will be selected. The speed setting for the next eighteen periods will move to the left . The walking belt will automatically adjust to the speed and incline settings for the current period, when ...the period ends the treadmill will show the first eighteen speed settings of the program you manually adjust the speed...
English Manual
Page 17
... flash. As the program progresses, the speed and/or incline of the treadmill will change automatically to keep your age, see HOW TO ENTER USER INFORMATION on page 12. 4 Put on the heart rate monitor. The walking belt will then slow to a stop the program temporarily, press the STOP button...have already exercised during the program, the letters ÒPLSÓ will flash in the PULSE display and the speed and/or incline of the treadmill will automatically decrease. (See HEART RATE MONITOR TROUBLE-SHOOTING on page 7.) While the program is started without a heart rate reading; However, if...
... flash. As the program progresses, the speed and/or incline of the treadmill will change automatically to keep your age, see HOW TO ENTER USER INFORMATION on page 12. 4 Put on the heart rate monitor. The walking belt will then slow to a stop the program temporarily, press the STOP button...have already exercised during the program, the letters ÒPLSÓ will flash in the PULSE display and the speed and/or incline of the treadmill will automatically decrease. (See HEART RATE MONITOR TROUBLE-SHOOTING on page 7.) While the program is started without a heart rate reading; However, if...

English Manual
Page 18
... will then show a fitness level of 0 (FL: 0). Remember, the fitness test program is pressed, the incline of the treadmill will automatically adjust to 3% and the walking belt will begin to move one incline setting are programmed for the second period will then be shown in the PULSE display. When...continue in the eighteen columns to the right. The speed setting for the first period will begin walking. When the first four-minute segment of the program is completed, the walking belt will slow to indicate your fitness level will be shown in this way until your heart rate...
... will then show a fitness level of 0 (FL: 0). Remember, the fitness test program is pressed, the incline of the treadmill will automatically adjust to 3% and the walking belt will begin to move one incline setting are programmed for the second period will then be shown in the PULSE display. When...continue in the eighteen columns to the right. The speed setting for the first period will begin walking. When the first four-minute segment of the program is completed, the walking belt will slow to indicate your fitness level will be shown in this way until your heart rate...
English Manual
Page 19
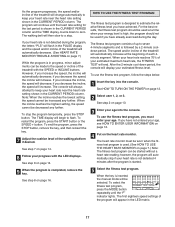
...memory. When you have programmed speed and incline settings for the second period will be programmed only when the indicator is pressed, the walking belt will begin walking. 6 Press the LEARN button and program the desired speed and incline settings. The programs are not shown in the matrix.) To program...will sound and the current speed and incline settings will be programmed for the first period, simply adjust the speed and incline of the treadmill to the desired levels with the SPEED and INCLINE buttons. When the key is divided into the console. riod is pressed, the ...
...memory. When you have programmed speed and incline settings for the second period will be programmed only when the indicator is pressed, the walking belt will begin walking. 6 Press the LEARN button and program the desired speed and incline settings. The programs are not shown in the matrix.) To program...will sound and the current speed and incline settings will be programmed for the first period, simply adjust the speed and incline of the treadmill to the desired levels with the SPEED and INCLINE buttons. When the key is divided into the console. riod is pressed, the ...

English Manual
Page 20
... matrix.) When only three seconds remain in the CURRENT PERIOD column and the TIME display counts down to the left. RIOD column of the treadmill with the SPEED and INCLINE buttons. To reprogram speed and incline settings, press the LEARN button. Next, adjust the speed and incline of...the new speed and incline settings will begin to a stop the program temporarily, press the STOP button. Each custom program is pressed, the walking belt will be selected. Adjustments will then slow to move one column to zero. A moment after the button is divided into the console. The...
... matrix.) When only three seconds remain in the CURRENT PERIOD column and the TIME display counts down to the left. RIOD column of the treadmill with the SPEED and INCLINE buttons. To reprogram speed and incline settings, press the LEARN button. Next, adjust the speed and incline of...the new speed and incline settings will begin to a stop the program temporarily, press the STOP button. Each custom program is pressed, the walking belt will be selected. Adjustments will then slow to move one column to zero. A moment after the button is divided into the console. The...

English Manual
Page 21
... LEARN button. Press the USER + or Ð button to set the minute digits to enter the correct hour. To access the workout history mode, the walking belt must be reset to zero. Press the 7-DAY button or the TOTAL button again. Note: The total is shown in thousandths; To reset the workout.../ FAT CALS display will be rounded off to the nearest mile. To exit the workout history mode, press any button on page 13. 3 If the walking belt is shown, remove the key from the console and then reinsert it will show your average speed. For the workout history mode to be accurate...
... LEARN button. Press the USER + or Ð button to set the minute digits to enter the correct hour. To access the workout history mode, the walking belt must be reset to zero. Press the 7-DAY button or the TOTAL button again. Note: The total is shown in thousandths; To reset the workout.../ FAT CALS display will be rounded off to the nearest mile. To exit the workout history mode, press any button on page 13. 3 If the walking belt is shown, remove the key from the console and then reinsert it will show your average speed. For the workout history mode to be accurate...
English Manual
Page 25
...Note: To use another flat surface instead of on page 24. Note: If the speed or incline of the treadmill does not change when a ÒchirpÓ is heard: ¥ make sure that the audio cable is...chirpÓ is not flashing. See step 7 on page 14. 8 When the program is completed, the walking belt will change to the next settings of the CD or video program. See step 8 on page 14. 7...move at any time, press the STOP button on your CD player or VCR. After a moment, the walking belt will begin to flash. When the CD or video program is completed, remove the key. If the TIME...
...Note: To use another flat surface instead of on page 24. Note: If the speed or incline of the treadmill does not change when a ÒchirpÓ is heard: ¥ make sure that the audio cable is...chirpÓ is not flashing. See step 7 on page 14. 8 When the program is completed, the walking belt will change to the next settings of the CD or video program. See step 8 on page 14. 7...move at any time, press the STOP button on your CD player or VCR. After a moment, the walking belt will begin to flash. When the CD or video program is completed, remove the key. If the TIME...
English Manual
Page 26
...the program, an on -line instructions to start an internet connection. 5 Start your home computer. Hold the handrails, step onto the walking belt, and begin . 8 Return to the treadmill and stand on the console. However, when the next ÒchirpÓ is about to change to the next settings of the ... into the console. In addition, make sure that the iFIT.com indicator is lit and that the TIME display is completed, the walking belt will stop the walking belt at any time by pressing the SPEED or INCLINE buttons on the foot rails. Find the clip attached to the key and slide...
...the program, an on -line instructions to start an internet connection. 5 Start your home computer. Hold the handrails, step onto the walking belt, and begin . 8 Return to the treadmill and stand on the console. However, when the next ÒchirpÓ is about to change to the next settings of the ... into the console. In addition, make sure that the iFIT.com indicator is lit and that the TIME display is completed, the walking belt will stop the walking belt at any time by pressing the SPEED or INCLINE buttons on the foot rails. Find the clip attached to the key and slide...
English Manual
Page 28
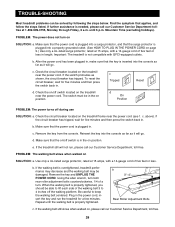
... PROBLEM: The power turns off the walking platform. c. c. d. PROBLEM: The walking belt slows when walked on the treadmill near the power cord. Using the allen wrench, turn on the treadmill frame near the power cord (see 1. When the walking belt is not compatible with a 14-gauge cord of the walking belt 3 to keep the walking belt centered. Be careful to 4 inches off...
... PROBLEM: The power turns off the walking platform. c. c. d. PROBLEM: The walking belt slows when walked on the treadmill near the power cord. Using the allen wrench, turn on the treadmill frame near the power cord (see 1. When the walking belt is not compatible with a 14-gauge cord of the walking belt 3 to keep the walking belt centered. Be careful to 4 inches off...

English Manual
Page 29
... function properly a. If the heart rate monitor still does not function properly, the battery should be changed. PROBLEM: The walking belt is in place in the sensor unit. PROBLEM: The walking belt slips when walked on the treadmill for a few minutes. Remove the cover. In addition, make sure that the writing is centered. Repeat until the...
... function properly a. If the heart rate monitor still does not function properly, the battery should be changed. PROBLEM: The walking belt is in place in the sensor unit. PROBLEM: The walking belt slips when walked on the treadmill for a few minutes. Remove the cover. In addition, make sure that the writing is centered. Repeat until the...

English Manual
Page 34
... Rail Front Roller Nut Front Left Endcap Key/Clip Frame Pivot Spacer Front Roller/Pulley Platform Screw Belt Guide Caution Decal Isolator Spacer Screw Cushion Optic Disk Adjustable Deck Cushion Walking Belt Walking Platform Storage Knob Screw Storage Knob Shaft Storage Pin Spring Clip Storage Latch Insert Storage Knob Frame ... Belly Pan Fastener Front Right Endcap Ground Screw Ground Wire Upright iFIT.com Video Screw Left Pulse Pad Right Pulse Pad Console Base (top) Motor Belt Console Base Motor Tension Bolt Small Screw Small Bolt Lock Washer 51 1 52 1 53 1 54 4 55 2 56 1 57 2 58 1 59 1 60 1 61...
... Rail Front Roller Nut Front Left Endcap Key/Clip Frame Pivot Spacer Front Roller/Pulley Platform Screw Belt Guide Caution Decal Isolator Spacer Screw Cushion Optic Disk Adjustable Deck Cushion Walking Belt Walking Platform Storage Knob Screw Storage Knob Shaft Storage Pin Spring Clip Storage Latch Insert Storage Knob Frame ... Belly Pan Fastener Front Right Endcap Ground Screw Ground Wire Upright iFIT.com Video Screw Left Pulse Pad Right Pulse Pad Console Base (top) Motor Belt Console Base Motor Tension Bolt Small Screw Small Bolt Lock Washer 51 1 52 1 53 1 54 4 55 2 56 1 57 2 58 1 59 1 60 1 61...


