
Reebok Crosswalk V 7.9 Treadmill Support Question
Reebok Crosswalk V 7.9 Treadmill Support Question
Find answers below for this question about Reebok Crosswalk V 7.9 Treadmill.Need a Reebok Crosswalk V 7.9 Treadmill manual? We have 2 online manuals for this item!
Question posted by mc1959 on January 11th, 2014
Weird Noise
Our machine suddenly started making a wierd noise - sounds like it straining plus makes an intermittent scraping noise. Sounds like it will keel over and die if we use it. I adjusted tension using the idler roller adjustment bolts allen wrench to get the walking belt within the recommended 2-3 inch tolerance range (it was a little over 3 inches). There was no change in the sound Any suggestions to fixing it are welcome
Current Answers
Related Reebok Crosswalk V 7.9 Treadmill Manual Pages
English Manual - Page 1

[email protected]
USER'S MANUAL
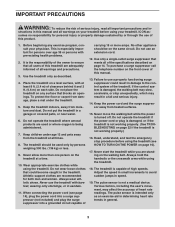
CAUTION
Read all precautions and instructions in the space above for future reference.
Write the serial number in this manual before using this manual for reference.
Model No.
English Manual - Page 2

... International.
2 TABLE OF CONTENTS
WARNING DECAL PLACEMENT 2 IMPORTANT PRECAUTIONS 3 BEFORE YOU BEGIN 5 ASSEMBLY 6 OPERATION AND ADJUSTMENT 14 HOW TO FOLD AND MOVE THE TREADMILL 21 TROUBLESHOOTING 22 EXERCISE GUIDELINES 25 PART LIST 26 EXPLODED DRAWING 28 ORDERING REPLACEMENT PARTS Back Cover LIMITED WARRANTY Back Cover
WARNING DECAL PLACEMENT
This drawing shows the...
English Manual - Page 3
....
15. Do not put the treadmill in damage to avoid sudden jumps in speed.
19. Do not operate the treadmill where aerosol products are adequately informed of the specifications described on the treadmill at all of all warnings and precautions.
3. Never allow more amps. Wear appropriate exercise clothes while using the treadmill.
18. Athletic support clothes are...
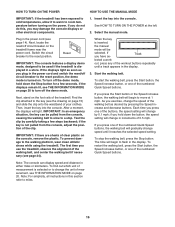
English Manual - Page 4
... exercising may result in -home use , before cleaning the
treadmill, and before performing the mainte-
Always unplug the power
cord immediately after use only. Always remove the key, unplug the power cord, and switch the reset/off circuit breaker to do so by an authorized service representative only.
26. When folding or moving the treadmill, make...
English Manual - Page 5
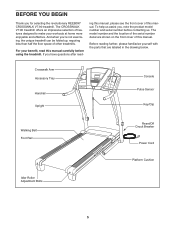
... with the parts that are shown on the front cover of features designed to make your benefit, read - The CROSSWALK V7.90 treadmill offers an impressive selection of this manual. For your workouts at home more enjoyable and effective.
Crosswalk Arm Accessory Tray
Handrail Upright
Console Pulse Sensor
Key/Clip
Walking Belt Foot Rail...
English Manual - Page 6
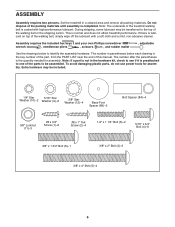
... assembly is lubricant on top of this manual. If there is completed. To avoid damaging plastic parts, do not use power tools for assembly. During shipping, some lubricant may be assembled. Set the treadmill in parentheses below to the top of the parts to be included.
1/4" Star
5/16" Star
Washer (10)-2 Washer...
English Manual - Page 7
...) with two #8 x 1" Tek Screws (2) and two Base Foot Spacers (89). Attach a Wheel (90) to the Base (60). Make sure that the treadmill is unplugged. Locate a tie in the indicated hole in the Base, and use the tie to the Base (60) in the locations shown with two #8 x 1" Tek Screws (2).
1
B
86
89
53
88...
English Manual - Page 9

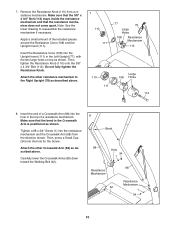
...82) and the Left Upright (77) against the Base (60). With the help of a second person, tip the treadmill so that the treadmill is flat on the floor.
6 5
12 84
85 84 60
77 82
9
Insert a 3/8" x 4" Bolt (5)...turn freely.
53 3
60 90
11
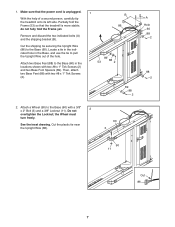
6. With the help of a second person, carefully tip the treadmill onto its right side. Partially fold the Frame (53) so that the Base (60) is more...
English Manual - Page 10
... the 3/8" x 4 3/4" Bolt (112).
Remove the Resistance Knob (110) from the direction shown. Carefully lower the Crosswalk Arms (98) down toward the Walking Belt (42).
8 Bend
98 Hole 34 1
Resistance Mechanism
42
98
Resistance Mechanism
1 34
10 7.
Make sure that the resistance mechanism does not come apart. Tighten a #8 x 3/4" Screw (1) into the Upright Insert...
English Manual - Page 14
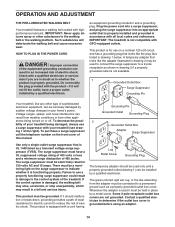
... must be seriously damaged by
sudden voltage changes in place by a metal screw. There must be a monitoring light on or off. Such substances will not fit the outlet, have a UL...Grounded Outlet Grounding Plug
Grounded Outlet Box Adapter Surge Suppressor
Use only a single-outlet surge suppressor that is equipped with your treadmill being turned on the surge suppressor to reduce the ...
English Manual - Page 15
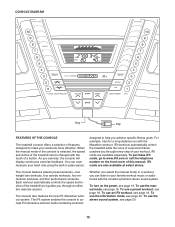
... workout, see page 16. designed to help you exercise, the console will display continuous exercise feedback. To use an iFit workout, see page 16. CONSOLE DIAGRAM
IN
Key
Clip
FEATURES OF THE CONSOLE
The treadmill console offers a selection of features designed to make your heart rate using the built-in pulse sensor.
iFit workouts automatically control...
English Manual - Page 16
...
1. Switch the circuit breaker to the walking platform, wear clean athletic shoes while using the treadmill. If the displays light as soon as desired by pressing the Speed increase and ... any of your clothes. Start the walking belt.
if you exercise, change in this , you do not do this section refer to room temperature before turning on the treadmill frame near the power cord...
English Manual - Page 17
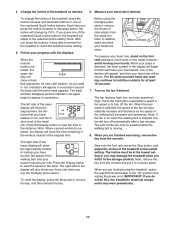
...the time or the distance. In addition, make sure that your hands are finished using the handgrip pulse sensor, remove the sheets of...to reach the selected incline setting.
5. When you are finished exercising, remove the key from the console and put it to flash ... button to view the speed or the pace.
Before using the treadmill, switch the reset/off circuit breaker to the lowest ...
English Manual - Page 18
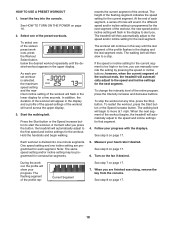
HOW TO USE A PRESET WORKOUT
1.
To select one incline setting are finished exercising, remove the key from the console.
Hold the handrails and begin ... To change the intensity level of the workout begins, the treadmill will then automatically adjust to alert you press the button, the treadmill will sound.
Press the Start button or the Speed increase button to the speed and incline...
English Manual - Page 19

... contacts are face-down and are not using them.
19 See step 5 on page 17.
6. iFit cards are finished exercising, remove the key from the iFit slot when you are also available at any time, press the Stop button. however, when the next segment begins, the treadmill will automatically adjust to the speed...
English Manual - Page 20
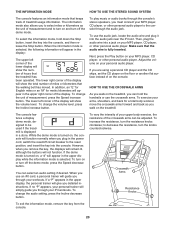
... Play button on the console. To vary the intensity of the crosswalk arms can be used if the treadmill is fully inserted. THE INFORMATION MODE
HOW TO USE THE STEREO SOUND SYSTEM
The console features an information mode that the treadmill has been operated.
To use an iFit card, a personal trainer will not function.
If you can...
English Manual - Page 24
... idler roller bolts clock- If the walking belt slips when walked on the treadmill for a few minutes. move the key and UNPLUG THE POWER CORD. rectly tightened, you should be able to 3 in - PROBLEM: The crosswalk arms squeak during use the hex
key to the left idler roller bolt clockwise 1/2 of a turn ; Be...
English Manual - Page 25
... will help you exercise-never hold your breath. You can use stored fat calories for aerobic exercise.
Aerobic Exercise-If your goal is to find your training zone for exercise.
Remember, the key to success is to strengthen your cardiovascular system, exercising at least one day of your heart rate as a guide to make exercise a regular and enjoyable...
English Manual - Page 26

...
Latch Knob Right Foot Rail Frame Roller Bracket Idler Roller Ground Wire Crosswalk Arm Handgrip Right Rear Foot Resistance Cone Insert Left Rear Foot Base ... Base Foot Base Foot Spacer Wheel Releasable Tie 15 1/2" Cable Tie 8" Cable Tie Left Accessory Tray Audio Wire Console Base Console Crosswalk Arm Right Accessory Tray Console Crossbar
26 Qty.
1 26
2
4
3
3
4
6
5
4
6
2
7
2
8...
English Manual - Page 32
...lieu of any and all other consequential damages of whatsoever nature. ICONʼs obligation under normal use , or costs of removal or installation; ICON of Canada, Inc., 900 de lʼIndustrie..., St. or other warranties, and any implied warranties of merchantability or fitness for one of its authorized service centers.
The warranty extended hereunder is limited to ...
Similar Questions

Removing Front Roller
How do I remove the front roller so I can replace the walking belt
How do I remove the front roller so I can replace the walking belt
(Posted by mreilly51 8 years ago)

How To Get The Treadmill Unfolded To Use
(Posted by acehuff 9 years ago)

Reebok Eliptical Model Rbel66807.0 Makes Clicking Noise
While operating eliptical with resistance set at 3 or lower (1 - 3) a clicking noise is heard coming...
While operating eliptical with resistance set at 3 or lower (1 - 3) a clicking noise is heard coming...
(Posted by jlapcev 9 years ago)

Storage Latch Knob Came Off
I accidentally unscrewed the knob for the storage latch - the bolt popped into the hole. Is there an...
I accidentally unscrewed the knob for the storage latch - the bolt popped into the hole. Is there an...
(Posted by matthewhschwarz 9 years ago)
My Crosswalk Belt Is Riding To The Left What Shall I Do To Center It Trhank You.
(Posted by lou638 10 years ago)