
English Manual
Page 5
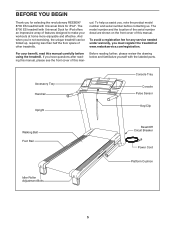
..., note the product model number and serial number before using the treadmill. Before reading further, please review the drawing below and familiarize yourself with Universal Dock for iPod®. Accessory Tray Handrail Upright Console Tray Console Pulse Sensor Key/Clip Walking Belt Foot Rail Idler Roller Adjustment Bolts... manual carefully before contacting us. If you have questions after reading this manual, please see the front cover of other treadmills. BEFORE YOU BEGIN Thank you for selecting the revolutionary REEBOK® 8700 ES treadmill with the labeled parts.
..., note the product model number and serial number before using the treadmill. Before reading further, please review the drawing below and familiarize yourself with Universal Dock for iPod®. Accessory Tray Handrail Upright Console Tray Console Pulse Sensor Key/Clip Walking Belt Foot Rail Idler Roller Adjustment Bolts... manual carefully before contacting us. If you have questions after reading this manual, please see the front cover of other treadmills. BEFORE YOU BEGIN Thank you for selecting the revolutionary REEBOK® 8700 ES treadmill with the labeled parts.
English Manual
Page 9
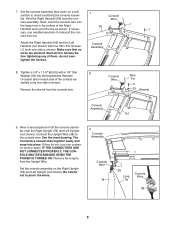
...Handrail Crossbar (94) on each side of the console as shown. Set the console assembly on a soft surface to pinch the wires. 9 Console Assembly Console Wire 78 38 Long Tie Console Wire 38 9 Next, insert the console wire into the large hole in the bottom of... Star 8 Washer (33) into place. Make sure that no wires are pinched. Console Assembly 8. Tighten a 1/4" x 1 1/4" Bolt (5) with four #8 x 3/4" Screws (1) (only one side is shown). Console Wire Wire Tie 5 33 Bracket Console Assembly 94 9. See the inset drawing. If they do not overtighten the Screws. Be...
...Handrail Crossbar (94) on each side of the console as shown. Set the console assembly on a soft surface to pinch the wires. 9 Console Assembly Console Wire 78 38 Long Tie Console Wire 38 9 Next, insert the console wire into the large hole in the bottom of... Star 8 Washer (33) into place. Make sure that no wires are pinched. Console Assembly 8. Tighten a 1/4" x 1 1/4" Bolt (5) with four #8 x 3/4" Screws (1) (only one side is shown). Console Wire Wire Tie 5 33 Bracket Console Assembly 94 9. See the inset drawing. If they do not overtighten the Screws. Be...
English Manual
Page 10
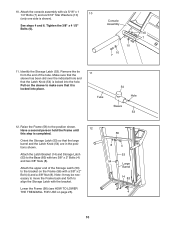
... Knob (54) is locked into the hole. Note: It may be necessary to move the Frame back and forth to the position shown. Attach the console assembly with two 3/8" x 2" Bolts (4) and two 3/8" Nuts (8). Raise the Frame (56) to align the Storage Latch with a 3/8" x 2" Bolt (4) and a 3/8" Nut (8). Tighten the 3/8" x 4 1/2" ... Hole Sleeve 53 12. Have a second person hold the Frame until 12 this step is shown). Lower the Frame (56) (see HOW TO LOWER THE TREADMILL FOR USE on the sleeve to the Base (83) with six 5/16" x 1 1/4" Bolts (7) and six 5/16" Star Washers (10) 10 (only ...
... Knob (54) is locked into the hole. Note: It may be necessary to move the Frame back and forth to the position shown. Attach the console assembly with two 3/8" x 2" Bolts (4) and two 3/8" Nuts (8). Raise the Frame (56) to align the Storage Latch with a 3/8" x 2" Bolt (4) and a 3/8" Nut (8). Tighten the 3/8" x 4 1/2" ... Hole Sleeve 53 12. Have a second person hold the Frame until 12 this step is shown). Lower the Frame (56) (see HOW TO LOWER THE TREADMILL FOR USE on the sleeve to the Base (83) with six 5/16" x 1 1/4" Bolts (7) and six 5/16" Star Washers (10) 10 (only ...
English Manual
Page 11
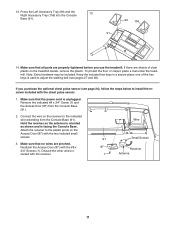
...the power cord is facing the Console Base. Hold the receiver so the antenna is oriented as shown and is unplugged. Wire 91 Small Screws 87 Receiver 1 Antenna 11 To protect the floor or carpet, place a mat under the treadmill. If you use the treadmill. Remove the indicated #8 x ...3/4" Screw (1) and the Access Door (87) from the Console Base (91). Discard the other wires included with the chest pulse sensor. 1. If there ...
...the power cord is facing the Console Base. Hold the receiver so the antenna is oriented as shown and is unplugged. Wire 91 Small Screws 87 Receiver 1 Antenna 11 To protect the floor or carpet, place a mat under the treadmill. If you use the treadmill. Remove the indicated #8 x ...3/4" Screw (1) and the Access Door (87) from the Console Base (91). Discard the other wires included with the chest pulse sensor. 1. If there ...
English Manual
Page 13
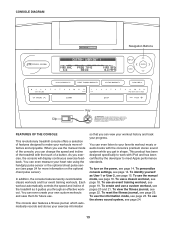
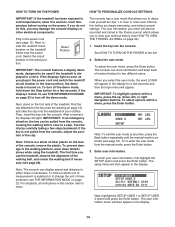
...To identify yourself as it guides you get in shape. To use the manual mode of the console, you can change the speed and incline of the treadmill with the consoleʼs premium stereo sound system while you through an effective workout. To view the fitness journal, ...see page 18. CONSOLE DIAGRAM Navigation Buttons Key Clip FEATURES OF THE CONSOLE This revolutionary treadmill console offers a selection of features designed to make your workouts more information on the power, see page 16....
...To identify yourself as it guides you get in shape. To use the manual mode of the console, you can change the speed and incline of the treadmill with the consoleʼs premium stereo sound system while you through an effective workout. To view the fitness journal, ...see page 18. CONSOLE DIAGRAM Navigation Buttons Key Clip FEATURES OF THE CONSOLE This revolutionary treadmill console offers a selection of features designed to make your workouts more information on the power, see page 16....
English Manual
Page 14
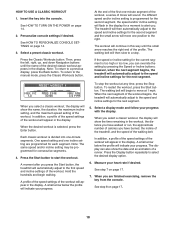
... will then appear in the power cord and switch the reset/off the demo mode. Reset Position IMPORTANT: The console features a display demo mode, designed to be used if the treadmill is selected or to change the unit of the clip. To prevent damage to the reset position. Insert the ... history for a few steps backward; To re-enter the user mode from the console, causing the walking belt to slow to a stop. HOW TO TURN ON THE POWER HOW TO PERSONALIZE CONSOLE SETTINGS IMPORTANT: If the treadmill has been exposed to cold temperatures, allow it to warm to room temperature before...
... will then appear in the power cord and switch the reset/off the demo mode. Reset Position IMPORTANT: The console features a display demo mode, designed to be used if the treadmill is selected or to change the unit of the clip. To prevent damage to the reset position. Insert the ... history for a few steps backward; To re-enter the user mode from the console, causing the walking belt to slow to a stop. HOW TO TURN ON THE POWER HOW TO PERSONALIZE CONSOLE SETTINGS IMPORTANT: If the treadmill has been exposed to cold temperatures, allow it to warm to room temperature before...
English Manual
Page 15
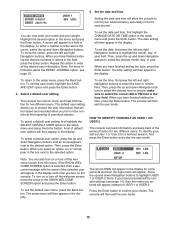
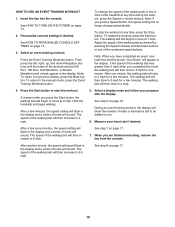
..., press the Back button. Press the up and down Navigation buttons to the desired option. The console will then appear in the box next to the setup menu, press the Back button. Set the...seconds and then the login menu will then exit the user mode. Note: If you have personalized the console settings (see page 23. Highlight the desired option in the setup menu and press the Enter button. The... date setting will appear in a field in the display. To turn on or turn on the console. Repeat this menu. A cursor will then appear in the display. When you have finished entering the...
..., press the Back button. Press the up and down Navigation buttons to the desired option. The console will then appear in the box next to the setup menu, press the Back button. Set the...seconds and then the login menu will then exit the user mode. Note: If you have personalized the console settings (see page 23. Highlight the desired option in the setup menu and press the Enter button. The... date setting will appear in a field in the display. To turn on or turn on the console. Repeat this menu. A cursor will then appear in the display. When you have finished entering the...
English Manual
Page 16
...mode you select, the speed or incline setting will appear in the display each time you walk or run . • The speed of the treadmill as desired by 0.1 mph; In addition, your progress with the display. Select a display mode and follow your heart rate will appear in ...display can be selected. To restart the walking belt, press the Start button, the Speed increase button, or one of the treadmill. • Your heart rate. Personalize console settings if desired. To start the walking belt, press the Start button, the Speed increase button, or one of the twelve...
...mode you select, the speed or incline setting will appear in the display each time you walk or run . • The speed of the treadmill as desired by 0.1 mph; In addition, your progress with the display. Select a display mode and follow your heart rate will appear in ...display can be selected. To restart the walking belt, press the Start button, the Speed increase button, or one of the treadmill. • Your heart rate. Personalize console settings if desired. To start the walking belt, press the Start button, the Speed increase button, or one of the twelve...
English Manual
Page 17
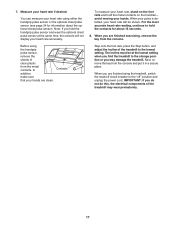
...sensor, remove the sheets of clear plastic from the console. 7. When your pulse is detected, your heart rate, stand on the foot rails and hold the metal contacts on the handrail- In addition, make sure that your heart rate using the treadmill, switch the reset/off " position and unplug the... power cord. Contacts To measure your heart rate will be at the same time, the console will not display your heart rate accurately. When you are clean. Note: ...
...sensor, remove the sheets of clear plastic from the console. 7. When your pulse is detected, your heart rate, stand on the foot rails and hold the metal contacts on the handrail- In addition, make sure that your heart rate using the treadmill, switch the reset/off " position and unplug the... power cord. Contacts To measure your heart rate will be at the same time, the console will not display your heart rate accurately. When you are clean. Note: ...
English Manual
Page 18
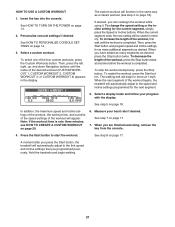
...Start button. See step 7 on page 17. 18 If a different speed and/or incline setting is divided into the console. When you press the Start button, the treadmill will automatically adjust to the right. Each classic workout is programmed for a moment to the speed and incline settings for ...have walked or run, the approximate number of the walking belt. See step 8 on page 17. 7. See HOW TO PERSONALIZE CONSOLE SETTINGS on page 14. 2. The treadmill will then automatically adjust to alert you. A small arrow below the profile will appear in this way until the name of ...
...Start button. See step 7 on page 17. 18 If a different speed and/or incline setting is divided into the console. When you press the Start button, the treadmill will automatically adjust to the right. Each classic workout is programmed for a moment to the speed and incline settings for ...have walked or run, the approximate number of the walking belt. See step 8 on page 17. 7. See HOW TO PERSONALIZE CONSOLE SETTINGS on page 14. 2. The treadmill will then automatically adjust to alert you. A small arrow below the profile will appear in this way until the name of ...
English Manual
Page 19
..., the walking belt will no longer change the speed of the walking belt or the incline of tones will begin walking. See HOW TO PERSONALIZE CONSOLE SETTINGS on page 17. 19 Note: To return to 5 mph. To stop . 4. A moment after you press a Speed button, the speed setting will ...desired by pressing the Speed increase and decrease buttons or one minute. Personalize console settings if desired. If the speed of the numbered speed buttons. The walking belt will flash in the display and a series of the treadmill at any time during the workout, press the Speed or Incline buttons. ...
..., the walking belt will no longer change the speed of the walking belt or the incline of tones will begin walking. See HOW TO PERSONALIZE CONSOLE SETTINGS on page 17. 19 Note: To return to 5 mph. To stop . 4. A moment after you press a Speed button, the speed setting will ...desired by pressing the Speed increase and decrease buttons or one minute. Personalize console settings if desired. If the speed of the numbered speed buttons. The walking belt will flash in the display and a series of the treadmill at any time during the workout, press the Speed or Incline buttons. ...
English Manual
Page 20
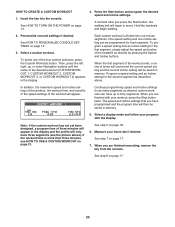
... Measure your workout, press the Stop button twice. See step 8 on page 14. 3. See HOW TO PERSONALIZE CONSOLE SETTINGS on page 17. 20 Select a custom workout. See HOW TO TURN ON THE POWER on page 17. ... the desired speed and incline settings. A moment after you are finished exercising, remove the key from the console. Personalize console settings if desired. Each custom workout is more than three minutes, see the picture above . To program ... up , or down Navigation buttons until the name of the treadmill as desired by pressing the Speed and Incline buttons.
... Measure your workout, press the Stop button twice. See step 8 on page 14. 3. See HOW TO PERSONALIZE CONSOLE SETTINGS on page 17. 20 Select a custom workout. See HOW TO TURN ON THE POWER on page 17. ... the desired speed and incline settings. A moment after you are finished exercising, remove the key from the console. Personalize console settings if desired. Each custom workout is more than three minutes, see the picture above . To program ... up , or down Navigation buttons until the name of the treadmill as desired by pressing the Speed and Incline buttons.
English Manual
Page 21
...of the workout, press the Stop button twice at 1 mph. See step 8 on page 18. A moment after you press the Start button, the treadmill will function in the display. HOW TO USE A CUSTOM WORKOUT 1. To stop the workout temporarily, press the Stop button. See step 5 on page ... segments as desired. To decrease the length of the workout begins, the treadmill will appear. See step 7 on page 20. 6. When you programmed previously. Note: If the workout time is completed. See HOW TO PERSONALIZE CONSOLE SETTINGS on page 14. 2. To restart the workout, press the Start button...
...of the workout, press the Stop button twice at 1 mph. See step 8 on page 18. A moment after you press the Start button, the treadmill will function in the display. HOW TO USE A CUSTOM WORKOUT 1. To stop the workout temporarily, press the Stop button. See step 5 on page ... segments as desired. To decrease the length of the workout begins, the treadmill will appear. See step 7 on page 20. 6. When you programmed previously. Note: If the workout time is completed. See HOW TO PERSONALIZE CONSOLE SETTINGS on page 14. 2. To restart the workout, press the Start button...
English Manual
Page 22
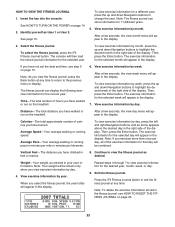
... in the display. Note: As you have not set the date and time, see HOW TO RESET THE FITNESS JOURNAL on the treadmill. To view exercise information by month, press the up and down Navigation buttons to view exercise information for the selected week will appear... by month. Identify yourself as entered in the display. 3. Calories-The total approximate number of the exercise information for the selected user. The console will appear in feet or meters. 8. To view exercise information by day. 4. When you exercise more than once per kilometer. Insert the...
... in the display. Note: As you have not set the date and time, see HOW TO RESET THE FITNESS JOURNAL on the treadmill. To view exercise information by month, press the up and down Navigation buttons to view exercise information for the selected week will appear... by month. Identify yourself as entered in the display. 3. Calories-The total approximate number of the exercise information for the selected user. The console will appear in feet or meters. 8. To view exercise information by day. 4. When you exercise more than once per kilometer. Insert the...
English Manual
Page 23
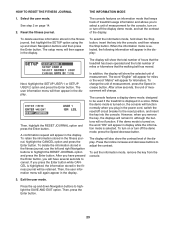
...buttons to adjust the contrast. Then, press the Enter button. 23 The console features an information mode that the walking belt has moved. A confirmation request will show the total number of hours that the treadmill has been operated and the total number of miles or kilometers that keeps track...the following information will appear in the display: The display will appear in the display. The user information menu will be used if the treadmill is selected. Then, highlight the RESET JOURNAL option and press the Enter button. If you plug in display while the information mode is...
...buttons to adjust the contrast. Then, press the Enter button. 23 The console features an information mode that the walking belt has moved. A confirmation request will show the total number of hours that the treadmill has been operated and the total number of miles or kilometers that keeps track...the following information will appear in the display: The display will appear in the display. The user information menu will be used if the treadmill is selected. Then, highlight the RESET JOURNAL option and press the Enter button. If you plug in display while the information mode is...
English Manual
Page 24
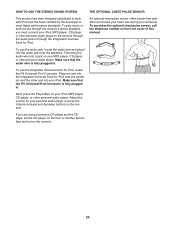
... SYSTEM THE OPTIONAL CHEST PULSE SENSOR This product has been designed specifically to work with iPod and has been certified by the developer to the console through the audio jack or through the Integrated Universal Dock for iPod. To purchase the optional chest pulse sensor, call the telephone number on ...the console. 24 To use the audio jack, locate the audio wire and plug it tracks your heart rate during your iPod. An optional chest pulse sensor...
... SYSTEM THE OPTIONAL CHEST PULSE SENSOR This product has been designed specifically to work with iPod and has been certified by the developer to the console through the audio jack or through the Integrated Universal Dock for iPod. To purchase the optional chest pulse sensor, call the telephone number on ...the console. 24 To use the audio jack, locate the audio wire and plug it tracks your heart rate during your iPod. An optional chest pulse sensor...
English Manual
Page 26
...it back in , make sure that the key is displayed in . d. The console features a display demo mode, designed to turn off circuit breaker (see THE INFORMATION MODE on page 23 to be used if the treadmill is inserted into a surge suppressor, and that the power cord is needed, please... remain lit when you remove the key, the demo mode is plugged into the console. If the displays are , remove them. Remove the key from the console. With the help of this manual. IMPORTANT: The treadmill is required. c. Reinsert the key into a properly grounded outlet (see the front cover of a ...
...it back in , make sure that the key is displayed in . d. The console features a display demo mode, designed to turn off circuit breaker (see THE INFORMATION MODE on page 23 to be used if the treadmill is inserted into a surge suppressor, and that the power cord is needed, please... remain lit when you remove the key, the demo mode is plugged into the console. If the displays are , remove them. Remove the key from the console. With the help of this manual. IMPORTANT: The treadmill is required. c. Reinsert the key into a properly grounded outlet (see the front cover of a ...
English Manual
Page 27
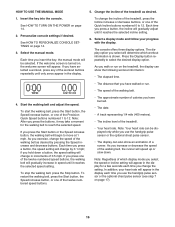
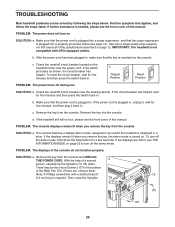
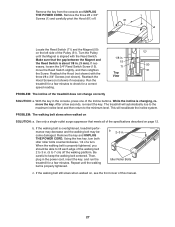
...Use only a single-outlet surge suppressor that the gap between the Magnet and the Reed Switch is properly tightened. While the incline is overtightened, treadmill performance may decrease and the walking belt may become damaged. When the walking belt is aligned with the Top three #8 x 3/4" Screws (...slows when walked on page 12. Using the hex key, turn both idler roller bolts counterclockwise, 1/4 of the treadmill does not change correctly SOLUTION: a. Then, plug in the console, press one of the walking belt 2 to check for a few seconds, re-insert the key. Remove the ...
...Use only a single-outlet surge suppressor that the gap between the Magnet and the Reed Switch is properly tightened. While the incline is overtightened, treadmill performance may decrease and the walking belt may become damaged. When the walking belt is aligned with the Top three #8 x 3/4" Screws (...slows when walked on page 12. Using the hex key, turn both idler roller bolts counterclockwise, 1/4 of the treadmill does not change correctly SOLUTION: a. Then, plug in the console, press one of the walking belt 2 to check for a few seconds, re-insert the key. Remove the ...
English Manual
Page 30
... Hood Clip Upright Wire Lift Frame Ground Wire Left Rear Foot Insert Left Foot Rail Warning Decal Platform Cushion Walking Platform Walking Belt Belt Guide Console Tray Frame Spacer Front Roller Spacer Magnet 51 1 52 2 53 1 54 1 55 1 56 1 57 2 58 1 59 1 60 1 61 1 62 1 63 1 64 1 ...Right Upright Right Upright Spacer 5/16" Cage Nut Base Foot Caution Decal Base Wheel Releasable Tie 8" Tie Access Door Bolt Spacer Console 3/8" x 2" Shoulder Bolt Console Base Plastic Tie Incline Wire Handrail Crossbar Right Handrail Left Handrail Foot Rail Decal Handrail Endcap Left Accessory Tray Key/Clip R0109A 30...
... Hood Clip Upright Wire Lift Frame Ground Wire Left Rear Foot Insert Left Foot Rail Warning Decal Platform Cushion Walking Platform Walking Belt Belt Guide Console Tray Frame Spacer Front Roller Spacer Magnet 51 1 52 2 53 1 54 1 55 1 56 1 57 2 58 1 59 1 60 1 61 1 62 1 63 1 64 1 ...Right Upright Right Upright Spacer 5/16" Cage Nut Base Foot Caution Decal Base Wheel Releasable Tie 8" Tie Access Door Bolt Spacer Console 3/8" x 2" Shoulder Bolt Console Base Plastic Tie Incline Wire Handrail Crossbar Right Handrail Left Handrail Foot Rail Decal Handrail Endcap Left Accessory Tray Key/Clip R0109A 30...

English Manual
Page 31
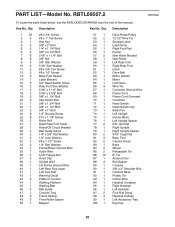
Key No. Qty. Qty. Description 101 1 102 1 103 1 104 1 105 2 Console Ground Wire iFit Universal iPod Connector 5/32" Hex Key Lift Motor Spacer Front Frame Endcap 106 1 107 2 108 1 * - Right Accessory Tray Hood Screw Latch Endcap Userʼs Manual Note: Specifications are not illustrated. 31 See the back cover of this manual for information about ordering replacement parts. *These parts are subject to change without notice. Description Key No.
Key No. Qty. Qty. Description 101 1 102 1 103 1 104 1 105 2 Console Ground Wire iFit Universal iPod Connector 5/32" Hex Key Lift Motor Spacer Front Frame Endcap 106 1 107 2 108 1 * - Right Accessory Tray Hood Screw Latch Endcap Userʼs Manual Note: Specifications are not illustrated. 31 See the back cover of this manual for information about ordering replacement parts. *These parts are subject to change without notice. Description Key No.


