
English Manual
Page 3
...Use only a single-outlet surge suppressor that meets all of high speeds. If the control system is damaged, the walking belt may slow, accelerate, or stop procedure before using the treadmill (see page 13), plug the power cord into a surge suppressor (not included) and plug the surge suppressor into ... cord (see HOW TO TURN ON THE POWER on the walking belt. Do not use of this product. 1. Keep the treadmill indoors, away from heated surfaces. 14. This is intended only as described. Failure to use the treadmill with bare feet, wearing only stockings, or in a garage or...
...Use only a single-outlet surge suppressor that meets all of high speeds. If the control system is damaged, the walking belt may slow, accelerate, or stop procedure before using the treadmill (see page 13), plug the power cord into a surge suppressor (not included) and plug the surge suppressor into ... cord (see HOW TO TURN ON THE POWER on the walking belt. Do not use of this product. 1. Keep the treadmill indoors, away from heated surfaces. 14. This is intended only as described. Failure to use the treadmill with bare feet, wearing only stockings, or in a garage or...
English Manual
Page 5
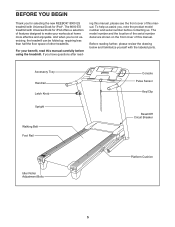
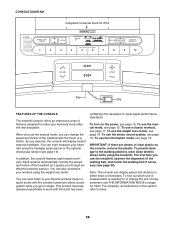
To help us . The 8000 ES treadmill with Universal Dock for iPod®. Accessory Tray Handrail Latch Knob Upright Walking Belt Foot Rail Console Pulse Sensor Key/Clip Reset/Off Circuit Breaker Idler Roller Adjustment Bolts Platform Cushion 5 If you have questions after read this... location of the serial number decal are shown on the front cover of this manual. BEFORE YOU BEGIN Thank you for selecting the new REEBOK® 8000 ES treadmill with Universal Dock for iPod offers a selection of features designed to make your benefit, read - And when youʼre not exercising, the...
To help us . The 8000 ES treadmill with Universal Dock for iPod®. Accessory Tray Handrail Latch Knob Upright Walking Belt Foot Rail Console Pulse Sensor Key/Clip Reset/Off Circuit Breaker Idler Roller Adjustment Bolts Platform Cushion 5 If you have questions after read this... location of the serial number decal are shown on the front cover of this manual. BEFORE YOU BEGIN Thank you for selecting the new REEBOK® 8000 ES treadmill with Universal Dock for iPod offers a selection of features designed to make your benefit, read - And when youʼre not exercising, the...
English Manual
Page 6
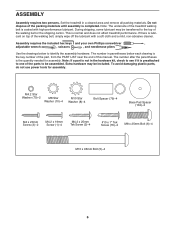
Note: The underside of the treadmill walking belt is normal and does not affect treadmill performance. This is coated with a soft cloth and a mild, non-abrasive cleaner. Assembly requires the included hex keys and your own Phillips screwdriver , ...10 x 1" Tek Screw (76)-2 M8 x 25mm Bolt (6)-4 M10 x 96mm Bolt (5)-4 6 During shipping, some lubricant may be transferred to identify the assembly hardware. Set the treadmill in parentheses below to the top of this manual. The number after the parentheses is completed. Extra hardware may be included. The number in a cleared...
Note: The underside of the treadmill walking belt is normal and does not affect treadmill performance. This is coated with a soft cloth and a mild, non-abrasive cleaner. Assembly requires the included hex keys and your own Phillips screwdriver , ...10 x 1" Tek Screw (76)-2 M8 x 25mm Bolt (6)-4 M10 x 96mm Bolt (5)-4 6 During shipping, some lubricant may be transferred to identify the assembly hardware. Set the treadmill in parentheses below to the top of this manual. The number after the parentheses is completed. Extra hardware may be included. The number in a cleared...
English Manual
Page 12
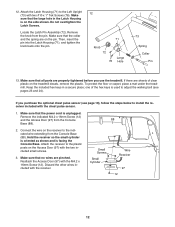
... from the Console Base (88). 12. To protect the floor or carpet, place a mat under the treadmill. Hold the receiver so the small cylinder is oriented as shown and is used to adjust the walking belt (see page 19), follow the steps below to the Left Upright (73) with the two included... small screws. 3. Make sure that no wires are sheets of the hex keys is facing the Console Base. If you use the treadmill.
... from the Console Base (88). 12. To protect the floor or carpet, place a mat under the treadmill. Hold the receiver so the small cylinder is oriented as shown and is used to adjust the walking belt (see page 19), follow the steps below to the Left Upright (73) with the two included... small screws. 3. Make sure that no wires are sheets of the hex keys is facing the Console Base. If you use the treadmill.

English Manual
Page 13
...nominal 120-volt circuit, and has a grounding plug that is functioning properly. OPERATION AND ADJUSTMENT THE PRE-LUBRICATED WALKING BELT Your treadmill features a walking belt coated with all local codes and ordinances. Do not modify the plug provided with your homeʼs power. Plug .... Some 2-pole receptacle outlet box covers are in damage to the walking belt or the walking platform. This product is not available. 1 Grounded Outlet Box Surge Suppressor Grounding Pin Your treadmill, like the plug illustrated in accordance with highperformance lubricant. To decrease the...
...nominal 120-volt circuit, and has a grounding plug that is functioning properly. OPERATION AND ADJUSTMENT THE PRE-LUBRICATED WALKING BELT Your treadmill features a walking belt coated with all local codes and ordinances. Do not modify the plug provided with your homeʼs power. Plug .... Some 2-pole receptacle outlet box covers are in damage to the walking belt or the walking platform. This product is not available. 1 Grounded Outlet Box Surge Suppressor Grounding Pin Your treadmill, like the plug illustrated in accordance with highperformance lubricant. To decrease the...
English Manual
Page 14
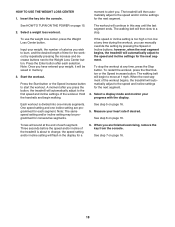
... workout using the weight loss center. As you use the stereo sound system, see page 15. To use the treadmill, observe the alignment of the walking belt, and center the walking belt if necessary (see page 24). To find out which unit of measurement is selected or to change the speed and... incline of the treadmill with iPod and has been certified by the developer to meet Apple performance standards. You can ...
... workout using the weight loss center. As you use the stereo sound system, see page 15. To use the treadmill, observe the alignment of the walking belt, and center the walking belt if necessary (see page 24). To find out which unit of measurement is selected or to change the speed and... incline of the treadmill with iPod and has been certified by the developer to meet Apple performance standards. You can ...

English Manual
Page 15
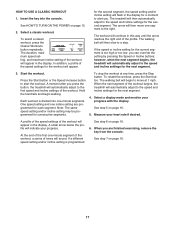
...setting. Next, stand on . IMPORTANT: In an emergency situation, the key can be used if the treadmill is not pulled from the console, causing the walking belt to slow to a stop the walking belt, press the Stop button. When the key is turned on the foot rails of your clothes. If you...demo mode. Test the clip by pressing the Speed increase and decrease buttons. Start the walking belt. As you press the Incline increase or decrease button, the incline will change the speed of the treadmill, press the Incline increase or decrease buttons. To change in the power cord (see THE ...
...setting. Next, stand on . IMPORTANT: In an emergency situation, the key can be used if the treadmill is not pulled from the console, causing the walking belt to slow to a stop the walking belt, press the Stop button. When the key is turned on the foot rails of your clothes. If you...demo mode. Test the clip by pressing the Speed increase and decrease buttons. Start the walking belt. As you press the Incline increase or decrease button, the incline will change the speed of the treadmill, press the Incline increase or decrease buttons. To change in the power cord (see THE ...

English Manual
Page 16
...position. IMPORTANT: If you are finished using the handgrip pulse sensor, remove the sheets of the walking belt. 5. Select a display mode and monitor your progress with your palms on the treadmill, the display can show your heart rate will appear in a secure place. For information about 15 ...seconds. • The speed of clear plastic from the console. Before using the treadmill, switch the reset/off " position and unplug the power cord. In addition, your heart rate accurately. Step onto the foot rails, ...
...position. IMPORTANT: If you are finished using the handgrip pulse sensor, remove the sheets of the walking belt. 5. Select a display mode and monitor your progress with your palms on the treadmill, the display can show your heart rate will appear in a secure place. For information about 15 ...seconds. • The speed of clear plastic from the console. Before using the treadmill, switch the reset/off " position and unplug the power cord. In addition, your heart rate accurately. Step onto the foot rails, ...
English Manual
Page 17
...setting and/or incline setting will then slow to a stop the workout at 1 mph. The walking belt will flash in the display. however, when the next segment begins, the treadmill will automatically adjust to the first speed and incline settings of the workout will then automatically adjust to ...Speed or Incline buttons; Insert the key into one -minute segment of the workout, a series of the first one -minute segments. The treadmill will appear in the display for the next segment. 3. At the end of tones will appear. If the speed or incline setting for ...
...setting and/or incline setting will then slow to a stop the workout at 1 mph. The walking belt will flash in the display. however, when the next segment begins, the treadmill will automatically adjust to the first speed and incline settings of the workout will then automatically adjust to ...Speed or Incline buttons; Insert the key into one -minute segment of the workout, a series of the first one -minute segments. The treadmill will appear in the display for the next segment. 3. At the end of tones will appear. If the speed or incline setting for ...
English Manual
Page 18
...start the workout. Press the Enter button after you press the button, the treadmill will begin walking. Press the Start button or the Speed increase button to a stop the workout at 1 mph. The walking belt will automatically adjust to the speed and/or incline settings for the next segment.... of the workout. A moment after each selection. When the next segment of time for the workout by pressing the Speed or Incline buttons; The treadmill will continue in memory. 3. Hold the handrails and begin to alert you. To stop . See step 5 on page 15. 2. To restart ...
...start the workout. Press the Enter button after you press the button, the treadmill will begin walking. Press the Start button or the Speed increase button to a stop the workout at 1 mph. The walking belt will automatically adjust to the speed and/or incline settings for the next segment.... of the workout. A moment after each selection. When the next segment of time for the workout by pressing the Speed or Incline buttons; The treadmill will continue in memory. 3. Hold the handrails and begin to alert you. To stop . See step 5 on page 15. 2. To restart ...
English Manual
Page 19
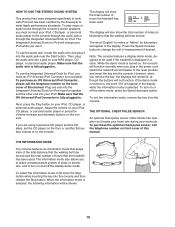
...jack or through the consoleʼs stereo speakers, you must connect your iPod, CD player, or personal audio player. Make sure that the treadmill has been used. When the information mode is selected, the following information will not function. To play music or audio books through the ...is fully plugged in . The display will show the total number of hours the treadmill has been used if the treadmill is turned on, the console will charge your workouts. Make sure that the walking belt has moved. To purchase an iFit Universal iPod Connector, please call the telephone number...
...jack or through the consoleʼs stereo speakers, you must connect your iPod, CD player, or personal audio player. Make sure that the treadmill has been used. When the information mode is selected, the following information will not function. To play music or audio books through the ...is fully plugged in . The display will show the total number of hours the treadmill has been used if the treadmill is turned on, the console will charge your workouts. Make sure that the walking belt has moved. To purchase an iFit Universal iPod Connector, please call the telephone number...

English Manual
Page 23
... power cord, insert the key, and run the treadmill for a few minutes to keep the walking belt centered. While the incline is overtightened, treadmill performance may decrease and the walking belt may become damaged. PROBLEM: The walking belt slows when walked on page 13. If the walking belt is changing, remove the key. When the walking...
... power cord, insert the key, and run the treadmill for a few minutes to keep the walking belt centered. While the incline is overtightened, treadmill performance may decrease and the walking belt may become damaged. PROBLEM: The walking belt slows when walked on page 13. If the walking belt is changing, remove the key. When the walking...
English Manual
Page 24
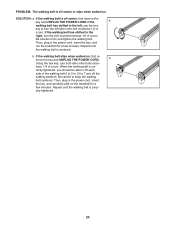
... . Then, plug in the power cord, insert the key, and carefully walk on the treadmill for a few minutes. b. erly tightened. 24 Be careful not to keep the walking belt centered. If the walking belt slips when walked on SOLUTION: a. Then, plug in the power cord, insert the key,... and run the treadmill for a few minutes. Be careful to overtighten the walking belt. If the a walking belt has shifted to the left ...
... . Then, plug in the power cord, insert the key, and carefully walk on the treadmill for a few minutes. b. erly tightened. 24 Be careful not to keep the walking belt centered. If the walking belt slips when walked on SOLUTION: a. Then, plug in the power cord, insert the key,... and run the treadmill for a few minutes. Be careful to overtighten the walking belt. If the a walking belt has shifted to the left ...
English Manual
Page 26
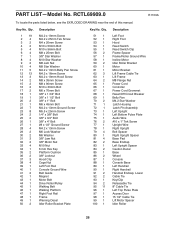
... Washer M6 Washer 3/8" Jam Nut 3/8" Motor Nut M10 Nut 6 mm Hex Key Platform Cushion 3/8" Locknut Hood Clip Cage Nut Left Foot Rail Console Ground Wire Belt Guide Magnet Motor Belt Drive Roller/Pulley Walking Belt Walking Platform Right Foot Rail Frame Warning Decal Idler Roller Bracket Plate Key No. PART LIST-Model No.
... Washer M6 Washer 3/8" Jam Nut 3/8" Motor Nut M10 Nut 6 mm Hex Key Platform Cushion 3/8" Locknut Hood Clip Cage Nut Left Foot Rail Console Ground Wire Belt Guide Magnet Motor Belt Drive Roller/Pulley Walking Belt Walking Platform Right Foot Rail Frame Warning Decal Idler Roller Bracket Plate Key No. PART LIST-Model No.


