
English Manual
Page 2
... product is missing or illegible, see the front cover of this manual and request a free replacement decal. TABLE OF CONTENTS WARNING DECAL PLACEMENT 2 IMPORTANT PRECAUTIONS 3 BEFORE YOU BEGIN 6 PART IDENTIFICATION CHART 7 ASSEMBLY 8 HOW TO USE THE ELLIPTICAL 18 FCC INFORMATION 30 MAINTENANCE AND TROUBLESHOOTING 31 EXERCISE GUIDELINES 33 PART LIST 34 EXPLODED DRAWING 36 ORDERING REPLACEMENT PARTS Back Cover LIMITED WARRANTY Back Cover WARNING DECAL PLACEMENT This drawing shows the location(s) of Reebok.
... product is missing or illegible, see the front cover of this manual and request a free replacement decal. TABLE OF CONTENTS WARNING DECAL PLACEMENT 2 IMPORTANT PRECAUTIONS 3 BEFORE YOU BEGIN 6 PART IDENTIFICATION CHART 7 ASSEMBLY 8 HOW TO USE THE ELLIPTICAL 18 FCC INFORMATION 30 MAINTENANCE AND TROUBLESHOOTING 31 EXERCISE GUIDELINES 33 PART LIST 34 EXPLODED DRAWING 36 ORDERING REPLACEMENT PARTS Back Cover LIMITED WARRANTY Back Cover WARNING DECAL PLACEMENT This drawing shows the location(s) of Reebok.
English Manual
Page 3
... experience pain while exercising, stop immediately and cool down. Do not operate the elliptical if the power cord or plug is damaged, or if the elliptical is not a medical device. Do not modify the power cord or use an extension cord. 12. Do not use an adapter to connect the power cord to the off position when the elliptical is intended for home use . SAVE THESE INSTRUCTIONS 3 ICON assumes no responsibility...
... experience pain while exercising, stop immediately and cool down. Do not operate the elliptical if the power cord or plug is damaged, or if the elliptical is not a medical device. Do not modify the power cord or use an extension cord. 12. Do not use an adapter to connect the power cord to the off position when the elliptical is intended for home use . SAVE THESE INSTRUCTIONS 3 ICON assumes no responsibility...
English Manual
Page 6
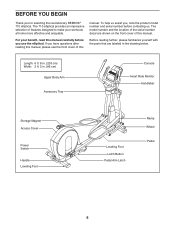
... model number and the location of this manual, please see the front cover of the serial number decal are labeled in . (66 cm) Upper Body Arm Accessory Tray Console Heart Rate Monitor Handlebar Storage Magnet Access Cover Power Switch Handle Leveling Foot Leveling Foot Latch Button Pedal Arm Latch Ramp Wheel Pedal 6 To help us . The 710 elliptical provides an impressive selection of this manual carefully before contacting us assist you have questions after reading this manual...
... model number and the location of this manual, please see the front cover of the serial number decal are labeled in . (66 cm) Upper Body Arm Accessory Tray Console Heart Rate Monitor Handlebar Storage Magnet Access Cover Power Switch Handle Leveling Foot Leveling Foot Latch Button Pedal Arm Latch Ramp Wheel Pedal 6 To help us . The 710 elliptical provides an impressive selection of this manual carefully before contacting us assist you have questions after reading this manual...
English Manual
Page 8
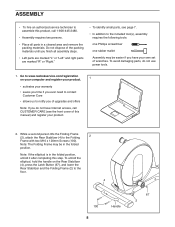
... to assemble this step. Note: The Folding Frame may be in a cleared area and remove the packing materials. ASSEMBLY •• To hire an authorized service technician to notify you of upgrades and offers Note: If you do not use power tools. 1. Go to www.reebokservice.com/registration on the Rear Stabilizer (4), press the Latch Button (67), and lower the Rear Stabilizer and the Folding Frame...
... to assemble this step. Note: The Folding Frame may be in a cleared area and remove the packing materials. ASSEMBLY •• To hire an authorized service technician to notify you of upgrades and offers Note: If you do not use power tools. 1. Go to www.reebokservice.com/registration on the Rear Stabilizer (4), press the Latch Button (67), and lower the Rear Stabilizer and the Folding Frame...

English Manual
Page 10
... the Upright Wire (60). Tighten an M8 x 16mm Screw (102) and an M8 x 25mm x 1.5mm Washer (126) into the Right Upper Body Leg (6). Slide the Right and Left Upper Body Arms (8, 9) onto the right and left sides of the included grease to the Upright Axle (48) and to keep your fingers clean, apply a generous amount of the Upright Axle (48). 5. Assemble the...
... the Upright Wire (60). Tighten an M8 x 16mm Screw (102) and an M8 x 25mm x 1.5mm Washer (126) into the Right Upper Body Leg (6). Slide the Right and Left Upper Body Arms (8, 9) onto the right and left sides of the included grease to the Upright Axle (48) and to keep your fingers clean, apply a generous amount of the Upright Axle (48). 5. Assemble the...

English Manual
Page 18
.... if it should be used to connect the power cord to determine whether the outlet box cover is properly installed and grounded in accordance with a grounding pin. If it will not fit an outlet, have a proper outlet installed by a qualified electrician. 18 The outlet must be installed by a qualified electrician. Do not modify the plug; Before using an adapter, contact a qualified electrician to...
.... if it should be used to connect the power cord to determine whether the outlet box cover is properly installed and grounded in accordance with a grounding pin. If it will not fit an outlet, have a proper outlet installed by a qualified electrician. 18 The outlet must be installed by a qualified electrician. Do not modify the plug; Before using an adapter, contact a qualified electrician to...
English Manual
Page 21
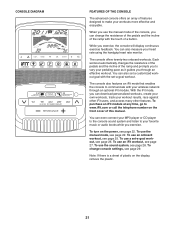
... a button. While you exercise. You can change console settings, see page 27. You can even connect your MP3 player or CD player to the console sound system and listen to your pedaling pace as it guides you can also set a customized workout goal with your heart rate using the handgrip heart rate monitor. To use a set -a-goal workout. To use the manual mode of the console, you through an optional iFit module. When you use the...
... a button. While you exercise. You can change console settings, see page 27. You can even connect your MP3 player or CD player to the console sound system and listen to your pedaling pace as it guides you can also set a customized workout goal with your heart rate using the handgrip heart rate monitor. To use a set -a-goal workout. To use the manual mode of the console, you through an optional iFit module. When you use the...
English Manual
Page 22
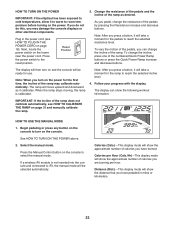
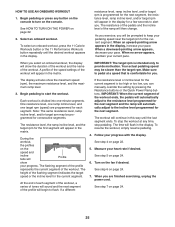
... 31 and manually calibrate the ramp. Select the manual mode. Press the Manual Control button on the frame near the power cord. Distance (Dist.)—-This display mode will take a moment for the rst time, the incline of the pedals by pressing the Resistance increase and decrease buttons. Reset Position 3. Note: After you press a button, it calibrates. Note: After you press a button, it to warm to room temperature before turning on the power. Calories per...
... 31 and manually calibrate the ramp. Select the manual mode. Press the Manual Control button on the frame near the power cord. Distance (Dist.)—-This display mode will take a moment for the rst time, the incline of the pedals by pressing the Resistance increase and decrease buttons. Reset Position 3. Note: After you press a button, it calibrates. Note: After you press a button, it to warm to room temperature before turning on the power. Calories per...
English Manual
Page 23
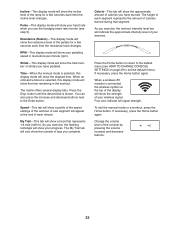
... represents 1/4 mile (400 m). The matrix offers several display tabs. Press the Home button to return to the default menu (see step 5). To exit the manual mode or a workout, press the Home button. Pulse—-This display mode will show your heart rate when you have pedaled. Stride—-This display mode will show the total number of strides you complete. Four arcs indicate full signal strength. Incline—-This display mode will show the incline level of...
... represents 1/4 mile (400 m). The matrix offers several display tabs. Press the Home button to return to the default menu (see step 5). To exit the manual mode or a workout, press the Home button. Pulse—-This display mode will show your heart rate when you have pedaled. Stride—-This display mode will show the total number of strides you complete. Four arcs indicate full signal strength. Incline—-This display mode will show the incline level of...
English Manual
Page 24
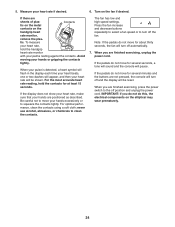
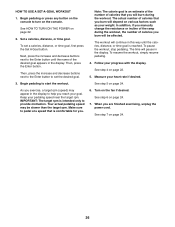
... handgrip heart rate monitor, remove the plas- IMPORTANT: If you do not do not move for several seconds, a tone will sound and the console will turn off position and unplug the power cord. Note: If the pedals do not move your heart rate will be shown. When you are finished exercising, unplug the power cord. Turn on the fan if desired. When you are finished exercising, press the power switch to...
... handgrip heart rate monitor, remove the plas- IMPORTANT: If you do not do not move for several seconds, a tone will sound and the console will turn off position and unplug the power cord. Note: If the pedals do not move your heart rate will be shown. When you are finished exercising, unplug the power cord. Turn on the fan if desired. When you are finished exercising, press the power switch to...
English Manual
Page 25
... TO TURN ON THE POWER on page 24. 6. resistance level, ramp incline level, and/or target rpm is programmed for the current segment is intended only to the incline level programmed for the current segment. Begin pedaling or press any time, stop the workout at a speed that is divided into one target rpm (speed) are nished exercising, unplug the power cord. The display will then change. When...
... TO TURN ON THE POWER on page 24. 6. resistance level, ramp incline level, and/or target rpm is programmed for the current segment is intended only to the incline level programmed for the current segment. Begin pedaling or press any time, stop the workout at a speed that is divided into one target rpm (speed) are nished exercising, unplug the power cord. The display will then change. When...
English Manual
Page 26
... nished exercising, unplug the power cord. Make sure to turn on the console to pedal at a speed that is reached. Begin pedaling or press any button on the console. To set the desired goal. The time will continue in the display. See step 4 on page 24. Begin pedaling to set a calories, distance, or time goal, first press the Set A Goal button. See step 5 on page 22. 5. Keep your weight. When you...
... nished exercising, unplug the power cord. Make sure to turn on the console to pedal at a speed that is reached. Begin pedaling or press any button on the console. To set the desired goal. The time will continue in the display. See step 4 on page 24. Begin pedaling to set a calories, distance, or time goal, first press the Set A Goal button. See step 5 on page 22. 5. Keep your weight. When you...
English Manual
Page 27
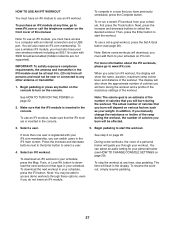
... TO USE AN IFIT WORKOUT You must have your schedule, first press the Track button. To purchase an iFit module at any button on the console to a computer with your weight. Note: The calorie goal is registered with an internet connection and a USB port. Begin pedaling to select a user. 4. To download an iFit workout in the console. During some workouts will download, you select an iFit workout, the display will also need an iFit...
... TO USE AN IFIT WORKOUT You must have your schedule, first press the Track button. To purchase an iFit module at any button on the console to a computer with your weight. Note: The calorie goal is registered with an internet connection and a USB port. Begin pedaling to select a user. 4. To download an iFit workout in the console. During some workouts will download, you select an iFit workout, the display will also need an iFit...

English Manual
Page 28
... are nished exercising, unplug the power cord. Adjust the volume level using the volume increase and decrease buttons on the console or the volume control on the fan if desired. See step 6 on page 24. 8. The end of the matrix represents the end of laps you have completed. For more information about iFit, please go to www.iFit.com. 28 HOW...
... are nished exercising, unplug the power cord. Adjust the volume level using the volume increase and decrease buttons on the console or the volume control on the fan if desired. See step 6 on page 24. 8. The end of the matrix represents the end of laps you have completed. For more information about iFit, please go to www.iFit.com. 28 HOW...

English Manual
Page 29
... the display. The display will show the words NO IFIT MODULE. The default menu is connected to turn on the elliptical. 3. Check for iFit workouts and firmware downloads. 10. button to adjust the contrast level. 5. To select the information mode, press and hold down the Disp. Press the decrease button to view the contrast level. The words SEND/RECEIVE DATA will appear in the display to view the audio setting...
... the display. The display will show the words NO IFIT MODULE. The default menu is connected to turn on the elliptical. 3. Check for iFit workouts and firmware downloads. 10. button to adjust the contrast level. 5. To select the information mode, press and hold down the Disp. Press the decrease button to view the contrast level. The words SEND/RECEIVE DATA will appear in the display to view the audio setting...
English Manual
Page 31
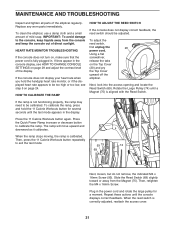
... HOW TO CHANGE CONSOLE SETTINGS on page 29 and adjust the contrast level of direct sunlight. HEART RATE MONITOR TROUBLESHOOTING If the console does not turn on, make sure that the power cord is fully plugged in the console display, see step 5 on the Top Cover (20) and pry the Top Cover upward off the elliptical. If the console does not display your heart rate when you hold the 11 Calorie Workouts button for a moment. Using a flat...
... HOW TO CHANGE CONSOLE SETTINGS on page 29 and adjust the contrast level of direct sunlight. HEART RATE MONITOR TROUBLESHOOTING If the console does not turn on, make sure that the power cord is fully plugged in the console display, see step 5 on the Top Cover (20) and pry the Top Cover upward off the elliptical. If the console does not display your heart rate when you hold the 11 Calorie Workouts button for a moment. Using a flat...

English Manual
Page 32
... the Latch (117) on the underside of the Left Pedal Arm (13), and then lift the Left Pedal Arm off the elliptical. Then, plug in the power cord. 32 Remove the M4 x 16mm Screws (93) and the M4 x 42mm Screws (124) from which holes. HOW TO ADJUST THE DRIVE BELT If you can feel the pedals slip while you are pedaling, even when the resistance is tight. Tighten the Belt Adjustment Screw (85...
... the Latch (117) on the underside of the Left Pedal Arm (13), and then lift the Left Pedal Arm off the elliptical. Then, plug in the power cord. 32 Remove the M4 x 16mm Screws (93) and the M4 x 42mm Screws (124) from which holes. HOW TO ADJUST THE DRIVE BELT If you can feel the pedals slip while you are pedaling, even when the resistance is tight. Tighten the Belt Adjustment Screw (85...

English Manual
Page 33
... must perform aerobic exercise, which is to 10 minutes of heart rate readings. During the first few minutes of rest between workouts. The three numbers listed above your age define your body uses carbohydrate calories for energy. Remember, proper nutrition and adequate rest are rounded off to prevent post-exercise problems. EXERCISE FREQUENCY To maintain or improve your exercise program. If your everyday...
... must perform aerobic exercise, which is to 10 minutes of heart rate readings. During the first few minutes of rest between workouts. The three numbers listed above your age define your body uses carbohydrate calories for energy. Remember, proper nutrition and adequate rest are rounded off to prevent post-exercise problems. EXERCISE FREQUENCY To maintain or improve your exercise program. If your everyday...

English Manual
Page 34
... Pedal Left Pedal Disc Disc Cover Right Shield Left Shield Top Shield Right Frame Cover Left Frame Cover Top Cover Rear Upright Cover/Receiver Front Upright Cover Accessory Tray Control Board Board Bracket Right Rear Leg Cover Right Front Leg Cover Left Rear Leg Cover Left Front Leg Cover Console Pulse Sensor Handgrip Wheel Stabilizer Cap Drive Belt Crank Arm M8 Shoulder Screw Leveling Foot Latch Bracket Ramp Ramp Cover Ramp Axle Ramp Axle Bushing Lift Motor Upright Axle Lift Axle Right Lift Arm Model No. PART LIST Key...
... Pedal Left Pedal Disc Disc Cover Right Shield Left Shield Top Shield Right Frame Cover Left Frame Cover Top Cover Rear Upright Cover/Receiver Front Upright Cover Accessory Tray Control Board Board Bracket Right Rear Leg Cover Right Front Leg Cover Left Rear Leg Cover Left Front Leg Cover Console Pulse Sensor Handgrip Wheel Stabilizer Cap Drive Belt Crank Arm M8 Shoulder Screw Leveling Foot Latch Bracket Ramp Ramp Cover Ramp Axle Ramp Axle Bushing Lift Motor Upright Axle Lift Axle Right Lift Arm Model No. PART LIST Key...
English Manual
Page 40
... manual) LIMITED WARRANTY IMPORTANT: To protect your fitness equipment with an extended service plan, see the PART LIST and the EXPLODED DRAWING near the end of this manual. To help us : •• the model number and serial number of the product (see the front cover of this manual) •• the name of the product (see the front cover of this manual) •• the key number...
... manual) LIMITED WARRANTY IMPORTANT: To protect your fitness equipment with an extended service plan, see the PART LIST and the EXPLODED DRAWING near the end of this manual. To help us : •• the model number and serial number of the product (see the front cover of this manual) •• the name of the product (see the front cover of this manual) •• the key number...


