
English Manual
Page 1
... note the product model number and serial number (see the drawing above for future reference. Keep this manual for future reference. MST ON THE WEB: www.reebokservice.com CAUTION Read all precautions and instructions in the space above ) before using this manual before contacting us. Serial Number Decal QUESTIONS? RBEX71507.0 Serial No. Write the serial number in this equipment. CALL TOLL-FREE: 1-877-994-4999...
... note the product model number and serial number (see the drawing above for future reference. Keep this manual for future reference. MST ON THE WEB: www.reebokservice.com CAUTION Read all precautions and instructions in the space above ) before using this manual before contacting us. Serial Number Decal QUESTIONS? RBEX71507.0 Serial No. Write the serial number in this equipment. CALL TOLL-FREE: 1-877-994-4999...
English Manual
Page 2
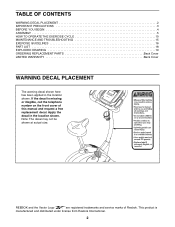
... distributed under license from Reebok International. 2 TABLE OF CONTENTS WARNING DECAL PLACEMENT 2 IMPORTANT PRECAUTIONS 3 BEFORE YOU BEGIN 4 ASSEMBLY 5 HOW TO OPERATE THE EXERCISE CYCLE 10 MAINTENANCE AND TROUBLESHOOTING 15 EXERCISE GUIDELINES 16 PART LIST 18 EXPLODED DRAWING 19 ORDERING REPLACEMENT PARTS Back Cover LIMITED WARRANTY Back Cover WARNING DECAL PLACEMENT The warning decal shown here has been applied in the location shown. Apply the decal...
... distributed under license from Reebok International. 2 TABLE OF CONTENTS WARNING DECAL PLACEMENT 2 IMPORTANT PRECAUTIONS 3 BEFORE YOU BEGIN 4 ASSEMBLY 5 HOW TO OPERATE THE EXERCISE CYCLE 10 MAINTENANCE AND TROUBLESHOOTING 15 EXERCISE GUIDELINES 16 PART LIST 18 EXPLODED DRAWING 19 ORDERING REPLACEMENT PARTS Back Cover LIMITED WARRANTY Back Cover WARNING DECAL PLACEMENT The warning decal shown here has been applied in the location shown. Apply the decal...
English Manual
Page 3
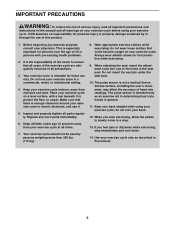
... instructions in this product. 1. Your exercise cycle should not be used by or through the use only. The pulse sensor is not a medical device. When you feel pain or dizziness while exercising, stop exercising, allow the pedals to slowly come to ensure that there is intended for persons over the age of 35 or persons with a mat beneath it . 5. Replace any exercise program...
... instructions in this product. 1. Your exercise cycle should not be used by or through the use only. The pulse sensor is not a medical device. When you feel pain or dizziness while exercising, stop exercising, allow the pedals to slowly come to ensure that there is intended for persons over the age of 35 or persons with a mat beneath it . 5. Replace any exercise program...
English Manual
Page 4
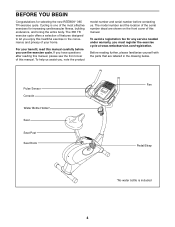
... any service needed under warranty, you use the exercise cycle. Pulse Sensor Console Water Bottle Holder* Seat Seat Post Seat Knob Fan Pedal/Strap *No water bottle is one of this manual. The 365 TR exercise cycle offers a selection of features designed to let you have questions after reading this manual, please see the front cover of the most effective exercises for selecting the new REEBOK® 365 TR exercise cycle...
... any service needed under warranty, you use the exercise cycle. Pulse Sensor Console Water Bottle Holder* Seat Seat Post Seat Knob Fan Pedal/Strap *No water bottle is one of this manual. The 365 TR exercise cycle offers a selection of features designed to let you have questions after reading this manual, please see the front cover of the most effective exercises for selecting the new REEBOK® 365 TR exercise cycle...
English Manual
Page 5
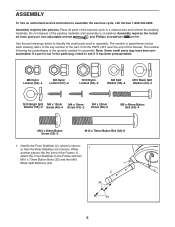
... . Use the part drawings below each drawing refers to the key number of the part, from the PART LIST near the end of the Frame (1), attach the Front Stabilizer to assemble the exercise cycle, call toll-free 1-800-445-2480. While another person lifts the front of this manual. Assembly requires the includ- The number in the parts bag, check to identify the small parts used in...
... . Use the part drawings below each drawing refers to the key number of the part, from the PART LIST near the end of the Frame (1), attach the Front Stabilizer to assemble the exercise cycle, call toll-free 1-800-445-2480. While another person lifts the front of this manual. Assembly requires the includ- The number in the parts bag, check to identify the small parts used in...

English Manual
Page 6
... step. Gently pull the upper end of the Frame (1), attach the Rear Stabilizer (14) to remove the slack, and slide the Upright (3) onto the Frame (1). While another person holds the Upright (3) near the Frame (1), connect the Upper Wire Harness (32) to avoid pinching the Wire Harnesses (31, 32) 55 35 35 55 32 31 1 4. Attach the Upright with two M4 x 15mm Screws...
... step. Gently pull the upper end of the Frame (1), attach the Rear Stabilizer (14) to remove the slack, and slide the Upright (3) onto the Frame (1). While another person holds the Upright (3) near the Frame (1), connect the Upper Wire Harness (32) to avoid pinching the Wire Harnesses (31, 32) 55 35 35 55 32 31 1 4. Attach the Upright with two M4 x 15mm Screws...

English Manual
Page 7
Attach the Handlebar (47) to the Upright 7 (3) with two M10 x 73mm Button Bolts (33) and two M10 Nylon Locknuts (52). 52 3 7 47 54 53 48 53 50 49 47 48 33 Attach the Handlebar Bracket (48) to the Handlebar Bracket (48) with three M4 x 25mm Screws (39). 6 Attach the Right Arm Pad (50) in the same way. 39 7. Attach the Left Arm Pad (49) to the Handlebar (47) with four M6 x 40mm Button Bolts 5 (53) and four M6 Nylon Locknuts (54). 54 6. 5.
Attach the Handlebar (47) to the Upright 7 (3) with two M10 x 73mm Button Bolts (33) and two M10 Nylon Locknuts (52). 52 3 7 47 54 53 48 53 50 49 47 48 33 Attach the Handlebar Bracket (48) to the Handlebar Bracket (48) with three M4 x 25mm Screws (39). 6 Attach the Right Arm Pad (50) in the same way. 39 7. Attach the Left Arm Pad (49) to the Handlebar (47) with four M6 x 40mm Button Bolts 5 (53) and four M6 Nylon Locknuts (54). 54 6. 5.
English Manual
Page 8
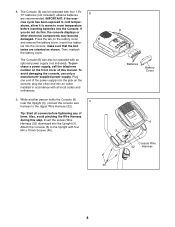
..., reattach the battery cover. Plug one end of the power supply into the Console. plug the other electronic components may become damaged. Also, avoid pinching the Wire Harness during this , the console displays or other end into an outlet installed in accordance with four M4 x 15mm Screws (40). 6 Batteries Battery Cover 6 3 Console Wire 32 Harness 40 8 alkaline batteries 8 are oriented as shown. Tip: Start all local codes and ordinances...
..., reattach the battery cover. Plug one end of the power supply into the Console. plug the other electronic components may become damaged. Also, avoid pinching the Wire Harness during this , the console displays or other end into an outlet installed in accordance with four M4 x 15mm Screws (40). 6 Batteries Battery Cover 6 3 Console Wire 32 Harness 40 8 alkaline batteries 8 are oriented as shown. Tip: Start all local codes and ordinances...
English Manual
Page 9
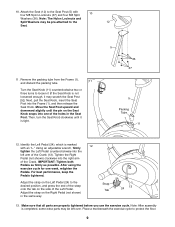
... using the exercise cycle for one of the Left Pedal. Strap Tab 24 13 13. Using an adjustable wrench, firmly 12 tighten the Left Pedal counterclockwise into the right arm of the Crank (13). Tighten the Right Pedal (not shown) clockwise into the left over. Note: After assembly is completed, some extra parts may be pre-attached to loosen it may be left arm of the Crank. Adjust...
... using the exercise cycle for one of the Left Pedal. Strap Tab 24 13 13. Using an adjustable wrench, firmly 12 tighten the Left Pedal counterclockwise into the right arm of the Crank (13). Tighten the Right Pedal (not shown) clockwise into the left over. Note: After assembly is completed, some extra parts may be pre-attached to loosen it may be left arm of the Crank. Adjust...
English Manual
Page 10
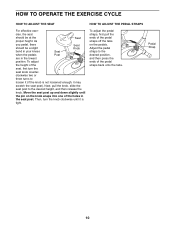
.... Pedal Strap 10 cise, the seat should be at the Seat proper height. Move the seat post up and down slightly until it is not loosened enough, it (if the knob is tight. Adjust the pedal straps to the desired height, and then release the knob. Then, turn the seat knob counter- HOW TO OPERATE THE EXERCISE CYCLE HOW TO ADJUST THE SEAT HOW TO ADJUST THE PEDAL STRAPS For...
.... Pedal Strap 10 cise, the seat should be at the Seat proper height. Move the seat post up and down slightly until it is not loosened enough, it (if the knob is tight. Adjust the pedal straps to the desired height, and then release the knob. Then, turn the seat knob counter- HOW TO OPERATE THE EXERCISE CYCLE HOW TO ADJUST THE SEAT HOW TO ADJUST THE PEDAL STRAPS For...

English Manual
Page 11
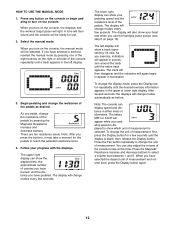
.... You can change the resistance of the pedals with the touch of the console, you can even measure your favorite music or audio books while you to your heart rate using the handgrip pulse sensor. To use the manual mode of the console, remove the plastic. 11 When you exercise, the console will provide continuous exercise feedback. As you select the manual mode of a button. You can even connect your MP3 player...
.... You can change the resistance of the pedals with the touch of the console, you can even measure your favorite music or audio books while you to your heart rate using the handgrip pulse sensor. To use the manual mode of the console, remove the plastic. 11 When you exercise, the console will provide continuous exercise feedback. As you select the manual mode of a button. You can even connect your MP3 player...
English Manual
Page 12
... change modes every few seconds. The left display. 3. As you exercise, indicators will light. Press the Magnetic Resistance increase and decrease buttons to turn on the console, the displays and the workout target pacer will appear in succession around the track until the desired exercise information appears in either miles or kilometers. The upper right display can show your heart rate when you pedal, change modes every few seconds. The lower right display...
... change modes every few seconds. The left display. 3. As you exercise, indicators will light. Press the Magnetic Resistance increase and decrease buttons to turn on the console, the displays and the workout target pacer will appear in succession around the track until the desired exercise information appears in either miles or kilometers. The upper right display can show your heart rate when you pedal, change modes every few seconds. The lower right display...
English Manual
Page 13
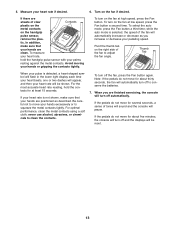
... moving your heart rate if desired. 6. while the auto mode is selected, the speed of tones will sound and the console will automatically turn on the handgrip pulse sensor, remove the plas- For optimal performance, clean the metal contacts using a soft cloth; When you are sheets of the fan to move for at least 15 seconds. tic. To turn off automatically. If the pedals...
... moving your heart rate if desired. 6. while the auto mode is selected, the speed of tones will sound and the console will automatically turn on the handgrip pulse sensor, remove the plas- For optimal performance, clean the metal contacts using a soft cloth; When you are sheets of the fan to move for at least 15 seconds. tic. To turn off automatically. If the pedals...
English Manual
Page 14
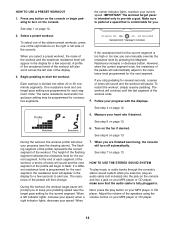
... resistance of the profile will begin pedaling to the resistance level programmed for several seconds, a series of the pedals will prompt you can manually override the resistance level by pressing the Magnetic Resistance increase or decrease button. During the workout, the workout target pacer will automatically adjust to turn off automatically. When 7. HOW TO USE A PRESET WORKOUT 1. Press any button on the console. Select a preset workout. Each workout is fully plugged in the display...
... resistance of the profile will begin pedaling to the resistance level programmed for several seconds, a series of the pedals will prompt you can manually override the resistance level by pressing the Magnetic Resistance increase or decrease button. During the workout, the workout target pacer will automatically adjust to turn off automatically. When 7. HOW TO USE A PRESET WORKOUT 1. Press any button on the console. Select a preset workout. Each workout is fully plugged in the display...
English Manual
Page 15
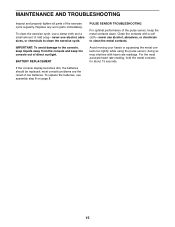
.... BATTERY REPLACEMENT Avoid moving your hands or squeezing the metal contacts too tightly while using the pulse sensor; Clean the contacts with heart rate readings. most accurate heart rate reading, hold the metal contacts for about 15 seconds. To clean the exercise cycle, use a damp cloth and a small amount of direct sunlight. If the console display becomes dim, the batteries should be replaced; MAINTENANCE AND TROUBLESHOOTING Inspect and properly tighten...
.... BATTERY REPLACEMENT Avoid moving your hands or squeezing the metal contacts too tightly while using the pulse sensor; Clean the contacts with heart rate readings. most accurate heart rate reading, hold the metal contacts for about 15 seconds. To clean the exercise cycle, use a damp cloth and a small amount of direct sunlight. If the console display becomes dim, the batteries should be replaced; MAINTENANCE AND TROUBLESHOOTING Inspect and properly tighten...
English Manual
Page 16
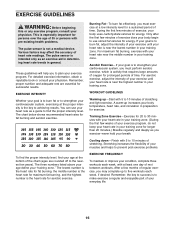
... numbers listed above your age define your training zone. The pulse sensor is activity that requires large amounts of oxygen for a sustained period of the chart (ages are essential for energy. You can use stored fat calories for successful results. This is not a medical device. The chart below shows recommended heart rates for aerobic exercise. Aerobic Exercise-If your heart rate as a guide to five workouts...
... numbers listed above your age define your training zone. The pulse sensor is activity that requires large amounts of oxygen for a sustained period of the chart (ages are essential for energy. You can use stored fat calories for successful results. This is not a medical device. The chart below shows recommended heart rates for aerobic exercise. Aerobic Exercise-If your heart rate as a guide to five workouts...
English Manual
Page 17
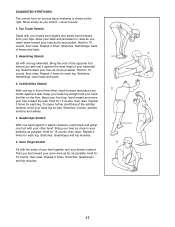
...and place your hands against the inner thigh of your feet together and your extended leg. Hamstring Stretch Sit with the soles of your knees outward. Bend your front leg, lean forward and move your groin area as far as possible. To cause further stretching of knees and...never bounce. 1. Inner Thigh Stretch Sit with one leg extended. Move slowly as well. Stretches: Calves, achilles tendons and ankles. 4. Repeat 3 times for 15 counts, then relax. Stretches: Hamstrings, lower back and groin. 3. SUGGESTED STRETCHES The correct form for balance, reach back and grasp one foot with...
...and place your hands against the inner thigh of your feet together and your extended leg. Hamstring Stretch Sit with the soles of your knees outward. Bend your front leg, lean forward and move your groin area as far as possible. To cause further stretching of knees and...never bounce. 1. Inner Thigh Stretch Sit with one leg extended. Move slowly as well. Stretches: Calves, achilles tendons and ankles. 4. Repeat 3 times for 15 counts, then relax. Stretches: Hamstrings, lower back and groin. 3. SUGGESTED STRETCHES The correct form for balance, reach back and grasp one foot with...
English Manual
Page 18
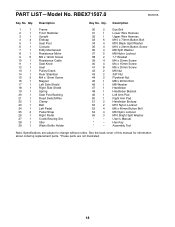
...Assembly Tool Note: Specifications are not illustrated. 18 Qty. PART LIST-Model No. Qty. Description 1 1 Frame 2 1 Front Stabilizer 3 1 Upright 4 4 Endcap 5 1 Seat Post 6 1 Console 7 1 Eddy Mechanism 8 1 Resistance Motor 9 5 M5 x 12mm Screw 10 1 Resistance Cable 11 1 Seat Knob 12 1 Seat 13 1 Pulley/Crank 14 1 Rear Stabilizer 15 2 M4 x 15mm Screw 16 1 Magnet 17 1 Left Side Shield 18 1 Right Side Shield 19 1 Spring 20 1 Seat Post Bushing 21 1 Reed Switch/Wire 22 1 Clamp 23 1 Belt 24 1 Left Pedal 25 2 Pedal Strap...
...Assembly Tool Note: Specifications are not illustrated. 18 Qty. PART LIST-Model No. Qty. Description 1 1 Frame 2 1 Front Stabilizer 3 1 Upright 4 4 Endcap 5 1 Seat Post 6 1 Console 7 1 Eddy Mechanism 8 1 Resistance Motor 9 5 M5 x 12mm Screw 10 1 Resistance Cable 11 1 Seat Knob 12 1 Seat 13 1 Pulley/Crank 14 1 Rear Stabilizer 15 2 M4 x 15mm Screw 16 1 Magnet 17 1 Left Side Shield 18 1 Right Side Shield 19 1 Spring 20 1 Seat Post Bushing 21 1 Reed Switch/Wire 22 1 Clamp 23 1 Belt 24 1 Left Pedal 25 2 Pedal Strap...

English Manual
Page 19
EXPLODED DRAWING-Model No. RBEX71507.0 18 41 39 41 6 39 39 51 41 47 17 12 41 52 49 50 25 R0707A 41 39 41 40 3 29 15 35 55 54 55 35 2 4 34 34 24 33 13 26 54 39 39 53 36 16 5 48 33 37 53 20 32 11 27 9 22 21 45 1 4 27 25 37 30 43 38 42 10 4 28 46 19 44 9 8 34 23 31 44 30 43 42 38 7 9 4 14 33 19
EXPLODED DRAWING-Model No. RBEX71507.0 18 41 39 41 6 39 39 51 41 47 17 12 41 52 49 50 25 R0707A 41 39 41 40 3 29 15 35 55 54 55 35 2 4 34 34 24 33 13 26 54 39 39 53 36 16 5 48 33 37 53 20 32 11 27 9 22 21 45 1 4 27 25 37 30 43 38 42 10 4 28 46 19 44 9 8 34 23 31 44 30 43 42 38 7 9 4 14 33 19
English Manual
Page 20
... to the terms set forth above limitation may not apply to the original purchaser. ICON's obligation under normal use , costs of removal, installation or other rights which warranty claims are made must be free from defects in its authorized service centers. ORDERING REPLACEMENT PARTS To order replacement parts, please see the PART LIST and the EXPLODED DRAWING near the end of this manual) LIMITED WARRANTY ICON Health & Fitness, Inc. (ICON) warrants this...
... to the terms set forth above limitation may not apply to the original purchaser. ICON's obligation under normal use , costs of removal, installation or other rights which warranty claims are made must be free from defects in its authorized service centers. ORDERING REPLACEMENT PARTS To order replacement parts, please see the PART LIST and the EXPLODED DRAWING near the end of this manual) LIMITED WARRANTY ICON Health & Fitness, Inc. (ICON) warrants this...


