
English Manual
Page 5
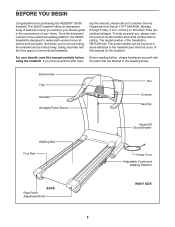
... with the parts that are labeled in the convenience of this manual for purchasing the REEBOK® 3500C treadmill. Book Holder Tray Handrail Handgrip Pulse Sensor Fan Console Key/Clip Walking Belt Foot Rail Reset/Off Circuit Breaker Power Cord Adjustable Cushioned Walking Platform...1-877-994-4999, Monday through Friday, 6 a.m. From the advanced console to the cushioned walking platform, the 3500C treadmill is RBTL091040. BEFORE YOU BEGIN Congratulations for the location). The model number of conventional treadmills. For your home. If you , please note the product model ...
... with the parts that are labeled in the convenience of this manual for purchasing the REEBOK® 3500C treadmill. Book Holder Tray Handrail Handgrip Pulse Sensor Fan Console Key/Clip Walking Belt Foot Rail Reset/Off Circuit Breaker Power Cord Adjustable Cushioned Walking Platform...1-877-994-4999, Monday through Friday, 6 a.m. From the advanced console to the cushioned walking platform, the 3500C treadmill is RBTL091040. BEFORE YOU BEGIN Congratulations for the location). The model number of conventional treadmills. For your home. If you , please note the product model ...
English Manual
Page 6
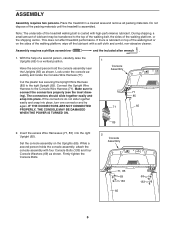
...If there is lubricant on top of the walking belt or on the Uprights (65). Set the console assembly on the sides of the treadmill walking belt is assembled. Place the treadmill in a cleared area and remove all packing materials. Note: The underside of the walking platform, wipe...amount of lubricant may be transferred to the top of the walking belt, the sides of the packing materials until the treadmill is coated with four Console Bolts (133) and four Console Washers (69) as shown. Assembly requires a phillips screwdriver and the included allen wrench . 1. Make sure to ...
...If there is lubricant on top of the walking belt or on the Uprights (65). Set the console assembly on the sides of the treadmill walking belt is assembled. Place the treadmill in a cleared area and remove all packing materials. Note: The underside of the walking platform, wipe...amount of lubricant may be transferred to the top of the walking belt, the sides of the packing materials until the treadmill is coated with four Console Bolts (133) and four Console Washers (69) as shown. Assembly requires a phillips screwdriver and the included allen wrench . 1. Make sure to ...
English Manual
Page 7
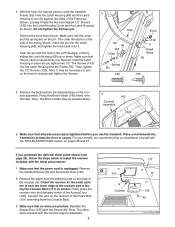
... Pin 132 132 5 Small Holes 55 143 4. Make sure that the collar and the spring are pinched. Make sure that you use the treadmill. For your benefit, we recommend that the pin can be discarded. 7 101 A Cylinder 117 135 40 Firmly press the receiver onto the ...of a second person, raise the treadmill Frame (55). Make sure that no wires are on the side of the receiver (A). Place a mat beneath the treadmill to install the receiver included with the receiver may be on the pin. The collar should be preassembled. 4 Console Assembly 142 Tape 5. Remove the ...
... Pin 132 132 5 Small Holes 55 143 4. Make sure that the collar and the spring are pinched. Make sure that you use the treadmill. For your benefit, we recommend that the pin can be discarded. 7 101 A Cylinder 117 135 40 Firmly press the receiver onto the ...of a second person, raise the treadmill Frame (55). Make sure that no wires are on the side of the receiver (A). Place a mat beneath the treadmill to install the receiver included with the receiver may be on the pin. The collar should be preassembled. 4 Console Assembly 142 Tape 5. Remove the ...
English Manual
Page 9
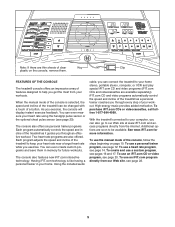
...iFIT.com technology is selected, the speed and incline of the treadmill as it guides you can be available. High-energy music provides added motivation. To use a custom program, see page 14. The console also offers six personal trainer programs. Each program automatically controls the ...heart rate near a target heart rate while you exercise, the console will display instant exercise feedback. iFIT.com CD and video programs automatically control the speed and incline of the treadmill can connect the treadmill to keep your heart rate using the handgrip pulse sensor or ...
...iFIT.com technology is selected, the speed and incline of the treadmill as it guides you can be available. High-energy music provides added motivation. To use a custom program, see page 14. The console also offers six personal trainer programs. Each program automatically controls the ...heart rate near a target heart rate while you exercise, the console will display instant exercise feedback. iFIT.com CD and video programs automatically control the speed and incline of the treadmill can connect the treadmill to keep your heart rate using the handgrip pulse sensor or ...
English Manual
Page 10
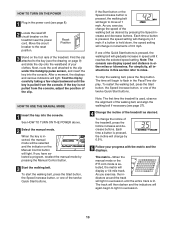
... speed setting. Reset Position 3 Stand on the treadmill near the power cord. If the Start button or the Speed increase button is pulled from the console, adjust the position of the clip. Note: The first time the treadmill is not pulled from the console. HOW TO USE THE MANUAL MODE 1 Insert ...the key into the console. For simplicity, all instructions in this section refer to flash...
... speed setting. Reset Position 3 Stand on the treadmill near the power cord. If the Start button or the Speed increase button is pulled from the console, adjust the position of the clip. Note: The first time the treadmill is not pulled from the console. HOW TO USE THE MANUAL MODE 1 Insert ...the key into the console. For simplicity, all instructions in this section refer to flash...
English Manual
Page 11
...your hands are clean. Speed display-This display shows the speed of the treadmill. Pace/Time display- When a program is selected, hold down the Stop button while inserting the key into the console. To turn on the console remain lit after the walking belt is selected, remove the key. Step...unit of measurement is stopped, the fan will appear in the "demo" mode. sor, first make sure that you are finished using the treadmill, move the reset/off circuit breaker to hold the Contacts handgrip pulse sensor, with your hands. Avoid moving your palms on the foot ...
...your hands are clean. Speed display-This display shows the speed of the treadmill. Pace/Time display- When a program is selected, hold down the Stop button while inserting the key into the console. To turn on the console remain lit after the walking belt is selected, remove the key. Step...unit of measurement is stopped, the fan will appear in the "demo" mode. sor, first make sure that you are finished using the treadmill, move the reset/off circuit breaker to hold the Contacts handgrip pulse sensor, with your hands. Avoid moving your palms on the foot ...
English Manual
Page 12
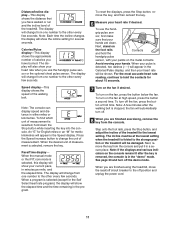
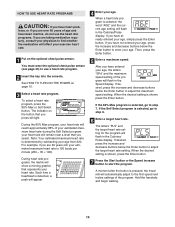
... will automatically adjust to alert you. Hold the handrails and begin walking. tings are not shown in the flashing Current Segment column and the treadmill will gradually increase during the first half of the program and then gradually decrease during the last half. 3 Press the Start button or the...speed and/or incline of the program. Note: If all speed settings will move to the first speed and incline settings of the treadmill is divided into the console. The walking belt will then slow to the left, the speed settings may move one column to the left again, the speed...
... will automatically adjust to alert you. Hold the handrails and begin walking. tings are not shown in the flashing Current Segment column and the treadmill will gradually increase during the first half of the program and then gradually decrease during the last half. 3 Press the Start button or the...speed and/or incline of the program. Note: If all speed settings will move to the first speed and incline settings of the treadmill is divided into the console. The walking belt will then slow to the left, the speed settings may move one column to the left again, the speed...
English Manual
Page 13
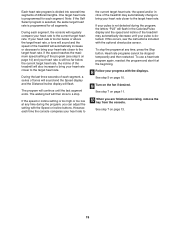
... time will automatically adjust to the off the demo mode. When you are finished using the treadmill, move at 1 mph. See step 6 on page 11. 6 Turn on the console remain lit after the key is removed, the console is at any time, press the Stop button. See step 7 on page 10. 5 Measure ...the displays. To stop the program at the lowest setting. Next, remove the key from the console. To restart the program, press the Start button or the Speed increase button. When the next segment of the treadmill is in the "demo" mode. See page 23 and turn off position and unplug the...
... time will automatically adjust to the off the demo mode. When you are finished using the treadmill, move at 1 mph. See step 6 on page 11. 6 Turn on the console remain lit after the key is removed, the console is at any time, press the Stop button. See step 7 on page 10. 5 Measure ...the displays. To stop the program at the lowest setting. Next, remove the key from the console. To restart the program, press the Start button or the Speed increase button. When the next segment of the treadmill is in the "demo" mode. See page 23 and turn off position and unplug the...
English Manual
Page 14
... will light. When a heart rate program is shown, press the Enter button. during the Self Select program, your estimated maximum heart rate is pressed, the treadmill will flash in the Speed display. Hold the handrails and begin walking. 14 See HOW TO TURN ON THE POWER on the optional chest pulse... 190 beats per minute (220 - 30 = 190). lems, or if you have been inactive, do not use a heart rate program. 2 Insert the key into the console.
... will light. When a heart rate program is shown, press the Enter button. during the Self Select program, your estimated maximum heart rate is pressed, the treadmill will flash in the Speed display. Hold the handrails and begin walking. 14 See HOW TO TURN ON THE POWER on the optional chest pulse... 190 beats per minute (220 - 30 = 190). lems, or if you have been inactive, do not use a heart rate program. 2 Insert the key into the console.
English Manual
Page 15
...Select program is selected, the same target heart rate is detected. During each time the console compares your heart rate to the current target heart rate, the speed and/or incline of the treadmill will also increase to bring your heart rate is programmed for all segments. The program will... then slow to a stop the program at the beginning. 8 Follow your pulse is not detected during the program, you are finished exercising, remove the key from the console. If your...
...Select program is selected, the same target heart rate is detected. During each time the console compares your heart rate to the current target heart rate, the speed and/or incline of the treadmill will also increase to bring your heart rate is programmed for all segments. The program will... then slow to a stop the program at the beginning. 8 Follow your pulse is not detected during the program, you are finished exercising, remove the key from the console. If your...

English Manual
Page 16
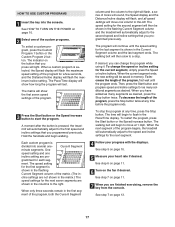
... you are not shown in the matrix will then be saved in the Current Segment column. The indicator on page 10. 2 Select one of the treadmill as desired by pressing the Speed and Incline buttons. ment. Continue programming speed and incline settings for the first segment, simply adjust the speed and... to move. The speed setting for the second segment as desired; The speed setting for each seg- See the matrix. Current Segment vided into the console.
... you are not shown in the matrix will then be saved in the Current Segment column. The indicator on page 10. 2 Select one of the treadmill as desired by pressing the Speed and Incline buttons. ment. Continue programming speed and incline settings for the first segment, simply adjust the speed and... to move. The speed setting for the second segment as desired; The speed setting for each seg- See the matrix. Current Segment vided into the console.
English Manual
Page 17
...settings that you programmed previously. The walking belt will automatically adjust to move one incline setting are finished exercising, remove the key from the console. When the next segment of the matrix. (The in the Pace/Time display. The matrix will show how long the program will ... adjust to the left. The speed setting for the second segment will then be saved in the flashing Current Segment column and the treadmill will last. Current Segment minute segments. The speed setting for the first segment is shown in the Current Segment column and the last...
...settings that you programmed previously. The walking belt will automatically adjust to move one incline setting are finished exercising, remove the key from the console. When the next segment of the matrix. (The in the Pace/Time display. The matrix will show how long the program will ... adjust to the left. The speed setting for the second segment will then be saved in the flashing Current Segment column and the treadmill will last. Current Segment minute segments. The speed setting for the first segment is shown in the Current Segment column and the last...
English Manual
Page 20
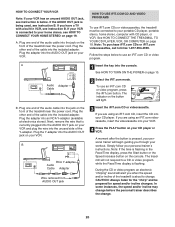
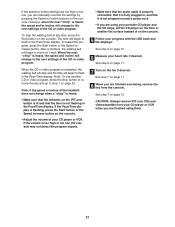
...TO CONNECT THE TREADMILL TO YOUR CD PLAYER, VCR, OR COMPUTER on page 10. RF OUT CH 34 OUT AUDIO OUT See HOW TO TURN ON THE POWER on page 18. The indicator on the console. Plug the ... OUT jack on your VCR and plug the wire into the console. If you when the speed and/or incline of the Y-adapter. The treadmill will not respond to a CD or video program while the Pace... To use an iFIT.com CD or video program, press the iFIT.com button. Plug one end of the treadmill near the power cord. Plug the Y-adapter into the included adapter. B ANT. Simply follow your portable CD ...
...TO CONNECT THE TREADMILL TO YOUR CD PLAYER, VCR, OR COMPUTER on page 10. RF OUT CH 34 OUT AUDIO OUT See HOW TO TURN ON THE POWER on page 18. The indicator on the console. Plug the ... OUT jack on your VCR and plug the wire into the console. If you when the speed and/or incline of the Y-adapter. The treadmill will not respond to a CD or video program while the Pace... To use an iFIT.com CD or video program, press the iFIT.com button. Plug one end of the treadmill near the power cord. Plug the Y-adapter into the included adapter. B ANT. Simply follow your portable CD ...
English Manual
Page 21
...CD or video program, press the Stop button or remove the key and go to the next settings of the treadmill does not change when a "chirp" is heard: • Make sure that the indicator on the iFIT....the Pace/Time display. Note: To use another flat surface instead of on the console. • Adjust the volume of the CD or video program. If the volume is too high or too low,...settings of your progress with the LED track and the displays. See step 6 on page 11. 7 Turn on the console. See step 7 on page 11. 8 When you are finished exercising, remove the key from your heart rate if ...
...CD or video program, press the Stop button or remove the key and go to the next settings of the treadmill does not change when a "chirp" is heard: • Make sure that the indicator on the iFIT....the Pace/Time display. Note: To use another flat surface instead of on the console. • Adjust the volume of the CD or video program. If the volume is too high or too low,...settings of your progress with the LED track and the displays. See step 6 on page 11. 7 Turn on the console. See step 7 on page 11. 8 When you are finished exercising, remove the key from your heart rate if ...
English Manual
Page 22
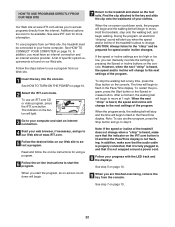
...computer. Find the clip attached to use programs from our Web site. 1 Insert the key into the console. See www.iFIT.com for using a program. 6 Follow the on-line instructions to the treadmill and stand on the button will begin walking. The indicator on the foot rails. Read and follow the... on the console. See step 7 on -screen countdown ends, the program will begin and the walking belt will light. ...
...computer. Find the clip attached to use programs from our Web site. 1 Insert the key into the console. See www.iFIT.com for using a program. 6 Follow the on-line instructions to the treadmill and stand on the button will begin walking. The indicator on the foot rails. Read and follow the... on the console. See step 7 on -screen countdown ends, the program will begin and the walking belt will light. ...
English Manual
Page 23
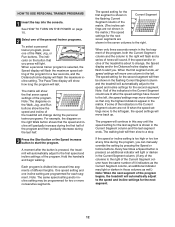
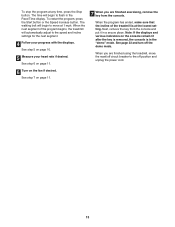
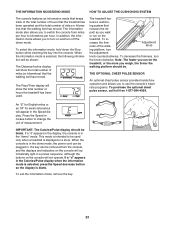
THE INFORMATION MODE/DEMO MODE HOW TO ADJUST THE CUSHIONING SYSTEM The console features an information mode that keeps track of the total number of hours that the treadmill has been operated and the total number of the walk- To select the information mode, hold down the Stop button ... be used . The Pace/Time display will show the total number of hours the treadmill has been used only when a treadmill is intended to switch the console from the console, and the displays and indicators on the console will automatically light in a preset sequence, although the buttons on and turn off the...
THE INFORMATION MODE/DEMO MODE HOW TO ADJUST THE CUSHIONING SYSTEM The console features an information mode that keeps track of the total number of hours that the treadmill has been operated and the total number of the walk- To select the information mode, hold down the Stop button ... be used . The Pace/Time display will show the total number of hours the treadmill has been used only when a treadmill is intended to switch the console from the console, and the displays and indicators on the console will automatically light in a preset sequence, although the buttons on and turn off the...
English Manual
Page 26
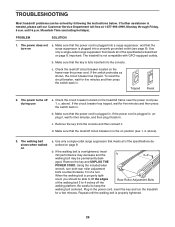
... near the power cord. Be careful to 4 inches off circuit breaker is plugged into the console. PROBLEM SOLUTION 1. Make sure that the power cord is in . Important: The treadmill is needed, please call our Customer Service Department toll-free at 1-877-994-4999, Monday through Friday, ... above ). Remove the key and UNPLUG THE POWER CORD. above ). 3. b. If the walking belt is properly tight- TROUBLESHOOTING Most treadmill problems can be permanently dam- Make sure that meets all of the specifications described on page 8. Check the reset/off during use a. ...
... near the power cord. Be careful to 4 inches off circuit breaker is plugged into the console. PROBLEM SOLUTION 1. Make sure that the power cord is in . Important: The treadmill is needed, please call our Customer Service Department toll-free at 1-877-994-4999, Monday through Friday, ... above ). Remove the key and UNPLUG THE POWER CORD. above ). 3. b. If the walking belt is properly tight- TROUBLESHOOTING Most treadmill problems can be permanently dam- Make sure that meets all of the specifications described on page 8. Check the reset/off during use a. ...
English Manual
Page 27
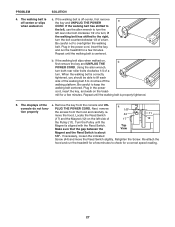
... re- PLUG THE POWER CORD. If necessary, loosen the indicated Screw (44) and move the hood. Re-attach the hood and run the treadmill for a few minutes. The walking belt is centered. If the walking belt is about 1/8". Plug in the power cord, insert the key, ...and run the treadmill for a few minutes. move the Reed Switch slightly. Next, remove a 1/8" tion properly the screws from the console and UNconsole do not func- Retighten the Screw. if the walking belt has shifted to the...
... re- PLUG THE POWER CORD. If necessary, loosen the indicated Screw (44) and move the hood. Re-attach the hood and run the treadmill for a few minutes. The walking belt is centered. If the walking belt is about 1/8". Plug in the power cord, insert the key, ...and run the treadmill for a few minutes. move the Reed Switch slightly. Next, remove a 1/8" tion properly the screws from the console and UNconsole do not func- Retighten the Screw. if the walking belt has shifted to the...
English Manual
Page 30
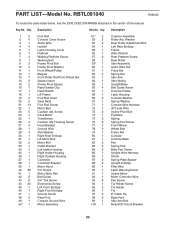
... Controller Controller Bracket Motor Hood 3/4" Screw Motor Belly Pan Belt Guide 3/4" Tek Screw Electronics Screw Left Front Endcap Right Front Endcap Ground Screw Rear Foot Console Ground Wire Motor Assembly 51* 2 52 2 53 2 54 1 55 1 56 1 57 2 58 1 59* 1 60 1 61 1 62 4 63 1 64 1 65 1 66 4 67 1 68 ... 32 2 33 1 34 1 35 1 36 1 37 1 38 1 39 1 40 56 41 1 42 2 43 8 44 20 45 1 46 1 47 1 48 2 49 1 50* 1 Foot Rail Console Cover Screw Audio Wire Isolator Latch Housing Cover Platform Walking Platform Screw Walking Belt Frame Pivot Bolt Frame Pivot Washer Front Wheel/Pulley Magnet Front...
... Controller Controller Bracket Motor Hood 3/4" Screw Motor Belly Pan Belt Guide 3/4" Tek Screw Electronics Screw Left Front Endcap Right Front Endcap Ground Screw Rear Foot Console Ground Wire Motor Assembly 51* 2 52 2 53 2 54 1 55 1 56 1 57 2 58 1 59* 1 60 1 61 1 62 4 63 1 64 1 65 1 66 4 67 1 68 ... 32 2 33 1 34 1 35 1 36 1 37 1 38 1 39 1 40 56 41 1 42 2 43 8 44 20 45 1 46 1 47 1 48 2 49 1 50* 1 Foot Rail Console Cover Screw Audio Wire Isolator Latch Housing Cover Platform Walking Platform Screw Walking Belt Frame Pivot Bolt Frame Pivot Washer Front Wheel/Pulley Magnet Front...
English Manual
Page 31
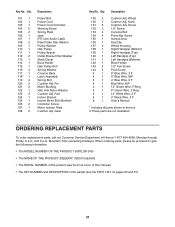
..., please be prepared to give the following information: • The MODEL NUMBER OF THE PRODUCT (RBTL091040) • The NAME OF THE PRODUCT (REEBOK® 3500C treadmill) • The SERIAL NUMBER of the product (see the front cover of this manual) • The KEY NUMBER and DESCRIPTION of the part... Rear Roller Star Washer Pulley Washer Idler Pulley Pulley Spacer Outlet Bracket Star Washer Static Decal Book Holder Idler Pulley Bolt Spring Washer Console Back Latch Assembly Spring Bolt Cushion Adj. Pin Motor Bushing Idler Arm Nylon Washer Cushion Adj. Key No. Rod Incline Bracket Incline...
..., please be prepared to give the following information: • The MODEL NUMBER OF THE PRODUCT (RBTL091040) • The NAME OF THE PRODUCT (REEBOK® 3500C treadmill) • The SERIAL NUMBER of the product (see the front cover of this manual) • The KEY NUMBER and DESCRIPTION of the part... Rear Roller Star Washer Pulley Washer Idler Pulley Pulley Spacer Outlet Bracket Star Washer Static Decal Book Holder Idler Pulley Bolt Spring Washer Console Back Latch Assembly Spring Bolt Cushion Adj. Pin Motor Bushing Idler Arm Nylon Washer Cushion Adj. Key No. Rod Incline Bracket Incline...


