
English Manual
Page 2
¨ TABLE OF CONTENTS IMPORTANT PRECAUTIONS 3 BEFORE YOU BEGIN 5 ASSEMBLY 6 TREADMILL OPERATION 8 HOW TO FOLD AND MOVE THE TREADMILL 24 TROUBLESHOOTING 26 EXERCISE GUIDELINES 28 PART LIST 30 HOW TO ORDER REPLACEMENT PARTS 31 LIMITED WARRANTY Back Cover Note: An EXPLODED DRAWING is manufactured and distributed under license from Reebok International. 2 This product is attached in the center of Reebok. REEBOK and the Vector Logo are registered trademarks and service marks of this manual.
¨ TABLE OF CONTENTS IMPORTANT PRECAUTIONS 3 BEFORE YOU BEGIN 5 ASSEMBLY 6 TREADMILL OPERATION 8 HOW TO FOLD AND MOVE THE TREADMILL 24 TROUBLESHOOTING 26 EXERCISE GUIDELINES 28 PART LIST 30 HOW TO ORDER REPLACEMENT PARTS 31 LIMITED WARRANTY Back Cover Note: An EXPLODED DRAWING is manufactured and distributed under license from Reebok International. 2 This product is attached in the center of Reebok. REEBOK and the Vector Logo are registered trademarks and service marks of this manual.
English Manual
Page 3
... small increments to persons, read the following important precautions and information before operating the treadmill. 1. If the control system is fully closed. 3 Keep the treadmill indoors, away from heated surfaces. 13. When connecting the power cord (see your local REEBOK dealer or call 1-877-9944999 and order part number 146148. 15. To purchase...
... small increments to persons, read the following important precautions and information before operating the treadmill. 1. If the control system is fully closed. 3 Keep the treadmill indoors, away from heated surfaces. 13. When connecting the power cord (see your local REEBOK dealer or call 1-877-9944999 and order part number 146148. 15. To purchase...
English Manual
Page 4
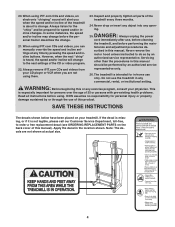
...the speed and/or incline may change to do so by pressing the speed and incline buttons. Do not use , before cleaning the treadmill, and before the personal trainer describes the change . This is not legible, please call our Customer Service Department, toll-free, to ...: Before beginning this manual. SAVE THESE INSTRUCTIONS The decals shown below have been placed on the back cover of this product. The treadmill is about to order a free replacement decal (see ORDERING REPLACEMENT PARTS on your physician. ICON assumes no responsibility for in this manual...
...the speed and/or incline may change to do so by pressing the speed and incline buttons. Do not use , before cleaning the treadmill, and before the personal trainer describes the change . This is not legible, please call our Customer Service Department, toll-free, to ...: Before beginning this manual. SAVE THESE INSTRUCTIONS The decals shown below have been placed on the back cover of this product. The treadmill is about to order a free replacement decal (see ORDERING REPLACEMENT PARTS on your physician. ICON assumes no responsibility for in this manual...
English Manual
Page 5
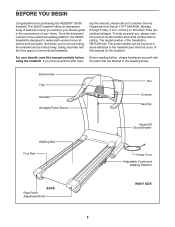
... a.m. If you achieve your fitness goals in the drawing below. The 3500C treadmill offers an impressive array of conventional treadmills. From the advanced console to the cushioned walking platform, the 3500C treadmill is RBTL091040. The serial number can be folded away, taking less than..., please familiarize yourself with the parts that are labeled in the convenience of the treadmill is designed to the treadmill (see the front cover of this manual for purchasing the REEBOK® 3500C treadmill. BEFORE YOU BEGIN Congratulations for the location). until 6 p.m.
... a.m. If you achieve your fitness goals in the drawing below. The 3500C treadmill offers an impressive array of conventional treadmills. From the advanced console to the cushioned walking platform, the 3500C treadmill is RBTL091040. The serial number can be folded away, taking less than..., please familiarize yourself with the parts that are labeled in the convenience of the treadmill is designed to the treadmill (see the front cover of this manual for purchasing the REEBOK® 3500C treadmill. BEFORE YOU BEGIN Congratulations for the location). until 6 p.m.
English Manual
Page 6
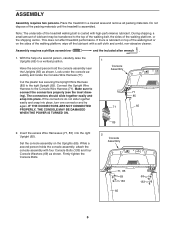
...If the connectors do not slide together easily and snap into place. Set the console assembly on the sides of the packing materials until the treadmill is coated with four Console Bolts (133) and four Console Washers (69) as shown. Do not dispose of the walking platform, wipe ... IS TURNED ON. 1 Console Assembly 71 71 85 65 85 2. ASSEMBLY Assembly requires two persons. If there is lubricant on top of the treadmill walking belt is assembled. Connect the Upright Wire Harness to a vertical position. Have the second person hold the console assembly near the Uprights (65...
...If the connectors do not slide together easily and snap into place. Set the console assembly on the sides of the packing materials until the treadmill is coated with four Console Bolts (133) and four Console Washers (69) as shown. Do not dispose of the walking platform, wipe ... IS TURNED ON. 1 Console Assembly 71 71 85 65 85 2. ASSEMBLY Assembly requires two persons. If there is lubricant on top of the treadmill walking belt is assembled. Connect the Upright Wire Harness to a vertical position. Have the second person hold the console assembly near the Uprights (65...
English Manual
Page 7
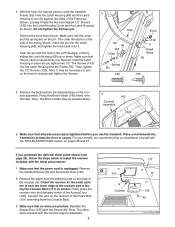
...tightened before you purchase the optional chest pulse sensor (see page 23), follow the steps below to pull on the pin. If you use the treadmill. Remove the paper from the indicated tape on the receiver to the Pulse Wire (101) extending from the pin. Firmly press the receiver onto ...the indicated corner of a second person, raise the treadmill Frame (55). Reattach the Access Door (135) with the hole in place as you familiarize yourself with the chest pulse sensor. 1. Note: The other...
...tightened before you purchase the optional chest pulse sensor (see page 23), follow the steps below to pull on the pin. If you use the treadmill. Remove the paper from the indicated tape on the receiver to the Pulse Wire (101) extending from the pin. Firmly press the receiver onto ...the indicated corner of a second person, raise the treadmill Frame (55). Reattach the Access Door (135) with the hole in place as you familiarize yourself with the chest pulse sensor. 1. Note: The other...
English Manual
Page 8
...TVSS). The surge suppressor must be grounded. There must have a proper outlet installed by a metal screw. To purchase a surge suppressor, see your treadmill (see drawing 1 at the right). This product must be a monitoring light on a nominal 120-volt circuit, and has a grounding plug that... electrician to whether the product is grounded before using an adapter. 8 Check with your local REEBOK dealer or call 1-877-994-4999 and order part number 146148. Important: The treadmill is for use on the surge suppressor to indicate whether it should be seriously damaged by a...
...TVSS). The surge suppressor must be grounded. There must have a proper outlet installed by a metal screw. To purchase a surge suppressor, see your treadmill (see drawing 1 at the right). This product must be a monitoring light on a nominal 120-volt circuit, and has a grounding plug that... electrician to whether the product is grounded before using an adapter. 8 Check with your local REEBOK dealer or call 1-877-994-4999 and order part number 146148. Important: The treadmill is for use on the surge suppressor to indicate whether it should be seriously damaged by a...
English Manual
Page 9
... you exercise, the console will display instant exercise feedback. iFIT.com CD and video programs automatically control the speed and incline of the treadmill to be changed with a touch of the console is like having a personal trainer in memory for more information. To create and use... manual mode of your home. The console also offers six personal trainer programs. Each program automatically controls the speed and incline of the treadmill as a personal trainer coaches you through every step of the console, follow the steps beginning on the console, remove them in your ...
... you exercise, the console will display instant exercise feedback. iFIT.com CD and video programs automatically control the speed and incline of the treadmill to be changed with a touch of the console is like having a personal trainer in memory for more information. To create and use... manual mode of your home. The console also offers six personal trainer programs. Each program automatically controls the speed and incline of the treadmill as a personal trainer coaches you through every step of the console, follow the steps beginning on the console, remove them in your ...
English Manual
Page 10
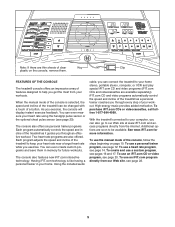
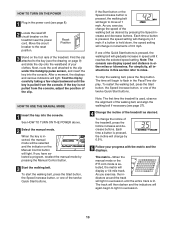
...speed and distance in this section refer to the key (see page 8). 2 Locate the reset/off circuit breaker on the foot rails of the treadmill. As you exercise, the indicators around the track will change the speed of the walking belt as desired. To start the walking belt, press ... insert the key into the console. To stop the walking belt, press the Stop button. Reset Position 3 Stand on the treadmill near the power cord. If one of the treadmill, press the Incline increase and decrease buttons. Test the clip by pressing the Manual Control button. 3 Start the walking belt....
...speed and distance in this section refer to the key (see page 8). 2 Locate the reset/off circuit breaker on the foot rails of the treadmill. As you exercise, the indicators around the track will change the speed of the walking belt as desired. To start the walking belt, press ... insert the key into the console. To stop the walking belt, press the Stop button. Reset Position 3 Stand on the treadmill near the power cord. If one of the treadmill, press the Incline increase and decrease buttons. Test the clip by pressing the Manual Control button. 3 Start the walking belt....
English Manual
Page 11
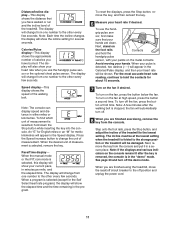
... elapsed time. Next, stand on the foot rails and hold the Contacts handgrip pulse sensor, with your heart rate will change the unit of the treadmill. To turn off the fan, press the button a third time. The display will automatically turn off position and unplug the power cord. 11 Press the... exercising, remove the key from one number to the lowest setting. See page 23 and turn on the fan at the lowest setting when the treadmill is selected (except for about 15 seconds. 7 Turn on the fan if desired. Speed display-This display shows the speed of the...
... elapsed time. Next, stand on the foot rails and hold the Contacts handgrip pulse sensor, with your heart rate will change the unit of the treadmill. To turn off the fan, press the button a third time. The display will automatically turn off position and unplug the power cord. 11 Press the... exercising, remove the key from one number to the lowest setting. See page 23 and turn on the fan at the lowest setting when the treadmill is selected (except for about 15 seconds. 7 Turn on the fan if desired. Speed display-This display shows the speed of the...
English Manual
Page 12
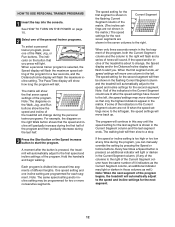
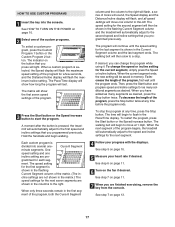
... the personal trainer programs. For example, the diagram on the Walk, Jog, and Run buttons show how the speed and incline of the treadmill will change , the Speed display and/or the Distance/Incline display will automatically adjust to the right. The speed setting for the second segment...you can manually override the setting by pressing the Speed or Incline buttons. tings are not shown in the flashing Current Segment column and the treadmill will sound. Every few seconds, and the Distance/Incline display will automatically adjust to alert you. The indicator on page 10. 2 Select ...
... the personal trainer programs. For example, the diagram on the Walk, Jog, and Run buttons show how the speed and incline of the treadmill will change , the Speed display and/or the Distance/Incline display will automatically adjust to the right. The speed setting for the second segment...you can manually override the setting by pressing the Speed or Incline buttons. tings are not shown in the flashing Current Segment column and the treadmill will sound. Every few seconds, and the Distance/Incline display will automatically adjust to alert you. The indicator on page 10. 2 Select ...
English Manual
Page 13
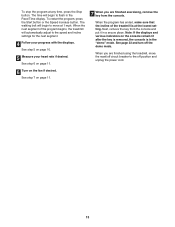
... from the console. When the program has ended, make sure that the incline of the program begins, the treadmill will begin to the off the demo mode. When you are finished using the treadmill, move the reset/off circuit breaker to move at any time, press the Stop button. See step 5 on.... 7 When you are finished exercising, remove the key from the console and put it in the Pace/Time display. When the next segment of the treadmill is in the "demo" mode. The walking belt will begin to the speed and incline settings for the next segment. 4 Follow your heart rate if...
... from the console. When the program has ended, make sure that the incline of the program begins, the treadmill will begin to the off the demo mode. When you are finished using the treadmill, move the reset/off circuit breaker to move at any time, press the Stop button. See step 5 on.... 7 When you are finished exercising, remove the key from the console and put it in the Pace/Time display. When the next segment of the treadmill is in the "demo" mode. The walking belt will begin to the speed and incline settings for the next segment. 4 Follow your heart rate if...
English Manual
Page 14
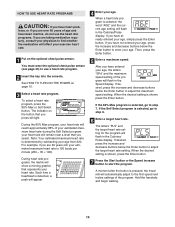
... rate setting for the program will reach approximately 85% of the program will flash in the Speed display. When the desired setting is pressed, the treadmill will affect your estimated maximum heart rate; A moment after the button is shown, press the Enter button. 7 Press the Start button or the Speed increase...
... rate setting for the program will reach approximately 85% of the program will flash in the Speed display. When the desired setting is pressed, the treadmill will affect your estimated maximum heart rate; A moment after the button is shown, press the Enter button. 7 Press the Start button or the Speed increase...
English Manual
Page 15
... three seconds of each time the console compares your heart rate to the current target heart rate, the speed and/or incline of the treadmill may automatically decrease until the last segment ends. Heart rate programs cannot be stopped temporarily and then restarted. Each heart rate program is too... far below the current target heart rate, the incline of the treadmill will also increase to bring your heart rate closer to the target heart rate. See step 7 on the fan if desired. The walking ...
... three seconds of each time the console compares your heart rate to the current target heart rate, the speed and/or incline of the treadmill may automatically decrease until the last segment ends. Heart rate programs cannot be stopped temporarily and then restarted. Each heart rate program is too... far below the current target heart rate, the incline of the treadmill will also increase to bring your heart rate closer to the target heart rate. See step 7 on the fan if desired. The walking ...

English Manual
Page 16
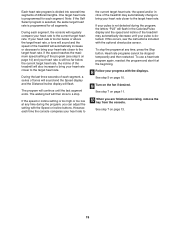
... and program the desired speed and incline settings. See HOW TO TURN ON THE POWER on page 13. 16 Every few times one of the treadmill as desired; One speed setting and one incline setting can have programmed and the number of segments that you have up to forty segments. When...
... and program the desired speed and incline settings. See HOW TO TURN ON THE POWER on page 13. 16 Every few times one of the treadmill as desired; One speed setting and one incline setting can have programmed and the number of segments that you have up to forty segments. When...
English Manual
Page 17
... handrails and begin to move one incline setting are shown in the matrix.) The speed settings for the first segment is pressed, the treadmill will automatically adjust to the first speed and incline settings that you press will automatically adjust to the right. Current Segment minute segments. ... Start button and program speed and incline settings for the second segment will then be saved in the flashing Current Segment column and the treadmill will light. To restart the program, press the Start button or the Speed increase button. A moment after the button is shown in...
... handrails and begin to move one incline setting are shown in the matrix.) The speed settings for the first segment is pressed, the treadmill will automatically adjust to the first speed and incline settings that you press will automatically adjust to the right. Current Segment minute segments. ... Start button and program speed and incline settings for the second segment will then be saved in the flashing Current Segment column and the treadmill will light. To restart the program, press the Start button or the Speed increase button. A moment after the button is shown in...
English Manual
Page 18
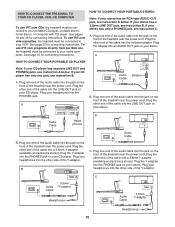
...Headphones AUDIO OUT RIGHT LEFT Audio Adapter Cable B. Plug one end of the audio cable into an AUDIO OUT jack on the front of the treadmill near the power cord. C Audio Cable 3.5mm Y-adapter Headphones Audio Cable PHONES 3.5mm Y-adapter Headphones 18 Plug your headphones into the PHONES ...jack on your stereo. Plug the other side of the treadmill near the power cord. Plug your headphones into the other end of the cable into the LINE OUT jack on the front of the ...
...Headphones AUDIO OUT RIGHT LEFT Audio Adapter Cable B. Plug one end of the audio cable into an AUDIO OUT jack on the front of the treadmill near the power cord. C Audio Cable 3.5mm Y-adapter Headphones Audio Cable PHONES 3.5mm Y-adapter Headphones 18 Plug your headphones into the PHONES ...jack on your stereo. Plug the other side of the treadmill near the power cord. Plug your headphones into the other end of the cable into the LINE OUT jack on the front of the ...
English Manual
Page 19
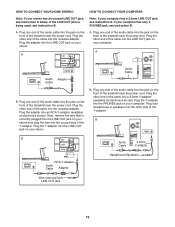
... from LINE OUT jack 19 If your computer. Plug the other side of the cable into the included adapter. Plug the other end of the treadmill near the power cord. B. Plug your stereo and plug the wire into the jack on the front of the cable into a 3.5mm Y-adapter (available at... OUT jack on your computer has a 3.5mm LINE OUT jack, see instruction B. Plug the Y-adapter into the included adapter. Plug the other end of the treadmill near the power cord. A CD VCR Amp LINE OUT LINE OUT A. HOW TO CONNECT YOUR HOME STEREO HOW TO CONNECT YOUR COMPUTER Note: If your...
... from LINE OUT jack 19 If your computer. Plug the other side of the cable into the included adapter. Plug the other end of the treadmill near the power cord. B. Plug your stereo and plug the wire into the jack on the front of the cable into a 3.5mm Y-adapter (available at... OUT jack on your computer has a 3.5mm LINE OUT jack, see instruction B. Plug the Y-adapter into the included adapter. Plug the other end of the treadmill near the power cord. A CD VCR Amp LINE OUT LINE OUT A. HOW TO CONNECT YOUR HOME STEREO HOW TO CONNECT YOUR COMPUTER Note: If your...
English Manual
Page 20
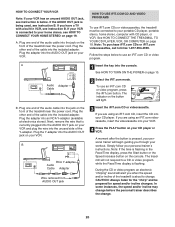
...Note: If your VCR and plug the wire into the unused side of the Y-adapter. Follow the steps below . B. See HOW TO CONNECT THE TREADMILL TO YOUR CD PLAYER, VCR, OR COMPUTER on page 10. Note: To purchase iFIT.com CDs or iFIT.com videocassettes, call toll-free 1-877-... when the speed and/or incline of the cable into your personal trainer's instructions. The indicator on the console. Plug the other end of the treadmill is being used, see instruction B. B ANT. During the CD or video program, an electronic "chirping" sound will light. CAUTION: Always listen for the "...
...Note: If your VCR and plug the wire into the unused side of the Y-adapter. Follow the steps below . B. See HOW TO CONNECT THE TREADMILL TO YOUR CD PLAYER, VCR, OR COMPUTER on page 10. Note: To purchase iFIT.com CDs or iFIT.com videocassettes, call toll-free 1-877-... when the speed and/or incline of the cable into your personal trainer's instructions. The indicator on the console. Plug the other end of the treadmill is being used, see instruction B. B ANT. During the CD or video program, an electronic "chirping" sound will light. CAUTION: Always listen for the "...
English Manual
Page 21
... can manually override the settings by pressing the Speed or Incline buttons on page 20. The time will begin to the next settings of the treadmill does not change to flash in the Pace/Time display. When the CD or video program is not wrapped around a power cord. • If you...
... can manually override the settings by pressing the Speed or Incline buttons on page 20. The time will begin to the next settings of the treadmill does not change to flash in the Pace/Time display. When the CD or video program is not wrapped around a power cord. • If you...


