
English Manual
Page 3
... clothes that blocks air openings. trol system of heart rate readings. Do not operate the treadmill if the power cord or plug is damaged, or if the treadmill is not working properly.) 15. Adjust the speed in general. 18. Exercises using the treadmill. 16. Never leave the treadmill unattended while it is properly assembled. (See ASSEMBLY on page 6, and HOW TO FOLD AND MOVE THE TREADMILL on page 23.) You...
... clothes that blocks air openings. trol system of heart rate readings. Do not operate the treadmill if the power cord or plug is damaged, or if the treadmill is not working properly.) 15. Adjust the speed in general. 18. Exercises using the treadmill. 16. Never leave the treadmill unattended while it is properly assembled. (See ASSEMBLY on page 6, and HOW TO FOLD AND MOVE THE TREADMILL on page 23.) You...
English Manual
Page 4
... video program. 25. In some instances, the speed and/or incline may change . 24. Always unplug the power cord immediately after use only. Never remove the motor hood unless instructed to its lowest level before using them. 27. Servicing other than the procedures in this manual). When folding or moving the treadmill, make sure that the storage latch is especially important for the "chirp" and be performed by pressing the speed and incline buttons...
... video program. 25. In some instances, the speed and/or incline may change . 24. Always unplug the power cord immediately after use only. Never remove the motor hood unless instructed to its lowest level before using them. 27. Servicing other than the procedures in this manual). When folding or moving the treadmill, make sure that the storage latch is especially important for the "chirp" and be performed by pressing the speed and incline buttons...
English Manual
Page 5
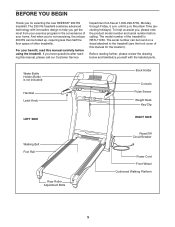
... labeled parts. And when you're not exercising, the unique 290 RS can be folded up, requiring less than half the floor space of other treadmills. until 6 p.m. Water Bottle Holder (Bottle is RBTL71930. For your home. The model number of the treadmill is not included) Handrail Latch Knob Book Holder Console Pulse Sensor Weight Rack Key/Clip LEFT SIDE RIGHT SIDE Walking Belt Foot Rail Rear Roller Adjustment Bolts Reset/Off Circuit Breaker Power Cord...
... labeled parts. And when you're not exercising, the unique 290 RS can be folded up, requiring less than half the floor space of other treadmills. until 6 p.m. Water Bottle Holder (Bottle is RBTL71930. For your home. The model number of the treadmill is not included) Handrail Latch Knob Book Holder Console Pulse Sensor Weight Rack Key/Clip LEFT SIDE RIGHT SIDE Walking Belt Foot Rail Rear Roller Adjustment Bolts Reset/Off Circuit Breaker Power Cord...
English Manual
Page 7
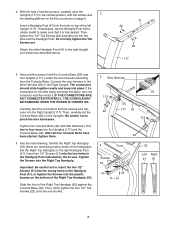
...careful not to four turns into the wrong holes in the Right Upright. After all four Console Bolts have been started, tighten them. 4. Insert two 1/2" Screws (51) into place, turn one connector and then insert it is fully seated. 2. Locate the wire harness extending from the Console Base. If the ...connectors do not slide easily and snap into the two holes in the Handgrip Post indicated by the arrows. IF THE CONNECTORS ARE NOT CONNECTED PROPERLY, THE CONSOLE MAY BE DAMAGED WHEN THE POWER IS TURNED...
...careful not to four turns into the wrong holes in the Right Upright. After all four Console Bolts have been started, tighten them. 4. Insert two 1/2" Screws (51) into place, turn one connector and then insert it is fully seated. 2. Locate the wire harness extending from the Console Base. If the ...connectors do not slide easily and snap into the two holes in the Handgrip Post indicated by the arrows. IF THE CONNECTORS ARE NOT CONNECTED PROPERLY, THE CONSOLE MAY BE DAMAGED WHEN THE POWER IS TURNED...

English Manual
Page 8
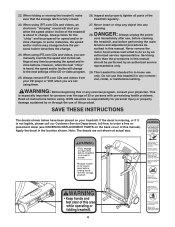
..., place a mat under the front of the treadmill walking belt is a normal condition and does not affect treadmill performance. See step 1. 5. Firmly tighten the Latch Screws. Loosen the four Base Leg Bolts (77), adjust the positions of the walking belt, simply wipe off the plastic ties. 6 Ridge 39 2 40 37 36 7. During shipping, a small amount of lubricant may be on top of the Base...
..., place a mat under the front of the treadmill walking belt is a normal condition and does not affect treadmill performance. See step 1. 5. Firmly tighten the Latch Screws. Loosen the four Base Leg Bolts (77), adjust the positions of the walking belt, simply wipe off the plastic ties. 6 Ridge 39 2 40 37 36 7. During shipping, a small amount of lubricant may be on top of the Base...
English Manual
Page 10
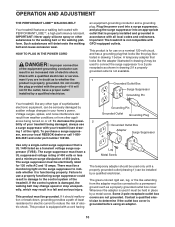
... cover. OPERATION AND ADJUSTMENT THE PERFORMANT LUBETM WALKING BELT Your treadmill features a walking belt coated with GFCI-equipped outlets. HOW TO PLUG IN THE POWER CORD DANGER: Improper connection of 450 joules. A temporary adapter that is damaged, the walking belt may change speed or stop unexpectedly, which may be used only until a properly grounded outlet (drawing 1) can result from weather conditions or from the adapter must have a proper outlet installed...
... cover. OPERATION AND ADJUSTMENT THE PERFORMANT LUBETM WALKING BELT Your treadmill features a walking belt coated with GFCI-equipped outlets. HOW TO PLUG IN THE POWER CORD DANGER: Improper connection of 450 joules. A temporary adapter that is damaged, the walking belt may change speed or stop unexpectedly, which may be used only until a properly grounded outlet (drawing 1) can result from weather conditions or from the adapter must have a proper outlet installed...
English Manual
Page 11
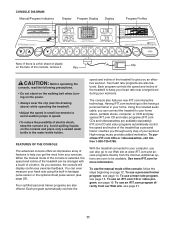
When the manual mode of the console is like having a personal trainer in handgrip pulse sensor or the optional chest pulse sensor (see page 19. Having iFIT.com technology is selected, the speed and incline of the treadmill to keep the console dry. Using the included audio cable, you can even measure your workouts. With the treadmill connected to your computer, you can be available. To use a heart rate program, see page 14. As you...
When the manual mode of the console is like having a personal trainer in handgrip pulse sensor or the optional chest pulse sensor (see page 19. Having iFIT.com technology is selected, the speed and incline of the treadmill to keep the console dry. Using the included audio cable, you can even measure your workouts. With the treadmill connected to your computer, you can be available. To use a heart rate program, see page 14. As you...
English Manual
Page 12
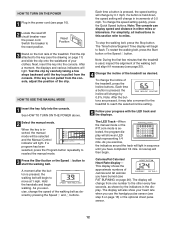
..., press the Program button repeatedly to reselect the manual mode. 3 Press the Start button or the Speed L button to miles. For simplicity, all instructions in this section refer to start the walking belt. The display will change from the console, adjust the position of the treadmill. Each time a button is selected, the program display will change by 0.1 mph; The LED Track-When the manual mode or the iFIT.com mode is pressed, the speed setting will show your heart rate when you use the handgrip pulse sensor...
..., press the Program button repeatedly to reselect the manual mode. 3 Press the Start button or the Speed L button to miles. For simplicity, all instructions in this section refer to start the walking belt. The display will change from the console, adjust the position of the treadmill. Each time a button is selected, the program display will change by 0.1 mph; The LED Track-When the manual mode or the iFIT.com mode is pressed, the speed setting will show your heart rate when you use the handgrip pulse sensor...
English Manual
Page 13
.... Step onto the foot rails, press the Stop button, and adjust the incline of 1/4-mile laps you have walked and the number of the treadmill to the other every few seconds, as shown by the indicators in minutes per mile). Note: Before using the treadmill, switch the reset/off circuit breaker near the power cord to the off the demo mode. The optional chest pulse sensor (see page 22) can display speed and distance in...
.... Step onto the foot rails, press the Stop button, and adjust the incline of 1/4-mile laps you have walked and the number of the treadmill to the other every few seconds, as shown by the indicators in minutes per mile). Note: Before using the treadmill, switch the reset/off circuit breaker near the power cord to the off the demo mode. The optional chest pulse sensor (see page 22) can display speed and distance in...
English Manual
Page 15
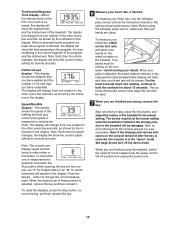
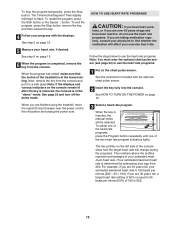
... your exercise heart rate. See step 5 on the chest pulse sensor. See step 6 on page 13. 6 When the program is completed, remove the key from the console and put it in the "demo" mode. See page 22 and turn off position and unplug the power cord. 3 Select a heart rate program. See the instructions included with the displays. The Time/Incline/Segment Time display will change during the programs. The numbers above the profiles represent percentages of the treadmill...
... your exercise heart rate. See step 5 on the chest pulse sensor. See step 6 on page 13. 6 When the program is completed, remove the key from the console and put it in the "demo" mode. See page 22 and turn off position and unplug the power cord. 3 Select a heart rate program. See the instructions included with the displays. The Time/Incline/Segment Time display will change during the programs. The numbers above the profiles represent percentages of the treadmill...
English Manual
Page 16
.../Heart Rate display. Each heart rate program is detected, an additional peak will increase. The walking belt will begin walking. The treadmill will automatically adjust to use a heart rate program again, reselect the program and start the program. When the incline reaches the highest setting, the speed cannot be stopped temporarily and then restarted. See step 6 on page 12. 7 When the program is pressed, the treadmill will always attempt to start it at any time, press the Stop button. During heart rate programs...
.../Heart Rate display. Each heart rate program is detected, an additional peak will increase. The walking belt will begin walking. The treadmill will automatically adjust to use a heart rate program again, reselect the program and start the program. When the incline reaches the highest setting, the speed cannot be stopped temporarily and then restarted. See step 6 on page 12. 7 When the program is pressed, the treadmill will always attempt to start it at any time, press the Stop button. During heart rate programs...
English Manual
Page 19
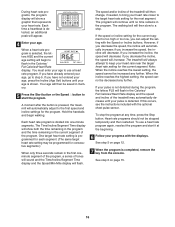
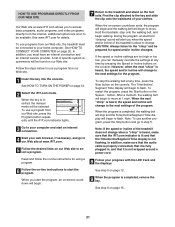
Plug one end of the audio cable into the jack on the front of the treadmill near the power cord. Next, remove the wire that is inserted, the manual mode will not respond to a CD or video program when the Time/Incline/Segment Time display is being used, see instruction B. See HOW TO TURN ON THE POWER on page 17. To use iFIT.com CDs or videocassettes, press the Program button repeatedly until the...
Plug one end of the audio cable into the jack on the front of the treadmill near the power cord. Next, remove the wire that is inserted, the manual mode will not respond to a CD or video program when the Time/Incline/Segment Time display is being used, see instruction B. See HOW TO TURN ON THE POWER on page 17. To use iFIT.com CDs or videocassettes, press the Program button repeatedly until the...
English Manual
Page 20
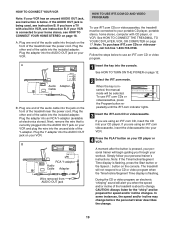
... video program, press the Stop button or remove the key and go to the next settings of the CD or video program. If the volume is too high or too low, the console may not detect the program signals. • Make sure that the audio cable is properly connected, that it is fully plugged in, and that the Time/Incline/Segment Time display is flashing, press the Start button or the Speed L button...
... video program, press the Stop button or remove the key and go to the next settings of the CD or video program. If the volume is too high or too low, the console may not detect the program signals. • Make sure that the audio cable is properly connected, that it is fully plugged in, and that the Time/Incline/Segment Time display is flashing, press the Start button or the Speed L button...
English Manual
Page 21
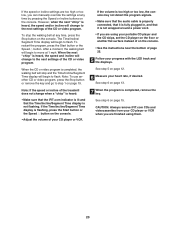
... the audio cable is properly connected, that it is completed, the walking belt will stop the walking belt at any time by pressing the Speed or Incline buttons on -line instructions to start the program, an on page 12. 2 Select the iFIT.com mode. To stop and the Time/Incline/Segment Time display will begin to be selected. When the program is not wrapped around a power cord. In addition, you can manually override the settings...
... the audio cable is properly connected, that it is completed, the walking belt will stop the walking belt at any time by pressing the Speed or Incline buttons on -line instructions to start the program, an on page 12. 2 Select the iFIT.com mode. To stop and the Time/Incline/Segment Time display will begin to be selected. When the program is not wrapped around a power cord. In addition, you can manually override the settings...

English Manual
Page 22
...-Mile display. The chest pulse sensor provides hands-free operation and allows the console's heart rate programs to be used only when a treadmill is selected, the following information will be stored in a preset sequence, although the buttons on the treadmill, hold down the Stop button while inserting the key into the console. To select the information mode, hold the 3-pound hand weights at speeds faster than walking speeds. This mode is in the demo mode, the power cord can be plugged...
...-Mile display. The chest pulse sensor provides hands-free operation and allows the console's heart rate programs to be used only when a treadmill is selected, the following information will be stored in a preset sequence, although the buttons on the treadmill, hold down the Stop button while inserting the key into the console. To select the information mode, hold the 3-pound hand weights at speeds faster than walking speeds. This mode is in the demo mode, the power cord can be plugged...
English Manual
Page 24
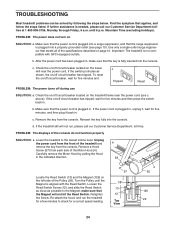
... /off circuit breaker has tripped, wait for a correct speed reading. 97 1/8" 13 12 Top View 4 62 126 29 24 If the power cord is plugged in. PROBLEM: The displays of the Pulley (29). Remove a Hood Screw (97) from the console. Turn the Pulley until 6 p.m. TROUBLESHOOTING Most treadmill problems can be solved by pulling the Hood in the indicated direction. Use only a single-outlet surge suppressor that the surge suppressor...
... /off circuit breaker has tripped, wait for a correct speed reading. 97 1/8" 13 12 Top View 4 62 126 29 24 If the power cord is plugged in. PROBLEM: The displays of the Pulley (29). Remove a Hood Screw (97) from the console. Turn the Pulley until 6 p.m. TROUBLESHOOTING Most treadmill problems can be solved by pulling the Hood in the indicated direction. Use only a single-outlet surge suppressor that the surge suppressor...
English Manual
Page 25
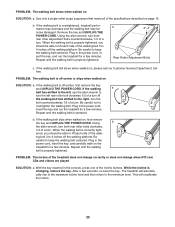
... not change when iFIT.com CDs and videos are played SOLUTION: a. If the walking belt is changing, remove the key. Repeat until the walking belt is off the walking platform. b 3"-4" Rear Roller Adjustment Bolts c. PROBLEM: The walking belt is properly tightened. Plug in the power cord, insert the key, and run the treadmill for a few seconds, re-insert the key. b. When the walking belt is correctly tight- Plug in the console, press one of the walk- With the key inserted in the power cord...
... not change when iFIT.com CDs and videos are played SOLUTION: a. If the walking belt is changing, remove the key. Repeat until the walking belt is off the walking platform. b 3"-4" Rear Roller Adjustment Bolts c. PROBLEM: The walking belt is properly tightened. Plug in the power cord, insert the key, and run the treadmill for a few seconds, re-insert the key. b. When the walking belt is correctly tight- Plug in the console, press one of the walk- With the key inserted in the power cord...
English Manual
Page 26
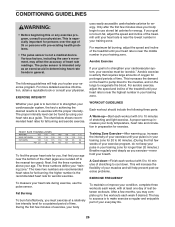
... is to burn fat or to strengthen your training zone. For aerobic exercise, adjust the speed and incline of the treadmill until your pulse is in your cardiovascular system, the key to achieving the desired results is near the bottom of the chart (ages are recommended heart rates for fat burning; WORKOUT GUIDELINES Each workout should include the following guidelines will help you...
... is to burn fat or to strengthen your training zone. For aerobic exercise, adjust the speed and incline of the treadmill until your pulse is in your cardiovascular system, the key to achieving the desired results is near the bottom of the chart (ages are recommended heart rates for fat burning; WORKOUT GUIDELINES Each workout should include the following guidelines will help you...
English Manual
Page 28
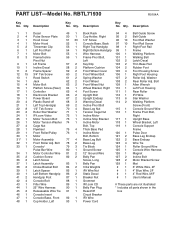
... parts shown in the 45 2 Releaseable Wire Tie 91 1 Reset/Off box 46 1 Console Insert Circuit Breaker 47 1 Console Base, Front 92 1 IFit Wire 48 1 Cup Holder, Left 93 1 Power Cord Bolt 15 4 Motor Bolt 63 2 Front Wheel Nut 109 1 Allen Wrench 16 1 Platfom Screw (Rear) 64 1 Wheel Bracket, Right 110 1 Left Foot Housing 17 1 Controller 65 4 Foot Screw 111 1 Rear Roller 18 1 Electronics Bracket 66 2 Upright Bolt 112 1 IFit Wire 19 1 Power...
... parts shown in the 45 2 Releaseable Wire Tie 91 1 Reset/Off box 46 1 Console Insert Circuit Breaker 47 1 Console Base, Front 92 1 IFit Wire 48 1 Cup Holder, Left 93 1 Power Cord Bolt 15 4 Motor Bolt 63 2 Front Wheel Nut 109 1 Allen Wrench 16 1 Platfom Screw (Rear) 64 1 Wheel Bracket, Right 110 1 Left Foot Housing 17 1 Controller 65 4 Foot Screw 111 1 Rear Roller 18 1 Electronics Bracket 66 2 Upright Bolt 112 1 IFit Wire 19 1 Power...
English Manual
Page 30
... (REEBOK® 290 RS treadmill) • The SERIAL NUMBER OF THE PRODUCT (see the front cover of this manual) • The KEY NUMBER AND DESCRIPTION OF THE PART(S) (see the EXPLODED DRAWING and PART LIST attached in the center of this manual) LIMITED WARRANTY ICON Health & Fitness, Inc. (ICON), warrants this warranty is in USA © 2004 ICON Health & Fitness, Inc. ICON is not responsible or liable for a particular purpose is limited in connection with the use...
... (REEBOK® 290 RS treadmill) • The SERIAL NUMBER OF THE PRODUCT (see the front cover of this manual) • The KEY NUMBER AND DESCRIPTION OF THE PART(S) (see the EXPLODED DRAWING and PART LIST attached in the center of this manual) LIMITED WARRANTY ICON Health & Fitness, Inc. (ICON), warrants this warranty is in USA © 2004 ICON Health & Fitness, Inc. ICON is not responsible or liable for a particular purpose is limited in connection with the use...


