

English Manual
Page 3
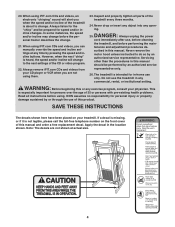
... remove the key, unplug the power cord, and move the walking belt while the power is running. Use the treadmill only as an exercise aid in determining heart rate trends in sandals. 9. Do not operate the treadmill if the power cord or plug is damaged, or if the treadmill is not working properly. (See BEFORE YOU BEGIN on page 5 for both men and women. Various factors, including the user's movement...
... remove the key, unplug the power cord, and move the walking belt while the power is running. Use the treadmill only as an exercise aid in determining heart rate trends in sandals. 9. Do not operate the treadmill if the power cord or plug is damaged, or if the treadmill is not working properly. (See BEFORE YOU BEGIN on page 5 for both men and women. Various factors, including the user's movement...
English Manual
Page 4
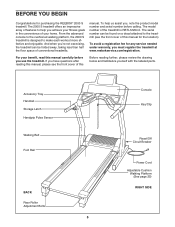
.... tenance and adjustment procedures de- Do not use only. If a decal is missing, or if it is heard, the speed and/or incline will alert you can manually override the speed and incline settings at actual size. 4 In some instances, the speed and/or incline may change . 21. When using them. 23. Never remove the motor hood unless instructed to the next settings of this manual and order a free replacement decal...
.... tenance and adjustment procedures de- Do not use only. If a decal is missing, or if it is heard, the speed and/or incline will alert you can manually override the speed and incline settings at actual size. 4 In some instances, the speed and/or incline may change . 21. When using them. 23. Never remove the motor hood unless instructed to the next settings of this manual and order a free replacement decal...
English Manual
Page 5
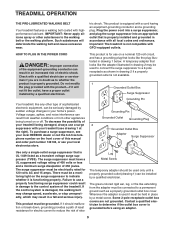
... treadmill. The model number of this manual for the location). manual. To help you achieve your fitness goals in the convenience of conventional treadmills. Accessory Tray Handrail Storage Latch Handgrip Pulse Sensor Walking Belt Foot Rail BACK Rear Roller Adjustment Bolts 5 Console Key/Clip Reset/Off Circuit Breaker Power Cord Adjustable Cushion Walking Platform (See page 25) RIGHT SIDE If you have questions after reading this manual, please see the front cover of features to make each workout...
... treadmill. The model number of this manual for the location). manual. To help you achieve your fitness goals in the convenience of conventional treadmills. Accessory Tray Handrail Storage Latch Handgrip Pulse Sensor Walking Belt Foot Rail BACK Rear Roller Adjustment Bolts 5 Console Key/Clip Reset/Off Circuit Breaker Power Cord Adjustable Cushion Walking Platform (See page 25) RIGHT SIDE If you have questions after reading this manual, please see the front cover of features to make each workout...

English Manual
Page 7
... ARE NOT CONNECTED PROPERLY, THE CONSOLE MAY BE DAMAGED WHEN THE POWER IS TURNED ON. Set the Handrail on the Base (99). 4 Make sure to - Feed the Upright Wire Harness (108) down into the Right Upright, and pull the end of the Upright Wire Harness out of the lower end of the Upright. Be careful to the Left Upright (90) 2 with two Latch Bolts (77...
... ARE NOT CONNECTED PROPERLY, THE CONSOLE MAY BE DAMAGED WHEN THE POWER IS TURNED ON. Set the Handrail on the Base (99). 4 Make sure to - Feed the Upright Wire Harness (108) down into the Right Upright, and pull the end of the Upright Wire Harness out of the lower end of the Upright. Be careful to the Left Upright (90) 2 with two Latch Bolts (77...

English Manual
Page 8
... be included. Make sure that the power cord is used in a secure place. Remove the two Upright 5 90 Bolts (86) used to adjust the walking belt (see page 25), follow the steps below to align the Upright Bolts with the Screw (83). Attach the receiver to avoid pinching your hands or the Wire Harnesses (not shown). Attach the Left Upright (90) in steps 3 and 5. 95 88 86 86 99...
... be included. Make sure that the power cord is used in a secure place. Remove the two Upright 5 90 Bolts (86) used to adjust the walking belt (see page 25), follow the steps below to align the Upright Bolts with the Screw (83). Attach the receiver to avoid pinching your hands or the Wire Harnesses (not shown). Attach the Left Upright (90) in steps 3 and 5. 95 88 86 86 99...
English Manual
Page 9
... can result in your home's power. The surge suppressor must be electrically rated for use a surge suppressor with highperformance lubricant. To purchase a surge suppressor, see your local REEBOK dealer or call the toll-free telephone number on the surge suppressor to whether the product is damaged, the walking belt may change speed, accelerate, or stop unexpectedly, which may be connected to a 2-pole receptacle as...
... can result in your home's power. The surge suppressor must be electrically rated for use a surge suppressor with highperformance lubricant. To purchase a surge suppressor, see your local REEBOK dealer or call the toll-free telephone number on the surge suppressor to whether the product is damaged, the walking belt may change speed, accelerate, or stop unexpectedly, which may be connected to a 2-pole receptacle as...
English Manual
Page 10
... trainer guides you to make your home. Each program automatically adjusts the speed and incline of the console, follow the steps beginning on the front cover of your computer, you exercise, the console will display instant exercise feedback. The console even allows you through an effective workout. With the treadmill connected to our Web site at www.iFIT.com and access programs directly from our Web site, see page 22. To use...
... trainer guides you to make your home. Each program automatically adjusts the speed and incline of the console, follow the steps beginning on the front cover of your computer, you exercise, the console will display instant exercise feedback. The console even allows you through an effective workout. With the treadmill connected to our Web site at www.iFIT.com and access programs directly from our Web site, see page 22. To use...
English Manual
Page 11
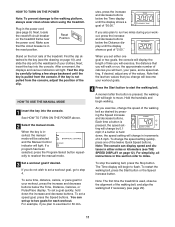
... 0.5 mph. To stop the walking belt, press the Stop button. When the key is held down the increase and decrease buttons. If you plan to step 4. utes, press the increase and decrease buttons below the Time, Distance, Calories, or Pulse/Pace display. Note: The console can set a workout goal, go to exercise for each workout. Plug in either one of the treadmill. You can display speed and distance in the power cord (see THE SPEED DISPLAY on page...
... 0.5 mph. To stop the walking belt, press the Stop button. When the key is held down the increase and decrease buttons. If you plan to step 4. utes, press the increase and decrease buttons below the Time, Distance, Calories, or Pulse/Pace display. Note: The console can set a workout goal, go to exercise for each workout. Plug in either one of the treadmill. You can display speed and distance in the power cord (see THE SPEED DISPLAY on page...
English Manual
Page 12
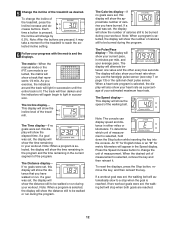
... Speed display. The Pulse/Pace display-This display will show the incline level of calories you use the handgrip pulse sensor (see step 7 on page 13) or the optional chest pulse sensor. The display will appear in your heart rate as desired. When a heart rate program is selected, the display will show your workout. Press the Speed increase button to be walked or run . To change by 0.5%. Note: When a program is selected, the display will also show the number...
... Speed display. The Pulse/Pace display-This display will show the incline level of calories you use the handgrip pulse sensor (see step 7 on page 13) or the optional chest pulse sensor. The display will appear in your heart rate as desired. When a heart rate program is selected, the display will show your workout. Press the Speed increase button to be walked or run . To change by 0.5%. Note: When a program is selected, the display will also show the number...
English Manual
Page 15
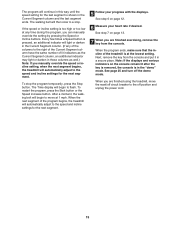
... exercising, remove the key from the console and put it in those columns as the Current Segment column, an additional indicator may light or darken in a secure place. See page 25 and turn off position and unplug the power cord. 15 To restart the program, press the Start button or the Speed increase button. See step 6 on page 12. 6 Measure your progress with the displays...
... exercising, remove the key from the console and put it in those columns as the Current Segment column, an additional indicator may light or darken in a secure place. See page 25 and turn off position and unplug the power cord. 15 To restart the program, press the Start button or the Speed increase button. See step 6 on page 12. 6 Measure your progress with the displays...

English Manual
Page 17
... many segments as desired. See step 7 on page 14. 4 Press the Start button to the right. A moment after the button is pressed, the treadmill will begin walking. The walking belt will move at any time before the program is selected, the Incline display will show the maximum speed setting. HOW TO USE A CUSTOM PROGRAM 1 Insert the key into several one- See HOW TO TURN ON THE POWER on page 11. 2 Select...
... many segments as desired. See step 7 on page 14. 4 Press the Start button to the right. A moment after the button is pressed, the treadmill will begin walking. The walking belt will move at any time before the program is selected, the Incline display will show the maximum speed setting. HOW TO USE A CUSTOM PROGRAM 1 Insert the key into several one- See HOW TO TURN ON THE POWER on page 11. 2 Select...

English Manual
Page 18
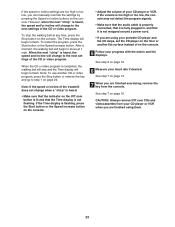
... Speed display to adjust the maximum speed setting. 5 Press the Start button to use a heart rate program. 1 Put on the optional chest pulse sensor. Each time a heartbeat is detected, an additional peak will affect your heart rate to the first speed and incline settings of your age and a maximum speed setting. If desired, press the increase and decrease buttons below to start when the button is pressed). A moment after the button is programmed for each segment, the console will automatically adjust...
... Speed display to adjust the maximum speed setting. 5 Press the Start button to use a heart rate program. 1 Put on the optional chest pulse sensor. Each time a heartbeat is detected, an additional peak will affect your heart rate to the first speed and incline settings of your age and a maximum speed setting. If desired, press the increase and decrease buttons below to start when the button is pressed). A moment after the button is programmed for each segment, the console will automatically adjust...

English Manual
Page 19
... exercising, remove the key from the console. The program will flash. The walking belt will then slow to the target heart rate. If your pulse is still too far below the current target heart rate, the incline of tones will sound and the Speed display and the Incline display will continue until your progress with the optional chest pulse sensor. The Time display will also increase to bring your heart rate closer to move...
... exercising, remove the key from the console. The program will flash. The walking belt will then slow to the target heart rate. If your pulse is still too far below the current target heart rate, the incline of tones will sound and the Speed display and the Incline display will continue until your progress with the optional chest pulse sensor. The Time display will also increase to bring your heart rate closer to move...

English Manual
Page 22
... Audio Adapter Cable B. Plug the other end of the Y-adapter. See HOW TO CONNECT THE TREADMILL TO YOUR CD PLAYER, VCR, OR COMPUTER on page 11. 2 Select the iFIT.com mode. Follow the steps below . See HOW TO TURN ON THE POWER on pages 20 to 22. During the CD or video program, an electronic "chirping" sound will begin guiding you when the speed and/or incline...
... Audio Adapter Cable B. Plug the other end of the Y-adapter. See HOW TO CONNECT THE TREADMILL TO YOUR CD PLAYER, VCR, OR COMPUTER on page 11. 2 Select the iFIT.com mode. Follow the steps below . See HOW TO TURN ON THE POWER on pages 20 to 22. During the CD or video program, an electronic "chirping" sound will begin guiding you when the speed and/or incline...
English Manual
Page 23
... speed or incline settings are using them. 23 To restart the program, press the Start button or the Speed increase button. After a moment, the walking belt will begin to move at any time, press the Stop button on the console. 5 Follow your CD player or VCR when you are finished exercising, remove the key from your progress with the matrix and the displays. Note: If the speed or incline of the CD or video program...
... speed or incline settings are using them. 23 To restart the program, press the Start button or the Speed increase button. After a moment, the walking belt will begin to move at any time, press the Stop button on the console. 5 Follow your CD player or VCR when you are finished exercising, remove the key from your progress with the matrix and the displays. Note: If the speed or incline of the CD or video program...

English Manual
Page 24
... start the program. To use an iFIT.com program directly from our Web site. 1 Insert the key into the console. Follow the steps below to use another program, press the Stop button and go to our Web site at www.iFIT.com. 5 Follow the desired links on the button will change when a "chirp" is heard, make sure that the audio cable is properly connected, that it is not flashing. A list of...
... start the program. To use an iFIT.com program directly from our Web site. 1 Insert the key into the console. Follow the steps below to use another program, press the Stop button and go to our Web site at www.iFIT.com. 5 Follow the desired links on the button will change when a "chirp" is heard, make sure that the audio cable is properly connected, that it is not flashing. A list of...
English Manual
Page 25
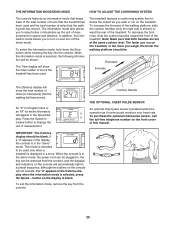
... the demo mode, the power cord can be removed from the console. 25 Note: Make sure that the walking belt has moved. To exit the information mode, remove the key from the console, and the displays and indicators on the console will not operate. The faster you run on the treadmill. When the console is selected, press the Speed - THE INFORMATION MODE/DEMO MODE HOW TO ADJUST THE CUSHIONING SYSTEM The console features an information mode that keeps track...
... the demo mode, the power cord can be removed from the console. 25 Note: Make sure that the walking belt has moved. To exit the information mode, remove the key from the console, and the displays and indicators on the console will not operate. The faster you run on the treadmill. When the console is selected, press the Speed - THE INFORMATION MODE/DEMO MODE HOW TO ADJUST THE CUSHIONING SYSTEM The console features an information mode that keeps track...

English Manual
Page 30
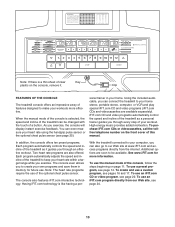
... is intended only as a guide. For aerobic exercise, adjust the speed or incline of the treadmill until your breath. EXERCISE GUIDELINES WARNING: Before beginning this or any exercise program, consult your physician. Only after the first few months, you exercise-never hold your heart rate is near the bottom of time. The lower two numbers are rounded off to use the handgrip pulse sensor. A Cool-down . To...
... is intended only as a guide. For aerobic exercise, adjust the speed or incline of the treadmill until your breath. EXERCISE GUIDELINES WARNING: Before beginning this or any exercise program, consult your physician. Only after the first few months, you exercise-never hold your heart rate is near the bottom of time. The lower two numbers are rounded off to use the handgrip pulse sensor. A Cool-down . To...
English Manual
Page 31
... lieu of any and all defects in the Manual to get a part replaced, or if necessary, arrange for service. This warranty gives you specific legal rights and you , please mention the MODEL NUMBER of the product (RBTL12204.0), the NAME of the product (REEBOK® 2000 S treadmill), the SERIAL NUMBER of the product (see the PART LIST on your User's Manual ("Manual"). Mountain Time (excluding holidays). To help us...
... lieu of any and all defects in the Manual to get a part replaced, or if necessary, arrange for service. This warranty gives you specific legal rights and you , please mention the MODEL NUMBER of the product (RBTL12204.0), the NAME of the product (REEBOK® 2000 S treadmill), the SERIAL NUMBER of the product (see the PART LIST on your User's Manual ("Manual"). Mountain Time (excluding holidays). To help us...

English Manual
Page 32
... 1 Hood Bracket Ground Wire Lift Frame Motor Bolt Motor Bushing Filter Wire Controller Plate Small Star Washer Lift Motor Bolt, Top Electronic Screw On/Reset Circuit Breaker Controller Power Cord Grommet Transformer Audio Wire Nut Audio Wire Hood Cover Hood Screw Hood Plate Hood Motor Belly Pan Screw Motor Belly Pan Belly Pan Fastener Frame Belly Pan Screw Allen Wrench Frame Belly pan Right Endcap Rear Foot Rear Roller Bolt Rear Roller Star Washer Rear Roller Washer Latch Bolt Latch Catch Screw 5/32" Allen Wrench Console Base Console Static Decal Console Back Screw Latch Pin Assembly Console...
... 1 Hood Bracket Ground Wire Lift Frame Motor Bolt Motor Bushing Filter Wire Controller Plate Small Star Washer Lift Motor Bolt, Top Electronic Screw On/Reset Circuit Breaker Controller Power Cord Grommet Transformer Audio Wire Nut Audio Wire Hood Cover Hood Screw Hood Plate Hood Motor Belly Pan Screw Motor Belly Pan Belly Pan Fastener Frame Belly Pan Screw Allen Wrench Frame Belly pan Right Endcap Rear Foot Rear Roller Bolt Rear Roller Star Washer Rear Roller Washer Latch Bolt Latch Catch Screw 5/32" Allen Wrench Console Base Console Static Decal Console Back Screw Latch Pin Assembly Console...


