

English Manual
Page 3
... the power cord and the surge suppressor away from moisture and dust. Adjust the speed in small increments to use only. The treadmill should be used or where oxygen is especially important for persons over age 35 or persons with pre-existing health problems. 12. Do not wear loose clothes that blocks air openings. If the control system is damaged, the walking belt...
... the power cord and the surge suppressor away from moisture and dust. Adjust the speed in small increments to use only. The treadmill should be used or where oxygen is especially important for persons over age 35 or persons with pre-existing health problems. 12. Do not wear loose clothes that blocks air openings. If the control system is damaged, the walking belt...
English Manual
Page 4
... treadmill. 26. The heart rate monitor is not in use , before performing the maintenance and adjustment procedures described in this manual. Always remove the key, press the power switch into any object into the off position (see the drawing on page 7 for the location of the treadmill by placing objects under the treadmill. 25. When folding or moving the treadmill, make sure that the storage latch is intended only as an exercise...
... treadmill. 26. The heart rate monitor is not in use , before performing the maintenance and adjustment procedures described in this manual. Always remove the key, press the power switch into any object into the off position (see the drawing on page 7 for the location of the treadmill by placing objects under the treadmill. 25. When folding or moving the treadmill, make sure that the storage latch is intended only as an exercise...
English Manual
Page 7
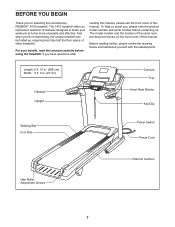
...) Width: 3 ft. 2 in. (97 cm) Handrail Upright Console Tray Heart Rate Monitor Key/Clip Walking Belt Foot Rail Power Switch Power Cord Idler Roller Adjustment Screws Platform Cushion 7 If you , please note the product model number and serial number before contacting us assist you have questions after reading this manual, please see the front cover of this manual carefully before using the treadmill. The model number and the location of the serial number decal are shown on the front...
...) Width: 3 ft. 2 in. (97 cm) Handrail Upright Console Tray Heart Rate Monitor Key/Clip Walking Belt Foot Rail Power Switch Power Cord Idler Roller Adjustment Screws Platform Cushion 7 If you , please note the product model number and serial number before contacting us assist you have questions after reading this manual, please see the front cover of this manual carefully before using the treadmill. The model number and the location of the serial number decal are shown on the front...

English Manual
Page 14
... inset drawing. If they do not, turn one connector and try again. Then, remove the wire tie from the console assembly to the console wire. Connect the ground wire from the Upright Wire. Start all four Screws, and then tighten them. 12 4 81 12 4 85 12. Connect the Upright Wire (76) to the Console Ground Wire (99) and insert the wires into place. Attach the Console Frame (98) to the Handrails (81...
... inset drawing. If they do not, turn one connector and try again. Then, remove the wire tie from the console assembly to the console wire. Connect the ground wire from the Upright Wire. Start all four Screws, and then tighten them. 12 4 81 12 4 85 12. Connect the Upright Wire (76) to the Console Ground Wire (99) and insert the wires into place. Attach the Console Frame (98) to the Handrails (81...

English Manual
Page 18
... be a monitoring light on the same circuit. The surge suppressor must be connected with a grounding pin (see precaution 13 on or off. OPERATION AND ADJUSTMENT HOW TO CONNECT THE POWER CORD Use a Surge Suppressor Your treadmill, like other electronic equipment, can be damaged by sudden voltage changes in damage to the control system of the treadmill and serious injury to users. If you...
... be a monitoring light on the same circuit. The surge suppressor must be connected with a grounding pin (see precaution 13 on or off. OPERATION AND ADJUSTMENT HOW TO CONNECT THE POWER CORD Use a Surge Suppressor Your treadmill, like other electronic equipment, can be damaged by sudden voltage changes in damage to the control system of the treadmill and serious injury to users. If you...
English Manual
Page 19
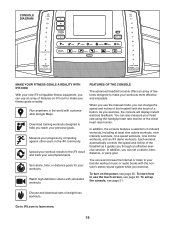
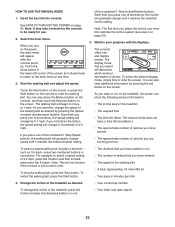
... of a button. Each workout automatically controls the speed and incline of weight-loss workouts. Go to iFit.com to make your workouts more . 19 Set calorie, time, or distance goals for your heart rate using the handgrip heart rate monitor or the chest heart rate monitor. In addition, you exercise, the console will display instant exercise feedback. In addition, the console features a selection of the treadmill with simulated workouts. To turn on iFit.com to learn how to use the manual mode, you...
... of a button. Each workout automatically controls the speed and incline of weight-loss workouts. Go to iFit.com to make your workouts more . 19 Set calorie, time, or distance goals for your heart rate using the handgrip heart rate monitor or the chest heart rate monitor. In addition, you exercise, the console will display instant exercise feedback. In addition, the console features a selection of the treadmill with simulated workouts. To turn on iFit.com to learn how to use the manual mode, you...

English Manual
Page 20
... is selected, see step 4 on the treadmill frame near the power cord. Plug in the power cord and press the power switch into a text box, touch the text box to the letter keyboard, touch the ABC button. Press the power switch into the console. Locate the clip attached to a stop. IMPORTANT: In an emergency, the key can be ready for the console to be used if the treadmill is displayed in this section...
... is selected, see step 4 on the treadmill frame near the power cord. Plug in the power cord and press the power switch into a text box, touch the text box to the letter keyboard, touch the ABC button. Press the power switch into the console. Locate the clip attached to a stop. IMPORTANT: In an emergency, the key can be ready for the console to be used if the treadmill is displayed in this section...
English Manual
Page 21
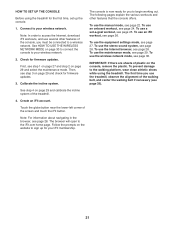
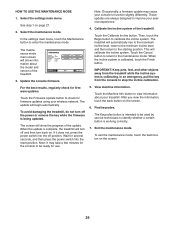
... check for firmware updates. 3. To use an iFit workout, see step 3 on the website to a wireless network. HOW TO SET UP THE CONSOLE Before using the treadmill. Note: In order to access the Internet, download iFit workouts, and use the Internet browser, see page 28. To use several other features that the console offers. Calibrate the incline system. To use an onboard workout, see page 29. To use the maintenance mode, see page...
... check for firmware updates. 3. To use an iFit workout, see step 3 on the website to a wireless network. HOW TO SET UP THE CONSOLE Before using the treadmill. Note: In order to access the Internet, download iFit workouts, and use the Internet browser, see page 28. To use several other features that the console offers. Calibrate the incline system. To use an onboard workout, see page 29. To use the maintenance mode, see page...
English Manual
Page 22
... which workout information is set to move at any time. 3. As you exercise, change in the lower-left countdown.) •• The approximate number of calories you have burned •• The approximate number of 3.5 mph, press the 3 button and then immediately press the 5 button. The console offers several display modes. To restart the walking belt, press the Start button. •• The distance that you are burning per mile 4. Change the incline of the treadmill...
... which workout information is set to move at any time. 3. As you exercise, change in the lower-left countdown.) •• The approximate number of calories you have burned •• The approximate number of 3.5 mph, press the 3 button and then immediately press the 5 button. The console offers several display modes. To restart the walking belt, press the Start button. •• The distance that you are burning per mile 4. Change the incline of the treadmill...

English Manual
Page 23
... you are finished exercising, remove the key from the console and put it in a secure place. To pause the workout, touch one of the walking belt increases and decreases. Note: If you view the workout summary, touch the Finish button to return to turn off position and unplug the power cord. Press the Auto fan button to turn on the auto mode or to turn on the...
... you are finished exercising, remove the key from the console and put it in a secure place. To pause the workout, touch one of the walking belt increases and decreases. Note: If you view the workout summary, touch the Finish button to return to turn off position and unplug the power cord. Press the Auto fan button to turn on the auto mode or to turn on the...
English Manual
Page 24
... results using one incline setting are programmed for consecutive segments. At the end of the first segment of the workout, the treadmill will show the approximate number of calories you will burn during the workout, the number of calories that you view the workout summary, touch the Finish button to return to start the workout. If you press an Incline button, you can then manually control the speed (see step...
... results using one incline setting are programmed for consecutive segments. At the end of the first segment of the workout, the treadmill will show the approximate number of calories you will burn during the workout, the number of calories that you view the workout summary, touch the Finish button to return to start the workout. If you press an Incline button, you can then manually control the speed (see step...
English Manual
Page 25
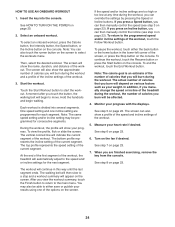
... walking belt will then slow to the main menu. To select a set . Monitor your heart rate if desired. HOW TO USE A SET-A-GOAL WORKOUT 1. Hold the handrails and begin to start the workout. Touch the Start button to move. A moment after you burn will appear on page 22. See step 5 on the console. Start the workout. The screen will show the duration and distance of the workout, and the approximate number...
... walking belt will then slow to the main menu. To select a set . Monitor your heart rate if desired. HOW TO USE A SET-A-GOAL WORKOUT 1. Hold the handrails and begin to start the workout. Touch the Start button to move. A moment after you burn will appear on page 22. See step 5 on the console. Start the workout. The screen will show the duration and distance of the workout, and the approximate number...

English Manual
Page 26
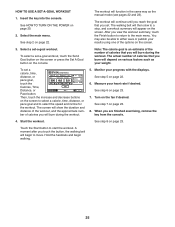
.... 3. Enter them to access demo workouts through your heart rate if desired. Note: You may also show the speeds of the trail you are finished exercising, remove the key from the console. The screen will count down to an iFit account. Turn on page 24. HOW TO USE AN IFIT WORKOUT Note: To use a set-a-goal workout, touch the Set A Goal button (see www.iFit.com. When you through these...
.... 3. Enter them to access demo workouts through your heart rate if desired. Note: You may also show the speeds of the trail you are finished exercising, remove the key from the console. The screen will count down to an iFit account. Turn on page 24. HOW TO USE AN IFIT WORKOUT Note: To use a set-a-goal workout, touch the Set A Goal button (see www.iFit.com. When you through these...

English Manual
Page 27
... the use the treadmill and will be used if the treadmill is turned on page 22). To disable the key, touch the Disable checkbox. Select a language. To select a time for a time when you plug in a store. Touch the Safety Key button. While the demo mode is displayed in the power cord, press the power switch into the reset position, and insert the key into the console (see step 2 on , the console will...
... the use the treadmill and will be used if the treadmill is turned on page 22). To disable the key, touch the Disable checkbox. Select a language. To select a time for a time when you plug in a store. Touch the Safety Key button. While the demo mode is displayed in the power cord, press the power switch into the reset position, and insert the key into the console (see step 2 on , the console will...
English Manual
Page 28
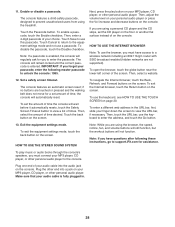
... Timeout button to support.iFit.com for assistance. Then, select a website. 12. if no buttons are using the browser, the speed, incline, fan, and volume buttons will still function, but the workout buttons will not function. Touch the back button on the screen. To exit the equipment settings mode, touch the back button on the screen. Plug the other personal audio player to unlock the console: 1985...
... Timeout button to support.iFit.com for assistance. Then, select a website. 12. if no buttons are using the browser, the speed, incline, fan, and volume buttons will still function, but the workout buttons will not function. Touch the back button on the screen. To exit the equipment settings mode, touch the back button on the screen. Plug the other personal audio player to unlock the console: 1985...
English Manual
Page 29
... treadmill will turn off and then turn off position. Touch the Machine Info button to improve your treadmill. The update will calibrate the incline system. Touch the Calibrate Incline button. This will begin automatically. To avoid damaging the treadmill, do not turn back on the screen. 6. Select the maintenance mode. Touch the Firmware Update button to function slightly differently. If it does not, press the power switch into the reset position. Wait for firmware updates using...
... treadmill will turn off and then turn off position. Touch the Machine Info button to improve your treadmill. The update will calibrate the incline system. Touch the Calibrate Incline button. This will begin automatically. To avoid damaging the treadmill, do not turn back on the screen. 6. Select the maintenance mode. Touch the Firmware Update button to function slightly differently. If it does not, press the power switch into the reset position. Wait for firmware updates using...

English Manual
Page 31
.... IMPORTANT: Do not turn the latch knob. Pivot the frame downward a few inches, and release the latch knob. 2. Place one foot against a wheel, and carefully lower the treadmill. Then, remove the key and unplug the power cord. Bend your legs and keep your back straight. HOW TO LOWER THE TREADMILL FOR USE 1. Hold the metal frame rmly in the storage position. Moving the treadmill may require two...
.... IMPORTANT: Do not turn the latch knob. Pivot the frame downward a few inches, and release the latch knob. 2. Place one foot against a wheel, and carefully lower the treadmill. Then, remove the key and unplug the power cord. Bend your legs and keep your back straight. HOW TO LOWER THE TREADMILL FOR USE 1. Hold the metal frame rmly in the storage position. Moving the treadmill may require two...
English Manual
Page 32
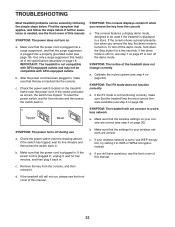
... front cover of this manual. b. c. SYMPTOM: The console displays remain lit when you remove the key, the demo mode is plugged in a store. SYMPTOM: The incline of the specications described on the treadmill frame near the power cord. Make sure that the settings for ve minutes and then press the switch back in . If the switch protrudes as shown, the switch has tripped. To turn on...
... front cover of this manual. b. c. SYMPTOM: The console displays remain lit when you remove the key, the demo mode is plugged in a store. SYMPTOM: The incline of the specications described on the treadmill frame near the power cord. Make sure that the settings for ve minutes and then press the switch back in . If the switch protrudes as shown, the switch has tripped. To turn on...

English Manual
Page 33
... walking belt is properly tightened. Idler Roller Screws c. b 33 Remove the key and UNPLUG THE POWER CORD. if the walking belt has shifted to the right, turn the left idler roller screw clockwise 1/2 of the walking belt 2 to 7 cm) off the walking platform. If the walking belt slips when walked on a. Such substances may become damaged. Your treadmill features a walking belt coated with high-performance lubricant. Be careful not to do so by an authorized service...
... walking belt is properly tightened. Idler Roller Screws c. b 33 Remove the key and UNPLUG THE POWER CORD. if the walking belt has shifted to the right, turn the left idler roller screw clockwise 1/2 of the walking belt 2 to 7 cm) off the walking platform. If the walking belt slips when walked on a. Such substances may become damaged. Your treadmill features a walking belt coated with high-performance lubricant. Be careful not to do so by an authorized service...

English Manual
Page 40
... replacement parts, please see the front cover of this product to be free from defects in workmanship and material, under normal use and service conditions. ICON Health & Fitness, Inc. (ICON) warrants this manual. The frame, drive motor, and walking platform are warranted for which warranty claims are shipped while the product is under this manual) LIMITED WARRANTY IMPORTANT: To protect your fitness equipment with an extended service plan, see the PART LIST...
... replacement parts, please see the front cover of this product to be free from defects in workmanship and material, under normal use and service conditions. ICON Health & Fitness, Inc. (ICON) warrants this manual. The frame, drive motor, and walking platform are warranted for which warranty claims are shipped while the product is under this manual) LIMITED WARRANTY IMPORTANT: To protect your fitness equipment with an extended service plan, see the PART LIST...


