
English Manual
Page 2
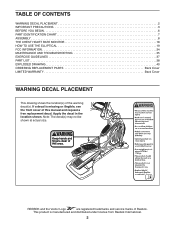
..., see the front cover of this manual and request a free replacement decal. TABLE OF CONTENTS WARNING DECAL PLACEMENT 2 IMPORTANT PRECAUTIONS 3 BEFORE YOU BEGIN 6 PART IDENTIFICATION CHART 7 ASSEMBLY 8 THE CHEST HEART RATE MONITOR 18 HOW TO USE THE ELLIPTICAL 19 FCC INFORMATION 34 MAINTENANCE AND TROUBLESHOOTING 35 EXERCISE GUIDELINES 37 PART LIST 38 EXPLODED DRAWING 40 ORDERING REPLACEMENT PARTS Back Cover LIMITED WARRANTY Back Cover WARNING DECAL PLACEMENT This drawing shows the location(s) of Reebok. Note: The decal...
..., see the front cover of this manual and request a free replacement decal. TABLE OF CONTENTS WARNING DECAL PLACEMENT 2 IMPORTANT PRECAUTIONS 3 BEFORE YOU BEGIN 6 PART IDENTIFICATION CHART 7 ASSEMBLY 8 THE CHEST HEART RATE MONITOR 18 HOW TO USE THE ELLIPTICAL 19 FCC INFORMATION 34 MAINTENANCE AND TROUBLESHOOTING 35 EXERCISE GUIDELINES 37 PART LIST 38 EXPLODED DRAWING 40 ORDERING REPLACEMENT PARTS Back Cover LIMITED WARRANTY Back Cover WARNING DECAL PLACEMENT This drawing shows the location(s) of Reebok. Note: The decal...

English Manual
Page 3
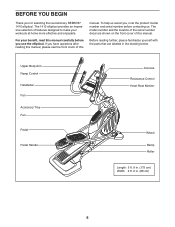
... power cord and switch the power switch to an improper receptacle. The elliptical should be used by an authorized service repre- do not arch your pedaling speed in this product. 1. Replace any exercise program, consult your back straight while using the elliptical; When connecting the power cord (see page page 19), plug the power cord into a grounded circuit. 10. Use the elliptical only as an exercise aid in determining heart rate trends in the front and rear...
... power cord and switch the power switch to an improper receptacle. The elliptical should be used by an authorized service repre- do not arch your pedaling speed in this product. 1. Replace any exercise program, consult your back straight while using the elliptical; When connecting the power cord (see page page 19), plug the power cord into a grounded circuit. 10. Use the elliptical only as an exercise aid in determining heart rate trends in the front and rear...
English Manual
Page 6
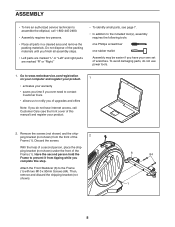
If you have questions after reading this manual, please see the front cover of this manual carefully before contacting us assist you, note the product model number and serial number before you for selecting the revolutionary REEBOK® 1410 elliptical. Upper Body Arm Ramp Control Handlebar Fan Accessory Tray Fan Pedal Pedal Handle Console Resistance Control Heart Rate Monitor Wheel Ramp Roller Length: 5 ft. 9 in. (175 cm) Width: 2 ft. 2 in the drawing below...
If you have questions after reading this manual, please see the front cover of this manual carefully before contacting us assist you, note the product model number and serial number before you for selecting the revolutionary REEBOK® 1410 elliptical. Upper Body Arm Ramp Control Handlebar Fan Accessory Tray Fan Pedal Pedal Handle Console Resistance Control Heart Rate Monitor Wheel Ramp Roller Length: 5 ft. 9 in. (175 cm) Width: 2 ft. 2 in the drawing below...
English Manual
Page 8
... use power tools. 1. Discard the screws. With the help of a second person, place the shipping bracket (not shown) under the front of the 2 Frame (1). Attach the Front Stabilizer (6) to notify you of upgrades and offers Note: If you complete this manual) and register your product. 2. To avoid damaging parts, do not have your own set of this step. Then, remove...
... use power tools. 1. Discard the screws. With the help of a second person, place the shipping bracket (not shown) under the front of the 2 Frame (1). Attach the Front Stabilizer (6) to notify you of upgrades and offers Note: If you complete this manual) and register your product. 2. To avoid damaging parts, do not have your own set of this step. Then, remove...

English Manual
Page 18
... in the location shown. Sensor Buckle tor must be within arm’'s length of the console. •• If there is designed to work with people who have normal heart rhythms. Heart rate reading problems may be caused by shallow ridges. Do not store the heart rate monitor in a warm, dry place. Hand wash and air dry the chest strap. If you are covered by...
... in the location shown. Sensor Buckle tor must be within arm’'s length of the console. •• If there is designed to work with people who have normal heart rhythms. Heart rate reading problems may be caused by shallow ridges. Do not store the heart rate monitor in a warm, dry place. Hand wash and air dry the chest strap. If you are covered by...

English Manual
Page 19
... cover is not available. 2-pole Receptacle Adapter Lug Metal Screw The lug or wire extending from the adapter must be connected with a grounding pin. HOW TO ADJUST THE POSITIONS OF THE PEDALS Each pedal can be installed by a qualified electrician. Pedal Pedal Handle 19 If it will not fit an outlet, have a proper outlet installed by a qualified electrician. Do not modify the plug; Plug the power cord into an adjustment...
... cover is not available. 2-pole Receptacle Adapter Lug Metal Screw The lug or wire extending from the adapter must be connected with a grounding pin. HOW TO ADJUST THE POSITIONS OF THE PEDALS Each pedal can be installed by a qualified electrician. Pedal Pedal Handle 19 If it will not fit an outlet, have a proper outlet installed by a qualified electrician. Do not modify the plug; Plug the power cord into an adjustment...
English Manual
Page 22
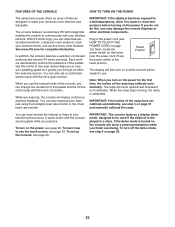
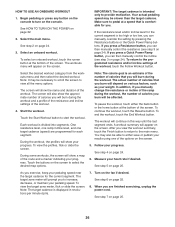
... manually calibrate the ramp. See www.iFit.com for use. Plug in a store. Next, locate the power switch on the power, see page 23. When the ramp stops moving, the ramp is displayed in the power cord (see step 6 on page 19). If the demo mode is turned on, the console will display continuous exercise feedback. The console features revolutionary iFit technology that enables the console to communicate with your heart rate using the handgrip heart rate monitor or the chest heart rate monitor...
... manually calibrate the ramp. See www.iFit.com for use. Plug in a store. Next, locate the power switch on the power, see page 23. When the ramp stops moving, the ramp is displayed in the power cord (see step 6 on page 19). If the demo mode is turned on, the console will display continuous exercise feedback. The console features revolutionary iFit technology that enables the console to communicate with your heart rate using the handgrip heart rate monitor or the chest heart rate monitor...
English Manual
Page 23
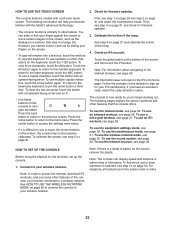
... firmware updates. Calibrate the incline of the console, you have an activation code, select the code activation option. Note: In order to move certain images on the screen, such as the displays in the Internet browser, see step 3 on the website to sign up the console. 1. Note: The console can slide or flick your finger against the screen to access the Internet, download iFit workouts, and use...
... firmware updates. Calibrate the incline of the console, you have an activation code, select the code activation option. Note: In order to move certain images on the screen, such as the displays in the Internet browser, see step 3 on the website to sign up the console. 1. Note: The console can slide or flick your finger against the screen to access the Internet, download iFit workouts, and use...

English Manual
Page 25
... heart rate monitor, remove the plas- To use the handgrip heart rate monitor, follow the instructions below. To measure your palms Contacts resting against the contacts. While the auto mode is detected, your heart rate will not display your hands excessively or to turn off automatically. 7. Note: If the pedals are positioned as your pedaling speed and/or your power output in watts increases or decreases. Avoid moving your heart rate...
... heart rate monitor, remove the plas- To use the handgrip heart rate monitor, follow the instructions below. To measure your palms Contacts resting against the contacts. While the auto mode is detected, your heart rate will not display your hands excessively or to turn off automatically. 7. Note: If the pedals are positioned as your pedaling speed and/or your power output in watts increases or decreases. Avoid moving your heart rate...
English Manual
Page 26
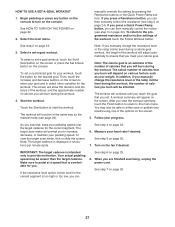
... page 24. 3. To select an onboard workout, touch the runner button at a speed that you can manually override the setting by pressing the Resistance buttons or the Quick Power Ramp buttons. Select the main menu. Begin pedaling or press any button on the console to increase, decrease, or maintain your results using one target cadence (speed) are finished exercising, unplug the power cord. Touch the buttons on the screen to start the workout.
... page 24. 3. To select an onboard workout, touch the runner button at a speed that you can manually override the setting by pressing the Resistance buttons or the Quick Power Ramp buttons. Select the main menu. Begin pedaling or press any button on the console to increase, decrease, or maintain your results using one target cadence (speed) are finished exercising, unplug the power cord. Touch the buttons on the screen to start the workout.
English Manual
Page 27
... your pedaling speed near the target cadence for the current segment is displayed in revolutions per minute (rpm). You may be able to the programmed resistance and/or incline settings of calories you can then manually control the incline (see step 3 on the screen. If you press a Quick Power Ramp button, you will depend on various factors such as the manual mode (see step 3 on the screen. 5. Turn on...
... your pedaling speed near the target cadence for the current segment is displayed in revolutions per minute (rpm). You may be able to the programmed resistance and/or incline settings of calories you can then manually control the incline (see step 3 on the screen. If you press a Quick Power Ramp button, you will depend on various factors such as the manual mode (see step 3 on the screen. 5. Turn on...

English Manual
Page 28
.... Begin pedaling or press any button on the console to access demo workouts through your schedule, touch the Map, Train, Video, or Lose Wt. If you through these options, even if you are finished exercising, unplug the power cord. To use an iFit workout, you will appear. When you select an iFit workout, the screen will guide you select a competition workout, the display will ask for your pedaling cadence. See step 2 on...
.... Begin pedaling or press any button on the console to access demo workouts through your schedule, touch the Map, Train, Video, or Lose Wt. If you through these options, even if you are finished exercising, unplug the power cord. To use an iFit workout, you will appear. When you select an iFit workout, the screen will guide you select a competition workout, the display will ask for your pedaling cadence. See step 2 on...

English Manual
Page 29
... the power. Turn on page 24). Enable or disable the auto relogin feature. The console features a child safety passcode, designed to your iFit account when you turn off the display demo mode. Next, touch the On checkbox or the Off checkbox. Note: You can also press the center button on the console to be used if the elliptical is recommended for automatic console updates, see steps...
... the power. Turn on page 24). Enable or disable the auto relogin feature. The console features a child safety passcode, designed to your iFit account when you turn off the display demo mode. Next, touch the On checkbox or the Off checkbox. Note: You can also press the center button on the console to be used if the elliptical is recommended for automatic console updates, see steps...
English Manual
Page 31
..., touch the Custom IP button to the factory default settings. Calibrate the screen. To calibrate the screen, touch the Calibrate Screen button. IMPORTANT: To avoid damaging the elliptical, do not turn off the power while the firmware is complete, the elliptical will be used by service technicians to identify whether a certain button is not properly calibrated, it does not, press the power switch into the reset position. If it...
..., touch the Custom IP button to the factory default settings. Calibrate the screen. To calibrate the screen, touch the Calibrate Screen button. IMPORTANT: To avoid damaging the elliptical, do not turn off the power while the firmware is complete, the elliptical will be used by service technicians to identify whether a certain button is not properly calibrated, it does not, press the power switch into the reset position. If it...

English Manual
Page 33
... support.ifit.com for assistance. 33 Next, press the play music or audio books through the console sound system while you are using the Internet browser, the resistance, ramp, fan, and volume buttons will still function, but the workout buttons will not function. make sure that the audio cable is fully plugged in the URL bar, first, slide your personal audio player. Adjust the volume level using...
... support.ifit.com for assistance. 33 Next, press the play music or audio books through the console sound system while you are using the Internet browser, the resistance, ramp, fan, and volume buttons will still function, but the workout buttons will not function. make sure that the audio cable is fully plugged in the URL bar, first, slide your personal audio player. Adjust the volume level using...

English Manual
Page 35
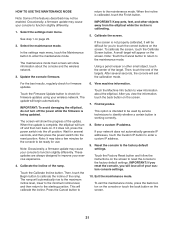
... Rollers (51) squeak when moving on the Tracks (11), apply a small amount of direct sunlight. Then, gently remove the right Disc. belt, first use a flat screwdriver to remove the Shield you use the chest heart rate monitor, see step 4 on , make sure that the indicated M4 x 16mm power cord is not functioning properly, the incline of the elliptical regularly. CONSOLE TROUBLESHOOTING Next, remove the If the console does not turn on page 31. Screw...
... Rollers (51) squeak when moving on the Tracks (11), apply a small amount of direct sunlight. Then, gently remove the right Disc. belt, first use a flat screwdriver to remove the Shield you use the chest heart rate monitor, see step 4 on , make sure that the indicated M4 x 16mm power cord is not functioning properly, the incline of the elliptical regularly. CONSOLE TROUBLESHOOTING Next, remove the If the console does not turn on page 31. Screw...

English Manual
Page 36
... cover, and the lower upright cover. 20 Loosen, but do not remove, the M4 x 16mm Screw (104). Then, retighten the Screw. Next, tighten the Belt Adjustment Screw (88) until one of the Magnets (43) on the Pulley (19) is tight. Repeat these actions until the console displays correct feedback. note which size of the way. Gently move the right Crank Arm and the Right Roller Arm (45) out of screw you remove...
... cover, and the lower upright cover. 20 Loosen, but do not remove, the M4 x 16mm Screw (104). Then, retighten the Screw. Next, tighten the Belt Adjustment Screw (88) until one of the Magnets (43) on the Pulley (19) is tight. Repeat these actions until the console displays correct feedback. note which size of the way. Gently move the right Crank Arm and the Right Roller Arm (45) out of screw you remove...

English Manual
Page 37
... highest number is the key to use your physician. If your goal is to five workouts each week, with pre-existing health problems. The heart rate monitor is intended only as a guide to prevent post-exercise problems. EXERCISE FREQUENCY To maintain or improve your cardiovascular system, you must perform aerobic exercise, which is especially important for exercise. For aerobic exercise, adjust the intensity of your exercise until your heart rate...
... highest number is the key to use your physician. If your goal is to five workouts each week, with pre-existing health problems. The heart rate monitor is intended only as a guide to prevent post-exercise problems. EXERCISE FREQUENCY To maintain or improve your cardiovascular system, you must perform aerobic exercise, which is especially important for exercise. For aerobic exercise, adjust the intensity of your exercise until your heart rate...

English Manual
Page 39
Key No. Description Key No. Heart Rate Monitor Chest Strap 1" Grommet Crank Arm Bushing Ramp Shield Roller Arm Flex Bracket Pedal Arm Flex Bracket Flex Bracket Cover Left Pedal Bracket Right Pedal Bracket Fan Bracket M8 x 20mm Screw M8 Split Washer Ground Wire Short Spacer Mechanism Spacer Pedal Insert M8 x 14mm Shoulder Screw User’'s Manual Assembly Tool Grease Packet PTFE Grease Packet Blue Wire Green Wire White Wire Lift Motor Wire A Lift Motor Wire B Resistance Motor Wire Note: Specifications are not illustrated. 39 Qty. Description 101 1 102 10 103...
Key No. Description Key No. Heart Rate Monitor Chest Strap 1" Grommet Crank Arm Bushing Ramp Shield Roller Arm Flex Bracket Pedal Arm Flex Bracket Flex Bracket Cover Left Pedal Bracket Right Pedal Bracket Fan Bracket M8 x 20mm Screw M8 Split Washer Ground Wire Short Spacer Mechanism Spacer Pedal Insert M8 x 14mm Shoulder Screw User’'s Manual Assembly Tool Grease Packet PTFE Grease Packet Blue Wire Green Wire White Wire Lift Motor Wire A Lift Motor Wire B Resistance Motor Wire Note: Specifications are not illustrated. 39 Qty. Description 101 1 102 10 103...

English Manual
Page 44
... of the product (see the front cover of this manual) •• the key number and description of the replacement part(s) (see the PART LIST and the EXPLODED DRAWING near the end of incidental or consequential damages. Accordingly, the above limitation may not apply to the customer. This warranty provides specic legal rights; ICON Health & Fitness, Inc., 1500 S. 1000 W., Logan, UT 84321...
... of the product (see the front cover of this manual) •• the key number and description of the replacement part(s) (see the PART LIST and the EXPLODED DRAWING near the end of incidental or consequential damages. Accordingly, the above limitation may not apply to the customer. This warranty provides specic legal rights; ICON Health & Fitness, Inc., 1500 S. 1000 W., Logan, UT 84321...


