Quick Start Guide
Page 2
... or down arrow buttons to scroll up or down arrow button to the retailer, please visit www.rca.com/television for an A at this point is the TV is perfectly normal. Entering Channel Numbers...subchannels. To tune to tune. Viewing Devices Connected to Your TV To view devices connected to your HDTV, you might appear as if it 's looking for the channel to a digital channel with the ...scroll left shows. Running Auto Channel Search erases list and labels. Here is still in the remote. The search first looks for analog channels and places the number of the screen to...
... or down arrow buttons to scroll up or down arrow button to the retailer, please visit www.rca.com/television for an A at this point is the TV is perfectly normal. Entering Channel Numbers...subchannels. To tune to tune. Viewing Devices Connected to Your TV To view devices connected to your HDTV, you might appear as if it 's looking for the channel to a digital channel with the ...scroll left shows. Running Auto Channel Search erases list and labels. Here is still in the remote. The search first looks for analog channels and places the number of the screen to...
User Guide & Warranty
Page 4
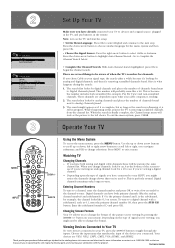
...) Connection .......... 8 HDMI/DVI Connection 10 USB Connection 12 VGA Connection 13 Plug in the TV 14 Put Batteries in the Remote 14 Turn on the TV 14 How to Use the Remote Control to Complete the Initial Setup 14 Complete the Initial Setup 15 Set the Menu Language 15 Complete Channel Setup... You've Programmed It 22 Modes of Operation 22 Volume Punchthrough Feature 22 Deleting ALL Volume Punchthrough Commands 23 Remote Code List 24 Chapter 3: Using the TV's Features Channel Banner 27 Autotuning 27 Parental Controls and V-Chip 29 How V-Chip Works for USA and Canada ...
...) Connection .......... 8 HDMI/DVI Connection 10 USB Connection 12 VGA Connection 13 Plug in the TV 14 Put Batteries in the Remote 14 Turn on the TV 14 How to Use the Remote Control to Complete the Initial Setup 14 Complete the Initial Setup 15 Set the Menu Language 15 Complete Channel Setup... You've Programmed It 22 Modes of Operation 22 Volume Punchthrough Feature 22 Deleting ALL Volume Punchthrough Commands 23 Remote Code List 24 Chapter 3: Using the TV's Features Channel Banner 27 Autotuning 27 Parental Controls and V-Chip 29 How V-Chip Works for USA and Canada ...
User Guide & Warranty
Page 5
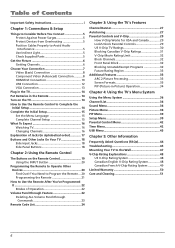
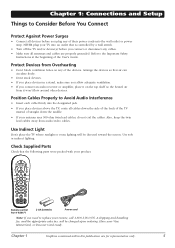
... top shelf so the heated air from it won't flow around other devices. DEF ABC GHI MNO JKL PQRS INPUT TUV _,.:=$ WXYZ SUB CH Remote control Part # R301F1 2 AA batteries Power cord Note: If you need to replace your Visa, MasterCard, or Discover Card ready. Have your... remote, call 1-800-338-0376. Chapter 1: Connections and Setup Things to Consider Before You Connect Protect Against Power Surges • Connect all devices before you connect ...
... top shelf so the heated air from it won't flow around other devices. DEF ABC GHI MNO JKL PQRS INPUT TUV _,.:=$ WXYZ SUB CH Remote control Part # R301F1 2 AA batteries Power cord Note: If you need to replace your Visa, MasterCard, or Discover Card ready. Have your... remote, call 1-800-338-0376. Chapter 1: Connections and Setup Things to Consider Before You Connect Protect Against Power Surges • Connect all devices before you connect ...
User Guide & Warranty
Page 9
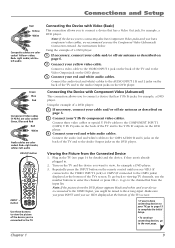
... audio (red and white) cables to the CMP1 AUDIO R and L jacks on the back of the TV and to the Audio Output jacks on the remote control until you to the channel list from the Connected Device 1. Using the example of a DVD player: 1. Using the example of a DVD player: 1. Connect your...
... audio (red and white) cables to the CMP1 AUDIO R and L jacks on the back of the TV and to the Audio Output jacks on the remote control until you to the channel list from the Connected Device 1. Using the example of a DVD player: 1. Using the example of a DVD player: 1. Connect your...
User Guide & Warranty
Page 11
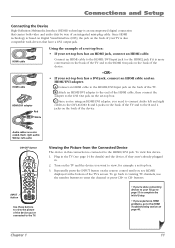
... in . 2. Repeatedly press the INPUT button on page 46. A. Turn on the TV and the device you want to the HDMI Troubleshooting section on the remote control until you experience HDMI problems, go back to viewing TV channels, use the number buttons to the HDMI1/DVI jack. buttons. • If you...
... in . 2. Repeatedly press the INPUT button on page 46. A. Turn on the TV and the device you want to the HDMI Troubleshooting section on the remote control until you experience HDMI problems, go back to viewing TV channels, use the number buttons to the HDMI1/DVI jack. buttons. • If you...
User Guide & Warranty
Page 13
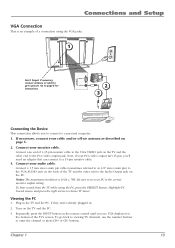
... TV and the PC, if they aren't already plugged in. 2. Turn on the TV and the other end to the Audio Output jack on the remote control until you to connect to a personal computer. 1. Connections and Setup VGA Connection This is 1024 x 768. Be sure to set your audio cable. buttons...
... TV and the PC, if they aren't already plugged in. 2. Turn on the TV and the other end to the Audio Output jack on the remote control until you to connect to a personal computer. 1. Connections and Setup VGA Connection This is 1024 x 768. Be sure to set your audio cable. buttons...
User Guide & Warranty
Page 14
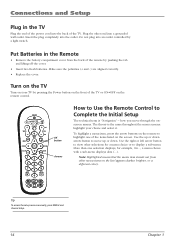
... To access the setup menus manually, press MENU and choose Setup. 14 Chapter 1 Connections and Setup Plug in the Remote • Remove the battery compartment cover from other menu items on the remote to highlight one selection displays, for a menu choice or to view other end into the outlet. Plug the other... INFO + CH CTRL ZOOMCLEAR PRESETS ZOOM+ GUIDE ?!+- DEF ABC GHI MNO JKL PQRS INPUT TUV _,.:=$ WXYZ SUB CH OK button Arrows How to Use the Remote Control to move through the onscreen menus. Note: Highlighted means that the menu item stands out from the back of the...
... To access the setup menus manually, press MENU and choose Setup. 14 Chapter 1 Connections and Setup Plug in the Remote • Remove the battery compartment cover from other menu items on the remote to highlight one selection displays, for a menu choice or to view other end into the outlet. Plug the other... INFO + CH CTRL ZOOMCLEAR PRESETS ZOOM+ GUIDE ?!+- DEF ABC GHI MNO JKL PQRS INPUT TUV _,.:=$ WXYZ SUB CH OK button Arrows How to Use the Remote Control to move through the onscreen menus. Note: Highlighted means that the menu item stands out from the back of the...

User Guide & Warranty
Page 18
...arrow button on the same channel you are recording. VGA AUDIO (Stereo mini jack) Use to the S-VIDEO jack, press the INPUT button on your remote, you can use the side panel buttons of the screen. VIDEO INPUT 2 Receives video from the ANTENNA/CABLE INPUT (excluding copy-protected programs and ...component video formats) while the TV is connected to the side jacks at the bottom of your remote until VID2 appears at the bottom of the TV's features. Note: Do not connect an S-Video and a regular video cable to the VGA jack....
...arrow button on the same channel you are recording. VGA AUDIO (Stereo mini jack) Use to the S-VIDEO jack, press the INPUT button on your remote, you can use the side panel buttons of the screen. VIDEO INPUT 2 Receives video from the ANTENNA/CABLE INPUT (excluding copy-protected programs and ...component video formats) while the TV is connected to the side jacks at the bottom of your remote until VID2 appears at the bottom of the TV's features. Note: Do not connect an S-Video and a regular video cable to the VGA jack....
User Guide & Warranty
Page 19
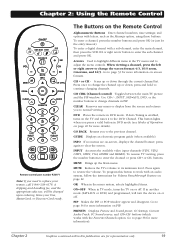
...Graphics contained within this button to page 33 for more information on page 22. DEF ABC GHI MNO JKL PQRS INPUT TUV _,.:=$ WXYZ SUB CH Remote control part number R301F1 Note: If you press a valid button in the TV menu and to normal viewing. Arrows Used to highlight different items...CLEAR Removes any menu or display from the screen and returns you to restore the volume. PRESETS Displays Picture and Sound preset; Chapter 2: Using the Remote Control ON•OFF TV PIP SAT•AUX DVD GO BACK VOL CH MENU MUTE INFO + CH CTRL ZOOMCLEAR PRESETS ZOOM+ GUIDE ?!+- Have ...
...Graphics contained within this button to page 33 for more information on page 22. DEF ABC GHI MNO JKL PQRS INPUT TUV _,.:=$ WXYZ SUB CH Remote control part number R301F1 Note: If you press a valid button in the TV menu and to normal viewing. Arrows Used to highlight different items...CLEAR Removes any menu or display from the screen and returns you to restore the volume. PRESETS Displays Picture and Sound preset; Chapter 2: Using the Remote Control ON•OFF TV PIP SAT•AUX DVD GO BACK VOL CH MENU MUTE INFO + CH CTRL ZOOMCLEAR PRESETS ZOOM+ GUIDE ?!+- Have ...

User Guide & Warranty
Page 20
... VCR doesn't respond, you need to program the remote to see Modes of your device. ZOOM- Point the remote at bottom of the remote) If programmed, provides transport control for some RCA devices. TV Turns on this TV. SAT•AUX Places the remote in TV mode. If Auto Tuning is entered, ...press the OK button to tune to operate your TV, such as a VCR, do the following: 1. Go to operate one of remote-controllable VCRs, audio devices...
... VCR doesn't respond, you need to program the remote to see Modes of your device. ZOOM- Point the remote at bottom of the remote) If programmed, provides transport control for some RCA devices. TV Turns on this TV. SAT•AUX Places the remote in TV mode. If Auto Tuning is entered, ...press the OK button to tune to operate your TV, such as a VCR, do the following: 1. Go to operate one of remote-controllable VCRs, audio devices...

User Guide & Warranty
Page 21
... following steps. 1. Then release the buttons. 3. On your device. Then release the buttons. 4. To test the code you entered for your remote control, simultaneously press and hold the ON•OFF and MUTE buttons (approximately 3 seconds) until a device button remains lit. Circle the code ...you must use these steps until a device button remains lit. Repeatedly press and release the ON•OFF button, watching for your remote control, simultaneously press and hold the ON•OFF and MUTE buttons (approximately 3 seconds) until you 've entered the correct programming ...
... following steps. 1. Then release the buttons. 3. On your device. Then release the buttons. 4. To test the code you entered for your remote control, simultaneously press and hold the ON•OFF and MUTE buttons (approximately 3 seconds) until a device button remains lit. Circle the code ...you must use these steps until a device button remains lit. Repeatedly press and release the ON•OFF button, watching for your remote control, simultaneously press and hold the ON•OFF and MUTE buttons (approximately 3 seconds) until you 've entered the correct programming ...

User Guide & Warranty
Page 22
...system. Since the DVD player sends its volume through the audio system, you 're using the TV remote to go forward through the codes; Press and release the ON•OFF button once. If you...ON or OFF. 3. Modes of Operation The button corresponding to operate your DVD player. 2. Using the Remote Control 4. There is being sent to an audio system, and you press any button that works in DVD... receiver, for example). Press the appropriate device button (SAT•AUX or DVD) to set the remote to control the device, for you to use it , press the left arrow button to retrieve and...
...system. Since the DVD player sends its volume through the audio system, you 're using the TV remote to go forward through the codes; Press and release the ON•OFF button once. If you...ON or OFF. 3. Modes of Operation The button corresponding to operate your DVD player. 2. Using the Remote Control 4. There is being sent to an audio system, and you press any button that works in DVD... receiver, for example). Press the appropriate device button (SAT•AUX or DVD) to set the remote to control the device, for you to use it , press the left arrow button to retrieve and...

User Guide & Warranty
Page 23
...the ON•OFF and MUTE buttons (approximately 3 seconds) until a device button remains lit. On your audio system. 6. Put the TV's remote in DVD mode (press the DVD button) and you want to adjust the volume, you programmed to operate the audio system (receiver or ampli&#... (satellite receiver, for example). 7. Press VOL+ or VOL-. Press and release the MUTE button until a device button remains lit. Turn on your remote control, simultaneously press and hold the ON•OFF and MUTE buttons (approximately 3 seconds) until the device button light turns off. 4. Deleting ALL...
...the ON•OFF and MUTE buttons (approximately 3 seconds) until a device button remains lit. On your audio system. 6. Put the TV's remote in DVD mode (press the DVD button) and you want to adjust the volume, you programmed to operate the audio system (receiver or ampli&#... (satellite receiver, for example). 7. Press VOL+ or VOL-. Press and release the MUTE button until a device button remains lit. Turn on your remote control, simultaneously press and hold the ON•OFF and MUTE buttons (approximately 3 seconds) until the device button light turns off. 4. Deleting ALL...

User Guide & Warranty
Page 24
...490 491 492 PHILIPS-MAGNAVOX 505 534 PIONEER 478 506 493 494 PULSAR 486 RADIO SHACK 505 534 525 RCA 460 471 507 REALISTIC 469 REGAL 482 REGENCY 477 REMBRANDT 463 ROGERS 506 RUNCO 486 SAMSUNG 474 494 SCIENTIFIC...719 750 837 876 PROTON 666 QUASAR 716 RADIO SHACK ..........668 699 706 750 786 868 874 876 RCA 661 667 703 723 750 795 844 873 874 876 REALISTIC 661 667 669 673 678 689 697 ... 944 GRADIENTE 415 GREENHILL 430 HAAZ 451 452 HAIER 935 24 Chapter 2 Using the Remote Control Remote Code List Note: The codes are programmable to any of the device buttons (SAT•AUX or DVD)...
...490 491 492 PHILIPS-MAGNAVOX 505 534 PIONEER 478 506 493 494 PULSAR 486 RADIO SHACK 505 534 525 RCA 460 471 507 REALISTIC 469 REGAL 482 REGENCY 477 REMBRANDT 463 ROGERS 506 RUNCO 486 SAMSUNG 474 494 SCIENTIFIC...719 750 837 876 PROTON 666 QUASAR 716 RADIO SHACK ..........668 699 706 750 786 868 874 876 RCA 661 667 703 723 750 795 844 873 874 876 REALISTIC 661 667 669 673 678 689 697 ... 944 GRADIENTE 415 GREENHILL 430 HAAZ 451 452 HAIER 935 24 Chapter 2 Using the Remote Control Remote Code List Note: The codes are programmable to any of the device buttons (SAT•AUX or DVD)...

User Guide & Warranty
Page 25
...651 652 098 REALISTIC 567 603 SAMSUNG 594 583 613 616 619 Chapter 2 25 Using the Remote Control HARMAN KARDON 427 HITACHI 404 407 419 428 HITEKER 445 HUMAX 912 ILO 959 INFINITY 417...ONKYO 975 PANASONIC 974 PHILIPS 755 [969 756] PIONEER 976 968 RADIO SHACK 449 894 895 [453 879] RCA 449 920 [453 879] REGENT 931 SABA 919 SAMSUNG 454 942 SONY 986 TEVION 448 ZENITH 405 787] ... DREAMBOX 620 ECHOSTAR 655 647 EXPRESSVU 647 655 FORTEC STAR 569 555 556 HUGHES NETWORK 621 580 RCA 653 PHILIPS 621 PROSCAN 653 SAMSUNG 583 SONY 657 659 ULTIMATE TV 653 659 ZENITH 656 Home ...
...651 652 098 REALISTIC 567 603 SAMSUNG 594 583 613 616 619 Chapter 2 25 Using the Remote Control HARMAN KARDON 427 HITACHI 404 407 419 428 HITEKER 445 HUMAX 912 ILO 959 INFINITY 417...ONKYO 975 PANASONIC 974 PHILIPS 755 [969 756] PIONEER 976 968 RADIO SHACK 449 894 895 [453 879] RCA 449 920 [453 879] REGENT 931 SABA 919 SAMSUNG 454 942 SONY 986 TEVION 448 ZENITH 405 787] ... DREAMBOX 620 ECHOSTAR 655 647 EXPRESSVU 647 655 FORTEC STAR 569 555 556 HUGHES NETWORK 621 580 RCA 653 PHILIPS 621 PROSCAN 653 SAMSUNG 583 SONY 657 659 ULTIMATE TV 653 659 ZENITH 656 Home ...

User Guide & Warranty
Page 26
... 381 292 RADIO SHACK 225 226 227 239 . 245 268 342 354 361 363 248 251 254 274 292 300 337 RADIX 245 RANDEX 245 RCA ...[225] 245 [308] 309 311 312 313 314 315 316 335 342 354 369 228 278 292 332 REALISTIC ... 225 226 227 245 268 354... 227 338 347 353 358 245 229 310 232 232 376 377 279 368 243 Web TV JVC 612 SONY 585 26 Chapter 2 Using the Remote Control SHARP 604 SKY NETWORK 614 615 646 SIERRA I II III 561 SONY 623 657 659 602 STARCHOICE 640 645 627 STAR SIGHT 633 STAR...
... 381 292 RADIO SHACK 225 226 227 239 . 245 268 342 354 361 363 248 251 254 274 292 300 337 RADIX 245 RANDEX 245 RCA ...[225] 245 [308] 309 311 312 313 314 315 316 335 342 354 369 228 278 292 332 REALISTIC ... 225 226 227 245 268 354... 227 338 347 353 358 245 229 310 232 232 376 377 279 368 243 Web TV JVC 612 SONY 585 26 Chapter 2 Using the Remote Control SHARP 604 SKY NETWORK 614 615 646 SIERRA I II III 561 SONY 623 657 659 602 STARCHOICE 640 645 627 STAR SIGHT 633 STAR...

User Guide & Warranty
Page 27
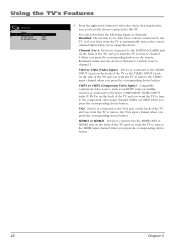
...the current channel is broadcasting SAP (Second Audio Program) information. Current screen format. Current time. Autotuning Note: This feature only works with other RCA devices. Set DVD Channel Lets you want to the VID1 input, for example, when you set up the Autotuning feature: Setup Go back Channel... DVD button. Closed Captioning is set up the channel the TV tunes to get rid of them by pressing the ZOOM buttons on the remote. The channel, sub-channel (if available for digital channels) and program (only for different devices you have to remember to change your ...
...the current channel is broadcasting SAP (Second Audio Program) information. Current screen format. Current time. Autotuning Note: This feature only works with other RCA devices. Set DVD Channel Lets you want to the VID1 input, for example, when you set up the Autotuning feature: Setup Go back Channel... DVD button. Closed Captioning is set up the channel the TV tunes to get rid of them by pressing the ZOOM buttons on the remote. The channel, sub-channel (if available for digital channels) and program (only for different devices you have to remember to change your ...
User Guide & Warranty
Page 28
... correct channel/input when you don't have the device connected to channel 3. CMP1 or CMP2 (Component Video Input) Compatible component video source, such as an HDTV tuner or satellite receiver, is connected to the ANTENNA/CABLE jack on the back of the TV, and you want the TV to automatically tune... the side of the TV and you want the TV to tune to the VIDEO input channel when you press the corresponding button on the remote. Press the right arrow button to select the choice that matches the way you have a device connected to the TV, or if you don't want...
... correct channel/input when you don't have the device connected to channel 3. CMP1 or CMP2 (Component Video Input) Compatible component video source, such as an HDTV tuner or satellite receiver, is connected to the ANTENNA/CABLE jack on the back of the TV, and you want the TV to automatically tune... the side of the TV and you want the TV to tune to the VIDEO input channel when you press the corresponding button on the remote. Press the right arrow button to select the choice that matches the way you have a device connected to the TV, or if you don't want...

User Guide & Warranty
Page 29
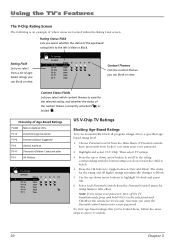
... control menu enter a new password. Go to block TV programs and movies. Simultaneously press and hold VOL v on the side panel and CLEAR on the remote for V-Chip, Channel Block, or Front Panel Block will receive the message This channel is explained on page 31. TV programs can be blocked by...
... control menu enter a new password. Go to block TV programs and movies. Simultaneously press and hold VOL v on the side panel and CLEAR on the remote for V-Chip, Channel Block, or Front Panel Block will receive the message This channel is explained on page 31. TV programs can be blocked by...
User Guide & Warranty
Page 30
..., turn off the TV. The status for rating limits to take effect. Simultaneously press and hold VOL v on the side panel and CLEAR on the remote for the selected rating, and whether the status of the content theme is currently unlocked ( ) or locked ( ). To view age-based ratings after you enter...
..., turn off the TV. The status for rating limits to take effect. Simultaneously press and hold VOL v on the side panel and CLEAR on the remote for the selected rating, and whether the status of the content theme is currently unlocked ( ) or locked ( ). To view age-based ratings after you enter...


