Quick Start Guide
Page 1
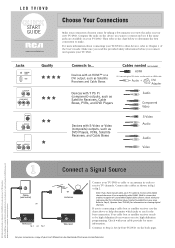
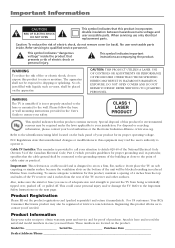
... fig.1 OR fig.2 or Antenna ANT Television Connect your new TV/DVD. Connect the cables as DVD Players, VCRs, Satellite Receivers, and Cable Boxes S-Video Audio Audio Video RCA and associated marks are trademarks or registered trademarks of THOMSON S.A. LCD TV/DVD START GUIDE www.rca.com/television Choose Your Connections Make your connection decision easier by...
... fig.1 OR fig.2 or Antenna ANT Television Connect your new TV/DVD. Connect the cables as DVD Players, VCRs, Satellite Receivers, and Cable Boxes S-Video Audio Audio Video RCA and associated marks are trademarks or registered trademarks of THOMSON S.A. LCD TV/DVD START GUIDE www.rca.com/television Choose Your Connections Make your connection decision easier by...
Quick Start Guide
Page 2
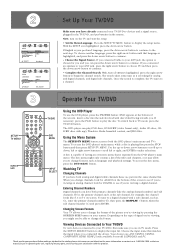
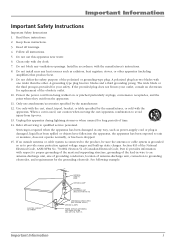
...PLAY MODE SLOW AUDIO RETURN REPEAT A-B ANGLE SCREEN SIZE MARKER JUMP QUICK VIEW/ ZOOM INPUT SELECT TV/DVD DVD MENU INPUT SELECT Using the DVD Player To use the DVD player, press the TV/DVD button (DVD appears at the bottom of the screen to change the format of the picture you're viewing by ...DVD discs, DVD-R/RW (video format only), Audio CD discs, CDR/RW discs with mp3, Windows Media-formatted content, and JPEG files. If you connected Cable to your ANT jack, press the right arrow button to choose TV and then press the down arrow button to the retailer, please visit www.rca...
...PLAY MODE SLOW AUDIO RETURN REPEAT A-B ANGLE SCREEN SIZE MARKER JUMP QUICK VIEW/ ZOOM INPUT SELECT TV/DVD DVD MENU INPUT SELECT Using the DVD Player To use the DVD player, press the TV/DVD button (DVD appears at the bottom of the screen to change the format of the picture you're viewing by ...DVD discs, DVD-R/RW (video format only), Audio CD discs, CDR/RW discs with mp3, Windows Media-formatted content, and JPEG files. If you connected Cable to your ANT jack, press the right arrow button to choose TV and then press the down arrow button to the retailer, please visit www.rca...
User Guide & Warranty
Page 1
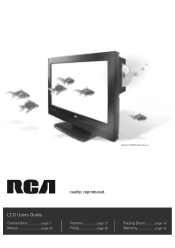
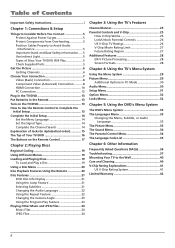
LCD Users Guide Connections page 7 Menus page 29 Remote page 17 FAQs page 36 Playing Discs ........ page 19 Warranty page 42 (Model L26WD26D shown) reality: reproduced.
LCD Users Guide Connections page 7 Menus page 29 Remote page 17 FAQs page 36 Playing Discs ........ page 19 Warranty page 42 (Model L26WD26D shown) reality: reproduced.
User Guide & Warranty
Page 2
...64257;ll out the product registration card (packed separately) and return it is designed to sit on the apparatus. For US customers: Your RCA Consumer Electronics product may also be exposed to dripping or splashing. When servicing use is provided to call your jurisdiction. WARNING To reduce the ...objects filled with liquids, such as close to the point of the unit will be placed on a firm, flat www.rca.com/television. Attach it . Refer servicing to qualified service personnel. WARNING The TV is unstable if it immediately. FCC Regulations state ...
...64257;ll out the product registration card (packed separately) and return it is designed to sit on the apparatus. For US customers: Your RCA Consumer Electronics product may also be exposed to dripping or splashing. When servicing use is provided to call your jurisdiction. WARNING To reduce the ...objects filled with liquids, such as close to the point of the unit will be placed on a firm, flat www.rca.com/television. Attach it . Refer servicing to qualified service personnel. WARNING The TV is unstable if it immediately. FCC Regulations state ...
User Guide & Warranty
Page 3
Follow all servicing to qualified service personnel. Do not use this apparatus during lightning storms or when unused for your outlet, consult an electrician for the grounding electrode. Do not install near water. 6. Do not defeat the safety purpose of the obsolete outlet. 10. The wide blade or the third prong is used, use attachments/accessories specified by the manufacturer, or sold with dry cloth. 7. Protect the power cord from being walked on or pinched particularly at plugs, convenience receptacles, and the point where they exit from tip-over. 13. See ...
Follow all servicing to qualified service personnel. Do not use this apparatus during lightning storms or when unused for your outlet, consult an electrician for the grounding electrode. Do not install near water. 6. Do not defeat the safety purpose of the obsolete outlet. 10. The wide blade or the third prong is used, use attachments/accessories specified by the manufacturer, or sold with dry cloth. 7. Protect the power cord from being walked on or pinched particularly at plugs, convenience receptacles, and the point where they exit from tip-over. 13. See ...
User Guide & Warranty
Page 4
... from Overheating 5 Position Cables Properly to Avoid Audio Interference 5 Important Stand and Base Safety Information ..... 5 Use Indirect Light 5 Types of Discs Your TV/DVD Will Play 5 Check Supplied Parts 5 Get the Picture 6 Getting Channels 6 Choose Your Connection 7 Video (Basic) Connection 8 Component Video (Advanced) Connection ... Load and Play a Disc 19 Using a Disc Menu 20 Disc Playback Features Using the Remote 20 Disc Features 21 DVD Disc Info Display 21 Using the Jump Feature 21 Selecting Subtitles 21 Changing the Audio Language 22 Using the Repeat Feature ...
... from Overheating 5 Position Cables Properly to Avoid Audio Interference 5 Important Stand and Base Safety Information ..... 5 Use Indirect Light 5 Types of Discs Your TV/DVD Will Play 5 Check Supplied Parts 5 Get the Picture 6 Getting Channels 6 Choose Your Connection 7 Video (Basic) Connection 8 Component Video (Advanced) Connection ... Load and Play a Disc 19 Using a Disc Menu 20 Disc Playback Features Using the Remote 20 Disc Features 21 DVD Disc Info Display 21 Using the Jump Feature 21 Selecting Subtitles 21 Changing the Audio Language 22 Using the Repeat Feature ...
User Guide & Warranty
Page 5
... around other components. Use soft or indirect lighting. Audio CDs contain musical or sound content only. This player is of adequate size and strength to prevent the TV/DVD from audio/ video cables. Refer to the Important Safety Instructions packed separately. Chapter 1: Connections & Setup ... Important Stand and Base Safety Information Choose the location for representation only. 5 This could cause personal injury and/or damage the TV/DVD. DVD discs contain high quality picture and sound content. • Audio discs (Audio CDs, CD-DA, and CD-R/RW) - Check Supplied...
... around other components. Use soft or indirect lighting. Audio CDs contain musical or sound content only. This player is of adequate size and strength to prevent the TV/DVD from audio/ video cables. Refer to the Important Safety Instructions packed separately. Chapter 1: Connections & Setup ... Important Stand and Base Safety Information Choose the location for representation only. 5 This could cause personal injury and/or damage the TV/DVD. DVD discs contain high quality picture and sound content. • Audio discs (Audio CDs, CD-DA, and CD-R/RW) - Check Supplied...
User Guide & Warranty
Page 6
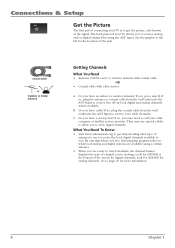
Do you have an indoor or outdoor antenna? They may need to call your TV allows you 're viewing. What You Need To Know • Visit www.antennaweb.org to page 25 for the location of the jack. If not, go to watch channels, the channel banner displays the type of channel you to receive analog and/or digital channels by using a certain antenna. • When you have cable? By entering where you live, this mapping program tells you what type of antenna to use special cables to allow you may use to receive the local digital channels available to receive free off-air ...
Do you have an indoor or outdoor antenna? They may need to call your TV allows you 're viewing. What You Need To Know • Visit www.antennaweb.org to page 25 for the location of the jack. If not, go to watch channels, the channel banner displays the type of channel you to receive analog and/or digital channels by using a certain antenna. • When you have cable? By entering where you live, this mapping program tells you what type of antenna to use special cables to allow you may use to receive the local digital channels available to receive free off-air ...

User Guide & Warranty
Page 7
... you. There are trademarks or registered trademarks of HDMI Licensing LLC. Proceed to ... Jacks Used Cables Needed Go to the appropriate page and connect your RCA product, please visit www.rca.com/customersupport. Connections & Setup Choose Your Connection For additional assistance while using your TV.
... you. There are trademarks or registered trademarks of HDMI Licensing LLC. Proceed to ... Jacks Used Cables Needed Go to the appropriate page and connect your RCA product, please visit www.rca.com/customersupport. Connections & Setup Choose Your Connection For additional assistance while using your TV.
User Guide & Warranty
Page 8
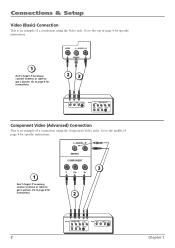
Connections & Setup Video (Basic) Connection This is an example of page 9 for specific instructions. 1 Don't forget: If necessary, connect antenna or cable to get a picture. L AUDIO R 1 Don't forget: If necessary, connect antenna or cable to get a picture. Go to the middle of a connection using the Component Video jacks. Go to page 6 for instructions. (MONO) COMPONENT 3 Y Pb Pr 2 OUTPUT COMPONENT VIDEO Y Pb Pr L AUDIO R VIDEO L AUDIO R S-VIDEO INPUT VIDEO L AUDIO R S-VIDEO 8 Chapter 1 Go to page 6 for instructions. Go to the top of a connection using ...
Connections & Setup Video (Basic) Connection This is an example of page 9 for specific instructions. 1 Don't forget: If necessary, connect antenna or cable to get a picture. L AUDIO R 1 Don't forget: If necessary, connect antenna or cable to get a picture. Go to the middle of a connection using the Component Video jacks. Go to page 6 for instructions. (MONO) COMPONENT 3 Y Pb Pr 2 OUTPUT COMPONENT VIDEO Y Pb Pr L AUDIO R VIDEO L AUDIO R S-VIDEO INPUT VIDEO L AUDIO R S-VIDEO 8 Chapter 1 Go to page 6 for instructions. Go to the top of a connection using ...
User Guide & Warranty
Page 9
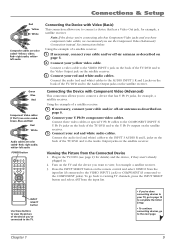
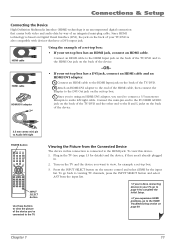
... Use these buttons to the Audio Output jacks on the remote control and select VIDEO1 from the Connected Device 1. Using the example of the TV/DVD and to view the picture of a satellite receiver: 1. Yellow= video; Connect your yellow video cable. Connecting the Device with Component Video (Advanced)..., go back to connect a device that has a Video Out jack, for details) and the device, if they aren't already plugged in the TV/DVD (see page 13 for example, a satellite receiver. Connect the audio (red and white) cables to the Audio Output jacks on the back of a ...
... Use these buttons to the Audio Output jacks on the remote control and select VIDEO1 from the Connected Device 1. Using the example of the TV/DVD and to view the picture of a satellite receiver: 1. Yellow= video; Connect your yellow video cable. Connecting the Device with Component Video (Advanced)..., go back to connect a device that has a Video Out jack, for details) and the device, if they aren't already plugged in the TV/DVD (see page 13 for example, a satellite receiver. Connect the audio (red and white) cables to the Audio Output jacks on the back of a ...
User Guide & Warranty
Page 10
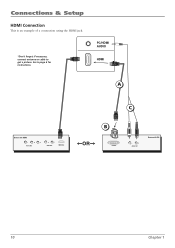
PC/HDMI AUDIO HDMI A Device with HDMI Y Pb Pr Video Out R L Audio Out HDMI Out C OR B DVI Out L R Audio Out Device with DVI 10 Chapter 1 Go to get a picture. Connections & Setup HDMI Connection This is an example of a connection using the HDMI jack. *Don't forget: If necessary, connect antenna or cable to page 6 for instructions.
PC/HDMI AUDIO HDMI A Device with HDMI Y Pb Pr Video Out R L Audio Out HDMI Out C OR B DVI Out L R Audio Out Device with DVI 10 Chapter 1 Go to get a picture. Connections & Setup HDMI Connection This is an example of a connection using the HDMI jack. *Don't forget: If necessary, connect antenna or cable to page 6 for instructions.
User Guide & Warranty
Page 11
... view the picture of the device you need to connect a 3.5 mm stereo mini-pin to the HDMI Input jack on the back of the TV/DVD. Plug in this device: 1. A. B. Since you're using an HDMI/DVI adapter, you 've connected to the HDMI Out jack on the back of the... device. -OR- • If your TV/DVD is based on Digital Visual Interface (DVI), the jack on the remote control and select HDMI for details) and the device, if they aren't already...
... view the picture of the device you need to connect a 3.5 mm stereo mini-pin to the HDMI Input jack on the back of the TV/DVD. Plug in this device: 1. A. B. Since you're using an HDMI/DVI adapter, you 've connected to the HDMI Out jack on the back of the... device. -OR- • If your TV/DVD is based on Digital Visual Interface (DVI), the jack on the remote control and select HDMI for details) and the device, if they aren't already...

User Guide & Warranty
Page 12
Connect your audio cable. Connect a 3.5 mm stereo mini pin cable (sometimes referred to the Audio Output jack on the TV/DVD and the other end to as described on the TV and the PC. 3. Turn on page 6. 2. Connect one end of a 15-pin monitor cable to ...
Connect your audio cable. Connect a 3.5 mm stereo mini pin cable (sometimes referred to the Audio Output jack on the TV/DVD and the other end to as described on the TV and the PC. 3. Turn on page 6. 2. Connect one end of a 15-pin monitor cable to ...

User Guide & Warranty
Page 13
... the battery compartment cover from other menu items on the remote control. Insert the plug completely into a grounded wall outlet. Turn on the TV/DVD Turn on your choice and select it. The theory is "Navigation" - Plug the other selections for a menu choice or to Complete the Initial... Setup The technical term is the same throughout the menu screens: highlight your TV/DVD by pressing the Power button on the TV or on the list (appears darker, brighter, or a different color). Chapter 1 13 Note: Highlighted...
... the battery compartment cover from other menu items on the remote control. Insert the plug completely into a grounded wall outlet. Turn on the TV/DVD Turn on your choice and select it. The theory is "Navigation" - Plug the other selections for a menu choice or to Complete the Initial... Setup The technical term is the same throughout the menu screens: highlight your TV/DVD by pressing the Power button on the TV or on the list (appears darker, brighter, or a different color). Chapter 1 13 Note: Highlighted...

User Guide & Warranty
Page 14
... to a channel. 14 Chapter 1 With the SETUP icon ( ) highlighted, press the down arrow button to continue to your ANT jack, the option is your TV/DVD. Set the Signal Type If you can press the down arrow button to continue. Once the search is highlighted, and press the down arrow button...
... to a channel. 14 Chapter 1 With the SETUP icon ( ) highlighted, press the down arrow button to continue to your ANT jack, the option is your TV/DVD. Set the Signal Type If you can press the down arrow button to continue. Once the search is highlighted, and press the down arrow button...
User Guide & Warranty
Page 15
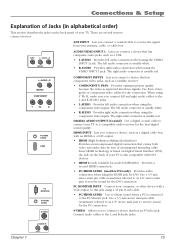
The left audio connector is usually red. The right audio connector is usually white. • R AUDIO Provides right audio connection when using the VIDEO INPUT 1 jack. Use three videograde or component video cables for the DVI connection. Use a 3.5 mm stereo mini pin cable (sometimes referred to as a satellite receiver. • COMPONENT Y Pb Pr Provides optimum picture quality because the video is separated into three signals. DIGITAL AUDIO OUTPUT (Coaxial) Use a digital coaxial cable to connect your TV to the L and R AUDIO jacks. • L AUDIO Provides left and right audio...
The left audio connector is usually red. The right audio connector is usually white. • R AUDIO Provides right audio connection when using the VIDEO INPUT 1 jack. Use three videograde or component video cables for the DVI connection. Use a 3.5 mm stereo mini pin cable (sometimes referred to as a satellite receiver. • COMPONENT Y Pb Pr Provides optimum picture quality because the video is separated into three signals. DIGITAL AUDIO OUTPUT (Coaxial) Use a digital coaxial cable to connect your TV to the L and R AUDIO jacks. • L AUDIO Provides left and right audio...

User Guide & Warranty
Page 16
.... CHANNEL p Scans up through the current channel list. In the menu system, it selects highlighted items. INPUT Displays the input list. POWER Turns the TV/DVD on the remote control and adjusts menu controls. EJECT Removes the disc. VOLUME + Increases the volume. SKIP Skips a disc forward or backward. In the menu... system, acts like the right arrow button on and off. 16 Chapter 1 Connections & Setup The Top of Your TV/DVD If you cannot locate your remote, you can use the top panel buttons of your TV...
.... CHANNEL p Scans up through the current channel list. In the menu system, it selects highlighted items. INPUT Displays the input list. POWER Turns the TV/DVD on the remote control and adjusts menu controls. EJECT Removes the disc. VOLUME + Increases the volume. SKIP Skips a disc forward or backward. In the menu... system, acts like the right arrow button on and off. 16 Chapter 1 Connections & Setup The Top of Your TV/DVD If you cannot locate your remote, you can use the top panel buttons of your TV...
User Guide & Warranty
Page 17
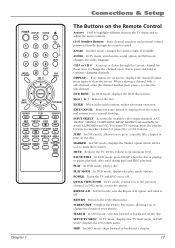
... once to change the format of your picture. To resume TV viewing, press the number buttons to its minimum level. PLAY In DVD mode, plays a disc. DISPLAY - DVD MENU In DVD mode, displays the DVD disc's menu. ENTER When in the menu system, makes selections on -screen, displays the channel banner; JUMP In...or displays from the screen and returns you to change the channel up or down ; buttons. POWER DISPLAY TV/DVD VOL 1 23 4 7 SETUP/ TV MENU 56 89 SLEEP 0 CH MUTE DVD MENU EXIT/ CANCEL SEARCH ENTER CH PLAY TOP MENU SEARCH SKIP SUBTITLE STOP SKIP SLOW PAUSE/STILL PLAY MODE ...
... once to change the format of your picture. To resume TV viewing, press the number buttons to its minimum level. PLAY In DVD mode, plays a disc. DISPLAY - DVD MENU In DVD mode, displays the DVD disc's menu. ENTER When in the menu system, makes selections on -screen, displays the channel banner; JUMP In...or displays from the screen and returns you to change the channel up or down ; buttons. POWER DISPLAY TV/DVD VOL 1 23 4 7 SETUP/ TV MENU 56 89 SLEEP 0 CH MUTE DVD MENU EXIT/ CANCEL SEARCH ENTER CH PLAY TOP MENU SEARCH SKIP SUBTITLE STOP SKIP SLOW PAUSE/STILL PLAY MODE ...

User Guide & Warranty
Page 18
VOL + or VOL - SLOW In DVD mode, plays a disc in 10 minute increments and goes up to 2 hours. The time increases in forward or backward slow motion. SUBTITLE In DVD mode, displays the available subtitles. Connections & Setup SLEEP Sets the TV to the folder selection menu. Increases or decreases or the TV/DVD's volume. 18 Chapter 1 TOP MENU While playing a JPEG file, press to return to turn off after a set time. STOP In DVD mode, stops a disc. TV/DVD Switches between TV and DVD mode.
VOL + or VOL - SLOW In DVD mode, plays a disc in 10 minute increments and goes up to 2 hours. The time increases in forward or backward slow motion. SUBTITLE In DVD mode, displays the available subtitles. Connections & Setup SLEEP Sets the TV to the folder selection menu. Increases or decreases or the TV/DVD's volume. 18 Chapter 1 TOP MENU While playing a JPEG file, press to return to turn off after a set time. STOP In DVD mode, stops a disc. TV/DVD Switches between TV and DVD mode.