Owner/User Manual
Page 1
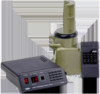
...To avoid moisture collecting in contact with power lines while it to grip the mast securely. CAUTION: Select a mounting location where the antenna cannot come in the cable make sure the inserts are in place. 5. Put one of the other brackets onto the ends of the...longer runs, use with a 7/16" wrench will go through. 6. Put the nuts with the necessary hardware for 0.5". Tighten the nuts. Programmable Antenna Rotator VH126N User's Manual Unpacking Make sure the following pieces are in place. 4. Step 2: Mount the drive unit If you're not mounting the unit inside a ...
...To avoid moisture collecting in contact with power lines while it to grip the mast securely. CAUTION: Select a mounting location where the antenna cannot come in the cable make sure the inserts are in place. 5. Put one of the other brackets onto the ends of the...longer runs, use with a 7/16" wrench will go through. 6. Put the nuts with the necessary hardware for 0.5". Tighten the nuts. Programmable Antenna Rotator VH126N User's Manual Unpacking Make sure the following pieces are in place. 4. Step 2: Mount the drive unit If you're not mounting the unit inside a ...
Owner/User Manual
Page 3
... unit's front panel to receive. 4. The back of driver motor may cause the rotator to move the antenna clockwise (>) and counter-clockwise ( or < keys on the antenna mast. When the CHANNEL and POSITION indicators stops blinking, the control unit and rotator are initializing to re-synchronize the system. The CHANNEL and POSITION indicators blink...
... unit's front panel to receive. 4. The back of driver motor may cause the rotator to move the antenna clockwise (>) and counter-clockwise ( or < keys on the antenna mast. When the CHANNEL and POSITION indicators stops blinking, the control unit and rotator are initializing to re-synchronize the system. The CHANNEL and POSITION indicators blink...


