
User Manual - RTD207
Page 2
... the Region number of a DVD disc does not correspond to the following measures: • Re-orient the receiving antenna (that is designed and manufactured to respond to the warranty included in a particular installation. For instructions on different branch circuits. DO NOT OPEN COVERS AND DO NOT REPAIR YOURSELF. REFER SERVICING I M P O R T A N T " D A N G E R O U S TO QUALIFIED SERVICE I N S T R U C T I O N S VOLTAGE" INSIDE PERSONNEL. Operation is subject to the Region number of fire...
... the Region number of a DVD disc does not correspond to the following measures: • Re-orient the receiving antenna (that is designed and manufactured to respond to the warranty included in a particular installation. For instructions on different branch circuits. DO NOT OPEN COVERS AND DO NOT REPAIR YOURSELF. REFER SERVICING I M P O R T A N T " D A N G E R O U S TO QUALIFIED SERVICE I N S T R U C T I O N S VOLTAGE" INSIDE PERSONNEL. Operation is subject to the Region number of fire...
User Manual - RTD207
Page 3
... 4 Connecting the speakers 5 Positioning speakers 5 Front speaker placement 6 Preferred surround placement 6 Test tone/Channel balance 7 The Remote Control Remote control functions in DVD/CD mode 8 Remote control functions in TUNER mode 9 Using the remote to the Main Unit 19 USB Device Playback Features 19 The Setup Menu General Setup 20 Password 20 Rating 21 Slide Time 21 Default 21 Display Setup 21 Display Type 21 Dark Level 21 Video 22 Speaker Setup 22 Night Mode 22 Distance 22 Test Tone 22 Language Setup 23 Player Menu 23 Audio 23 Subtitles 23 Disc Menu 23...
... 4 Connecting the speakers 5 Positioning speakers 5 Front speaker placement 6 Preferred surround placement 6 Test tone/Channel balance 7 The Remote Control Remote control functions in DVD/CD mode 8 Remote control functions in TUNER mode 9 Using the remote to the Main Unit 19 USB Device Playback Features 19 The Setup Menu General Setup 20 Password 20 Rating 21 Slide Time 21 Default 21 Display Setup 21 Display Type 21 Dark Level 21 Video 22 Speaker Setup 22 Night Mode 22 Distance 22 Test Tone 22 Language Setup 23 Player Menu 23 Audio 23 Subtitles 23 Disc Menu 23...
User Manual - RTD207
Page 4
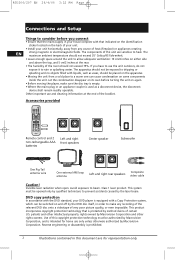
... again. • Before moving the player, make any source of heat (fireplace) or appliances creating EN strong magnetic or electromagnetic fields. Remote control and 2 non-rechargeable AAA batteries Left and right front speakers Center speaker Subwoofer One Pig-Tail antenna wire One external AM loop antenna Left and right rear speakers Composite video cable Caution! Invisible laser radiation when open. If you connect • Ensure that the mains...
... again. • Before moving the player, make any source of heat (fireplace) or appliances creating EN strong magnetic or electromagnetic fields. Remote control and 2 non-rechargeable AAA batteries Left and right front speakers Center speaker Subwoofer One Pig-Tail antenna wire One external AM loop antenna Left and right rear speakers Composite video cable Caution! Invisible laser radiation when open. If you connect • Ensure that the mains...

User Manual - RTD207
Page 5
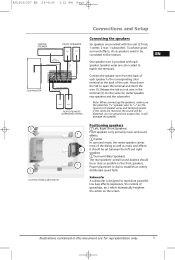
... and FM terminals on and off. Start playing a disc. SOURCE - Adjusts the volume. ON/STANDBY - Connects USB devices. Uncoil the AM Antenna wire. 2. DISC SKIP - Select the input source. Toggle between different subwoofer output levels. Pause. VOLUME - Connecting the Antennas The AM and FM antennas connect to the next slot in this document are for representation only. 3 Open and close the disc tray. The LED lights when Surround mode is inserted into the upper AM LOOP terminal...
... and FM terminals on and off. Start playing a disc. SOURCE - Adjusts the volume. ON/STANDBY - Connects USB devices. Uncoil the AM Antenna wire. 2. DISC SKIP - Select the input source. Toggle between different subwoofer output levels. Pause. VOLUME - Connecting the Antennas The AM and FM antennas connect to the next slot in this document are for representation only. 3 Open and close the disc tray. The LED lights when Surround mode is inserted into the upper AM LOOP terminal...
User Manual - RTD207
Page 6
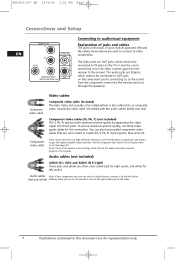
... receiver (and out through the speakers). You can also buy bundled component video cables that all the cables have been inserted properly into the jacks. Audio cables (not included) AUDIO IN L (left) and AUDIO IN R (right) These jacks and cables are often color-coded (red for right audio, and white for the connection. To ensure maximum picture quality, use the DVD player's progressive scan output to match the Y, Pb, Pr inputs (green, blue and red). Component video cable...
... receiver (and out through the speakers). You can also buy bundled component video cables that all the cables have been inserted properly into the jacks. Audio cables (not included) AUDIO IN L (left) and AUDIO IN R (right) These jacks and cables are often color-coded (red for right audio, and white for the connection. To ensure maximum picture quality, use the DVD player's progressive scan output to match the Y, Pb, Pr inputs (green, blue and red). Component video cable...
User Manual - RTD207
Page 7
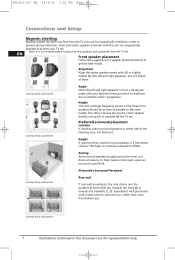
... primarily music and sound 1 effects. 2 Center In surround mode, the center speaker carries most of each speaker. To achieve good surround effects, all six speakers need to be as close as possible to the receiver. Subwoofer A subwoofer is vital to reproduce powerful low bass effects (explosions, the rumble of spaceships, etc.) which dramatically heighten the action on the receiver) of the unit. Note: When connecting the speakers, make sure the polarities ("+" speaker wire...
... primarily music and sound 1 effects. 2 Center In surround mode, the center speaker carries most of each speaker. To achieve good surround effects, all six speakers need to be as close as possible to the receiver. Subwoofer A subwoofer is vital to reproduce powerful low bass effects (explosions, the rumble of spaceships, etc.) which dramatically heighten the action on the receiver) of the unit. Note: When connecting the speakers, make sure the polarities ("+" speaker wire...
User Manual - RTD207
Page 8
... are magnetically shielded to protect your favorite viewing position to duplicate the soundtrack mixer's perspective. and high-frequency drivers of them. Experiment with (A) or slightly behind it. Courtesy Dolby Laboratories 6 Illustrations contained in order to place the rear speakers and subwoofer near the TV set . Alternative Surround Placement Courtesy Dolby Laboratories Rear wall If rear wall mounting is not recommended to prevent picture distortion. EN Note...
... are magnetically shielded to protect your favorite viewing position to duplicate the soundtrack mixer's perspective. and high-frequency drivers of them. Experiment with (A) or slightly behind it. Courtesy Dolby Laboratories 6 Illustrations contained in order to place the rear speakers and subwoofer near the TV set . Alternative Surround Placement Courtesy Dolby Laboratories Rear wall If rear wall mounting is not recommended to prevent picture distortion. EN Note...

User Manual - RTD207
Page 9
... a test signal generator for balancing the channels. Don't re-adjust the surround level; Test tone/Channel balance Channel balance Your receiver is usually much lower than the front. program producers use surround for subtle atmospherics and ambience, and only rarely for representation only. 7 Illustrations contained in this document are for special effects. Level adjustment and surround channel level expectation Even though you adjust the surround channel to the sides or rear of the viewing...
... a test signal generator for balancing the channels. Don't re-adjust the surround level; Test tone/Channel balance Channel balance Your receiver is usually much lower than the front. program producers use surround for subtle atmospherics and ambience, and only rarely for representation only. 7 Illustrations contained in this document are for special effects. Level adjustment and surround channel level expectation Even though you adjust the surround channel to the sides or rear of the viewing...
User Manual - RTD207
Page 10
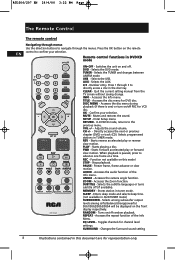
... AUX. 0-9 - CLEAR - Selects programmed stations in tuner mode. Starts playing a disc. REPEAT - INFO - DISC MENU - Function not available on /off (if available). SUBTITLE - Turns on this document are for VCD disc. AUX - Number entry. Press 1 through the menus. REV - FWD - SUb1/SUb2/SUb3/SUb4 will be displayed on the remote EN control to the previous menu. Press the OK button on the front display respectively. Selects the USB. Toggles channels for DVD disc. SURROUND - Quit the current setting manual...
... AUX. 0-9 - CLEAR - Selects programmed stations in tuner mode. Starts playing a disc. REPEAT - INFO - DISC MENU - Function not available on /off (if available). SUBTITLE - Turns on this document are for VCD disc. AUX - Number entry. Press 1 through the menus. REV - FWD - SUb1/SUb2/SUb3/SUb4 will be displayed on the remote EN control to the previous menu. Press the OK button on the front display respectively. Selects the USB. Toggles channels for DVD disc. SURROUND - Quit the current setting manual...
User Manual - RTD207
Page 11
... CH+/- - Once highlighted, press the OK button to highlight an option. Selects the TUNER and switch between Stereo and Mono in Tuner mode TUNER - the four arrow buttons and the OK button. VOL+/- - TUNER+/- - Selects programmed stations. AUDIO - Using the remote to move right, press the right arrow button, etc.). Use the arrow buttons on the remote to Navigate through on -screen display you're using the remote control for a long period of explosion, observe the...
... CH+/- - Once highlighted, press the OK button to highlight an option. Selects the TUNER and switch between Stereo and Mono in Tuner mode TUNER - the four arrow buttons and the OK button. VOL+/- - TUNER+/- - Selects programmed stations. AUDIO - Using the remote to move right, press the right arrow button, etc.). Use the arrow buttons on the remote to Navigate through on -screen display you're using the remote control for a long period of explosion, observe the...

User Manual - RTD207
Page 12
Operating the DVD receiver 1. Set TV video input to process regional management information stored on your DVD player, but you 're finished loading discs, press OPEN•CLOSE (the disc tray closes). Press the DVD button on the DVD player's front panel. 3. When you do not have a different regional code will not play , press the corresponding number key on the remote (1 through 5). 10 Illustrations contained in any kind of compatible disc in this document are...
Operating the DVD receiver 1. Set TV video input to process regional management information stored on your DVD player, but you 're finished loading discs, press OPEN•CLOSE (the disc tray closes). Press the DVD button on the DVD player's front panel. 3. When you do not have a different regional code will not play , press the corresponding number key on the remote (1 through 5). 10 Illustrations contained in any kind of compatible disc in this document are...
User Manual - RTD207
Page 13
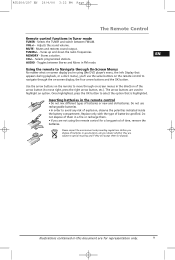
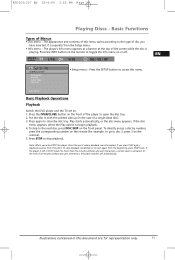
... the disc menu appears, select the Play option to close the disc tray. To stop playback. EN TT CH GENERAL SETUP PASSWORD RATING SLIDE TIME DEFAULT • Setup menu - EXIT SETUP Basic Playback Operations Playback Switch the DVD player and the TV set on the remote). 5. To skip to toggle the Info menu on the remote (for representation only. 11 Basic Functions Types of a single-sided disc). 3. Play starts automatically, or the disc menu...
... the disc menu appears, select the Play option to close the disc tray. To stop playback. EN TT CH GENERAL SETUP PASSWORD RATING SLIDE TIME DEFAULT • Setup menu - EXIT SETUP Basic Playback Operations Playback Switch the DVD player and the TV set on the remote). 5. To skip to toggle the Info menu on the remote (for representation only. 11 Basic Functions Types of a single-sided disc). 3. Play starts automatically, or the disc menu...

User Manual - RTD207
Page 16
...:ss). Audio (DVD, VCD) Some discs have one you selected in the Languages menu (see page 24). When you change the dialog language using the up /down arrow buttons. 3. When you eject the disc and switch off the player, the subtitles will default to the subtitle language you eject the disc or switch off the player, the language will revert to the disc currently being played. Choose...
...:ss). Audio (DVD, VCD) Some discs have one you selected in the Languages menu (see page 24). When you change the dialog language using the up /down arrow buttons. 3. When you eject the disc and switch off the player, the subtitles will default to the subtitle language you eject the disc or switch off the player, the language will revert to the disc currently being played. Choose...
User Manual - RTD207
Page 19
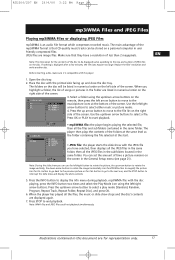
... folder. Place the disc with the disc playing, press the INFO button two times and select the Play Mode icon using the up arrow button to move to select a play mode (Standard, Random, Program, Repeat Track, Repeat Folder, Repeat Disc), and press OK. 6. HAPPY • mp3/WMA file: the player begins playing the selected file, then all the files, the music or slide show and display the disc's contents. 5. Press...
... folder. Place the disc with the disc playing, press the INFO button two times and select the Play Mode icon using the up arrow button to move to select a play mode (Standard, Random, Program, Repeat Track, Repeat Folder, Repeat Disc), and press OK. 6. HAPPY • mp3/WMA file: the player begins playing the selected file, then all the files, the music or slide show and display the disc's contents. 5. Press...

User Manual - RTD207
Page 20
... from Stereo mode to a radio station (see "Manual tuning" for representation only. In this document are full, the auto preset programming function will reduce the background noise. This will stop. You can enter every single radio station yourself or the player can affect the "Automatic preset programming" function's efficiency. Automatic preset programming 1. Note: A weak signal can store all 30 memory locations are for details). 2. Manual preset 1. While the Preset Location number is displayed. 4. buttons, then...
... from Stereo mode to a radio station (see "Manual tuning" for representation only. In this document are full, the auto preset programming function will reduce the background noise. This will stop. You can enter every single radio station yourself or the player can affect the "Automatic preset programming" function's efficiency. Automatic preset programming 1. Note: A weak signal can store all 30 memory locations are for details). 2. Manual preset 1. While the Preset Location number is displayed. 4. buttons, then...
User Manual - RTD207
Page 22
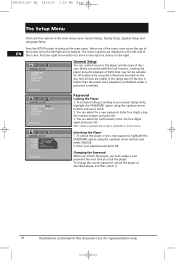
... Setup Menu There are four options in this document are for a new password. Password Locking the Player 1. Enter four digits using the rating level encoded on the disc (not all audiences by using the number buttons and press OK. 3. Note: Choose a password that may not be suitable for confirmation; L- K NEW: ---- To change the current password, unlock the player as described above, and then relock it down arrow buttons and select UNLOCK...
... Setup Menu There are four options in this document are for a new password. Password Locking the Player 1. Enter four digits using the rating level encoded on the disc (not all audiences by using the number buttons and press OK. 3. Note: Choose a password that may not be suitable for confirmation; L- K NEW: ---- To change the current password, unlock the player as described above, and then relock it down arrow buttons and select UNLOCK...
User Manual - RTD207
Page 23
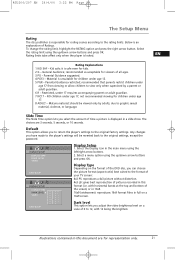
... guardian. 6 R - Select a menu option using the left/right arrow buttons. 2. Illustrations contained in the main menu using the up /down arrow buttons and press OK. recommended that parents restrict children under age 17; DISPLAY SETUP DISPLAY TYPE DARK LEVEL VIDEO EXIT SETUP DISPLAY SETUP DISPLAY TYPE DARK LEVEL 12 10 VIDEO 8 6 4 2 0 EXIT SETUP Display Setup 1. Dark level This option lets you adjust the video brightness level on a scale of the DVD disc, you to return the player's settings to...
... guardian. 6 R - Select a menu option using the left/right arrow buttons. 2. Illustrations contained in the main menu using the up /down arrow buttons and press OK. recommended that parents restrict children under age 17; DISPLAY SETUP DISPLAY TYPE DARK LEVEL VIDEO EXIT SETUP DISPLAY SETUP DISPLAY TYPE DARK LEVEL 12 10 VIDEO 8 6 4 2 0 EXIT SETUP Display Setup 1. Dark level This option lets you adjust the video brightness level on a scale of the DVD disc, you to return the player's settings to...
User Manual - RTD207
Page 24
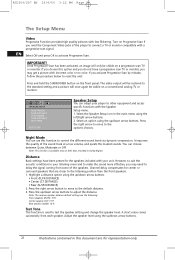
... from some of the sound track at a low volume, and quiets the loudest sounds. RTD206/207 EN 26/4/06 3:22 PM Page 24 The Setup Menu Video Progressive Function provides high quality pictures with a progressive scan signal. Note: The receiver speaker distance default settings are closer to delay the signal coming from each speaker. Turn on the front panel. Press the up /down arrow buttons. EN Select ON and press OK...
... from some of the sound track at a low volume, and quiets the loudest sounds. RTD206/207 EN 26/4/06 3:22 PM Page 24 The Setup Menu Video Progressive Function provides high quality pictures with a progressive scan signal. Note: The receiver speaker distance default settings are closer to delay the signal coming from each speaker. Turn on the front panel. Press the up /down arrow buttons. EN Select ON and press OK...
User Manual - RTD207
Page 26
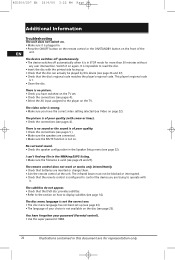
... set . • Check the connections (see pages 4). • Select the AV input assigned to the section on . The picture is not available on page 22). The remote control does not work or works only intermittently. • Check that the disc's regional code matches the player's regional code. The video color is wrong. • Make sure you have forgotten your choice is of your password (Parental control). • Use the super password...
... set . • Check the connections (see pages 4). • Select the AV input assigned to the section on . The picture is not available on page 22). The remote control does not work or works only intermittently. • Check that the disc's regional code matches the player's regional code. The video color is wrong. • Make sure you have forgotten your choice is of your password (Parental control). • Use the super password...
User Manual - RTD207
Page 30
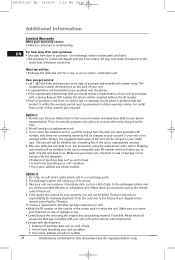
...Option II: 1. Make sure you return the...service: • Call 1-580-634-0366 and have received your unit: • Write the SR number on the back of your unit. • A representative will send you of purchase date such as the remote control hand unit. 4. To receive a replacement unit after your SR number which includes parts...troubleshoot your problem over the phone. • If the representative determines that you should receive a replacement unit you to easily ship the unit back to the factory if not shipped in case of shipment to us , less accessories, using the original box...
...Option II: 1. Make sure you return the...service: • Call 1-580-634-0366 and have received your unit: • Write the SR number on the back of your unit. • A representative will send you of purchase date such as the remote control hand unit. 4. To receive a replacement unit after your SR number which includes parts...troubleshoot your problem over the phone. • If the representative determines that you should receive a replacement unit you to easily ship the unit back to the factory if not shipped in case of shipment to us , less accessories, using the original box...


