User Manual
Page 3
... (2) this Guide Technical Specification Product: Dolby Digital Audio video receiver Brand: RCA Model: RT2380 / RT2380BK Electrical current consumption Power Supply: 120V ~ 60Hz Power consumption: 135 Watts IMPORTER Comercializadora Thomson de México, S.A. If the plug won 't fit, contact a qualified electrician to correct the interference by one way. Service Information This product should be serviced only by Thomson Inc. Government Printing Office, Washington, DC 20402. Remote Control No. Col...
... (2) this Guide Technical Specification Product: Dolby Digital Audio video receiver Brand: RCA Model: RT2380 / RT2380BK Electrical current consumption Power Supply: 120V ~ 60Hz Power consumption: 135 Watts IMPORTER Comercializadora Thomson de México, S.A. If the plug won 't fit, contact a qualified electrician to correct the interference by one way. Service Information This product should be serviced only by Thomson Inc. Government Printing Office, Washington, DC 20402. Remote Control No. Col...
User Manual
Page 4
... Speaker 7 Headset safety 23 Front Speaker Placement 7 Don't infringe 23 Preferred Surround Placement 8 Equipment Specifications 23 Advanced Setting 8 Test Tone / Channel Balance 9 Connecting for Power 9 Limited Warranty (U.S 24 Using Headphones 9 Factory Setting 9 Limited Warranty (Canada) . . . . .25 Operating your Receiver Receiver Controls 10 Your Remote Control 11 Display 12 Switching On/Off 13 Selection of Audio/Video Source . . . . . .13 Using the Remote to Control Additional Components 14 Using the receiver to play a Source . . . .15 Operating the Radio...
... Speaker 7 Headset safety 23 Front Speaker Placement 7 Don't infringe 23 Preferred Surround Placement 8 Equipment Specifications 23 Advanced Setting 8 Test Tone / Channel Balance 9 Connecting for Power 9 Limited Warranty (U.S 24 Using Headphones 9 Factory Setting 9 Limited Warranty (Canada) . . . . .25 Operating your Receiver Receiver Controls 10 Your Remote Control 11 Display 12 Switching On/Off 13 Selection of Audio/Video Source . . . . . .13 Using the Remote to Control Additional Components 14 Using the receiver to play a Source . . . .15 Operating the Radio...
User Manual
Page 6
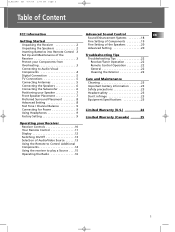
... expose your set to the AC power cords until all connections are completed. Insert two "AAA" (R03) batteries according to a warm place: there is risk of the stand so heated air rising from Overheating • Do not block ventilation holes in a stand. • Place an amplifier near other components. To use the remote • Do not use strong solvents...
... expose your set to the AC power cords until all connections are completed. Insert two "AAA" (R03) batteries according to a warm place: there is risk of the stand so heated air rising from Overheating • Do not block ventilation holes in a stand. • Place an amplifier near other components. To use the remote • Do not use strong solvents...
User Manual
Page 7
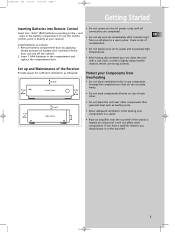
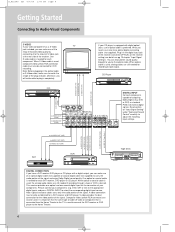
... DVD player. When optical or coaxial cable is used , the analog audio cables are still needed for each SAT receiver, DVD player or CD player. Composite video (yellow RCA connector) can enjoy better sound quality brought to the relevant S-Video jack at the rear side of the receiver. Plug it to you by connecting it in the digital input jack of the receiver and select OPTICAL on the receiver setting (see details on "Input Signal Setting" under "Advanced Sound Control" carefully to plug in the optical cable or S-Video cable, make...
... DVD player. When optical or coaxial cable is used , the analog audio cables are still needed for each SAT receiver, DVD player or CD player. Composite video (yellow RCA connector) can enjoy better sound quality brought to the relevant S-Video jack at the rear side of the receiver. Plug it to you by connecting it in the digital input jack of the receiver and select OPTICAL on the receiver setting (see details on "Input Signal Setting" under "Advanced Sound Control" carefully to plug in the optical cable or S-Video cable, make...
User Manual
Page 8
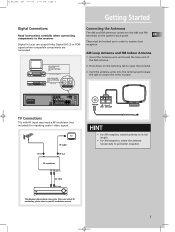
... modulator, please refer to open the terminal. 3. OPTICAL DIGITAL IN (AUDIO) Optical Fiber Cable Connect to the receiver. B_RT2380 EN 4/7/04 1:44 PM Page 9 Getting Started Digital Connections Read instructions carefully when connecting components to optical digital output of DVD, CD, SAT or other compatible devices. Press down on the system's back panel. The diagram shown above may need a RF modulator (not included) for inputting audio / video signals. RF in TV RF cable RF out RF modulator...
... modulator, please refer to open the terminal. 3. OPTICAL DIGITAL IN (AUDIO) Optical Fiber Cable Connect to the receiver. B_RT2380 EN 4/7/04 1:44 PM Page 9 Getting Started Digital Connections Read instructions carefully when connecting components to optical digital output of DVD, CD, SAT or other compatible devices. Press down on the system's back panel. The diagram shown above may need a RF modulator (not included) for inputting audio / video signals. RF in TV RF cable RF out RF modulator...

User Manual
Page 9
... 10 Getting Started Connecting the Speakers Speaker wires 1 for each speaker, is completely removed from the ends of the Antenna and speaker wires at the back of the speakers to be connected. the terminal. Do the same for user to lock wire in insert wire. If you want to maintain adequate bass signal. For better sound quality, Center speaker, rear speakers and Subwoofer should also be connected to lock wire in the terminal. This receiver offers a high...
... 10 Getting Started Connecting the Speakers Speaker wires 1 for each speaker, is completely removed from the ends of the Antenna and speaker wires at the back of the speakers to be connected. the terminal. Do the same for user to lock wire in insert wire. If you want to maintain adequate bass signal. For better sound quality, Center speaker, rear speakers and Subwoofer should also be connected to lock wire in the terminal. This receiver offers a high...
User Manual
Page 10
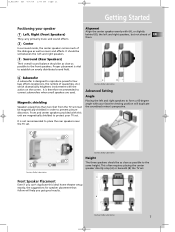
... same height. Front and center speakers provided with your favorite viewing position will help you can't duplicate this unit are used. This often requires placing the center speaker directly atop (A) or beneath (B) the TV set . It should be as close as possible to form a 45-degree angle with this ideal home theater setup exactly, the suggestions for speaker placement that follow will duplicate...
... same height. Front and center speakers provided with your favorite viewing position will help you can't duplicate this unit are used. This often requires placing the center speaker directly atop (A) or beneath (B) the TV set . It should be as close as possible to form a 45-degree angle with this ideal home theater setup exactly, the suggestions for speaker placement that follow will duplicate...
User Manual
Page 12
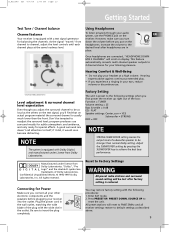
... actual program material the surround channel is usually much lower than normal Dolby setting. As the signal "travels" from down the volume before plugging your receiver into the outlet. Courtesy Dolby Laboratories Level adjustment & surround channel level expectation Even though you turn for Power Make sure you connect all receiver settings restore to default settings as the others on the test signal, you put on the channel to Factory Settings WARNING All preset radio stations and surround sound setting will scroll on display. A good surround mix...
... actual program material the surround channel is usually much lower than normal Dolby setting. As the signal "travels" from down the volume before plugging your receiver into the outlet. Courtesy Dolby Laboratories Level adjustment & surround channel level expectation Even though you turn for Power Make sure you connect all receiver settings restore to default settings as the others on the test signal, you put on the channel to Factory Settings WARNING All preset radio stations and surround sound setting will scroll on display. A good surround mix...
User Manual
Page 14
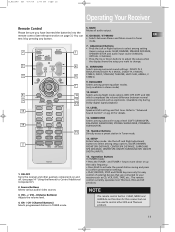
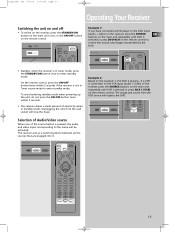
...SURROUND SPK ON/OFF, DIGITAL INPUT). 1. ON•OFF Turns the receiver and other RCA and Thomson products. 11 Operation Buttons In TUNER mode: • Press the TUNER - MUTE Mutes all audio output. Number Buttons Directly access a preset station in TUNER mode. 15. CH+ / CH- (Channel Buttons) Selects programmed stations in Tuner mode. 14. The remote control currently operates most Thomson, RCA and GE products. NOTE The remote control button CLEAR, MENU and GUIDE do not function for details. 12. Please be used to change. 3 4 8. LEVEL 13 Speaker LEVEL setting and Test...
...SURROUND SPK ON/OFF, DIGITAL INPUT). 1. ON•OFF Turns the receiver and other RCA and Thomson products. 11 Operation Buttons In TUNER mode: • Press the TUNER - MUTE Mutes all audio output. Number Buttons Directly access a preset station in TUNER mode. 15. CH+ / CH- (Channel Buttons) Selects programmed stations in Tuner mode. 14. The remote control currently operates most Thomson, RCA and GE products. NOTE The remote control button CLEAR, MENU and GUIDE do not function for details. 12. Please be used to change. 3 4 8. LEVEL 13 Speaker LEVEL setting and Test...
User Manual
Page 16
... sounds and images transmitted by the DVD. • Standby: when the receiver is not in Tuner source mode to the name will be activated. Example 1: If you have connected a DVD player to the DVD input (audio + video) on the receiver, press the SOURCE EN buttons on the remote control. The receiver acts as a switching device between all the sources that are plugged into it. 13 B_RT2380 EN 4/7/04 1:44 PM Page 17 Operating Your Receiver Switching...
... sounds and images transmitted by the DVD. • Standby: when the receiver is not in Tuner source mode to the name will be activated. Example 1: If you have connected a DVD player to the DVD input (audio + video) on the receiver, press the SOURCE EN buttons on the remote control. The receiver acts as a switching device between all the sources that are plugged into it. 13 B_RT2380 EN 4/7/04 1:44 PM Page 17 Operating Your Receiver Switching...
User Manual
Page 17
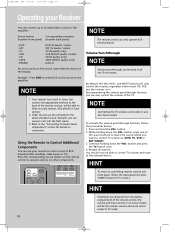
... radio stations. (See details in Tuner section) 2. Using the Remote to this amplifier: Source button Corresponding connector (receiver front panel) (receiver back panel) - Press and hold the VOL- Continue holding down the VOL- B_RT2380 EN 4/7/04 1:44 PM Page 18 Operating your remote to control most of the source buttons to select the source where you can be done in all non-Tuner modes. NOTE Controlling the TV volume can connect up to 6 audio/video sources to Control Additional Components...
... radio stations. (See details in Tuner section) 2. Using the Remote to this amplifier: Source button Corresponding connector (receiver front panel) (receiver back panel) - Press and hold the VOL- Continue holding down the VOL- B_RT2380 EN 4/7/04 1:44 PM Page 18 Operating your remote to control most of the source buttons to select the source where you can be done in all non-Tuner modes. NOTE Controlling the TV volume can connect up to 6 audio/video sources to Control Additional Components...
User Manual
Page 18
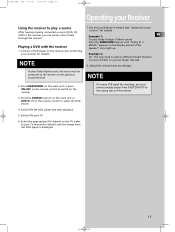
... optical or coaxial terminal NOTE 2. Press the SOURCE buttons on the main unit or DVD•6 CH on the remote control to switch on your LD (refer to your Receiver Using the receiver to play a source After having properly connected a source (DVD, CD, VCR) to the analog input of the speaker'' icons light up. 1. Set the sound Mode if needed (see connecting your TV. 6. Switch ON the DVD player and start playback. 5. Adjust the volume knob accordingly. To play Dolby...
... optical or coaxial terminal NOTE 2. Press the SOURCE buttons on the main unit or DVD•6 CH on the remote control to switch on your LD (refer to your Receiver Using the receiver to play a source After having properly connected a source (DVD, CD, VCR) to the analog input of the speaker'' icons light up. 1. Set the sound Mode if needed (see connecting your TV. 6. Switch ON the DVD player and start playback. 5. Adjust the volume knob accordingly. To play Dolby...
User Manual
Page 20
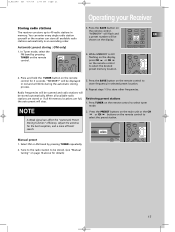
... to store frequency in an ascending order. Press the SAVE button on the remote control to select the preset station. While MEMORY is still flashing on the display, press CH or CH on the remote control to select tuner mode. 2. When all available radio stations are full, the auto preset will be stored. (see "Manual tuning" on the display. B_RT2380 EN 4/7/04 1:44 PM Page 21 Operating your Receiver Storing radio stations 3. The receiver can store...
... to store frequency in an ascending order. Press the SAVE button on the remote control to select the preset station. While MEMORY is still flashing on the display, press CH or CH on the remote control to select tuner mode. 2. When all available radio stations are full, the auto preset will be stored. (see "Manual tuning" on the display. B_RT2380 EN 4/7/04 1:44 PM Page 21 Operating your Receiver Storing radio stations 3. The receiver can store...
User Manual
Page 21
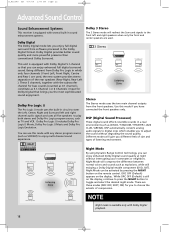
... Surround signals to the front left and right channel audio signals and uses all five speakers to play both stereo and Dolby Pro Logic program source, such as (DISCO / STADIUM / THEATER / JAZZ CLUB / ARENA). Front Left Speaker Rear Left Speaker 18 Center Speaker Listening Zone Front Right Speaker Subwoofer Rear Right Speaker Night Mode By using Dynamic Range Control technology, you to enjoy multi-channel sound experience. There are three modes (DRC OFF, SOFT, ON) for you can enjoy enhanced Dolby Digital sound...
... Surround signals to the front left and right channel audio signals and uses all five speakers to play both stereo and Dolby Pro Logic program source, such as (DISCO / STADIUM / THEATER / JAZZ CLUB / ARENA). Front Left Speaker Rear Left Speaker 18 Center Speaker Listening Zone Front Right Speaker Subwoofer Rear Right Speaker Night Mode By using Dynamic Range Control technology, you to enjoy multi-channel sound experience. There are three modes (DRC OFF, SOFT, ON) for you can enjoy enhanced Dolby Digital sound...
User Manual
Page 22
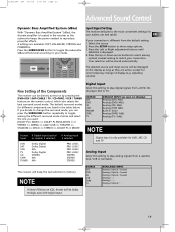
... play digital signals from a DVD, CD, LD player, SAT or TV. Your selection will be displayed on the display as long as seen on the remote control, which also selects the best surround sound mode. Fine Setting of display (e.g. DOLBY PL II MUSIC => DOLBY PL EMULATION => 3 STEREO => ARENA => JAZZ CLUB => THEATER => STADIUM => DISCO => STEREO => DOLBY PL II MOVIE Digital Input Select this setting to select among the different surround mode choices and select the one you want. If linear PCM source (CD), format will be directly turned...
... play digital signals from a DVD, CD, LD player, SAT or TV. Your selection will be displayed on the display as long as seen on the remote control, which also selects the best surround sound mode. Fine Setting of display (e.g. DOLBY PL II MUSIC => DOLBY PL EMULATION => 3 STEREO => ARENA => JAZZ CLUB => THEATER => STADIUM => DISCO => STEREO => DOLBY PL II MOVIE Digital Input Select this setting to select among the different surround mode choices and select the one you want. If linear PCM source (CD), format will be directly turned...
User Manual
Page 23
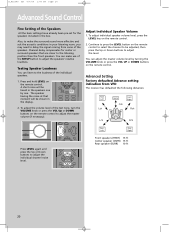
... need to delay the signal coming from VFD The receiver has defaulted the following distances: Front Left Lch Center Cch Front Right Rch L/S R/S Rear Rear Left Right Press LEVEL again and press the Up or Down buttons to adjust the individual channel noise level. To adjust the volume level of the test tone, turn the VOLUME knob or press the VOL Up or DOWN buttons on the remote control. Front speakers (FRNT) 15 ft Center speaker...
... need to delay the signal coming from VFD The receiver has defaulted the following distances: Front Left Lch Center Cch Front Right Rch L/S R/S Rear Rear Left Right Press LEVEL again and press the Up or Down buttons to adjust the individual channel noise level. To adjust the volume level of the test tone, turn the VOLUME knob or press the VOL Up or DOWN buttons on the remote control. Front speakers (FRNT) 15 ft Center speaker...

User Manual
Page 24
... to use them, set up the next speaker Center Speaker selection (CTR) Surround Speaker selection (SURR) Front Speaker distance (FRNT) Centre Speaker distance (CNTR) Rear Speaker distance (SURR) YES / NO YES / NO 3-30 ft 0-30 ft 0-30 ft Displaying Program Formats LCR LS LFE RS When a digital source starts playing, the receiver automatically switches to NO so the sound performance is not affected. 2. Repeat step 2 and 3 to set to change the setup of the Speakers") and...
... to use them, set up the next speaker Center Speaker selection (CTR) Surround Speaker selection (SURR) Front Speaker distance (FRNT) Centre Speaker distance (CNTR) Rear Speaker distance (SURR) YES / NO YES / NO 3-30 ft 0-30 ft 0-30 ft Displaying Program Formats LCR LS LFE RS When a digital source starts playing, the receiver automatically switches to NO so the sound performance is not affected. 2. Repeat step 2 and 3 to set to change the setup of the Speakers") and...

User Manual
Page 25
... the speaker wire or external source cable connections. No audio from AC power before attempting to operate the remote. Specific instruments sound displaced. • Check the connections between the remote and the main unit. • The remote control is too far from the main unit, move closer. Connect an external antenna. • Adjust Antenna • Reposition Antenna away from the signal source to the audio system. No audio. • Make sure the speakers are not outputting in VCR mode...
... the speaker wire or external source cable connections. No audio from AC power before attempting to operate the remote. Specific instruments sound displaced. • Check the connections between the remote and the main unit. • The remote control is too far from the main unit, move closer. Connect an external antenna. • Adjust Antenna • Reposition Antenna away from the signal source to the audio system. No audio. • Make sure the speakers are not outputting in VCR mode...
User Manual
Page 26
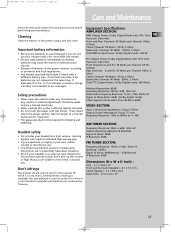
... Specifications: AMPLIFIER SECTION: RMS Output Power: Dolby Digital Mode with 10% Total EN Harmonic Distortion Front and Rear Channels: 55 Watts each Channel (1KHz, 6 Ohm) Center Channel: 90 Watts (1KHz, 3 Ohm) Subwoofer Channel: 90 Watts (100Hz, 3 Ohm) Total RMS Output Power, Dolby Digital mode : 400 W FTC Output Power: Dolby Digital Mode with wet hands. Hearing experts warn against extended high-volume play your headset is an open the cabinet under any liquid enters the player cabinet, take the player to use your remote control for...
... Specifications: AMPLIFIER SECTION: RMS Output Power: Dolby Digital Mode with 10% Total EN Harmonic Distortion Front and Rear Channels: 55 Watts each Channel (1KHz, 6 Ohm) Center Channel: 90 Watts (1KHz, 3 Ohm) Subwoofer Channel: 90 Watts (100Hz, 3 Ohm) Total RMS Output Power, Dolby Digital mode : 400 W FTC Output Power: Dolby Digital Mode with wet hands. Hearing experts warn against extended high-volume play your headset is an open the cabinet under any liquid enters the player cabinet, take the player to use your remote control for...
User Manual
Page 27
...audio heads. • Batteries. • A unit that vary from your dealer.) • Installation and related adjustments. • Signal reception problems not caused by this warranty. To identify your nearest Authorized RCA Audio Service Center...make it ever be presented to obtain warranty service. For how long after your unit. How you purchased your unit to install, adjust, and operate...; Customer instruction. (Your Owner's Manual describes how to any Authorized RCA Audio Service Center for the new or, at our option, refurbished replacement parts required to repair your purchase...
...audio heads. • Batteries. • A unit that vary from your dealer.) • Installation and related adjustments. • Signal reception problems not caused by this warranty. To identify your nearest Authorized RCA Audio Service Center...make it ever be presented to obtain warranty service. For how long after your unit. How you purchased your unit to install, adjust, and operate...; Customer instruction. (Your Owner's Manual describes how to any Authorized RCA Audio Service Center for the new or, at our option, refurbished replacement parts required to repair your purchase...


