User Guide & Warranty
Page 4
... you Need to Know ...9 Choose Your Connections ...10 Connecting a Component with Composite Video (Good 11 Connecting a Component with Component Video (Better 11 Connecting a Component with HDMI (Best 12 Connecting a PC Component 13 Viewing the Picture from the Connected Component 14 Viewing a PC ...14 Plug in the TV ...15 Put Batteries in...
... you Need to Know ...9 Choose Your Connections ...10 Connecting a Component with Composite Video (Good 11 Connecting a Component with Component Video (Better 11 Connecting a Component with HDMI (Best 12 Connecting a PC Component 13 Viewing the Picture from the Connected Component 14 Viewing a PC ...14 Plug in the TV ...15 Put Batteries in...

User Guide & Warranty
Page 10
... of an Authorized Service Representative who will, for you in using your RCA product, please visit www.rca.com/customersupport. 10 Chapter 1 Connections and Setup Input Ant/Cable Composite Video S-Video Component Video PC HDMI Signal Compatability 480i, 480p, 720p, 1080i (NTSC, ATSC, and QAM... formats) 480i 480i 480i, 480p, 720p/60Hz, 1080i/60Hz VGA, SVGA, XGA 480i, 480p, 720p/60Hz, 1080i/60Hz, 1080p...
... of an Authorized Service Representative who will, for you in using your RCA product, please visit www.rca.com/customersupport. 10 Chapter 1 Connections and Setup Input Ant/Cable Composite Video S-Video Component Video PC HDMI Signal Compatability 480i, 480p, 720p, 1080i (NTSC, ATSC, and QAM... formats) 480i 480i 480i, 480p, 720p/60Hz, 1080i/60Hz VGA, SVGA, XGA 480i, 480p, 720p/60Hz, 1080i/60Hz, 1080p...
User Guide & Warranty
Page 12
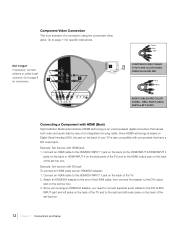
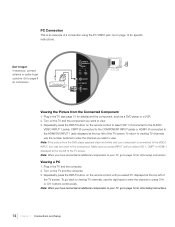
... set -top box. 12 Chapter 1 Connections and Setup Connect an HDMI cable to the HDMI/DVI INPUT 1 jack on the back (or the HDMI INPUT 2/HDMI INPUT 3 jacks on the back or HDMI INPUT 4 on the side panel of the TV) and to the HDMI/DVI INPUT 1 jack on the back of your TV is also... adapter to get a picture. Don't forget: If necessary, connect antenna or cable to the end of the HDMI cable; Component Video Connection This is an example of a connection using an HDMI/DVI adapter, you need to connect separate audio cables to the DVI AUDIO INPUT right and left audio jacks on the...
... set -top box. 12 Chapter 1 Connections and Setup Connect an HDMI cable to the HDMI/DVI INPUT 1 jack on the back (or the HDMI INPUT 2/HDMI INPUT 3 jacks on the back or HDMI INPUT 4 on the side panel of the TV) and to the HDMI/DVI INPUT 1 jack on the back of your TV is also... adapter to get a picture. Don't forget: If necessary, connect antenna or cable to the end of the HDMI cable; Component Video Connection This is an example of a connection using an HDMI/DVI adapter, you need to connect separate audio cables to the DVI AUDIO INPUT right and left audio jacks on the...
User Guide & Warranty
Page 13
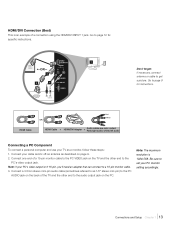
... accordingly. Be sure to set your TV as a monitor, follow these steps: 1. Connections and Setup Chapter 1 13 HDMI Cable Red White OR HDMI Cable + HDMI/DVI Adapter + Audio cables are color coded Red=right audio; HDMI/DVI Connection (Best) This is 1024x768. Go to the PC AUDIO jack on the back of a connection using... the HDMI/DVI INPUT 1 jack. Note: If your cable and/or off-air antenna as 1/8" stereo mini-pin) to page 9 for specific instructions. Connect your PC's video ...
... accordingly. Be sure to set your TV as a monitor, follow these steps: 1. Connections and Setup Chapter 1 13 HDMI Cable Red White OR HDMI Cable + HDMI/DVI Adapter + Audio cables are color coded Red=right audio; HDMI/DVI Connection (Best) This is 1024x768. Go to the PC AUDIO jack on the back of a connection using... the HDMI/DVI INPUT 1 jack. Note: If your cable and/or off-air antenna as 1/8" stereo mini-pin) to page 9 for specific instructions. Connect your PC's video ...
User Guide & Warranty
Page 14
... to select VID 1 (if connected to the AUDIO/ VIDEO INPUT 1 jacks), CMPT (if connected to the COMPONENT INPUT jacks) or HDMI1 (if connected to the HDMI/DVI INPUT 1 jack) displayed at the top left of a connection using the PC VIDEO jack. Turn on the remote control until you select VID 1, CMPT... or HDMI 1 displayed at the top left of the TV screen. buttons continuously. Make sure you press INPUT until you select PC displayed at the top left...
... to select VID 1 (if connected to the AUDIO/ VIDEO INPUT 1 jacks), CMPT (if connected to the COMPONENT INPUT jacks) or HDMI1 (if connected to the HDMI/DVI INPUT 1 jack) displayed at the top left of a connection using the PC VIDEO jack. Turn on the remote control until you select VID 1, CMPT... or HDMI 1 displayed at the top left of the TV screen. buttons continuously. Make sure you press INPUT until you select PC displayed at the top left...
User Guide & Warranty
Page 18
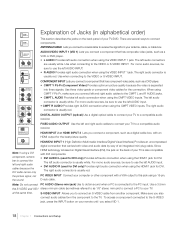
.... Note: Do not connect PC AUDIO (Stereo mini jack) Use to obtain sound when a PC is connected to a compatible audio receiver. at the same time. HDMI/DVI INPUT 1 R L DVI AUDIO INPUT PC INPUT AUDIO VIDEO COMPONENT Y INPUT (CMPT) Pb L AUDIO Pr R R R AUDIO AUDIO L L S-VIDEO INPUT ...TV to use the left AUDIO input. • DVI AUDIO R (used for DVI only) Provides left audio connector is usually white. HDMI/DVI INPUT 1 (High-Definition Multimedia Interface/Digital Visual Interface) Provides an uncompressed digital connection that has component video jacks, such as a ...
.... Note: Do not connect PC AUDIO (Stereo mini jack) Use to obtain sound when a PC is connected to a compatible audio receiver. at the same time. HDMI/DVI INPUT 1 R L DVI AUDIO INPUT PC INPUT AUDIO VIDEO COMPONENT Y INPUT (CMPT) Pb L AUDIO Pr R R R AUDIO AUDIO L L S-VIDEO INPUT ...TV to use the left AUDIO input. • DVI AUDIO R (used for DVI only) Provides left audio connector is usually white. HDMI/DVI INPUT 1 (High-Definition Multimedia Interface/Digital Visual Interface) Provides an uncompressed digital connection that has component video jacks, such as a ...
User Guide & Warranty
Page 19
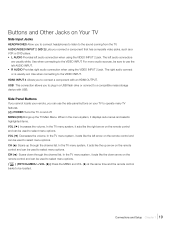
... AUDIO Provides left AUDIO INPUT. • R AUDIO Provides right audio connection when using the VIDEO INPUT 2 jack. The right audio connect or is usually red. HDMI INPUT 4 Allows you to connect headphones to listen to the sound coming from the TV. Side Panel Buttons If you to plug in the menu...the remote control and can be used to select menu options. When in a USB flash drive or connect to a compatible mass storage device with an HDMI OUTPUT. Use when connecting to the VIDEO INPUT. USB This connection allows you cannot locate your TV to operate many TV features. ( ) POWER Turns...
... AUDIO Provides left AUDIO INPUT. • R AUDIO Provides right audio connection when using the VIDEO INPUT 2 jack. The right audio connect or is usually red. HDMI INPUT 4 Allows you to connect headphones to listen to the sound coming from the TV. Side Panel Buttons If you to plug in the menu...the remote control and can be used to select menu options. When in a USB flash drive or connect to a compatible mass storage device with an HDMI OUTPUT. Use when connecting to the VIDEO INPUT. USB This connection allows you cannot locate your TV to operate many TV features. ( ) POWER Turns...
User Guide & Warranty
Page 20
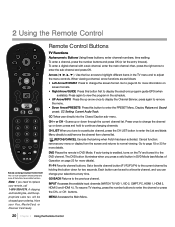
..., press the number buttons to the previous channel. F1-F4 Favorite channel buttons. INPUT Accesses the available input channels (WATCH TV, VID 1, VID 2, CMPT, PC, HDMI 1, HDMI 2, HDMI 3 and HDMI 4.). Arrows ( / / / ) Use the four arrows to highlight different items in the schedule. • UP Arrow/INFO Press the up or down for more details...
..., press the number buttons to the previous channel. F1-F4 Favorite channel buttons. INPUT Accesses the available input channels (WATCH TV, VID 1, VID 2, CMPT, PC, HDMI 1, HDMI 2, HDMI 3 and HDMI 4.). Arrows ( / / / ) Use the four arrows to highlight different items in the schedule. • UP Arrow/INFO Press the up or down for more details...
User Guide & Warranty
Page 29
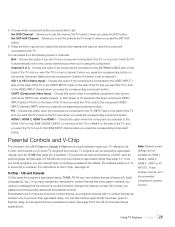
... only if you press the corresponding component button. Set SAT-AUX Channel - You can unblock them by age-based ratings, such as an HDTV tuner, satellite receiver, or DVD player, is turned off or unlocked. Choose this option if the component is connected to the ANTENNA/CABLE...to when you can select from the following inputs or channels: N/A - Once you block programs, you press the DVD button. See page 45 for HDMI 1, HDMI 2, HDMI 3, HDMI 4, CMPT or PC INPUTS. These settings must be blocked by entering a password. Allows you to set in the US V-Chip and Canada V-Chip...
... only if you press the corresponding component button. Set SAT-AUX Channel - You can unblock them by age-based ratings, such as an HDTV tuner, satellite receiver, or DVD player, is turned off or unlocked. Choose this option if the component is connected to the ANTENNA/CABLE...to when you can select from the following inputs or channels: N/A - Once you block programs, you press the DVD button. See page 45 for HDMI 1, HDMI 2, HDMI 3, HDMI 4, CMPT or PC INPUTS. These settings must be blocked by entering a password. Allows you to set in the US V-Chip and Canada V-Chip...
User Guide & Warranty
Page 33
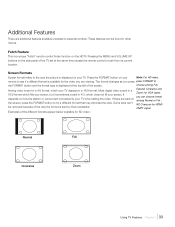
...video is sent in a 16/9 format which fills your screen, but it sometimes is formatting the video. If there are bars on the HDTV. These features can 't NO Overscan for SD video : Normal Full Cinerama Zoom Using TV Features Chapter 3 33 the screen, press the FORMAT... button to parental controls. CMPT signal. The format changes as you are viewing. Examples of the different formats appear below available for HDMI/ be found in a 16/9 format. Additional Features There are additional features available unrelated to try a different format that may eliminate the ...
...video is sent in a 16/9 format which fills your screen, but it sometimes is formatting the video. If there are bars on the HDTV. These features can 't NO Overscan for SD video : Normal Full Cinerama Zoom Using TV Features Chapter 3 33 the screen, press the FORMAT... button to parental controls. CMPT signal. The format changes as you are viewing. Examples of the different formats appear below available for HDMI/ be found in a 16/9 format. Additional Features There are additional features available unrelated to try a different format that may eliminate the ...
User Guide & Warranty
Page 35
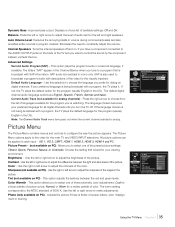
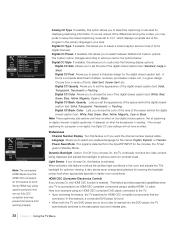
... and controls to the NTSC standard of screen letters, color misalignment or blurring. The Picture Menu options apply to change this setting. VID 1, VID 2, CMPT, HDMI 1, HDMI 2, HDMI 3, HDMI 4 and PC. Adjusts the picture if there is being broadcast with a program, the TV plays it. Picture Preset - (not available on PC) - Color - The default...
... and controls to the NTSC standard of screen letters, color misalignment or blurring. The Picture Menu options apply to change this setting. VID 1, VID 2, CMPT, HDMI 1, HDMI 2, HDMI 3, HDMI 4 and PC. Adjusts the picture if there is being broadcast with a program, the TV plays it. Picture Preset - (not available on PC) - Color - The default...
User Guide & Warranty
Page 37
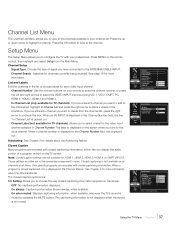
... Setup Exit List and Labels Sound Autotuning Picture Closed Caption Channel List Preferences Setup Dynamic Backlight On Parental Control Light Sensor Off Time HDMI CEC Off USB Press OK or > to open this input channel. then highlight and select Setup from the channel list, press ...'s sound is not muted. Press MENU on all channels at all the channels available in your preferences. In Channel List (only available for HDMI 1, HDMI 2, HDMI 3, HDMI 4, or CMPT INPUTS. If you've entered a channel you want to add to the channel list, highlight In Channel List and press...
... Setup Exit List and Labels Sound Autotuning Picture Closed Caption Channel List Preferences Setup Dynamic Backlight On Parental Control Light Sensor Off Time HDMI CEC Off USB Press OK or > to open this input channel. then highlight and select Setup from the channel list, press ...'s sound is not muted. Press MENU on all channels at all the channels available in your preferences. In Channel List (only available for HDMI 1, HDMI 2, HDMI 3, HDMI 4, or CMPT INPUTS. If you've entered a channel you want to add to the channel list, highlight In Channel List and press...
User Guide & Warranty
Page 38
... always display the channel number on and a disc is sending. Digital CC Color Allows you to choose the color if the digital closed captioning for HDMI CEC-compliant components that are on screen, put a check in darker room conditions). If the closed caption text: White, Red, Green, Blue, ... being displayed and adjusts the backlight to the associated input and initiates play. 38 Chapter 4 Using the TV Menu Note: The connected HDMI device must be HDMI CEC-compliant for the menus: English, Espanol, or Francais. If you to set the appearance of the space behind the digital closed...
... always display the channel number on and a disc is sending. Digital CC Color Allows you to choose the color if the digital closed captioning for HDMI CEC-compliant components that are on screen, put a check in darker room conditions). If the closed caption text: White, Red, Green, Blue, ... being displayed and adjusts the backlight to the associated input and initiates play. 38 Chapter 4 Using the TV Menu Note: The connected HDMI device must be HDMI CEC-compliant for the menus: English, Espanol, or Francais. If you to set the appearance of the space behind the digital closed...
User Guide & Warranty
Page 39
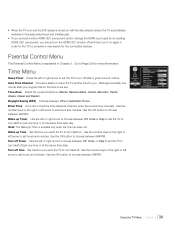
... Timer is turned on with the disc already loaded, the TV automatically switches to the associated input and initiates play. • If you connect another HDMI CEC component and/or change this for the connected devices. Time Zone Eastern Daylight Saving Automatic Enter time 10:35AM Wake up Timer Off Wake... between AM/PM. Use the OK button to have the TV set the time for an existing HDMI CEC component, you . Use the OK button to change the HDMI input used for you should turn the HDMI CEC function off and then turn itself on. AM Press < / > or OK to choose between ...
... Timer is turned on with the disc already loaded, the TV automatically switches to the associated input and initiates play. • If you connect another HDMI CEC component and/or change this for the connected devices. Time Zone Eastern Daylight Saving Automatic Enter time 10:35AM Wake up Timer Off Wake... between AM/PM. Use the OK button to have the TV set the time for an existing HDMI CEC component, you . Use the OK button to change the HDMI input used for you should turn the HDMI CEC function off and then turn itself on. AM Press < / > or OK to choose between ...
User Guide & Warranty
Page 44
... Do? What Else Can I want to change the picture quality output that after a reboot, you have to reprogram the remote to the HDMI 1, HDMI 2, HDMI 3 or HDMI 4 INPUT and you forget your TV through the Troubleshooting section and nothing has fixed your problem, try connecting the Y Pb Pr jacks if ... an Unusable Signal message onscreen, press the INFO button on the remote for updated FAQs or contact RCA Customer Support at the support number provided in the Channel Banner, the HDMI or DVI device isn't responding. Reset the power by unplugging the power cord and plugging it back...
... Do? What Else Can I want to change the picture quality output that after a reboot, you have to reprogram the remote to the HDMI 1, HDMI 2, HDMI 3 or HDMI 4 INPUT and you forget your TV through the Troubleshooting section and nothing has fixed your problem, try connecting the Y Pb Pr jacks if ... an Unusable Signal message onscreen, press the INFO button on the remote for updated FAQs or contact RCA Customer Support at the support number provided in the Channel Banner, the HDMI or DVI device isn't responding. Reset the power by unplugging the power cord and plugging it back...
Spec Sheet
Page 1
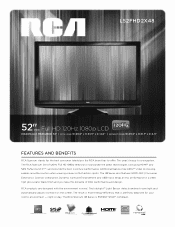
... is ENERGY STAR® compliant. Wrap all this performance in mind. l52FHD2X48 52"class Full HD 120Hz 1080p LCD DIAGONALLY MEASURED: 52" | WITH STAND W-49.6" x H-33.9" x D-12.6" | WITHOUT STAND W-49.6" x H-31.7" x D-4.5" FEATURES AND BENEFITS RCA Scenium stands for your room's environment - The 48 Series also features HDMI-CEC (Consumer Electronics Control) compliance, Dynamic Contrast Enhancement and USB Input...
... is ENERGY STAR® compliant. Wrap all this performance in mind. l52FHD2X48 52"class Full HD 120Hz 1080p LCD DIAGONALLY MEASURED: 52" | WITH STAND W-49.6" x H-33.9" x D-12.6" | WITHOUT STAND W-49.6" x H-31.7" x D-4.5" FEATURES AND BENEFITS RCA Scenium stands for your room's environment - The 48 Series also features HDMI-CEC (Consumer Electronics Control) compliance, Dynamic Contrast Enhancement and USB Input...
Spec Sheet
Page 2
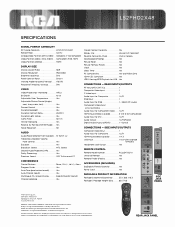
...Package Weight (lbs 86 / 70.6 SIDE JACK PANEL TTE Technology, Inc. 5541 West 74th Street Indianapolis, IN U.S.A. 46268 rca.com/television ENERGY STAR and the ENERGY STAR mark are trademarks or registered trademarks of Dolby Laboratories. Dolby is a registered trademark of... Formats (1080p HDMI DISPLAY SIZE Display Aspect Ratio 16x9 Display Resolution 1920x1080 Brightness (cd/m2 500 Panel Contrast Ratio 5000:1 Viewing Angle Horizontal/Vertical . . . . . 176/176 Response Time (Gray to TTE CORPORATION. Yes CONNECTIONS - l52FHD2X48 SPECIFICATIONS SIGNAL FORMAT CAPABILITY RF ...
...Package Weight (lbs 86 / 70.6 SIDE JACK PANEL TTE Technology, Inc. 5541 West 74th Street Indianapolis, IN U.S.A. 46268 rca.com/television ENERGY STAR and the ENERGY STAR mark are trademarks or registered trademarks of Dolby Laboratories. Dolby is a registered trademark of... Formats (1080p HDMI DISPLAY SIZE Display Aspect Ratio 16x9 Display Resolution 1920x1080 Brightness (cd/m2 500 Panel Contrast Ratio 5000:1 Viewing Angle Horizontal/Vertical . . . . . 176/176 Response Time (Gray to TTE CORPORATION. Yes CONNECTIONS - l52FHD2X48 SPECIFICATIONS SIGNAL FORMAT CAPABILITY RF ...


