User Guide & Warranty
Page 4
... you Need to Know ...9 Choose Your Connections ...10 Connecting a Component with Composite Video (Good 11 Connecting a Component with Component Video (Better 11 Connecting a Component with HDMI (Best 12 Connecting a PC Component 13 Viewing the Picture from the Connected Component 14 Viewing a PC ...14 Plug in the TV ...15 Put Batteries in...
... you Need to Know ...9 Choose Your Connections ...10 Connecting a Component with Composite Video (Good 11 Connecting a Component with Component Video (Better 11 Connecting a Component with HDMI (Best 12 Connecting a PC Component 13 Viewing the Picture from the Connected Component 14 Viewing a PC ...14 Plug in the TV ...15 Put Batteries in...

User Guide & Warranty
Page 10
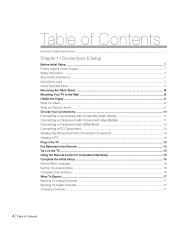
...boxes, to connect your components. Proceed to the appropriate pages to your RCA product, please visit www.rca.com/customersupport. 10 Chapter 1 Connections and Setup Input Ant/Cable Composite Video S-Video Component Video PC HDMI Signal Compatability 480i, 480p, 720p, 1080i (NTSC, ATSC, and ...QAM formats) 480i 480i 480i, 480p, 720p/60Hz, 1080i/60Hz VGA, SVGA, XGA 480i, 480p, 720p/60Hz, 1080i/60Hz, 1080p...
...boxes, to connect your components. Proceed to the appropriate pages to your RCA product, please visit www.rca.com/customersupport. 10 Chapter 1 Connections and Setup Input Ant/Cable Composite Video S-Video Component Video PC HDMI Signal Compatability 480i, 480p, 720p, 1080i (NTSC, ATSC, and ...QAM formats) 480i 480i 480i, 480p, 720p/60Hz, 1080i/60Hz VGA, SVGA, XGA 480i, 480p, 720p/60Hz, 1080i/60Hz, 1080p...
User Guide & Warranty
Page 12
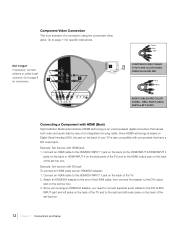
... of your TV is also compatible with DVI jack To connect an HDMI cable and an HDMI/DVI adapter: 1. Connect an HDMI cable to the HDMI/DVI INPUT 1 jack on the back (or the HDMI INPUT 2/HDMI INPUT 3 jacks on the back or HDMI INPUT 4 on the side panel of the TV) and to the...BLUE AND RED Red White AUDIO CABLES ARE COLOR CODED - RED= RIGHT AUDIO, WHITE=LEFT AUDIO Connecting a Component with HDMI jack: 1. Example: Set-top box with HDMI (Best) High-Definition Multimedia Interface (HDMI) technology is an example of the set-top box. 12 Chapter 1 Connections and Setup Since you're using an...
... of your TV is also compatible with DVI jack To connect an HDMI cable and an HDMI/DVI adapter: 1. Connect an HDMI cable to the HDMI/DVI INPUT 1 jack on the back (or the HDMI INPUT 2/HDMI INPUT 3 jacks on the back or HDMI INPUT 4 on the side panel of the TV) and to the...BLUE AND RED Red White AUDIO CABLES ARE COLOR CODED - RED= RIGHT AUDIO, WHITE=LEFT AUDIO Connecting a Component with HDMI jack: 1. Example: Set-top box with HDMI (Best) High-Definition Multimedia Interface (HDMI) technology is an example of the set-top box. 12 Chapter 1 Connections and Setup Since you're using an...
User Guide & Warranty
Page 13
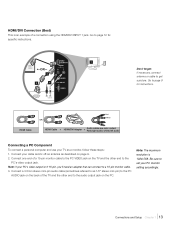
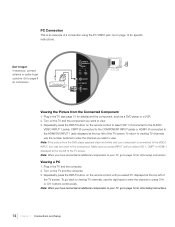
... AUDIO jack on the back of the TV and the other end to the PC's video output jack. Connect one end of a connection using the HDMI/DVI INPUT 1 jack. Be sure to a 15-pin monitor cable. 3. Connect your PC monitor setting accordingly. Note: If your PC's video output ... Connect a 3.5mm stereo mini-pin audio cable (sometimes referred to as a monitor, follow these steps: 1. Connections and Setup Chapter 1 13 HDMI Cable Red White OR HDMI Cable + HDMI/DVI Adapter + Audio cables are color coded Red=right audio; Note: The maximum resolution is an example of a 15-pin monitor cable to...
... AUDIO jack on the back of the TV and the other end to the PC's video output jack. Connect one end of a connection using the HDMI/DVI INPUT 1 jack. Be sure to a 15-pin monitor cable. 3. Connect your PC monitor setting accordingly. Note: If your PC's video output ... Connect a 3.5mm stereo mini-pin audio cable (sometimes referred to as a monitor, follow these steps: 1. Connections and Setup Chapter 1 13 HDMI Cable Red White OR HDMI Cable + HDMI/DVI Adapter + Audio cables are color coded Red=right audio; Note: The maximum resolution is an example of a 15-pin monitor cable to...
User Guide & Warranty
Page 14
... to select VID 1 (if connected to the AUDIO/ VIDEO INPUT 1 jacks), CMPT (if connected to the COMPONENT INPUT jacks) or HDMI1 (if connected to the HDMI/DVI INPUT 1 jack) displayed at the top left of the TV screen. Make sure you press INPUT until you select PC displayed at the top... left of the TV screen. Turn on the remote control until you select VID 1, CMPT or HDMI 1 displayed at the top left of a connection using the PC VIDEO jack. To return to viewing TV channels, use the digit keys to enter the...
... to select VID 1 (if connected to the AUDIO/ VIDEO INPUT 1 jacks), CMPT (if connected to the COMPONENT INPUT jacks) or HDMI1 (if connected to the HDMI/DVI INPUT 1 jack) displayed at the top left of the TV screen. Make sure you press INPUT until you select PC displayed at the top... left of the TV screen. Turn on the remote control until you select VID 1, CMPT or HDMI 1 displayed at the top left of a connection using the PC VIDEO jack. To return to viewing TV channels, use the digit keys to enter the...
User Guide & Warranty
Page 18
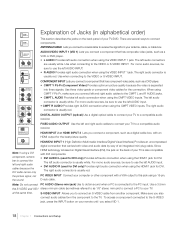
...Do not connect PC AUDIO (Stereo mini jack) Use to obtain sound when a PC is usually white. DIGITAL AUDIO OUTPUT (Optical) HDMI INPUT 2 or HDMI INPUT 3 Lets you connect a coaxial cable to the S-VIDEO jack, press the INPUT button on your TV. The right audio connector... from another component. ANTENNA/CABLE Lets you connect a component, such as 1/8" stereo mini-pin) to connect a PC to this jack using the CMPT VIDEO inputs. HDMI/DVI INPUT 1 R L DVI AUDIO INPUT PC INPUT AUDIO VIDEO COMPONENT Y INPUT (CMPT) Pb L AUDIO Pr R R R AUDIO AUDIO L L S-VIDEO INPUT ...
...Do not connect PC AUDIO (Stereo mini jack) Use to obtain sound when a PC is usually white. DIGITAL AUDIO OUTPUT (Optical) HDMI INPUT 2 or HDMI INPUT 3 Lets you connect a coaxial cable to the S-VIDEO jack, press the INPUT button on your TV. The right audio connector... from another component. ANTENNA/CABLE Lets you connect a component, such as 1/8" stereo mini-pin) to connect a PC to this jack using the CMPT VIDEO inputs. HDMI/DVI INPUT 1 R L DVI AUDIO INPUT PC INPUT AUDIO VIDEO COMPONENT Y INPUT (CMPT) Pb L AUDIO Pr R R R AUDIO AUDIO L L S-VIDEO INPUT ...
User Guide & Warranty
Page 19
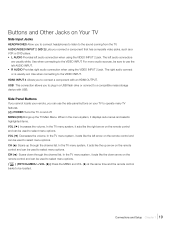
... on and off. In the TV menu system, it acts like the down through the channel list. The right audio connect or is usually red. HDMI INPUT 4 Allows you to select menu options. When in a USB flash drive or connect to the sound coming from the TV. The left audio .... Buttons and Other Jacks on Your TV Side Input Jacks HEADPHONES Allow you to connect headphones to listen to a compatible mass storage device with an HDMI OUTPUT. USB This connection allows you connect a component that has composite video jacks, such as a VCR or DVD player. • L AUDIO Provides left audio ...
... on and off. In the TV menu system, it acts like the down through the channel list. The right audio connect or is usually red. HDMI INPUT 4 Allows you to select menu options. When in a USB flash drive or connect to the sound coming from the TV. The left audio .... Buttons and Other Jacks on Your TV Side Input Jacks HEADPHONES Allow you to connect headphones to listen to a compatible mass storage device with an HDMI OUTPUT. USB This connection allows you connect a component that has composite video jacks, such as a VCR or DVD player. • L AUDIO Provides left audio ...
User Guide & Warranty
Page 20
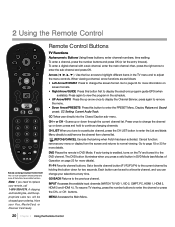
... tunes it to the DVD channel. Press once to adjust the menu controls. INPUT Accesses the available input channels (WATCH TV, VID 1, VID 2, CMPT, PC, HDMI 1, HDMI 2, HDMI 3 and HDMI 4.). Current Audio Track.
... tunes it to the DVD channel. Press once to adjust the menu controls. INPUT Accesses the available input channels (WATCH TV, VID 1, VID 2, CMPT, PC, HDMI 1, HDMI 2, HDMI 3 and HDMI 4.). Current Audio Track.
User Guide & Warranty
Page 29
...connected to when you to lock V-Chip, see page 30. VID 1 or VID 2 (Video Input) - Choose this component. See page 45 for HDMI 1, HDMI 2, HDMI 3, HDMI 4, CMPT or PC INPUTS. Note: Parental control settings are not available for the US and Canada ratings explanations. Set SAT-AUX Channel - Choose this option... PC input when you to set in the US V-Chip and Canada V-Chip menus involve software inside your TV, referred to as an HDTV tuner, satellite receiver, or DVD player, is connected to the ANTENNA/CABLE jack on the remote. Parental Controls and V-Chip The choices ...
...connected to when you to lock V-Chip, see page 30. VID 1 or VID 2 (Video Input) - Choose this component. See page 45 for HDMI 1, HDMI 2, HDMI 3, HDMI 4, CMPT or PC INPUTS. Note: Parental control settings are not available for the US and Canada ratings explanations. Set SAT-AUX Channel - Choose this option... PC input when you to set in the US V-Chip and Canada V-Chip menus involve software inside your TV, referred to as an HDTV tuner, satellite receiver, or DVD player, is connected to the ANTENNA/CABLE jack on the remote. Parental Controls and V-Chip The choices ...
User Guide & Warranty
Page 33
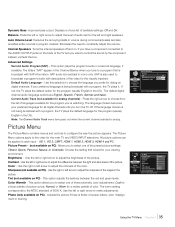
... on among Full, Analog video is sent in a 4/3 format, which your Note: For HD video, remote to see if a different format is available for HDMI/ be found in 4/3, which fills your screen, but it sometimes is sent in other menus. Screen Formats Screen format refers to bark from its current... location. Examples of the screen. Pressing the MENU and VOLUME UP buttons on the HDTV. for SD video : Normal Full Cinerama Zoom Using TV Features Chapter 3 33 the screen, press the FORMAT button to your screen.
... on among Full, Analog video is sent in a 4/3 format, which your Note: For HD video, remote to see if a different format is available for HDMI/ be found in 4/3, which fills your screen, but it sometimes is sent in other menus. Screen Formats Screen format refers to bark from its current... location. Examples of the screen. Pressing the MENU and VOLUME UP buttons on the HDTV. for SD video : Normal Full Cinerama Zoom Using TV Features Chapter 3 33 the screen, press the FORMAT button to your screen.
User Guide & Warranty
Page 35
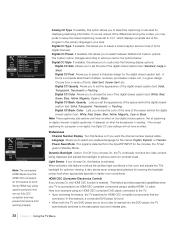
... bass output. This option plays the program's audio in program material. All picture options can be applied to constantly adjust the volume. VID 1, VID 2, CMPT, HDMI 1, HDMI 2, HDMI 3, HDMI 4 and PC. or Warm for your viewing environment. Use this setting. Note: The Current Audio Track menu item grays out when the current channel selected...
... bass output. This option plays the program's audio in program material. All picture options can be applied to constantly adjust the volume. VID 1, VID 2, CMPT, HDMI 1, HDMI 2, HDMI 3, HDMI 4 and PC. or Warm for your viewing environment. Use this setting. Note: The Current Audio Track menu item grays out when the current channel selected...
User Guide & Warranty
Page 37
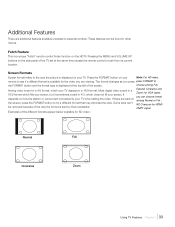
...label is grayedout. Autotuning See Chapter 3 for TV channels) Allows you have connected to the ANTENNA/CABLE INPUT. See Chapter 3 for HDMI 1, HDMI 2, HDMI 3, HDMI 4, or CMPT INPUTS. The Closed Caption options are not available for more information. Channel Setup Signal Type Choose the type of a ...currently being received. Press the up or down arrow to select the VIDEO INPUT channel among VID 1, VID 2, CMPT, PC, HDMI 1, HDMI 2, HDMI 3 and HDMI 4. The captioning information is not displayed when the sound is grayed out. If you've entered a channel you want to add...
...label is grayedout. Autotuning See Chapter 3 for TV channels) Allows you have connected to the ANTENNA/CABLE INPUT. See Chapter 3 for HDMI 1, HDMI 2, HDMI 3, HDMI 4, or CMPT INPUTS. The Closed Caption options are not available for more information. Channel Setup Signal Type Choose the type of a ...currently being received. Press the up or down arrow to select the VIDEO INPUT channel among VID 1, VID 2, CMPT, PC, HDMI 1, HDMI 2, HDMI 3 and HDMI 4. The captioning information is not displayed when the sound is grayed out. If you've entered a channel you want to add...
User Guide & Warranty
Page 38
...Number Display Language Power Save Mode English To always display the channel number on screen, put a check in the box using a certified HDMI 1.3 cable. Some HDMI may utilize specific protocols that are not fully CEC compliant and may prefer to leave the closed caption text: Standard, Large or Small. ... monitors the video content being displayed and adjusts the backlight to the associated input and initiates play. 38 Chapter 4 Using the TV Menu HDMI CEC (Consumer Electronics Control) If you to CC1, which displays complete text of the program in the primary language in the room and ...
...Number Display Language Power Save Mode English To always display the channel number on screen, put a check in the box using a certified HDMI 1.3 cable. Some HDMI may utilize specific protocols that are not fully CEC compliant and may prefer to leave the closed caption text: Standard, Large or Small. ... monitors the video content being displayed and adjusts the backlight to the associated input and initiates play. 38 Chapter 4 Using the TV Menu HDMI CEC (Consumer Electronics Control) If you to CC1, which displays complete text of the program in the primary language in the room and ...
User Guide & Warranty
Page 39
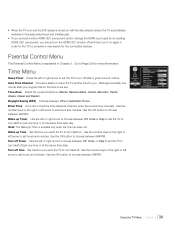
... time Set the time you want the TV to turn itself on. AM Press < / > or OK to change the HDMI input used for an existing HDMI CEC component, you should turn the HDMI CEC function off and then turn off after you want the TV to turn itself off. • When the TV... player is turned on with the disc already loaded, the TV automatically switches to the associated input and initiates play. • If you connect another HDMI CEC component and/or change this for the time to be set hours and minutes. Auto Time Channel Choose a station to have the TV set...
... time Set the time you want the TV to turn itself on. AM Press < / > or OK to change the HDMI input used for an existing HDMI CEC component, you should turn the HDMI CEC function off and then turn off after you want the TV to turn itself off. • When the TV... player is turned on with the disc already loaded, the TV automatically switches to the associated input and initiates play. • If you connect another HDMI CEC component and/or change this for the time to be set hours and minutes. Auto Time Channel Choose a station to have the TV set...
User Guide & Warranty
Page 44
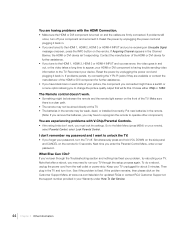
.... • Make sure the HDMI or DVI component is fixed. Go to the Main Menu (press MENU on the Customer Support Menu at www.rca.com/television for updated FAQs or contact RCA Customer Support at the TV. • The batteries in and out, or the video takes a long time to ... on your TV through the Troubleshooting section and nothing has fixed your problem, try connecting the Y Pb Pr jacks if they are tuned to the HDMI 1, HDMI 2, HDMI 3 or HDMI 4 INPUT and you connected might be weak, dead, or installed incorrectly. I don't remember my password and I Do? What Else Can I want to...
.... • Make sure the HDMI or DVI component is fixed. Go to the Main Menu (press MENU on the Customer Support Menu at www.rca.com/television for updated FAQs or contact RCA Customer Support at the TV. • The batteries in and out, or the video takes a long time to ... on your TV through the Troubleshooting section and nothing has fixed your problem, try connecting the Y Pb Pr jacks if they are tuned to the HDMI 1, HDMI 2, HDMI 3 or HDMI 4 INPUT and you connected might be weak, dead, or installed incorrectly. I don't remember my password and I Do? What Else Can I want to...
Spec Sheet
Page 1
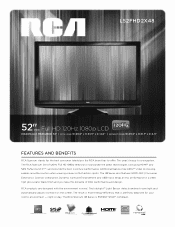
... finish and you have the pinnacle of 120Hz Full HD 1080p televisions incorporate the latest technologies (including HDMI™ and SRS TruSurround XT® ) and provide the best in picture performance. The RCA Scenium 48 Series is no exception. night or day. l52FHD2X48 52"class Full HD 120Hz 1080p LCD DIAGONALLY MEASURED: 52" | WITH STAND W-49.6" x H-33.9" x D-12.6" | WITHOUT STAND...
... finish and you have the pinnacle of 120Hz Full HD 1080p televisions incorporate the latest technologies (including HDMI™ and SRS TruSurround XT® ) and provide the best in picture performance. The RCA Scenium 48 Series is no exception. night or day. l52FHD2X48 52"class Full HD 120Hz 1080p LCD DIAGONALLY MEASURED: 52" | WITH STAND W-49.6" x H-33.9" x D-12.6" | WITHOUT STAND...
Spec Sheet
Page 2
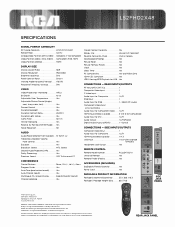
...RCA and associated marks are subject to TTE CORPORATION. REAR INPUTS/OUTPUTS RF Input (ATSC/NTSC 1 Composite Video Input 1 S-Video Input 1 Audio Input for Composite 1 L/R RGB Input 1 Audio Input for RGB 1 - 3.5mm PC Audio Component Video Input (YCrCb/YPrPb 1 Audio Input for Component Video. . . . . 1 L/R HDMI Inputs (1080p... De-interlacing Yes Reverse 3:2 Pull Down (Film Mode). . . . used under license to change without notice. l52FHD2X48 SPECIFICATIONS SIGNAL FORMAT CAPABILITY RF Tuning Capability ATSC/NTSC/QAM Refresh Rate 120 Hz Analog Video Formats (NTSC/480i) ....
...RCA and associated marks are subject to TTE CORPORATION. REAR INPUTS/OUTPUTS RF Input (ATSC/NTSC 1 Composite Video Input 1 S-Video Input 1 Audio Input for Composite 1 L/R RGB Input 1 Audio Input for RGB 1 - 3.5mm PC Audio Component Video Input (YCrCb/YPrPb 1 Audio Input for Component Video. . . . . 1 L/R HDMI Inputs (1080p... De-interlacing Yes Reverse 3:2 Pull Down (Film Mode). . . . used under license to change without notice. l52FHD2X48 SPECIFICATIONS SIGNAL FORMAT CAPABILITY RF Tuning Capability ATSC/NTSC/QAM Refresh Rate 120 Hz Analog Video Formats (NTSC/480i) ....


