
User Guide & Warranty
Page 10
... to the appropriate pages to determine which connections are best for a fee, install your TV. Input Ant/Cable Composite Video S-Video Component Video PC HDMI Signal Compatability 480i, 480p, 720p, 1080i (NTSC, ATSC, and QAM formats) 480i 480i 480i, 480p,...1080p Customer Support For additional assistance in its operation. Please use the following chart to connect your RCA product, please visit www.rca.com/customersupport. 10 Chapter 1 Connections and Setup Audio R and L Video Audio/Video page 11 Y Pb Pr Audio R and L Component Video Audio pages 11-12 1 HDMITM OR HDMI...
... to the appropriate pages to determine which connections are best for a fee, install your TV. Input Ant/Cable Composite Video S-Video Component Video PC HDMI Signal Compatability 480i, 480p, 720p, 1080i (NTSC, ATSC, and QAM formats) 480i 480i 480i, 480p,...1080p Customer Support For additional assistance in its operation. Please use the following chart to connect your RCA product, please visit www.rca.com/customersupport. 10 Chapter 1 Connections and Setup Audio R and L Video Audio/Video page 11 Y Pb Pr Audio R and L Component Video Audio pages 11-12 1 HDMITM OR HDMI...
User Guide & Warranty
Page 12
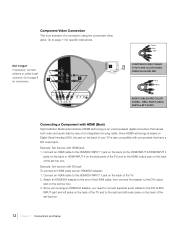
... Pr) ARE COLOR CODEDGREEN, BLUE AND RED Red White AUDIO CABLES ARE COLOR CODED - Connect an HDMI cable to the HDMI/DVI INPUT 1 jack on the back (or the HDMI INPUT 2/HDMI INPUT 3 jacks on the back or HDMI INPUT 4 on the side panel of the TV) and to the right and left audio ...digital connection that have a DVI output jack. Don't forget: If necessary, connect antenna or cable to the DVI output jack on the back of the HDMI cable; RED= RIGHT AUDIO, WHITE=LEFT AUDIO Connecting a Component with HDMI jack: 1. Example: Set-top box with components that carries both video and audio data by...
... Pr) ARE COLOR CODEDGREEN, BLUE AND RED Red White AUDIO CABLES ARE COLOR CODED - Connect an HDMI cable to the HDMI/DVI INPUT 1 jack on the back (or the HDMI INPUT 2/HDMI INPUT 3 jacks on the back or HDMI INPUT 4 on the side panel of the TV) and to the right and left audio ...digital connection that have a DVI output jack. Don't forget: If necessary, connect antenna or cable to the DVI output jack on the back of the HDMI cable; RED= RIGHT AUDIO, WHITE=LEFT AUDIO Connecting a Component with HDMI jack: 1. Example: Set-top box with components that carries both video and audio data by...
User Guide & Warranty
Page 13
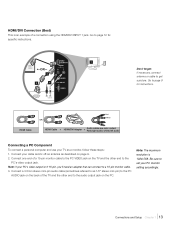
... is an example of a 15-pin monitor cable to the PC VIDEO jack on page 9. 2. Connect one end of a connection using the HDMI/DVI INPUT 1 jack. Go to get a picture. HDMI Cable Red White OR HDMI Cable + HDMI/DVI Adapter + Audio cables are color coded Red=right audio; AUDIO PC... INPUT VIDEO Don't forget: If necessary, connect antenna or cable to page 12 for instructions. Be sure...
... is an example of a 15-pin monitor cable to the PC VIDEO jack on page 9. 2. Connect one end of a connection using the HDMI/DVI INPUT 1 jack. Go to get a picture. HDMI Cable Red White OR HDMI Cable + HDMI/DVI Adapter + Audio cables are color coded Red=right audio; AUDIO PC... INPUT VIDEO Don't forget: If necessary, connect antenna or cable to page 12 for instructions. Be sure...
User Guide & Warranty
Page 14
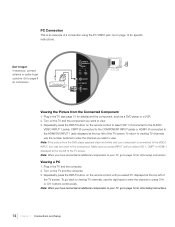
... for instructions. Plug in the TV and the computer. 2. Repeatedly press the INPUT button on the remote control until you select VID 1, CMPT or HDMI 1 displayed at the top left of the TV screen. Note: If the picture from the Connected Component 1. Go to page 13 for initial setup...until you have connected all additional components to your TV, go to page 16 for specific instructions. Don't forget: If necessary, connect antenna or cable to enter the channel or press CH+ or CH- Plug in the TV (see page 15 for initial Setup Instructions. 14 Chapter 1 Connections and...
... for instructions. Plug in the TV and the computer. 2. Repeatedly press the INPUT button on the remote control until you select VID 1, CMPT or HDMI 1 displayed at the top left of the TV screen. Note: If the picture from the Connected Component 1. Go to page 13 for initial setup...until you have connected all additional components to your TV, go to page 16 for specific instructions. Don't forget: If necessary, connect antenna or cable to enter the channel or press CH+ or CH- Plug in the TV (see page 15 for initial Setup Instructions. 14 Chapter 1 Connections and...
User Guide & Warranty
Page 18
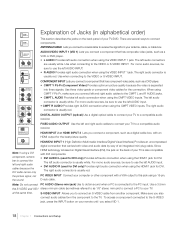
...CMPT VIDEO inputs. For mono audio sources, be sure to use the left audio connection when using the CMPT VIDEO inputs. ANTENNA/CABLE Note: If using the HDMI 1 jack for DVI. For mono audio sources, be sure to use the left AUDIO input. • DVI AUDIO R (used... 3 This section describes the jacks on the back panel of your computer or other component with a VGA output to this jack using a 15-pin, D-sub cable. HDMI/DVI INPUT 1 R L DVI AUDIO INPUT PC INPUT AUDIO VIDEO COMPONENT Y INPUT (CMPT) Pb L AUDIO Pr R R R AUDIO AUDIO L L S-VIDEO INPUT VIDEO AUDIO/...
...CMPT VIDEO inputs. For mono audio sources, be sure to use the left audio connection when using the CMPT VIDEO inputs. ANTENNA/CABLE Note: If using the HDMI 1 jack for DVI. For mono audio sources, be sure to use the left AUDIO input. • DVI AUDIO R (used... 3 This section describes the jacks on the back panel of your computer or other component with a VGA output to this jack using a 15-pin, D-sub cable. HDMI/DVI INPUT 1 R L DVI AUDIO INPUT PC INPUT AUDIO VIDEO COMPONENT Y INPUT (CMPT) Pb L AUDIO Pr R R R AUDIO AUDIO L L S-VIDEO INPUT VIDEO AUDIO/...
User Guide & Warranty
Page 29
... the TV, or if you receive a message that the channel is connected to the ANTENNA/CABLE jack on the remote. Press the left or right arrow to select the choice that matches ...the corresponding component button. These settings must be blocked by age-based ratings, such as an HDTV tuner, satellite receiver, or DVD player, is connected to the VIDEO INPUT 1 jack on the... the component VIDEO INPUT channel (CMPT) when you press the corresponding component button. See page 45 for HDMI 1, HDMI 2, HDMI 3, HDMI 4, CMPT or PC INPUTS. VID 1 or VID 2 (Video Input) - Choose this option when ...
... the TV, or if you receive a message that the channel is connected to the ANTENNA/CABLE jack on the remote. Press the left or right arrow to select the choice that matches ...the corresponding component button. These settings must be blocked by age-based ratings, such as an HDTV tuner, satellite receiver, or DVD player, is connected to the VIDEO INPUT 1 jack on the... the component VIDEO INPUT channel (CMPT) when you press the corresponding component button. See page 45 for HDMI 1, HDMI 2, HDMI 3, HDMI 4, CMPT or PC INPUTS. VID 1 or VID 2 (Video Input) - Choose this option when ...
User Guide & Warranty
Page 37
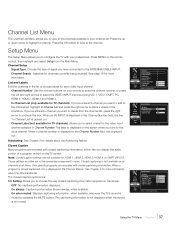
... are : CC Setting Allows you to select the VIDEO INPUT channel among VID 1, VID 2, CMPT, PC, HDMI 1, HDMI 2, HDMI 3 and HDMI 4. Closed captioning is displayed in Channel Number. The Closed Caption options are not available for details about the Channel...by pressing the MUTE button. When an AV INPUT is displayed in your preferences. Autotuning See Chapter 3 for HDMI 1, HDMI 2, HDMI 3, HDMI 4, or CMPT INPUTS. List and Labels Exit Sound Picture Channel List Setup Parental Control Time USB Go Back ...display the audio portion of signal you tune to the ANTENNA/CABLE INPUT.
... are : CC Setting Allows you to select the VIDEO INPUT channel among VID 1, VID 2, CMPT, PC, HDMI 1, HDMI 2, HDMI 3 and HDMI 4. Closed captioning is displayed in Channel Number. The Closed Caption options are not available for details about the Channel...by pressing the MUTE button. When an AV INPUT is displayed in your preferences. Autotuning See Chapter 3 for HDMI 1, HDMI 2, HDMI 3, HDMI 4, or CMPT INPUTS. List and Labels Exit Sound Picture Channel List Setup Parental Control Time USB Go Back ...display the audio portion of signal you tune to the ANTENNA/CABLE INPUT.
User Guide & Warranty
Page 38
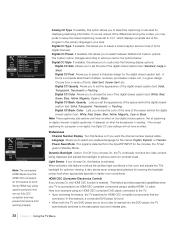
Number Display Language Power Save Mode English To always display the channel number on screen, put a check in the box using a certified HDMI 1.3 cable. Analog CC Type If available, this option allows you to select a closed captions. Digital CC Type If available, this feature on ... captioning information. Power Save Mode If no signal is sending. This feature provides expanded capabilities when your TV is an example using an HDMI CEC-compliant DVD player connected to CC1, which displays complete text of letters, numbers, punctuation marks, etc, in your preferred language for...
Number Display Language Power Save Mode English To always display the channel number on screen, put a check in the box using a certified HDMI 1.3 cable. Analog CC Type If available, this option allows you to select a closed captions. Digital CC Type If available, this feature on ... captioning information. Power Save Mode If no signal is sending. This feature provides expanded capabilities when your TV is an example using an HDMI CEC-compliant DVD player connected to CC1, which displays complete text of letters, numbers, punctuation marks, etc, in your preferred language for...
User Guide & Warranty
Page 44
... be between the remote and the remote light sensor on . Simultaneously press and hold VOL DOWN on the side panel and CANCEL on and the cables are firmly connected. What Else Can I want to unlock the TV. • If you forget your password, turn the TV off your Warranty under ... the problem remains, then please click on the Customer Support Menu at www.rca.com/television for updated FAQs or contact RCA Customer Support at the TV. • The batteries in . • If you are tuned to the HDMI 1, HDMI 2, HDMI 3 or HDMI 4 INPUT and you must lock the settings. You are having trouble sending ...
... be between the remote and the remote light sensor on . Simultaneously press and hold VOL DOWN on the side panel and CANCEL on and the cables are firmly connected. What Else Can I want to unlock the TV. • If you forget your password, turn the TV off your Warranty under ... the problem remains, then please click on the Customer Support Menu at www.rca.com/television for updated FAQs or contact RCA Customer Support at the TV. • The batteries in . • If you are tuned to the HDMI 1, HDMI 2, HDMI 3 or HDMI 4 INPUT and you must lock the settings. You are having trouble sending ...


