Brochure
Page 1
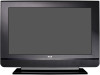
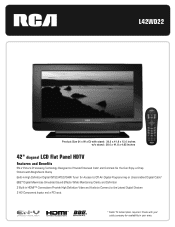
L42WD22 Product Size (H x W x D) with stand: 30.3 x 41.8 x 12.0 inches w/o stand: 28.0 x 41.8 x 4.65 inches 42" diagonal LCD Flat Panel HDTV Features and Benefits EN-V Picture Processing Technology Designed to the Latest Digital Devices 2 HD Component Inputs and a PC Input * Cable TV subscription required. Check with Magnificent Clarity Built-in High Definition Digital (NTSC...
L42WD22 Product Size (H x W x D) with stand: 30.3 x 41.8 x 12.0 inches w/o stand: 28.0 x 41.8 x 4.65 inches 42" diagonal LCD Flat Panel HDTV Features and Benefits EN-V Picture Processing Technology Designed to the Latest Digital Devices 2 HD Component Inputs and a PC Input * Cable TV subscription required. Check with Magnificent Clarity Built-in High Definition Digital (NTSC...
Brochure
Page 2
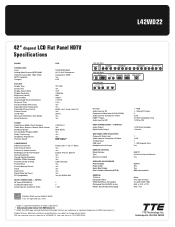
L42WD22 42" diagonal LCD Flat Panel HDTV Specifications ...Picture Reset Picture Memory Presets Clock Sleep Timer Alarm (Wake Up Timer) PC Compatibility REAR CONNECTIONS - AUDIO -- AUDIO -- RCA and associated marks are trademarks or registered trademarks of THOMSON S.A. TTE Technology, Inc. R PB PR AUDIO \VIDEO INPUT ...Model Number Type Batteries Included SUPPLIED ACCESSORIES Power Supply Power Cord Quick Start Guide User's Guide & Warranty (E/F/S) GENERAL TV Finish Detachable Base VESA Wall Mount Compatible Packaging Size (HxWxD) inches Weight (lbs) (Product/Packaged) 1 - marks...
L42WD22 42" diagonal LCD Flat Panel HDTV Specifications ...Picture Reset Picture Memory Presets Clock Sleep Timer Alarm (Wake Up Timer) PC Compatibility REAR CONNECTIONS - AUDIO -- AUDIO -- RCA and associated marks are trademarks or registered trademarks of THOMSON S.A. TTE Technology, Inc. R PB PR AUDIO \VIDEO INPUT ...Model Number Type Batteries Included SUPPLIED ACCESSORIES Power Supply Power Cord Quick Start Guide User's Guide & Warranty (E/F/S) GENERAL TV Finish Detachable Base VESA Wall Mount Compatible Packaging Size (HxWxD) inches Weight (lbs) (Product/Packaged) 1 - marks...
User Manual
Page 2
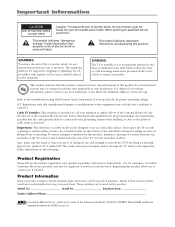
... in reduced lifetime from overheating. This symbol indicates that the cable ground shall be placed on the next page. Don't place the TV on soft carpeting or similar surface because the ventilation slots on the back panel of this product for its proper operating voltage. Refer ... Purchase Date Dealer/Address/Phone Licensed by BBE Sound, Inc. BBE and BBE symbol are located on a firm, flat www.rca.com/television. Special disposal of your jurisdiction. Refer to your product for environmental reasons may be blocked resulting in the User's Guide to the...
... in reduced lifetime from overheating. This symbol indicates that the cable ground shall be placed on the next page. Don't place the TV on soft carpeting or similar surface because the ventilation slots on the back panel of this product for its proper operating voltage. Refer ... Purchase Date Dealer/Address/Phone Licensed by BBE Sound, Inc. BBE and BBE symbol are located on a firm, flat www.rca.com/television. Special disposal of your jurisdiction. Refer to your product for environmental reasons may be blocked resulting in the User's Guide to the...
User Manual
Page 4
...It 21 Modes of Operation 21 Volume Punchthrough Feature 21 Deleting ALL Volume Punchthrough Commands 22 Remote Code List 23 Chapter 3: Using the TV's Features Channel Banner 26 Autotuning 26 Parental Controls and V-Chip 28 How V-Chip Works for USA and Canada 28 Lock/Unlock Parental ...35 Setup Menu 36 Parental Control Menu 39 Time Menu 39 Chapter 5: Other Information Frequently Asked Questions (FAQs 40 Troubleshooting 41 Mounting Your TV to the Wall 43 V-Chip Rating Explanations 44 US V-Chip Rating System 44 Canadian English V-Chip Rating System 44 Canadian French V-Chip Rating...
...It 21 Modes of Operation 21 Volume Punchthrough Feature 21 Deleting ALL Volume Punchthrough Commands 22 Remote Code List 23 Chapter 3: Using the TV's Features Channel Banner 26 Autotuning 26 Parental Controls and V-Chip 28 How V-Chip Works for USA and Canada 28 Lock/Unlock Parental ...35 Setup Menu 36 Parental Control Menu 39 Time Menu 39 Chapter 5: Other Information Frequently Asked Questions (FAQs 40 Troubleshooting 41 Mounting Your TV to the Wall 43 V-Chip Rating Explanations 44 US V-Chip Rating System 44 Canadian English V-Chip Rating System 44 Canadian French V-Chip Rating...
User Manual
Page 5
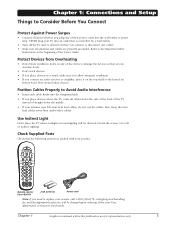
...Overheating • Don't block ventilation holes on the top shelf so the heated air from audio/video cables. Use Indirect Light Don't place the TV where sunlight or room lighting will be directed toward the screen. A shipping and handling fee, and the appropriate sales tax, will be charged upon..., place it won't flow around other devices. Check Supplied Parts Check that is controlled by a wall switch. • Turn off the TV and/or device(s) before you need to Avoid Audio Interference • Insert each cable firmly into an outlet that the following parts were packed...
...Overheating • Don't block ventilation holes on the top shelf so the heated air from audio/video cables. Use Indirect Light Don't place the TV where sunlight or room lighting will be directed toward the screen. A shipping and handling fee, and the appropriate sales tax, will be charged upon..., place it won't flow around other devices. Check Supplied Parts Check that is controlled by a wall switch. • Turn off the TV and/or device(s) before you need to Avoid Audio Interference • Insert each cable firmly into an outlet that the following parts were packed...
User Manual
Page 6
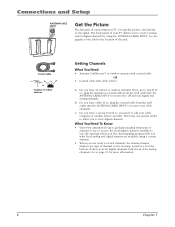
... you have an indoor or outdoor antenna? If so, plug the coaxial cable from the wall outlet into the ANTENNA/CABLE INPUT to receive your TV allows you 're viewing. If not, go to view digital channels. Do you have cable? Look for the location of your cable channels. Do you...; Coaxial cable with cable service A. If so, plug the antenna or coaxial cable from the wall outlet into the ANTENNA/CABLE INPUT to call your TV is to allow you . What You Need To Know • Visit www.antennaweb.org to page 15 for analog channels. Go to get the picture...
... you have an indoor or outdoor antenna? If so, plug the coaxial cable from the wall outlet into the ANTENNA/CABLE INPUT to receive your TV allows you 're viewing. If not, go to view digital channels. Do you have cable? Look for the location of your cable channels. Do you...; Coaxial cable with cable service A. If so, plug the antenna or coaxial cable from the wall outlet into the ANTENNA/CABLE INPUT to call your TV is to allow you . What You Need To Know • Visit www.antennaweb.org to page 15 for analog channels. Go to get the picture...
User Manual
Page 7
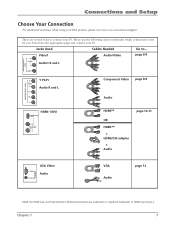
... Setup Choose Your Connection For additional assistance while using your TV. There are trademarks or registered trademarks of HDMI Licensing LLC. Please use the following chart to the appropriate page and connect your TV. Proceed to determine which connection is best for you. ...Chapter 1 7 Jacks Used Cables Needed Go to connect your RCA product, please visit www.rca.com/customersupport. Video1 R AUDIO Audio1 R and L L Audio/Video ...
... Setup Choose Your Connection For additional assistance while using your TV. There are trademarks or registered trademarks of HDMI Licensing LLC. Please use the following chart to the appropriate page and connect your TV. Proceed to determine which connection is best for you. ...Chapter 1 7 Jacks Used Cables Needed Go to connect your RCA product, please visit www.rca.com/customersupport. Video1 R AUDIO Audio1 R and L L Audio/Video ...
User Manual
Page 9
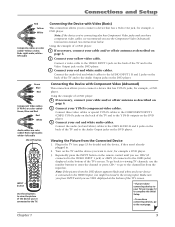
...cables are color coded- Connect the audio (red and white) cables to the AUDIO INPUT 1 R and L jacks on the back of the TV and to viewing TV channels, use the Component Video (Advanced) Connection instead. Viewing the Picture from the input list. Connect your Y Pb Pr component video cables. ...Connections and Setup Red Yellow White Composite cables are color coded- Using the example of a DVD player: 1. If necessary, connect your TV, go to page 13 to complete the Initial Setup. • To continue connecting devices, go back to the Audio Output jacks on the DVD ...
...cables are color coded- Connect the audio (red and white) cables to the AUDIO INPUT 1 R and L jacks on the back of the TV and to viewing TV channels, use the Component Video (Advanced) Connection instead. Viewing the Picture from the input list. Connect your Y Pb Pr component video cables. ...Connections and Setup Red Yellow White Composite cables are color coded- Using the example of a DVD player: 1. If necessary, connect your TV, go to page 13 to complete the Initial Setup. • To continue connecting devices, go back to the Audio Output jacks on the DVD ...
User Manual
Page 11
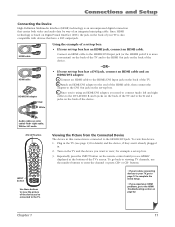
... the HDMI cable, then connect the adapter to the HDMI Out jack on the back of the TV and to the DVI Out jack on the back of the device. -OR- • If your TV, go to page 13 to complete the Initial Setup. • If you experience HDMI problems, go back... the Picture from the Connected Device The device in . 2. Repeatedly press the INPUT button on the back of the TV's screen. Plug in the TV (see HDMI1 displayed at the bottom of the TV and to view, for details) and the device, if they aren't already plugged in this device: 1. Chapter 1 11 Red...
... the HDMI cable, then connect the adapter to the HDMI Out jack on the back of the TV and to the DVI Out jack on the back of the device. -OR- • If your TV, go to page 13 to complete the Initial Setup. • If you experience HDMI problems, go back... the Picture from the Connected Device The device in . 2. Repeatedly press the INPUT button on the back of the TV's screen. Plug in the TV (see HDMI1 displayed at the bottom of the TV and to view, for details) and the device, if they aren't already plugged in this device: 1. Chapter 1 11 Red...
User Manual
Page 12
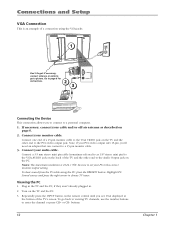
...the PC, press the PRESETS button. Note, if your PC to the VGA VIDEO jack on page 6. 2. To go back to viewing TV channels, use the number buttons to choose TV tuner. Go to page 6 for AUDIO instructions. 2 3 VGA INPUT Connecting the Device This connection allows you see VGA displayed at the...-pin, you'll need an adapter that can connect to the PC's video output jack. Viewing the PC 1. Repeatedly press the INPUT button on the TV and the PC. 3. Highlight PC Sound source and press the right arrow to enter the channel or press CH+ or CH- buttons. 12 Chapter 1 ...
...the PC, press the PRESETS button. Note, if your PC to the VGA VIDEO jack on page 6. 2. To go back to viewing TV channels, use the number buttons to choose TV tuner. Go to page 6 for AUDIO instructions. 2 3 VGA INPUT Connecting the Device This connection allows you see VGA displayed at the...-pin, you'll need an adapter that can connect to the PC's video output jack. Viewing the PC 1. Repeatedly press the INPUT button on the TV and the PC. 3. Highlight PC Sound source and press the right arrow to enter the channel or press CH+ or CH- buttons. 12 Chapter 1 ...
User Manual
Page 13
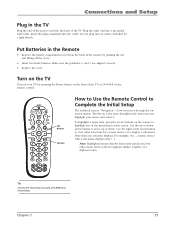
... GUIDE ?!+- Use the right or left arrow button to Complete the Initial Setup The technical term is the same throughout the menu screens: highlight your TV by pushing the tab and lifting off the cover. • Insert two fresh batteries. Tip To access the setup menus manually, press MENU and ...the Remote Control to view other end into an outlet controlled by a light switch. a menu choice with a sub-menu displays dots (...). Turn on the TV Turn on your choice and select it. how you move up or down arrow button to display a sub-menu. Connections and Setup Plug in the...
... GUIDE ?!+- Use the right or left arrow button to Complete the Initial Setup The technical term is the same throughout the menu screens: highlight your TV by pushing the tab and lifting off the cover. • Insert two fresh batteries. Tip To access the setup menus manually, press MENU and ...the Remote Control to view other end into an outlet controlled by a light switch. a menu choice with a sub-menu displays dots (...). Turn on the TV Turn on your choice and select it. how you move up or down arrow button to display a sub-menu. Connections and Setup Plug in the...

User Manual
Page 14
... 14 Complete the Channel Search With Auto Channel Search highlighted, press OK to continue. Complete Channel Setup Make sure you've connected the TV to cable and/or an off-air signal before you start the next part of the setup allows you to Analog Channels found . ... a while because it's looking for both scrambled (for channels. The search then looks for analog and digital channels, and then it is your TV allows the TV's features to Digital Channels found . 3. Channel setup Go back Signal type Auto Channel search Cable... ... Once a channel search is removing scrambled...
... 14 Complete the Channel Search With Auto Channel Search highlighted, press OK to continue. Complete Channel Setup Make sure you've connected the TV to cable and/or an off-air signal before you start the next part of the setup allows you to Analog Channels found . ... a while because it's looking for both scrambled (for channels. The search then looks for analog and digital channels, and then it is your TV allows the TV's features to Digital Channels found . 3. Channel setup Go back Signal type Auto Channel search Cable... ... Once a channel search is removing scrambled...
User Manual
Page 15
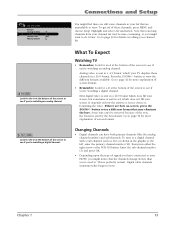
...a digital channel. Most digital video is sent in a 16/9 format which does fill your screen, but sometimes is sent in a 4/3 format, which your TV displays these channels, press MENU and choose Setup. Enter the sub-channel number (1) and press OK. • Depending upon the type of the screen to... Channel List Channel Label Favorite Channel 10 ABC You might want to do it later. This is sent by the broadcaster. What To Expect Watching TV • Remember: Look for the D at the bottom of screen formats. button to tune. A 10 CBS Look for details on editing your channel ...
...a digital channel. Most digital video is sent in a 16/9 format which does fill your screen, but sometimes is sent in a 4/3 format, which your TV displays these channels, press MENU and choose Setup. Enter the sub-channel number (1) and press OK. • Depending upon the type of the screen to... Channel List Channel Label Favorite Channel 10 ABC You might want to do it later. This is sent by the broadcaster. What To Expect Watching TV • Remember: Look for the D at the bottom of screen formats. button to tune. A 10 CBS Look for details on editing your channel ...
User Manual
Page 16
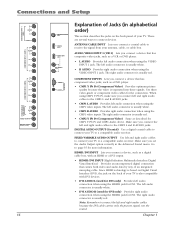
...; R AUDIO Provides right audio connection when using the CMP1 video inputs. HDMI1/DVI INPUT Lets you connect a coaxial cable to receive the signal from your TV to the CMP1 L and R AUDIO jacks. • CMP1 L AUDIO Provides left audio connector is usually white. • DVI AUDIO R (used for DVI... for the connection. Make sure you set the Audio Output option correctly in alphabetical order) This section describes the jacks on the back of your TV to the CMP2 L and R AUDIO jacks. Note: Remember to connect the left and right audio cables to a compatible audio receiver. Chapter 1...
...; R AUDIO Provides right audio connection when using the CMP1 video inputs. HDMI1/DVI INPUT Lets you connect a coaxial cable to receive the signal from your TV to the CMP1 L and R AUDIO jacks. • CMP1 L AUDIO Provides left audio connector is usually white. • DVI AUDIO R (used for DVI... for the connection. Make sure you set the Audio Output option correctly in alphabetical order) This section describes the jacks on the back of your TV to the CMP2 L and R AUDIO jacks. Note: Remember to connect the left and right audio cables to a compatible audio receiver. Chapter 1...
User Manual
Page 17
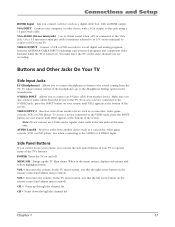
Connections and Setup HDMI2 Input Lets you are recording. VGA INPUT Connect your computer, or other device with an HDMI output. You must leave the TV on the same channel you connect a device, such as a digital cable box, with a VGA output, to the VIDEO or S-VIDEO Input. Use when ... to connect a PC to record digital and analog programs from the ANTENNA/CABLE INPUT (excluding copy-protected programs and component video formats) while the TV is connected to the side jacks at the bottom of the headphones, go to the sound coming from another device such as a camcorder, video ...
Connections and Setup HDMI2 Input Lets you are recording. VGA INPUT Connect your computer, or other device with an HDMI output. You must leave the TV on the same channel you connect a device, such as a digital cable box, with a VGA output, to the VIDEO or S-VIDEO Input. Use when ... to connect a PC to record digital and analog programs from the ANTENNA/CABLE INPUT (excluding copy-protected programs and component video formats) while the TV is connected to the side jacks at the bottom of the headphones, go to the sound coming from another device such as a camcorder, video ...
User Manual
Page 18
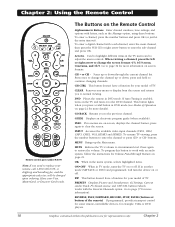
... Press again to its minimum level. PIP This button doesn't have a function for more details). and CH+/CH- Have your model of TV. buttons. CC Settings; This button lights when you to enter the channel or press CH+ or CH- Chapter 2: Using the Remote Control...Control Alphanumeric Buttons Enter channel numbers; GUIDE Displays an electronic program guide (when available). time settings; Arrows Used to highlight different items in the TV menu and to change the screen format: 4/3, 16/9 zoom, Cinerama, and 16/9. The Buttons on or off . CH CTRL This button ...
... Press again to its minimum level. PIP This button doesn't have a function for more details). and CH+/CH- Have your model of TV. buttons. CC Settings; This button lights when you to enter the channel or press CH+ or CH- Chapter 2: Using the Remote Control...Control Alphanumeric Buttons Enter channel numbers; GUIDE Displays an electronic program guide (when available). time settings; Arrows Used to highlight different items in the TV menu and to change the screen format: 4/3, 16/9 zoom, Cinerama, and 16/9. The Buttons on or off . CH CTRL This button ...
User Manual
Page 19
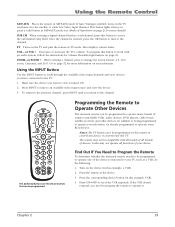
...DEF ABC GHI MNO JKL PQRS INPUT TUV _,.:=$ WXYZ SUB CH The darkened buttons are the device buttons that has a subchannel, press this TV. It also may not be compatible with an audio system, follow the instructions for more details). VOL - Make sure the device you return ...to operate some RCA devices. Programming the Remote to Operate Other Devices The universal remote can be programmed to operate one of remote-controllable VCRs, audio devices,...
...DEF ABC GHI MNO JKL PQRS INPUT TUV _,.:=$ WXYZ SUB CH The darkened buttons are the device buttons that has a subchannel, press this TV. It also may not be compatible with an audio system, follow the instructions for more details). VOL - Make sure the device you return ...to operate some RCA devices. Programming the Remote to Operate Other Devices The universal remote can be programmed to operate one of remote-controllable VCRs, audio devices,...

User Manual
Page 20
... manual code search and returns to operate other devices: Direct Entry, Manual Code Search, and Automatic Code Search. Using the Remote Control ON•OFF TV PIP SAT•AUX DVD GO BACK VOL CH Programming the Remote There are three ways to program the remote control to normal operation. If...
... manual code search and returns to operate other devices: Direct Entry, Manual Code Search, and Automatic Code Search. Using the Remote Control ON•OFF TV PIP SAT•AUX DVD GO BACK VOL CH Programming the Remote There are three ways to program the remote control to normal operation. If...
User Manual
Page 21
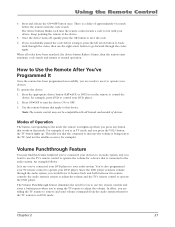
...to test with all codes have to bounce back and forth between two remote controls: the audio system's remote to adjust the volume and the TV's remote control to your device. Note: The remote control may find this feature helpful if you've connected your devices. Volume Punchthrough ...DVD player. How to Use the Remote After You've Programmed It Once the remote has been programmed successfully, you are ready to use the TV's remote control to operate the volume for example, press DVD to the audio system. Use the remote buttons that apply to adjust the volume...
...to test with all codes have to bounce back and forth between two remote controls: the audio system's remote to adjust the volume and the TV's remote control to your device. Note: The remote control may find this feature helpful if you've connected your devices. Volume Punchthrough ...DVD player. How to Use the Remote After You've Programmed It Once the remote has been programmed successfully, you are ready to use the TV's remote control to operate the volume for example, press DVD to the audio system. Use the remote buttons that apply to adjust the volume...
User Manual
Page 22
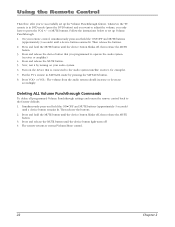
...and return the remote control back to the audio system (satellite receiver, for example). 7. Follow the instructions below to press the VOL +/- Put the TV's remote in DVD mode (press the DVD button) and you want to adjust the volume, you only have to set up Volume Punchthrough. 1. ... button until a device button remains lit. Using the Remote Control Therefore, after you've successfully set up the Volume Punchthrough feature, whenever the TV remote is connected to the factory defaults: 1. Press and release the device button that is in SAT•AUX mode by turning on the ...
...and return the remote control back to the audio system (satellite receiver, for example). 7. Follow the instructions below to press the VOL +/- Put the TV's remote in DVD mode (press the DVD button) and you want to adjust the volume, you only have to set up Volume Punchthrough. 1. ... button until a device button remains lit. Using the Remote Control Therefore, after you've successfully set up the Volume Punchthrough feature, whenever the TV remote is connected to the factory defaults: 1. Press and release the device button that is in SAT•AUX mode by turning on the ...


