User Guide & Warranty
Page 7
...List 38 How V-Chip Works for the USA and Canada 39 USA V-Chip TV Ratings ...39 Canada V-Chip ...43 Auto Tuning Feature ...45 PIP (Picture-in the Remote ...23 Turn on the TV ...23 Use the Remote Control to Complete the Assisted Setup 23 Complete the Assisted Setup ...24 Set ...ALL Volume Punchthrough Commands 32 Using the INPUT Button ...33 Remote Code List ...33 Chapter 3: Using the TV's Features About the Channel Banner ...36 Digital or Analog TV Channels ...37 Direct Tuning to a Channel ...37 Parental Controls ...38 Lock/Unlock TV ...38 Channel Lists (Video Input List, Cable Channel List...
...List 38 How V-Chip Works for the USA and Canada 39 USA V-Chip TV Ratings ...39 Canada V-Chip ...43 Auto Tuning Feature ...45 PIP (Picture-in the Remote ...23 Turn on the TV ...23 Use the Remote Control to Complete the Assisted Setup 23 Complete the Assisted Setup ...24 Set ...ALL Volume Punchthrough Commands 32 Using the INPUT Button ...33 Remote Code List ...33 Chapter 3: Using the TV's Features About the Channel Banner ...36 Digital or Analog TV Channels ...37 Direct Tuning to a Channel ...37 Parental Controls ...38 Lock/Unlock TV ...38 Channel Lists (Video Input List, Cable Channel List...
User Guide & Warranty
Page 9
Chapter 1 Connections & Setup Chapter Overview: • Things to Consider Before You Connect • Choose Your Connection • Explanation of Jacks and Cables • The Front of Your TV • How To Connect • Plug in the TV • Put Batteries in the Remote • Turn on the TV • Use the Remote Control to Complete the Assisted Setup • Complete the Assisted Setup Graphics contained within this publication are for representation only. 7
Chapter 1 Connections & Setup Chapter Overview: • Things to Consider Before You Connect • Choose Your Connection • Explanation of Jacks and Cables • The Front of Your TV • How To Connect • Plug in the TV • Put Batteries in the Remote • Turn on the TV • Use the Remote Control to Complete the Assisted Setup • Complete the Assisted Setup Graphics contained within this publication are for representation only. 7
User Guide & Warranty
Page 12
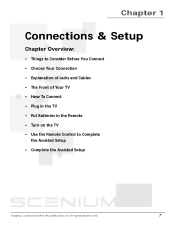
...8226; R and L Provides right front and right rear mixed sound, and left front and left rear surround sound. Connections & Setup Explanation of Jacks and Cables The diagrams below illustrate jacks found on the remote control and choose Audio, then Audio Connections. Then ...VARIABLE AUDIO OUTPUTS • CENTER Provides center surround sound to the TV's center channel input. TV CENTER SPEAKER INPUT EXTERNAL AMP MAX POWER RATING! (60 WATTS into 8 OHMS) FIXED/VARIABLE AUDIO OUTPUTS CENTER R REAR L REAR MATRIX SURROUND OUTPUTS SUBWOOFER R L SPEAKERS • CENTER SPEAKER INPUT ...
...8226; R and L Provides right front and right rear mixed sound, and left front and left rear surround sound. Connections & Setup Explanation of Jacks and Cables The diagrams below illustrate jacks found on the remote control and choose Audio, then Audio Connections. Then ...VARIABLE AUDIO OUTPUTS • CENTER Provides center surround sound to the TV's center channel input. TV CENTER SPEAKER INPUT EXTERNAL AMP MAX POWER RATING! (60 WATTS into 8 OHMS) FIXED/VARIABLE AUDIO OUTPUTS CENTER R REAR L REAR MATRIX SURROUND OUTPUTS SUBWOOFER R L SPEAKERS • CENTER SPEAKER INPUT ...

User Guide & Warranty
Page 14
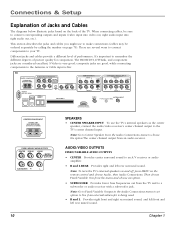
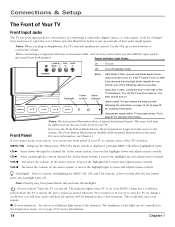
... Input Setup and choose Composite video as a DVD player or satellite receiver. WIRED IR ETHERNET WIRED IR This jack is for connecting a wired remote control system, which is usually red. • L Audio provides left and right audio cables because the Y, Pb, Pr cables carry only ...that was included with your source. Such a connection using anything into this jack or the TV won't respond to the remote. ETHERNET Connect a router, cable modem, or Digital Subscriber Line (DSL) modem to the TV using . Dolby Digital offers theatre-quality sound (six audio channels). "Dolby" and the ...
... Input Setup and choose Composite video as a DVD player or satellite receiver. WIRED IR ETHERNET WIRED IR This jack is for connecting a wired remote control system, which is usually red. • L Audio provides left and right audio cables because the Y, Pb, Pr cables carry only ...that was included with your source. Such a connection using anything into this jack or the TV won't respond to the remote. ETHERNET Connect a router, cable modem, or Digital Subscriber Line (DSL) modem to the TV using . Dolby Digital offers theatre-quality sound (six audio channels). "Dolby" and the ...
User Guide & Warranty
Page 16
...for MENU/OK, CH, and VOL buttons. CH Scans up or down and adjusts menu controls. VOL Increases the volume. The indicator lights when TV is turned on during a cooldown, you use the Front Button Block feature, the front panel no longer provides access to operate many of the ... you will hear audio and then the picture will be displayed after the last button press, the backlight turns off . If you cannot locate your remote, you plug in the Preferences menu. VOL Decreases the volume. A few seconds after a few moments. Connections & Setup The Front of the VOL - The ...
...for MENU/OK, CH, and VOL buttons. CH Scans up or down and adjusts menu controls. VOL Increases the volume. The indicator lights when TV is turned on during a cooldown, you use the Front Button Block feature, the front panel no longer provides access to operate many of the ... you will hear audio and then the picture will be displayed after the last button press, the backlight turns off . If you cannot locate your remote, you plug in the Preferences menu. VOL Decreases the volume. A few seconds after a few moments. Connections & Setup The Front of the VOL - The ...
User Guide & Warranty
Page 17
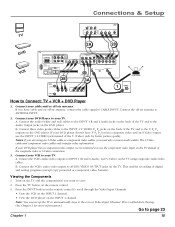
...Video output, use the component video input on the DVD player. Notes: If you want to CABLE INPUT. Turn on the remote control. 3. B. This enables recording of the V (Video) jack for more information.) Go to the Audio Output jacks on the... L IN R L OUT VIDEO VIDEO DVD PR PB Y S-VIDEO L/ L/ L/ 2A 2B DVD VCR TV CENTER SPEAKER INPUT EXTERNAL AMP MAX POWER RATING! (60 WATTS into 8 OHMS) FIXED/VARIABLE AUDIO OUTPUTS CENTER R REAR L REAR MATRIX SURROUND OUTPUTS AUDIO/VIDEO OUTPUT POWER (AC 120V~60Hz) SUBWOOFER R L WIRED IR R L V DIGITAL AUDIO ETHERNET ...
...Video output, use the component video input on the DVD player. Notes: If you want to CABLE INPUT. Turn on the remote control. 3. B. This enables recording of the V (Video) jack for more information.) Go to the Audio Output jacks on the... L IN R L OUT VIDEO VIDEO DVD PR PB Y S-VIDEO L/ L/ L/ 2A 2B DVD VCR TV CENTER SPEAKER INPUT EXTERNAL AMP MAX POWER RATING! (60 WATTS into 8 OHMS) FIXED/VARIABLE AUDIO OUTPUTS CENTER R REAR L REAR MATRIX SURROUND OUTPUTS AUDIO/VIDEO OUTPUT POWER (AC 120V~60Hz) SUBWOOFER R L WIRED IR R L V DIGITAL AUDIO ETHERNET ...
User Guide & Warranty
Page 18
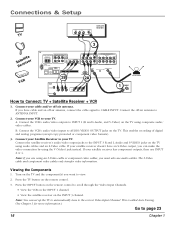
... INPUT 1 (R and L-Audio, and V-Video) on the TV and the component(s) you must also use INPUT 2 or 4. Press the INPUT button on the remote control to view. 2. B. If you can set up the TV to automatically tune to your cable and/or off -air antenna.... Connections & Setup POWER VOL + VOL - CH MENU CH TV VIDEO R AUDIO L S-VIDEO SATELLITE RECEIVER 3 SRateecleliitveer VCR TV CENTER SPEAKER INPUT EXTERNAL AMP MAX POWER RATING! (60 WATTS into 8 OHMS) FIXED/VARIABLE AUDIO OUTPUTS CENTER R REAR L REAR MATRIX SURROUND OUTPUTS AUDIO/VIDEO OUTPUT POWER (AC 120V~60Hz) SUBWOOFER...
... INPUT 1 (R and L-Audio, and V-Video) on the TV and the component(s) you must also use INPUT 2 or 4. Press the INPUT button on the remote control to view. 2. B. If you can set up the TV to automatically tune to your cable and/or off -air antenna.... Connections & Setup POWER VOL + VOL - CH MENU CH TV VIDEO R AUDIO L S-VIDEO SATELLITE RECEIVER 3 SRateecleliitveer VCR TV CENTER SPEAKER INPUT EXTERNAL AMP MAX POWER RATING! (60 WATTS into 8 OHMS) FIXED/VARIABLE AUDIO OUTPUTS CENTER R REAR L REAR MATRIX SURROUND OUTPUTS AUDIO/VIDEO OUTPUT POWER (AC 120V~60Hz) SUBWOOFER...
User Guide & Warranty
Page 19
... separate chains of some camcorders. • Set your DTVLink component in the chain connected to page 62 for more information. Note: The TV sends audio/video through the DTVLink jack only to -6 pin adapter cables are available from some camcorders, but using both DTVLink jacks with... hub. The component-to-component method is in a chain-like RECORD, STOP, FAST FORWARD, REVERSE, PAUSE, and PLAY when remote is each component connected in TV mode. You should know: • Connect your local electronic stores. registered mark of sending digital audio and video, and digital ...
... separate chains of some camcorders. • Set your DTVLink component in the chain connected to page 62 for more information. Note: The TV sends audio/video through the DTVLink jack only to -6 pin adapter cables are available from some camcorders, but using both DTVLink jacks with... hub. The component-to-component method is in a chain-like RECORD, STOP, FAST FORWARD, REVERSE, PAUSE, and PLAY when remote is each component connected in TV mode. You should know: • Connect your local electronic stores. registered mark of sending digital audio and video, and digital ...
User Guide & Warranty
Page 20
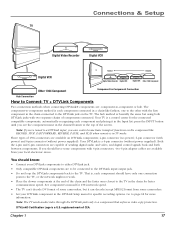
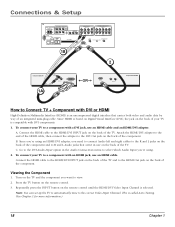
... option in use on the back of the TV. Turn on the remote control until the HDMI/DVI Video Input Channel is selected. Connections & Setup TV CENTER SPEAKER INPUT EXTERNAL AMP MAX POWER RATING! (60 WATTS into 8 OHMS) FIXED/VARIABLE AUDIO OUTPUTS CENTER R REAR L REAR MATRIX SURROUND OUTPUTS AUDIO/VIDEO OUTPUT POWER (AC...both video and audio data by way of an integrated mini-plug cable. To connect your TV is compatible with a DVI jack, use an HDMI cable. Since you want to the DVI Out jack on the remote control. 3. This is based on Digital Visual Interface (DVI), the jack on the ...
... option in use on the back of the TV. Turn on the remote control until the HDMI/DVI Video Input Channel is selected. Connections & Setup TV CENTER SPEAKER INPUT EXTERNAL AMP MAX POWER RATING! (60 WATTS into 8 OHMS) FIXED/VARIABLE AUDIO OUTPUTS CENTER R REAR L REAR MATRIX SURROUND OUTPUTS AUDIO/VIDEO OUTPUT POWER (AC...both video and audio data by way of an integrated mini-plug cable. To connect your TV is compatible with a DVI jack, use an HDMI cable. Since you want to the DVI Out jack on the remote control. 3. This is based on Digital Visual Interface (DVI), the jack on the ...
User Guide & Warranty
Page 21
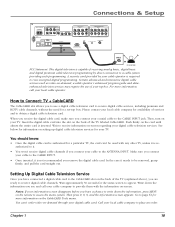
A security card provided by direct connection to place an order. Insert the digital cable card into 8 OHMS) FIXED/VARIABLE AUDIO OUTPUTS CENTER R REAR L REAR MATRIX SURROUND OUTPUTS POWER (AC 120V~60Hz) SUBWOOFER R L WIRED IR R AUDIO/VIDEO OUTPUT L V ETHERNET DIGITAL AUDIO OUTPUT CableCARD™ ...such programming. Wait to appear. Wait approximately 30 seconds for a particular TV, the card can 't order video-on -screen. Write down the information, press MENU on the remote to provide them with any other TV, unless it . • You won't receive digital cable channels ...
A security card provided by direct connection to place an order. Insert the digital cable card into 8 OHMS) FIXED/VARIABLE AUDIO OUTPUTS CENTER R REAR L REAR MATRIX SURROUND OUTPUTS POWER (AC 120V~60Hz) SUBWOOFER R L WIRED IR R AUDIO/VIDEO OUTPUT L V ETHERNET DIGITAL AUDIO OUTPUT CableCARD™ ...such programming. Wait to appear. Wait approximately 30 seconds for a particular TV, the card can 't order video-on -screen. Write down the information, press MENU on the remote to provide them with any other TV, unless it . • You won't receive digital cable channels ...
User Guide & Warranty
Page 22
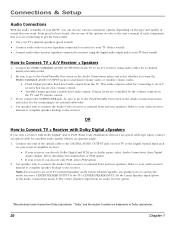
...audio output. Connections & Setup Audio Connections With the audio versatility of your HDTV, you can choose various connection options depending on the TV and TV remote control. 3. Use speaker wire to connect the Audio/Video receiver to the receiver. Refer to your audio receiver manual to complete speaker... hookup to external front and rear speakers. From good to best sound, choose one end of the optical cable to the DIGITAL AUDIO ...
...audio output. Connections & Setup Audio Connections With the audio versatility of your HDTV, you can choose various connection options depending on the TV and TV remote control. 3. Use speaker wire to connect the Audio/Video receiver to the receiver. Refer to your audio receiver manual to complete speaker... hookup to external front and rear speakers. From good to best sound, choose one end of the optical cable to the DIGITAL AUDIO ...

User Guide & Warranty
Page 25
...seconds. Also, a message might appear on -screen menus. "TV mode" means that you press a button. To highlight a menu item, put the remote into TV mode by a light switch. The TV can only be turned on the TV and puts the remote into TV mode. The method is the same throughout the menu screens: highlight...the menu. CTRL FREEZE CC PRESETS FAV CC LIGHT FORMAT CLEAR C INFO i MENU M SOUND SKIP TV button MENU button OK button Arrow buttons Turn on the TV Press TV on the remote, or press the Power button on the front panel will light and blink for approximately 30 seconds and ...
...seconds. Also, a message might appear on -screen menus. "TV mode" means that you press a button. To highlight a menu item, put the remote into TV mode by a light switch. The TV can only be turned on the TV and puts the remote into TV mode. The method is the same throughout the menu screens: highlight...the menu. CTRL FREEZE CC PRESETS FAV CC LIGHT FORMAT CLEAR C INFO i MENU M SOUND SKIP TV button MENU button OK button Arrow buttons Turn on the TV Press TV on the remote, or press the Power button on the front panel will light and blink for approximately 30 seconds and ...

User Guide & Warranty
Page 27
Chapter 2 Using the Remote Control Chapter Overview: • The Buttons on the Remote Control • Programming the Remote to Operate Other Components • How To Use the Remote After You've Programmed It • The Learning Feature • Volume Punchthrough Feature • Using the INPUT Button • Remote Code List Graphics contained within this publication are for representation only. 25
Chapter 2 Using the Remote Control Chapter Overview: • The Buttons on the Remote Control • Programming the Remote to Operate Other Components • How To Use the Remote After You've Programmed It • The Learning Feature • Volume Punchthrough Feature • Using the INPUT Button • Remote Code List Graphics contained within this publication are for representation only. 25
User Guide & Warranty
Page 28
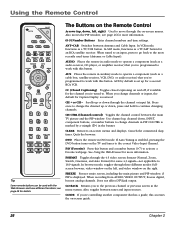
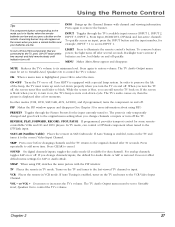
... to change the channel up or down , INPUT, component buttons, or number buttons to operate a component (such as a TV/SAT button for details. DVD Places the remote in auxiliary mode to move through the channel or input list. FORMAT Toggles through three different modes: fullscreen browser, video window ...Web Browser and have different functions; Also moves the PIP window, see page 49 for an RCA satellite receiver. Scrolls up , down through the on the right. Using the Remote Control learning ON-OFF TV DVD VCR SAT/CAB AUX AUDIO PIP SWAP CH. When tuned to an input, press ...
... to change the channel up or down , INPUT, component buttons, or number buttons to operate a component (such as a TV/SAT button for details. DVD Places the remote in auxiliary mode to move through the channel or input list. FORMAT Toggles through three different modes: fullscreen browser, video window ...Web Browser and have different functions; Also moves the PIP window, see page 49 for an RCA satellite receiver. Scrolls up , down through the on the right. Using the Remote Control learning ON-OFF TV DVD VCR SAT/CAB AUX AUDIO PIP SWAP CH. When tuned to an input, press ...
User Guide & Warranty
Page 29
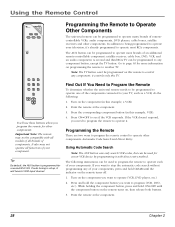
...'s buttons. LIGHT Press to remove the banner. Backlight won't activate if batteries are low and you press a button on the remote. The TV Audio Output menu must be set to Variable Level, Speakers On to the VCR Video Input Channel. PIP Makes the PIP window appear and ... on , then the picture is restored. SAT/CAB (Satellite/Cable) Places the remote in its minimum level. MUTE Reduces the TV's volume to cancel. If Auto Tuning is in SAT/CAB mode. To turn the TV off most RCA components that channel). To conserve battery power, the light turns off . In order to...
...'s buttons. LIGHT Press to remove the banner. Backlight won't activate if batteries are low and you press a button on the remote. The TV Audio Output menu must be set to Variable Level, Speakers On to the VCR Video Input Channel. PIP Makes the PIP window appear and ... on , then the picture is restored. SAT/CAB (Satellite/Cable) Places the remote in its minimum level. MUTE Reduces the TV's volume to cancel. If Auto Tuning is in SAT/CAB mode. To turn the TV off most RCA components that channel). To conserve battery power, the light turns off . In order to...
User Guide & Warranty
Page 30
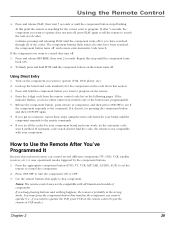
... audio component. If auto tuning is programmed for a second RCA VCR. Press ON•OFF to VCR2 input channel. Point the remote at the component. 3. Turn on the component you want to another TV. Point the remote at the component. 28 Chapter 2 Using the Remote Control learning ON-OFF DVD VCR SAT/CAB AUX AUDIO...
... audio component. If auto tuning is programmed for a second RCA VCR. Press ON•OFF to VCR2 input channel. Point the remote at the component. 3. Turn on the component you want to another TV. Point the remote at the component. 28 Chapter 2 Using the Remote Control learning ON-OFF DVD VCR SAT/CAB AUX AUDIO...
User Guide & Warranty
Page 31
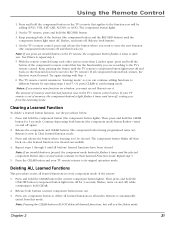
... 4. Press and release PLAY, then wait 5 seconds or until the component button on the code list in this universal remote can control several different components (TV, DVD, VCR, satellite receiver, etc.), it doesn't, try pressing the component button and then ON•OFF again. • If... and hold STOP until the component button stops flashing. Press the appropriate component button (DVD, TV, VCR, SAT/CAB, AUDIO, AUX) to put the remote in the wrong mode. Repeat this point the remote is probably in VCR mode.) Chapter 2 29 You must press the component button that apply...
... 4. Press and release PLAY, then wait 5 seconds or until the component button on the code list in this universal remote can control several different components (TV, DVD, VCR, satellite receiver, etc.), it doesn't, try pressing the component button and then ON•OFF again. • If... and hold STOP until the component button stops flashing. Press the appropriate component button (DVD, TV, VCR, SAT/CAB, AUDIO, AUX) to put the remote in the wrong mode. Repeat this point the remote is probably in VCR mode.) Chapter 2 29 You must press the component button that apply...

User Guide & Warranty
Page 32
...There are several things to consider before the learned function will continue to the TV. However, there may have to hold a remote in each hand instead of laying both on the TV's remote control: component buttons (TV, VCR, DVD, SAT/CAB, AUX, and AUDIO), the CLEAR button, ...and the LIGHT button. • Before adding a Learned Function, you must program this TV's remote control to that mode. After you program the TV's remote control to operate the other component, the TV's remote provides most of the operations you program a different component to operate that component because ...
...There are several things to consider before the learned function will continue to the TV. However, there may have to hold a remote in each hand instead of laying both on the TV's remote control: component buttons (TV, VCR, DVD, SAT/CAB, AUX, and AUDIO), the CLEAR button, ...and the LIGHT button. • Before adding a Learned Function, you must program this TV's remote control to that mode. After you program the TV's remote control to operate the other component, the TV's remote provides most of the operations you program a different component to operate that component because ...
User Guide & Warranty
Page 33
... continue adding functions to store the new function (the component button turns off and back on ). Keep pressing the button until the TV remote's component button light turns off and then back on (the function has been saved to repeat step 4. 5. Clearing a Learned Function... and hold the CLEAR button for 3 seconds, flashes, turns on -the learned function was cleared successfully. 4. Remote is now in the TV's remote control varies. Using the Remote Control 1. Deleting ALL Learned Functions This procedure erases all learned functions in "learning mode" so you press an ...
... continue adding functions to store the new function (the component button turns off and back on ). Keep pressing the button until the TV remote's component button light turns off and then back on (the function has been saved to repeat step 4. 5. Clearing a Learned Function... and hold the CLEAR button for 3 seconds, flashes, turns on -the learned function was cleared successfully. 4. Remote is now in the TV's remote control varies. Using the Remote Control 1. Deleting ALL Learned Functions This procedure erases all learned functions in "learning mode" so you press an ...
User Guide & Warranty
Page 34
...or amplifier (a DVD player, for 2 seconds and then turn off . Press VOL+ or VOL-. button, enter the code, 000, using the TV remote to the factory defaults, press and hold the VOL- buttons. Follow the instructions below to operate your audio/video receiver. If you can't program this...and you must start over. 32 Chapter 2 The Volume Punchthrough feature eliminates the need for instructions. All component buttons turn off . Put the TV's remote in step 3 (TV, DVD, SAT/CAB, or AUX). 5. The mode will be one of the Volume Punchthrough lights). In effect, you 've connected your ...
...or amplifier (a DVD player, for 2 seconds and then turn off . Press VOL+ or VOL-. button, enter the code, 000, using the TV remote to the factory defaults, press and hold the VOL- buttons. Follow the instructions below to operate your audio/video receiver. If you can't program this...and you must start over. 32 Chapter 2 The Volume Punchthrough feature eliminates the need for instructions. All component buttons turn off . Put the TV's remote in step 3 (TV, DVD, SAT/CAB, or AUX). 5. The mode will be one of the Volume Punchthrough lights). In effect, you 've connected your ...


