User Guide
Page 2
... not expose this DVD Recorder to the Region Management Information. USE OF CONTROLS OR ADJUSTMENTS OR PERFORMANCE OF PROCEDURES OTHER THAN THOSE SPECIFIED HEREIN MAY RESULT IN HAZARDOUS RADIATION EXPOSURE. If the Region number of a DVD disc does not correspond to radio communications. The VCR Plus+ and the GUIDE Plus+ systems are trademarks of Macrovision's copy protection technology in a particular installation. REFER SERVICING TO QUALIFIED PERSONNEL...
... not expose this DVD Recorder to the Region Management Information. USE OF CONTROLS OR ADJUSTMENTS OR PERFORMANCE OF PROCEDURES OTHER THAN THOSE SPECIFIED HEREIN MAY RESULT IN HAZARDOUS RADIATION EXPOSURE. If the Region number of a DVD disc does not correspond to radio communications. The VCR Plus+ and the GUIDE Plus+ systems are trademarks of Macrovision's copy protection technology in a particular installation. REFER SERVICING TO QUALIFIED PERSONNEL...
User Guide
Page 3
... Setup ...32 Chapter 4: Playing Discs 33 Regional Coding 34 How to Load and Play Discs 34 Using Different Menus 35 Search Options 35 Playback Options 35 Using the On-Screen Info Display 36 Time Display 37 Selecting a Title 37 Selecting a Chapter 37 Selecting Subtitles 37 Repeat Feature 38 Changing the Audio Language 38 Changing the Camera Angle 39 Play Mode Feature (Audio CD only 39 IntroScan (Audio CD only 40 PlayBack Control (PBC),Video CD only 40 Playing mp3 and/or JPEG files 41 Viewing JPEG files...
... Setup ...32 Chapter 4: Playing Discs 33 Regional Coding 34 How to Load and Play Discs 34 Using Different Menus 35 Search Options 35 Playback Options 35 Using the On-Screen Info Display 36 Time Display 37 Selecting a Title 37 Selecting a Chapter 37 Selecting Subtitles 37 Repeat Feature 38 Changing the Audio Language 38 Changing the Camera Angle 39 Play Mode Feature (Audio CD only 39 IntroScan (Audio CD only 40 PlayBack Control (PBC),Video CD only 40 Playing mp3 and/or JPEG files 41 Viewing JPEG files...
User Guide
Page 7
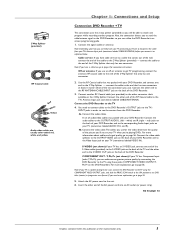
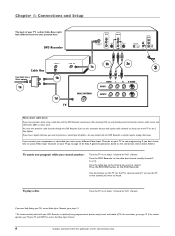
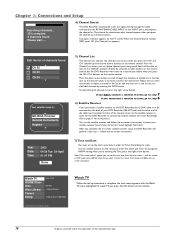
.... Chapter 1: Connections and Setup Connection: DVD Recorder + TV This connection uses the 2-way splitter (provided) so you 're playing DVDs. Connect the other end of the picture you'll see on your DVD Recorder. A set of progressive scan, connect the DVD Recorder to the TV using these jacks (COMPONENT VIDEO OUTPUT,Y, Pb, Pr on the back of the DVD Recorder. 3. 2 Way Splitter (provided) RF Coaxial cable Red White Yellow Audio video cables are for representation only. 5 Connect the video cable.The cables you use...
.... Chapter 1: Connections and Setup Connection: DVD Recorder + TV This connection uses the 2-way splitter (provided) so you 're playing DVDs. Connect the other end of the picture you'll see on your DVD Recorder. A set of progressive scan, connect the DVD Recorder to the TV using these jacks (COMPONENT VIDEO OUTPUT,Y, Pb, Pr on the back of the DVD Recorder. 3. 2 Way Splitter (provided) RF Coaxial cable Red White Yellow Audio video cables are for representation only. 5 Connect the video cable.The cables you use...
User Guide
Page 8
... the ones pictured here. To play a disc Tune the TV to operate many brands and models of your TV, press TV and INPUT to access the Video Input Channel. 6 Graphics contained within this connection because only regular cable channels are for regular, analog cable boxes. RCA can only provide general instructions because cable service and cable boxes differ in various areas. DVD Recorder INPUT VIDEO OUTPUT VIDEO RF ANTENNA/CABLE INPUT L AUDIO R S-VIDEO IN L AUDIO R S-VIDEO OUT DIGITAL AUDIO OUT COAXIAL OPTICAL COMPONENT VIDEO OUTPUT Y G-LINK...
... the ones pictured here. To play a disc Tune the TV to operate many brands and models of your TV, press TV and INPUT to access the Video Input Channel. 6 Graphics contained within this connection because only regular cable channels are for regular, analog cable boxes. RCA can only provide general instructions because cable service and cable boxes differ in various areas. DVD Recorder INPUT VIDEO OUTPUT VIDEO RF ANTENNA/CABLE INPUT L AUDIO R S-VIDEO IN L AUDIO R S-VIDEO OUT DIGITAL AUDIO OUT COAXIAL OPTICAL COMPONENT VIDEO OUTPUT Y G-LINK...

User Guide
Page 9
Chapter 1: Connections and Setup Connection: DVD Recorder + TV + Cable Box 2 Way Splitter (provided) RF Coaxial cable Red Yellow White Audio video cables are on the back of progressive scan, connect the DVD Recorder to the TV using these jacks (COMPONENT VIDEO OUTPUT,Y, Pb, Pr on the back of audio/video cables was packed with your TV's Antenna Input jack (sometimes labeled CABLE/ANTENNA). Connect this cable to see DVD titles (movies) in order to the Cable Signal Input jack (sometimes labeled CABLE IN) on...
Chapter 1: Connections and Setup Connection: DVD Recorder + TV + Cable Box 2 Way Splitter (provided) RF Coaxial cable Red Yellow White Audio video cables are on the back of progressive scan, connect the DVD Recorder to the TV using these jacks (COMPONENT VIDEO OUTPUT,Y, Pb, Pr on the back of audio/video cables was packed with your TV's Antenna Input jack (sometimes labeled CABLE/ANTENNA). Connect this cable to see DVD titles (movies) in order to the Cable Signal Input jack (sometimes labeled CABLE IN) on...

User Guide
Page 11
... program or a disc you're playing). 3a. For more explanation, go to the satellite receiver's output jacks [sometimes labeled Audio Left (white) and Audio Right (red)]. Chapter 1: Connections and Setup Connection: DVD Recorder + TV + Satellite Receiver RF Coaxial cable Red Yellow White The following instructions enable you to see DVD titles (movies) in progressive scan format. Satellite signal: Leave the cable in place that jack and to the VCR's Cable/Antenna Input jack. Connect the...
... program or a disc you're playing). 3a. For more explanation, go to the satellite receiver's output jacks [sometimes labeled Audio Left (white) and Audio Right (red)]. Chapter 1: Connections and Setup Connection: DVD Recorder + TV + Satellite Receiver RF Coaxial cable Red Yellow White The following instructions enable you to see DVD titles (movies) in progressive scan format. Satellite signal: Leave the cable in place that jack and to the VCR's Cable/Antenna Input jack. Connect the...
User Guide
Page 12
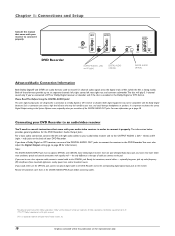
.... SCAN IR SAT ON OFF OUTPUT AUDIO L (left rear, right rear, and common subwoofer.The disc will play 5.1-channel sound only if you would rather use either of noise that 's in the Dolby Digital or DTS format. If you connect to the COAXIAL jack. DTS is encoded in the DIGITAL AUDIO OPTICAL jack before connecting cables. DVD Recorder INPUT VIDEO OUTPUT VIDEO RF ANTENNA/CABLE INPUT L AUDIO R S-VIDEO IN L AUDIO R S-VIDEO OUT DIGITAL AUDIO OUT COAXIAL OPTICAL COMPONENT VIDEO OUTPUT Y G-LINK...
.... SCAN IR SAT ON OFF OUTPUT AUDIO L (left rear, right rear, and common subwoofer.The disc will play 5.1-channel sound only if you would rather use either of noise that 's in the Dolby Digital or DTS format. If you connect to the COAXIAL jack. DTS is encoded in the DIGITAL AUDIO OPTICAL jack before connecting cables. DVD Recorder INPUT VIDEO OUTPUT VIDEO RF ANTENNA/CABLE INPUT L AUDIO R S-VIDEO IN L AUDIO R S-VIDEO OUT DIGITAL AUDIO OUT COAXIAL OPTICAL COMPONENT VIDEO OUTPUT Y G-LINK...
User Guide
Page 14
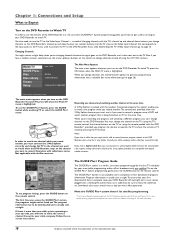
... access the Video Input Channel on your TV, go to page 16. 1) Select on-screen menu language Make sure the remote is in DVD Mode When you 're not going to use the remote for a month or more, be sure to remove the batteries because they can program your connections, you want to follow the on-screen instructions.The arrow buttons move , get a different program provider for the remote control's signal to be...
... access the Video Input Channel on your TV, go to page 16. 1) Select on-screen menu language Make sure the remote is in DVD Mode When you 're not going to use the remote for a month or more, be sure to remove the batteries because they can program your connections, you want to follow the on-screen instructions.The arrow buttons move , get a different program provider for the remote control's signal to be...
User Guide
Page 15
...). 2d. Use the number buttons on the DVD Recorder. 2a. If the test failed, choose another brand or set it gives you need to the Cable Box category. Check to make sure it . If any settings are being sent to complete the setup. Graphics contained within this publication are for instructions.) Turn on the screen to it has received the appropriate information. Chapter 1: Connections and Setup Antenna-Cable Input 1 Input 2 - Choose...
...). 2d. Use the number buttons on the DVD Recorder. 2a. If the test failed, choose another brand or set it gives you need to the Cable Box category. Check to make sure it . If any settings are being sent to complete the setup. Graphics contained within this publication are for instructions.) Turn on the screen to it has received the appropriate information. Chapter 1: Connections and Setup Antenna-Cable Input 1 Input 2 - Choose...
User Guide
Page 16
... menu appears with the remote in DVD mode, press MENU, select Setup, select Installation, select Clock Setup and follow the on-screen instructions. 7) Time and Date You must be connected to the channel means it has been stored in the channel list. follow the onscreen instructions. Use the number buttons on the remote. 14 Graphics contained within this screen doesn't appear, you complete the on -screen instructions to the "deleted" channels directly by pressing the INFO button. To change the AM/PM setting...
... menu appears with the remote in DVD mode, press MENU, select Setup, select Installation, select Clock Setup and follow the on-screen instructions. 7) Time and Date You must be connected to the channel means it has been stored in the channel list. follow the onscreen instructions. Use the number buttons on the remote. 14 Graphics contained within this screen doesn't appear, you complete the on -screen instructions to the "deleted" channels directly by pressing the INFO button. To change the AM/PM setting...
User Guide
Page 17
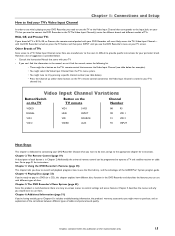
... cable box. Chapter 6: Additional Information (page 51) If you're having trouble, go to use with your TV screen. Other Brands of discs. However, a list of TVs. It includes troubleshooting information, the product's warranty, accessories you can't find the manual, review the following list. • There might be programmed to pop in Chapter 2. Video Input Channel Variations Button/Switch on the TV Button on the TV's remote control that came with the DVD Recorder turned...
... cable box. Chapter 6: Additional Information (page 51) If you're having trouble, go to use with your TV screen. Other Brands of discs. However, a list of TVs. It includes troubleshooting information, the product's warranty, accessories you can't find the manual, review the following list. • There might be programmed to pop in Chapter 2. Video Input Channel Variations Button/Switch on the TV Button on the TV's remote control that came with the DVD Recorder turned...
User Guide
Page 19
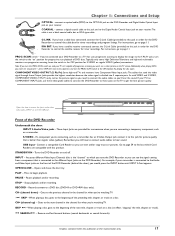
... a black coaxial cable, but an RCA-type cable. Connect a compatible Card Reader so you 'll hear the sound. INPUT - RECORD - press STOP (the main menu appears) and turn the switch to the "on the TV to the next channel in the OFF position for timer recordings and program listings. STANDBY/ON - OPEN/CLOSE - Goes to get the best picture quality. If you've connected your TV has COMPONENT INPUT jacks, use three video grade cables to connect the DVD Recorder to...
... a black coaxial cable, but an RCA-type cable. Connect a compatible Card Reader so you 'll hear the sound. INPUT - RECORD - press STOP (the main menu appears) and turn the switch to the "on the TV to the next channel in the OFF position for timer recordings and program listings. STANDBY/ON - OPEN/CLOSE - Goes to get the best picture quality. If you've connected your TV has COMPONENT INPUT jacks, use three video grade cables to connect the DVD Recorder to...
User Guide
Page 20
...+ Disc Disc Library Timers Setup Live - When you change channels via the DVD Recorder's channel up for representation only. the channel buttons on the remote control. If you have a digital cable box, you must use it if you want to record. The GUIDE Plus+ System is highlighted. If you use a cable box, be sure to page 26) To watch channels, or video inputs, press OK The main menu appears when you turn on the DVD Recorder.To watch one program...
...+ Disc Disc Library Timers Setup Live - When you change channels via the DVD Recorder's channel up for representation only. the channel buttons on the remote control. If you have a digital cable box, you must use it if you want to record. The GUIDE Plus+ System is highlighted. If you use a cable box, be sure to page 26) To watch channels, or video inputs, press OK The main menu appears when you turn on the DVD Recorder.To watch one program...
User Guide
Page 22
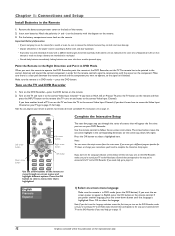
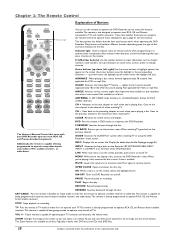
... VCDs or mp3 files. The Universal Remote Control that follow describe how each button works when operating the DVD Recorder. CH - OPEN•CLOSE Opens and closes the disc tray. Goes back to the preceding chapter or track when you to the previous menu.When watching TV, goes back to the previous channel in the channel list when watching TV. STOP Stops playback or recording. The Zoom feature isn't available on the remote. 0-9 (Number buttons) Use the number buttons to restore...
... VCDs or mp3 files. The Universal Remote Control that follow describe how each button works when operating the DVD Recorder. CH - OPEN•CLOSE Opens and closes the disc tray. Goes back to the preceding chapter or track when you to the previous menu.When watching TV, goes back to the previous channel in the channel list when watching TV. STOP Stops playback or recording. The Zoom feature isn't available on the remote. 0-9 (Number buttons) Use the number buttons to restore...

User Guide
Page 24
... receiver or cable box. To finish, press and hold the SAT•CABLE button on the remote stops flashing. To summarize, to operate the DVD Recorder you used to connect the component to the Video Input jack you must press the SAT•CABLE button. to operate the TV, you must press the TV button before you press the MENU button so the remote control knows that corresponds to the DVD Recorder. just press...
... receiver or cable box. To finish, press and hold the SAT•CABLE button on the remote stops flashing. To summarize, to operate the DVD Recorder you used to connect the component to the Video Input jack you must press the SAT•CABLE button. to operate the TV, you must press the TV button before you press the MENU button so the remote control knows that corresponds to the DVD Recorder. just press...
User Guide
Page 47
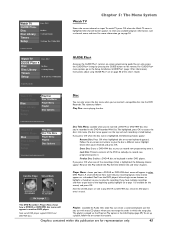
... . Play full title; and Clear chapters. Instructions about using GUIDE Plus+ are for Audio CDs only):You can create a customized playlist just like you available program information, such as a thumbnail.You'll use the DVD player's left and right arrow buttons to be played in the Info Display (page 39).To set up a playlist, follow : Play Disc: starts playing the disc. To start playback from each recording is played via the Program Play option in other DVD Players. Playlist...
... . Play full title; and Clear chapters. Instructions about using GUIDE Plus+ are for Audio CDs only):You can create a customized playlist just like you available program information, such as a thumbnail.You'll use the DVD player's left and right arrow buttons to be played in the Info Display (page 39).To set up a playlist, follow : Play Disc: starts playing the disc. To start playback from each recording is played via the Program Play option in other DVD Players. Playlist...
User Guide
Page 52
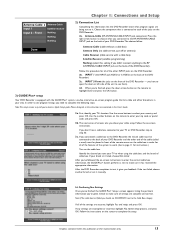
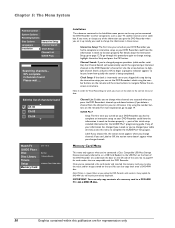
... copied, the DVD+RW disc will automatically search the signal and put the latest channels in the Installation menu pertain to the way you set the clock to change channels. part of this DVD Recorder. If you 've connected the DVD Recorder to navigate. Chapter 5: The Menu System Parental Control System Options Recording Options Disc Options Interactive Setup Languages Channel Search Installation Clock Setup Channel List GUIDE Plus+ Searching channels... 35% complete 2 channels found Ch 02 Ch 03 Ch 04 Watch TV GUIDE Plus+ Disc Disc Library Timers Setup...
... copied, the DVD+RW disc will automatically search the signal and put the latest channels in the Installation menu pertain to the way you set the clock to change channels. part of this DVD Recorder. If you 've connected the DVD Recorder to navigate. Chapter 5: The Menu System Parental Control System Options Recording Options Disc Options Interactive Setup Languages Channel Search Installation Clock Setup Channel List GUIDE Plus+ Searching channels... 35% complete 2 channels found Ch 02 Ch 03 Ch 04 Watch TV GUIDE Plus+ Disc Disc Library Timers Setup...
User Guide
Page 54
... the buttons.You'll need to set up your TV to the Video Input Channel that language. Just press the GUIDE button, and then use to record at least 3 seconds before releasing both buttons. in . • Reset the DVD Recorder: on the front of the Disc Library. wait at the same time; If the regional codes don't match, the disc cannot be unlocked). Chapter 6: Additional Information Troubleshooting General Problems Player won't work , try resetting the DVD Recorder (instructions are...
... the buttons.You'll need to set up your TV to the Video Input Channel that language. Just press the GUIDE button, and then use to record at least 3 seconds before releasing both buttons. in . • Reset the DVD Recorder: on the front of the Disc Library. wait at the same time; If the regional codes don't match, the disc cannot be unlocked). Chapter 6: Additional Information Troubleshooting General Problems Player won't work , try resetting the DVD Recorder (instructions are...
User Guide
Page 55
Clean it. • Condensation has formed in the Ratings Limits menu. The picture is not the one selected from interlace to progressive (and vice versa), the Recorder resynchronizes the signal. A more recording time, you 've connected the DVD Recorder to a television that uses progressive scanning to readjust the Digital Output setting (from the System Options menu). Set the subtitle and/or audio language manually through it 's a DVD+R disc, make sure you chose the correct input setting on the DVD+R or DVD+RW...
Clean it. • Condensation has formed in the Ratings Limits menu. The picture is not the one selected from interlace to progressive (and vice versa), the Recorder resynchronizes the signal. A more recording time, you 've connected the DVD Recorder to a television that uses progressive scanning to readjust the Digital Output setting (from the System Options menu). Set the subtitle and/or audio language manually through it 's a DVD+R disc, make sure you chose the correct input setting on the DVD+R or DVD+RW...
User Guide
Page 56
... playing DVD discs, Audio CDs,Video CDs, and watching TV.The Info Display disappears automatically (times out) 54 Graphics contained within this publication are for programming the remote control are using a general name format of no more than the settings in the guide that doesn't work • You might obstruct the remote control from the disc tray. Open the doors. Won't work with cable box • You can program it to operate many other types of converted...
... playing DVD discs, Audio CDs,Video CDs, and watching TV.The Info Display disappears automatically (times out) 54 Graphics contained within this publication are for programming the remote control are using a general name format of no more than the settings in the guide that doesn't work • You might obstruct the remote control from the disc tray. Open the doors. Won't work with cable box • You can program it to operate many other types of converted...


