
User Guide
Page 12
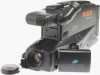
First-Time Operation 11. Review camcorder's operating controls. DISPLAY Button RESET Button DATE/TIME Button TITLER Button CAMERA/ OFF/VCR Switch REW (Rewind)/REVIEW Button (Also - Button) PLAY Button F.FWD (Fast Forward) Button (Also + Button) STOP/EJECT Button (Also EDIT-ADV Button) Microphone Lens Lens Hood Reset Switch (See Trouble Checks for details.) VIDEO, AUDIO OUT, and RF DC OUT Jacks (Located Behind Small Cover) (continued on next page) 9
First-Time Operation 11. Review camcorder's operating controls. DISPLAY Button RESET Button DATE/TIME Button TITLER Button CAMERA/ OFF/VCR Switch REW (Rewind)/REVIEW Button (Also - Button) PLAY Button F.FWD (Fast Forward) Button (Also + Button) STOP/EJECT Button (Also EDIT-ADV Button) Microphone Lens Lens Hood Reset Switch (See Trouble Checks for details.) VIDEO, AUDIO OUT, and RF DC OUT Jacks (Located Behind Small Cover) (continued on next page) 9

User Guide
Page 40
...The major features are described on the following pages. • Camera Edit • Titler CAMERA/OFF/ VCR Switch REW/REVIEW Button F.FWD Button Camera Edit Feature The camera edit feature allows you to position the tape when the camcorder is in reverse. • Press and hold F.FWD to visually... search forward on the recorded tape. • Press and hold the small red button on the CAMERA/OFF/VCR switch while you slide it easy and fun to edit your home videos...
...The major features are described on the following pages. • Camera Edit • Titler CAMERA/OFF/ VCR Switch REW/REVIEW Button F.FWD Button Camera Edit Feature The camera edit feature allows you to position the tape when the camcorder is in reverse. • Press and hold F.FWD to visually... search forward on the recorded tape. • Press and hold the small red button on the CAMERA/OFF/VCR switch while you slide it easy and fun to edit your home videos...

User Guide
Page 43
... it to insert the title, press TITLER. 6. Place the tape you want to CAMERA. 2. Stop the camcorder and VCR when you record a title on the CAMERA/OFF/ VCR switch while you want to copy in the Camcorder 1. Press REC/PAUSE to VCR. 3. Remember: Remove the titler graphics for normal recording... a prerecorded tape, the audio and video is erased where the title is inserted. The camcorder will now record normally. Note: You can also use the automatic title recording feature to Another VCR 1. Press and hold the small red button on the CAMERA/ OFF/VCR switch while you have ...
... it to insert the title, press TITLER. 6. Place the tape you want to CAMERA. 2. Stop the camcorder and VCR when you record a title on the CAMERA/OFF/ VCR switch while you want to copy in the Camcorder 1. Press REC/PAUSE to VCR. 3. Remember: Remove the titler graphics for normal recording... a prerecorded tape, the audio and video is erased where the title is inserted. The camcorder will now record normally. Note: You can also use the automatic title recording feature to Another VCR 1. Press and hold the small red button on the CAMERA/ OFF/VCR switch while you have ...

User Guide
Page 50
... VCR. 2. Press and hold the small red button on the TV screen. Camcorder connected to VCR that is seeing (or recording) on the CAMERA/OFF/VCR switch while you set it to the video input channel. Press and hold the small button on the monitor down to prevent... picture distortion. A. B. Caution: The unauthorized recording of copyrighted material may infringe the rights of others. 47 Press STOP/EJECT when you normally do to CAMERA. Camcorder connected directly to TV...
... VCR. 2. Press and hold the small red button on the TV screen. Camcorder connected to VCR that is seeing (or recording) on the CAMERA/OFF/VCR switch while you set it to the video input channel. Press and hold the small button on the monitor down to prevent... picture distortion. A. B. Caution: The unauthorized recording of copyrighted material may infringe the rights of others. 47 Press STOP/EJECT when you normally do to CAMERA. Camcorder connected directly to TV...
User Guide
Page 54
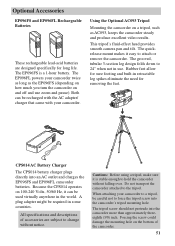
...for removing the feet. Rechargable Batteries Battery Charger Tripod Using the Optional AC093 Tripod Mounting the camcorder on and off and use . This tripod's fluid-effect head provides smooth camera pan and tilt. Because the CPS014 operates on the bottom of accessories are designed specifically ...be recharged with the AC adapter/ charger that came with your camcorder twice as long as the EP096FS (depending on how much you turn the camcorder on a tripod, such as AC093, keeps the camcorder steady and produce excellent video results. Forcing the screw could damage the mounting hole on ...
...for removing the feet. Rechargable Batteries Battery Charger Tripod Using the Optional AC093 Tripod Mounting the camcorder on and off and use . This tripod's fluid-effect head provides smooth camera pan and tilt. Because the CPS014 operates on the bottom of accessories are designed specifically ...be recharged with the AC adapter/ charger that came with your camcorder twice as long as the EP096FS (depending on how much you turn the camcorder on a tripod, such as AC093, keeps the camcorder steady and produce excellent video results. Forcing the screw could damage the mounting hole on ...

User Guide
Page 67
...4 3/4" (W) x 8 3/8" (H) x 13 1/8" (D) 121 (W) x 213 (H) x 334 (D) mm Video Recorder Section Format: VHS Record/playback system: Two video record/playback heads Video signal: EIA standard NTSC color Viewfinder 0.5" black-and-white electronic viewfinder Specifications LCD Monitor 3" diagonally measured LCD/TFT... active matrix system Camera Section Scanning: 525 lines/60 ...
...4 3/4" (W) x 8 3/8" (H) x 13 1/8" (D) 121 (W) x 213 (H) x 334 (D) mm Video Recorder Section Format: VHS Record/playback system: Two video record/playback heads Video signal: EIA standard NTSC color Viewfinder 0.5" black-and-white electronic viewfinder Specifications LCD Monitor 3" diagonally measured LCD/TFT... active matrix system Camera Section Scanning: 525 lines/60 ...
User Guide
Page 71
Index A Accessories included 3 optional 50 order form 55 Adapter/charger accessory 3 charging battery 13 using 4, 12 AE focus indicators 24, 27 Assistance 1, 3 Audio/Video (A/V) jacks 9, 46, 48 B Battery 3 attaching and removing 14 care 16 charging 13 safety precautions 16 storage 16 using 13 BATTERY EJECT button 10, 14 Battery... level indicator 15, 24 Bright control 10, 22, 42, 43 Built-in speaker 10 C Cable TV installer note 49 Camcorder cleaning 62 turn on 5 Camera edit feature 37 CAMERA/OFF/VCR switch 5, 9, 14, 15, 17, 20, 21, 26, 36, 37, 38, 39, 40, 42, 43, 44, 47, 49 Car ...
Index A Accessories included 3 optional 50 order form 55 Adapter/charger accessory 3 charging battery 13 using 4, 12 AE focus indicators 24, 27 Assistance 1, 3 Audio/Video (A/V) jacks 9, 46, 48 B Battery 3 attaching and removing 14 care 16 charging 13 safety precautions 16 storage 16 using 13 BATTERY EJECT button 10, 14 Battery... level indicator 15, 24 Bright control 10, 22, 42, 43 Built-in speaker 10 C Cable TV installer note 49 Camcorder cleaning 62 turn on 5 Camera edit feature 37 CAMERA/OFF/VCR switch 5, 9, 14, 15, 17, 20, 21, 26, 36, 37, 38, 39, 40, 42, 43, 44, 47, 49 Car ...


