
Instruction Manual
Page 1
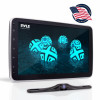
User's Manual PL2DN105 Adjustable Viewing Angle (Maximum Angle 360°) 10.1'' Touch Screen TFT/LCD Monitor Double Din MP5 Player With Swivel Screen, Phone Link, With Backup Camera
User's Manual PL2DN105 Adjustable Viewing Angle (Maximum Angle 360°) 10.1'' Touch Screen TFT/LCD Monitor Double Din MP5 Player With Swivel Screen, Phone Link, With Backup Camera
Instruction Manual
Page 2
Precautions 2 Wiring Diagram 3 General Operation 5 AM/FM Tuner Operation 6 Multimedia player 7 Music playing interface 7 Viedo or Picture playing interface 7 AUX in/ Rearview Camera 7 Wireless BT Streaming 8 AutoLink Software (Phone Link) 9 Setting Menu 11 Troubleshooting 12 Systematic Parameter 14 Disassembly Steps of Display 15 Rear View Backup Camera Installation 16 1 www.PyleUSA.com
Precautions 2 Wiring Diagram 3 General Operation 5 AM/FM Tuner Operation 6 Multimedia player 7 Music playing interface 7 Viedo or Picture playing interface 7 AUX in/ Rearview Camera 7 Wireless BT Streaming 8 AutoLink Software (Phone Link) 9 Setting Menu 11 Troubleshooting 12 Systematic Parameter 14 Disassembly Steps of Display 15 Rear View Backup Camera Installation 16 1 www.PyleUSA.com
Instruction Manual
Page 3
... parts of the car is extremely cold and the unit is encouraged to consult an experienced radio technician for a Class B digital device, pursuant to Part 15 of the player and proper playback may cause harmful interference to radio reception, which can radiate radio frequency energy and, if not installed and used soon after switching on the heater, moisture may form on the disc...
... parts of the car is extremely cold and the unit is encouraged to consult an experienced radio technician for a Class B digital device, pursuant to Part 15 of the player and proper playback may cause harmful interference to radio reception, which can radiate radio frequency energy and, if not installed and used soon after switching on the heater, moisture may form on the disc...

Instruction Manual
Page 4
Video Output 2 D. Rear Left Audio Output G. Video Output 1 C. Left Audio Input E. Right Audio Input H. Video Input B. Front Left Audio Output F. Rear Right Audio Output Wiring-Back Panel: RADIO ANT USB SUBWOOFER OUTPUT 3 www.PyleUSA.com A. Front Right Audio Output I.
Video Output 2 D. Rear Left Audio Output G. Video Output 1 C. Left Audio Input E. Right Audio Input H. Video Input B. Front Left Audio Output F. Rear Right Audio Output Wiring-Back Panel: RADIO ANT USB SUBWOOFER OUTPUT 3 www.PyleUSA.com A. Front Right Audio Output I.
Instruction Manual
Page 6
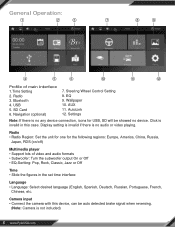
....com Radio • Radio Region: Set the unit for one for USB, SD will be showed no audio or video playing. General Operation: 1 2 3 7 8 9 4 5 6 10 11 12 Profile of video and audio formats • Subwoofer: Tum the subwoofer output On or Off • EQ-Sertting: Pop, Rock, Classic, Jazz or Off Time • Slide the figures in this device, can be auto detected brake signal when reversing. (Note: Camera is no any device connection, icons...
....com Radio • Radio Region: Set the unit for one for USB, SD will be showed no audio or video playing. General Operation: 1 2 3 7 8 9 4 5 6 10 11 12 Profile of video and audio formats • Subwoofer: Tum the subwoofer output On or Off • EQ-Sertting: Pop, Rock, Classic, Jazz or Off Time • Slide the figures in this device, can be auto detected brake signal when reversing. (Note: Camera is no any device connection, icons...
Instruction Manual
Page 7
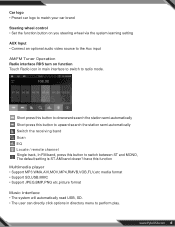
... etc.picture format Music interface • The system will automatically read USB, SD. • The user can directly click options in main interface to switch to radio mode. Car logo • Preset car logo to match your car brand Steering wheel control • Set the function button on you steering wheel via the system learning setting AUX Input • Connect an optional audio video source to the Aux input AM/FM Tuner Operation Radio interface RDS turn on function Touch Radio icon...
... etc.picture format Music interface • The system will automatically read USB, SD. • The user can directly click options in main interface to switch to radio mode. Car logo • Preset car logo to match your car brand Steering wheel control • Set the function button on you steering wheel via the system learning setting AUX Input • Connect an optional audio video source to the Aux input AM/FM Tuner Operation Radio interface RDS turn on function Touch Radio icon...

Instruction Manual
Page 8
... in Mode. AUX in enables external media sources to connect to AUX in remote control to switch to the system, like camera, video games, Walkman, external navigation box (controlled by remote controller)etc. Rearview Camera Auto operation: After connect with reverse camera, it will swift to any mode to previous mode. 7 www.PyleUSA.com When reverse is over, the system will come back to rear view lens mode automatically. Connect external devices through the 3.5mm auxiliary audio/video input. It can display the corresponding picture as the output video.
... in Mode. AUX in enables external media sources to connect to AUX in remote control to switch to the system, like camera, video games, Walkman, external navigation box (controlled by remote controller)etc. Rearview Camera Auto operation: After connect with reverse camera, it will swift to any mode to previous mode. 7 www.PyleUSA.com When reverse is over, the system will come back to rear view lens mode automatically. Connect external devices through the 3.5mm auxiliary audio/video input. It can display the corresponding picture as the output video.
Instruction Manual
Page 9
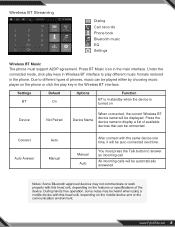
... devices that can be played either by choosing music player on Device Not Paired Device Name When connected, the current Wireless BT device name will be auto connected next time. You must support A2DP agreement. Settings BT Default On Options Function BT is in standby when the device is turned on the phone or click the play different music formats restored in the main interface. Press the device name to display a list of phones, music...
... devices that can be played either by choosing music player on Device Not Paired Device Name When connected, the current Wireless BT device name will be auto connected next time. You must support A2DP agreement. Settings BT Default On Options Function BT is in standby when the device is turned on the phone or click the play different music formats restored in the main interface. Press the device name to display a list of phones, music...
Instruction Manual
Page 10
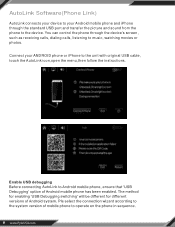
AutoLink Software(Phone Link) AutoLink connects your device to your ANDROID phone or iPhone to the unit with original USB cable, touch the AutoLink icon,open the menu,then follow the instructions. You can control the phone through the standard USB port and transfer the picture and sound from the phone to music, watching movies or photos. Connect your Android mobile phone and iPhone through the device's screen , such as receiving calls, dialing calls, listening to the device. AutoLink 9 www.PyleUSA.com
AutoLink Software(Phone Link) AutoLink connects your device to your ANDROID phone or iPhone to the unit with original USB cable, touch the AutoLink icon,open the menu,then follow the instructions. You can control the phone through the standard USB port and transfer the picture and sound from the phone to music, watching movies or photos. Connect your Android mobile phone and iPhone through the device's screen , such as receiving calls, dialing calls, listening to the device. AutoLink 9 www.PyleUSA.com
Instruction Manual
Page 12
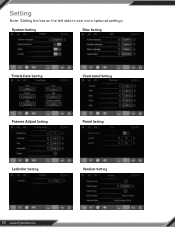
Setting System Setting Disc Setting Time& Date Setting Vsurround Setting Frames Adjust Setting Panel Setting Ledcolor Setting Version Setting 11 www.PyleUSA.com
Setting System Setting Disc Setting Time& Date Setting Vsurround Setting Frames Adjust Setting Panel Setting Ledcolor Setting Version Setting 11 www.PyleUSA.com
Instruction Manual
Page 13
... reset by pressing the due to illegal operation Resetkey Check the wiring Wrong pin assignment ISO connector diagram Remote comtrol Battery is not correct. Adjust the volume loudspeaker connection balance setting to activate the function. Loudspeaker opens circuit. Change new battery; instruction; Use genuine discs; Distortion Loudspeaker does not match impedance Change a loudspeaker; Increase the Disconnection; Loudspeaker fault; Wheel Set Setting Connect the steering wheel control cable, and click the corresponding key to middle place; doesn' t work Battery...
... reset by pressing the due to illegal operation Resetkey Check the wiring Wrong pin assignment ISO connector diagram Remote comtrol Battery is not correct. Adjust the volume loudspeaker connection balance setting to activate the function. Loudspeaker opens circuit. Change new battery; instruction; Use genuine discs; Distortion Loudspeaker does not match impedance Change a loudspeaker; Increase the Disconnection; Loudspeaker fault; Wheel Set Setting Connect the steering wheel control cable, and click the corresponding key to middle place; doesn' t work Battery...
Instruction Manual
Page 14
... images system video setting; Apacer etc. Nonrepeat and search function PBC service is turned upside down PBC service while play Lock function; Unstable output DVD does not correspond with sign up when insert the disk. Unsupported code Images being stretched or Inappropriate image proportion setting Adjust image setting compression Trouble Cause(s) Solution (s) Radio Auto antenna does not reach out completely Connect auto antenna line correctly; Documents or Clean or replace the disk; SD card readable Due to Error...
... images system video setting; Apacer etc. Nonrepeat and search function PBC service is turned upside down PBC service while play Lock function; Unstable output DVD does not correspond with sign up when insert the disk. Unsupported code Images being stretched or Inappropriate image proportion setting Adjust image setting compression Trouble Cause(s) Solution (s) Radio Auto antenna does not reach out completely Connect auto antenna line correctly; Documents or Clean or replace the disk; SD card readable Due to Error...
Instruction Manual
Page 15
... Standard • Hi-Res 10.1'' Digital Display • Full HD 1080 Support • USB Flash Drive Reader • AM/FM Radio with 30 Station Memory • Video Aux (RCA) Input/Output Connector Jacks • Rearview Backup Camera Support • Audio Aux (RCA) Input/Output Connector Jacks • Marine Grade Waterproof Construction • Night Vision Illumination • Total Pixels: 656 x 492 • 170 Degree Wide Viewing Angle • 420 TVL Horizontal Resolution FM...
... Standard • Hi-Res 10.1'' Digital Display • Full HD 1080 Support • USB Flash Drive Reader • AM/FM Radio with 30 Station Memory • Video Aux (RCA) Input/Output Connector Jacks • Rearview Backup Camera Support • Audio Aux (RCA) Input/Output Connector Jacks • Marine Grade Waterproof Construction • Night Vision Illumination • Total Pixels: 656 x 492 • 170 Degree Wide Viewing Angle • 420 TVL Horizontal Resolution FM...

Instruction Manual
Page 16
Disassembly Steps of the display to both sides. 2. Disassembly completed. 15 www.PyleUSA.com Press the clips toward the center and unplug the cable. 4. Pull the two clips(A&B) on the back of Display 1. Remove the display. 3.
Disassembly Steps of the display to both sides. 2. Disassembly completed. 15 www.PyleUSA.com Press the clips toward the center and unplug the cable. 4. Pull the two clips(A&B) on the back of Display 1. Remove the display. 3.
Instruction Manual
Page 17
... Digital Backup Camera is not adequate enough to a driver. The installation instructions do not apply to the driver in the rear view monitor differ from actual and real-time conditions. Please consult an experienced technician if you would if the vehicle did not have the Digital Backup Camera. You, the driver, must also remember to assist in this user manual. Objects viewed in detecting...
... Digital Backup Camera is not adequate enough to a driver. The installation instructions do not apply to the driver in the rear view monitor differ from actual and real-time conditions. Please consult an experienced technician if you would if the vehicle did not have the Digital Backup Camera. You, the driver, must also remember to assist in this user manual. Objects viewed in detecting...
Instruction Manual
Page 18
... 12V power cable. Connect the power cable's Black wire to slightly adjust the camera's positioning at a later time. • After installation, test the camera before use the included yellow RCA video connector cable, and run that cable from the camera to your compatible video display monitor. * Please remember to the positive 12V reverse tail light in the rear of the system type in the least obtrusive route possible. The yellow RCA cable when connected, automatically retrieves the video signal when activated (when...
... 12V power cable. Connect the power cable's Black wire to slightly adjust the camera's positioning at a later time. • After installation, test the camera before use the included yellow RCA video connector cable, and run that cable from the camera to your compatible video display monitor. * Please remember to the positive 12V reverse tail light in the rear of the system type in the least obtrusive route possible. The yellow RCA cable when connected, automatically retrieves the video signal when activated (when...
Instruction Manual
Page 19
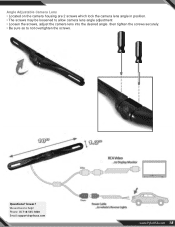
Issues? Phone: (1) 718-535-1800 Email: support@pyleusa.com www.PyleUSA.com 18 then tighten the screws securely. • Be sure as to help! We are 2 screws which lock the camera lens angle in position. • The screws may be loosened to allow camera lens angle adjustment • Loosen the screws, adjust the camera lens into the desired angle. Angle Adjustable Camera Lens • Located on the camera housing are here to not overtighten the screws. Questions?
Issues? Phone: (1) 718-535-1800 Email: support@pyleusa.com www.PyleUSA.com 18 then tighten the screws securely. • Be sure as to help! We are 2 screws which lock the camera lens angle in position. • The screws may be loosened to allow camera lens angle adjustment • Loosen the screws, adjust the camera lens into the desired angle. Angle Adjustable Camera Lens • Located on the camera housing are here to not overtighten the screws. Questions?


