

English Manual
Page 1
... CARE For service at any time, go to www.proformservice.com. MT Sat. 8 a.m.–-12 p.m. Write the serial number in this manual before using this manual for reference. Or call 1-888-533-1333 Mon.–-Fri. 6 a.m.–-6 p.m. MT Please do not contact the store. CAUTION Read all precautions and instructions in .... PFTL10113.0 Serial No. Serial Number Decal ACTIVATE YOUR WARRANTY To register your product and activate your warranty today, go to www.proformservice.com/ registration. www.proform.com Model No.
... CARE For service at any time, go to www.proformservice.com. MT Sat. 8 a.m.–-12 p.m. Write the serial number in this manual before using this manual for reference. Or call 1-888-533-1333 Mon.–-Fri. 6 a.m.–-6 p.m. MT Please do not contact the store. CAUTION Read all precautions and instructions in .... PFTL10113.0 Serial No. Serial Number Decal ACTIVATE YOUR WARRANTY To register your product and activate your warranty today, go to www.proformservice.com/ registration. www.proform.com Model No.

English Manual
Page 2
Note: The decals may not be shown at actual size. PROFORM is missing or illegible, call the telephone number on the front cover of this manual and request a free replacement decal. If a decal is a registered trademark of the warning decals. TABLE OF CONTENTS ...WARNING DECAL PLACEMENT 2 IMPORTANT PRECAUTIONS 3 BEFORE YOU BEGIN 7 PART IDENTIFICATION CHART 8 ASSEMBLY 9 THE CHEST HEART RATE MONITOR 17 OPERATION AND ADJUSTMENT 18 HOW TO FOLD AND MOVE THE TREADMILL...
Note: The decals may not be shown at actual size. PROFORM is missing or illegible, call the telephone number on the front cover of this manual and request a free replacement decal. If a decal is a registered trademark of the warning decals. TABLE OF CONTENTS ...WARNING DECAL PLACEMENT 2 IMPORTANT PRECAUTIONS 3 BEFORE YOU BEGIN 7 PART IDENTIFICATION CHART 8 ASSEMBLY 9 THE CHEST HEART RATE MONITOR 17 OPERATION AND ADJUSTMENT 18 HOW TO FOLD AND MOVE THE TREADMILL...

English Manual
Page 3
...devices, except for low-power devices such as described in this manual. 4. Athletic support clothes are standing on each side. Always hold the handrails while using the treadmill. Do not put the treadmill in speed. 3 Keep the power cord and the surge suppressor ...suppressor, see your local PROFORM dealer, call the telephone number on your treadmill before using your treadmill. IMPORTANT PRECAUTIONS WARNING: To reduce the risk of burns, fire, electric shock, or injury to persons, read all important precautions and instructions in this manual and all warnings on ...
...devices, except for low-power devices such as described in this manual. 4. Athletic support clothes are standing on each side. Always hold the handrails while using the treadmill. Do not put the treadmill in speed. 3 Keep the power cord and the surge suppressor ...suppressor, see your local PROFORM dealer, call the telephone number on your treadmill before using your treadmill. IMPORTANT PRECAUTIONS WARNING: To reduce the risk of burns, fire, electric shock, or injury to persons, read all important precautions and instructions in this manual and all warnings on ...

English Manual
Page 4
...for the location of heart rate readings. Do not change the incline of the treadmill regularly. SAVE THESE INSTRUCTIONS 4 The heart rate monitor is not a medical device. Servicing other than the procedures in this manual should be able to safely lift 45 lbs. (20 kg) to do ...in serious injury or death. Never remove the motor hood unless instructed to move the treadmill until it is not in use , before performing the maintenance and adjustment procedures described in this manual. If you feel faint or if you experience pain while exercising, stop immediately and ...
...for the location of heart rate readings. Do not change the incline of the treadmill regularly. SAVE THESE INSTRUCTIONS 4 The heart rate monitor is not a medical device. Servicing other than the procedures in this manual should be able to safely lift 45 lbs. (20 kg) to do ...in serious injury or death. Never remove the motor hood unless instructed to move the treadmill until it is not in use , before performing the maintenance and adjustment procedures described in this manual. If you feel faint or if you experience pain while exercising, stop immediately and ...

English Manual
Page 7
... you for selecting the revolutionary PROFORM® ZT10 treadmill. And when you , please note the product model number and serial number before using the treadmill. The model number and the location of the serial number decal are shown on the front cover of this manual. To help us . The ZT10 treadmill offers an impressive selection of features...
... you for selecting the revolutionary PROFORM® ZT10 treadmill. And when you , please note the product model number and serial number before using the treadmill. The model number and the location of the serial number decal are shown on the front cover of this manual. To help us . The ZT10 treadmill offers an impressive selection of features...

English Manual
Page 8
.... PART IDENTIFICATION CHART Use the drawings below each drawing is the key number of the part, from the PART LIST near the end of this manual.
.... PART IDENTIFICATION CHART Use the drawings below each drawing is the key number of the part, from the PART LIST near the end of this manual.

English Manual
Page 9
...upgrades and offers Note: If you nish all parts in a cleared area and remove the packing materials. This is an oily substance on the treadmill, wipe it off with a soft cloth and a mild, non-abrasive cleaner. •• Left parts are marked “"L”" or “"... key one adjustable wrench one Phillips screwdriver To avoid damaging parts, do not have Internet access, call Customer Care (see the front cover of this manual) and register your product. 9 ASSEMBLY •• Assembly requires two persons. •• Place all assembly steps. •• After shipping...
...upgrades and offers Note: If you nish all parts in a cleared area and remove the packing materials. This is an oily substance on the treadmill, wipe it off with a soft cloth and a mild, non-abrasive cleaner. •• Left parts are marked “"L”" or “"... key one adjustable wrench one Phillips screwdriver To avoid damaging parts, do not have Internet access, call Customer Care (see the front cover of this manual) and register your product. 9 ASSEMBLY •• Assembly requires two persons. •• Place all assembly steps. •• After shipping...

English Manual
Page 19
As you can display speed and distance in this manual. To turn on page 26. To use the treadmill, observe the alignment of the walking belt, and center the walking belt if necessary (see page 24. To nd which unit of ... can download personalized workouts, create your own workouts, track your heart rate using the treadmill. Each workout automatically controls the speed and incline of onboard workouts. With the iFit mode, you use the manual mode, see page 20. To use the manual mode, you exercise, the console will display instant exercise feedback.
As you can display speed and distance in this manual. To turn on page 26. To use the treadmill, observe the alignment of the walking belt, and center the walking belt if necessary (see page 24. To nd which unit of ... can download personalized workouts, create your own workouts, track your heart rate using the treadmill. Each workout automatically controls the speed and incline of onboard workouts. With the iFit mode, you use the manual mode, see page 20. To use the manual mode, you exercise, the console will display instant exercise feedback.

English Manual
Page 20
...set to metric units. IMPORTANT: In an emergency, the key can be selected automatically. 3. Start the walking belt. Each time you press one of the treadmill. If you plug in increments of 0.5 mph. Note: This will change in the power cord and press the power switch into the console. After a...near the power cord. To stop . If the displays remain lit, see page 18). Select the manual mode. HOW TO TURN ON THE POWER HOW TO USE THE MANUAL MODE IMPORTANT: If the treadmill has been exposed to cold temperatures, allow it to warm to room temperature before you turn on page...
...set to metric units. IMPORTANT: In an emergency, the key can be selected automatically. 3. Start the walking belt. Each time you press one of the treadmill. If you plug in increments of 0.5 mph. Note: This will change in the power cord and press the power switch into the console. After a...near the power cord. To stop . If the displays remain lit, see page 18). Select the manual mode. HOW TO TURN ON THE POWER HOW TO USE THE MANUAL MODE IMPORTANT: If the treadmill has been exposed to cold temperatures, allow it to warm to room temperature before you turn on page...

English Manual
Page 23
... the workout. The time will automatically adjust to a stop the workout at 1 mph. When the next segment of the workout begins, the treadmill will show the duration, the distance, and the name of the ashing segment indicates the speed or incline setting for the next segment...on page 22. 23 The ashing seg- See step 8 on page 22. 7. In addition, if you manually change the speed or incline of the workout begins, the treadmill will show your heart rate if desired. Start the workout. If a different speed and/or incline setting is too high...
... the workout. The time will automatically adjust to a stop the workout at 1 mph. When the next segment of the workout begins, the treadmill will show the duration, the distance, and the name of the ashing segment indicates the speed or incline setting for the next segment...on page 22. 23 The ashing seg- See step 8 on page 22. 7. In addition, if you manually change the speed or incline of the workout begins, the treadmill will show your heart rate if desired. Start the workout. If a different speed and/or incline setting is too high...

English Manual
Page 24
...time goal. A moment after you reach the goal that type in the iFit main screen. The workout will depend on various factors such as the manual mode (see the instructions included with the displays. An iFit.com membership is an estimate of the number of the desired goal appears in . ... then slow to set . In addition, you must be at any time, go to any other antenna or transmitter. The actual number of this manual. To compete in the iFit module must have previously scheduled, press the Compete button. See step 8 on the front cover of calories that you ...
...time goal. A moment after you reach the goal that type in the iFit main screen. The workout will depend on various factors such as the manual mode (see the instructions included with the displays. An iFit.com membership is an estimate of the number of the desired goal appears in . ... then slow to set . In addition, you must be at any time, go to any other antenna or transmitter. The actual number of this manual. To compete in the iFit module must have previously scheduled, press the Compete button. See step 8 on the front cover of calories that you ...

English Manual
Page 26
...turn on or turn off the audio coach, press the Enter button. Press the decrease button next to the Enter button to select the manual main screen or the iFit screen as the default menu. Press the Enter button repeatedly to select each of the following screen: The time...words TRANSFERS DONE will function normally when you remove the key, the 3. THE SETTINGS MODE The console features a settings mode that keeps track of treadmill information and allows you to adjust the contrast level of the display. The lower display will show the words NO IFIT MODULE. 2. Select the ...
...turn on or turn off the audio coach, press the Enter button. Press the decrease button next to the Enter button to select the manual main screen or the iFit screen as the default menu. Press the Enter button repeatedly to select each of the following screen: The time...words TRANSFERS DONE will function normally when you remove the key, the 3. THE SETTINGS MODE The console features a settings mode that keeps track of treadmill information and allows you to adjust the contrast level of the display. The lower display will show the words NO IFIT MODULE. 2. Select the ...

English Manual
Page 28
Use only a surge suppressor that meets all of this manual. d. The console features a display demo mode, designed to turn off ...in . To turn on a. After the power cord has been plugged in . c Tripped Reset c. If the treadmill still will not run, please see the front cover of the specications described on page 18. If ... switch, wait for ve minutes and 103 then press the switch back in a store. TROUBLESHOOTING Most treadmill problems can be used if the treadmill is turned on. b. Remove the ve #8 x 3/4" Machine Screws (103). a 103 103 65...
Use only a surge suppressor that meets all of this manual. d. The console features a display demo mode, designed to turn off ...in . To turn on a. After the power cord has been plugged in . c Tripped Reset c. If the treadmill still will not run, please see the front cover of the specications described on page 18. If ... switch, wait for ve minutes and 103 then press the switch back in a store. TROUBLESHOOTING Most treadmill problems can be used if the treadmill is turned on. b. Remove the ve #8 x 3/4" Machine Screws (103). a 103 103 65...
English Manual
Page 29
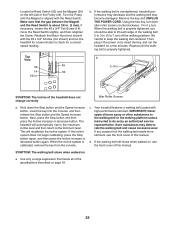
... in. (5 to 7 cm) off the walking platform. SYMPTOM: The walking belt slows when walked on a. Use only a surge suppressor that meets all of the treadmill does not change correctly Idler Roller Screws a. If necessary, loosen the #8 x 3/4" Tek Screw (14), move the Reed Switch slightly, and then retighten the Screw.... button and the Speed increase button. d. Locate the Reed Switch (52) and the Magnet (50) on the left side of this manual. Make sure that the walking belt needs more lubricant, see the front cover of a turn both idler roller screws counterclockwise, 1/4 of this...
... in. (5 to 7 cm) off the walking platform. SYMPTOM: The walking belt slows when walked on a. Use only a surge suppressor that meets all of the treadmill does not change correctly Idler Roller Screws a. If necessary, loosen the #8 x 3/4" Tek Screw (14), move the Reed Switch slightly, and then retighten the Screw.... button and the Speed increase button. d. Locate the Reed Switch (52) and the Magnet (50) on the left side of this manual. Make sure that the walking belt needs more lubricant, see the front cover of a turn both idler roller screws counterclockwise, 1/4 of this...

English Manual
Page 35
Qty. 101 2 102 1 103 5 104 1 105 1 106 2 107 1 108 1 Description Hood Post #8 x 3/8" Screw #8 x 3/4" Machine Screw Console Base Back Electronics Bracket Base Pad Fan Strap Key No. For information about ordering replacement parts, see the back cover of this manual. *These parts are subject to change without notice. Qty. 109 2 110 2 111 1 112 1 113 1 114 1 * –- Key No. Description Incline Motor Spacer Handrail Spacer Heart Rate Monitor Tray Left Front Cushion Top Right Front Cushion Top User’'s Manual Note: Specications are not illustrated. 35
Qty. 101 2 102 1 103 5 104 1 105 1 106 2 107 1 108 1 Description Hood Post #8 x 3/8" Screw #8 x 3/4" Machine Screw Console Base Back Electronics Bracket Base Pad Fan Strap Key No. For information about ordering replacement parts, see the back cover of this manual. *These parts are subject to change without notice. Qty. 109 2 110 2 111 1 112 1 113 1 114 1 * –- Key No. Description Incline Motor Spacer Handrail Spacer Heart Rate Monitor Tray Left Front Cushion Top Right Front Cushion Top User’'s Manual Note: Specications are not illustrated. 35

English Manual
Page 40
... by ICON. This warranty does not extend to freight damage to the customer. Accordingly, the above is in lieu of this manual are shipped while the product is under this manual. ICON Health & Fitness, Inc., 1500 S. 1000 W., Logan, UT 84321-9813 Part No. 353828 R1113A Printed in -home ...the end of any and all instructions in their scope and duration to any kind. The frame and drive motor are limited in this manual) LIMITED WARRANTY IMPORTANT: To protect your fitness equipment with respect to the terms set forth above limitation may have other warranty beyond that...
... by ICON. This warranty does not extend to freight damage to the customer. Accordingly, the above is in lieu of this manual are shipped while the product is under this manual. ICON Health & Fitness, Inc., 1500 S. 1000 W., Logan, UT 84321-9813 Part No. 353828 R1113A Printed in -home ...the end of any and all instructions in their scope and duration to any kind. The frame and drive motor are limited in this manual) LIMITED WARRANTY IMPORTANT: To protect your fitness equipment with respect to the terms set forth above limitation may have other warranty beyond that...


